background image

Cop

ying

26

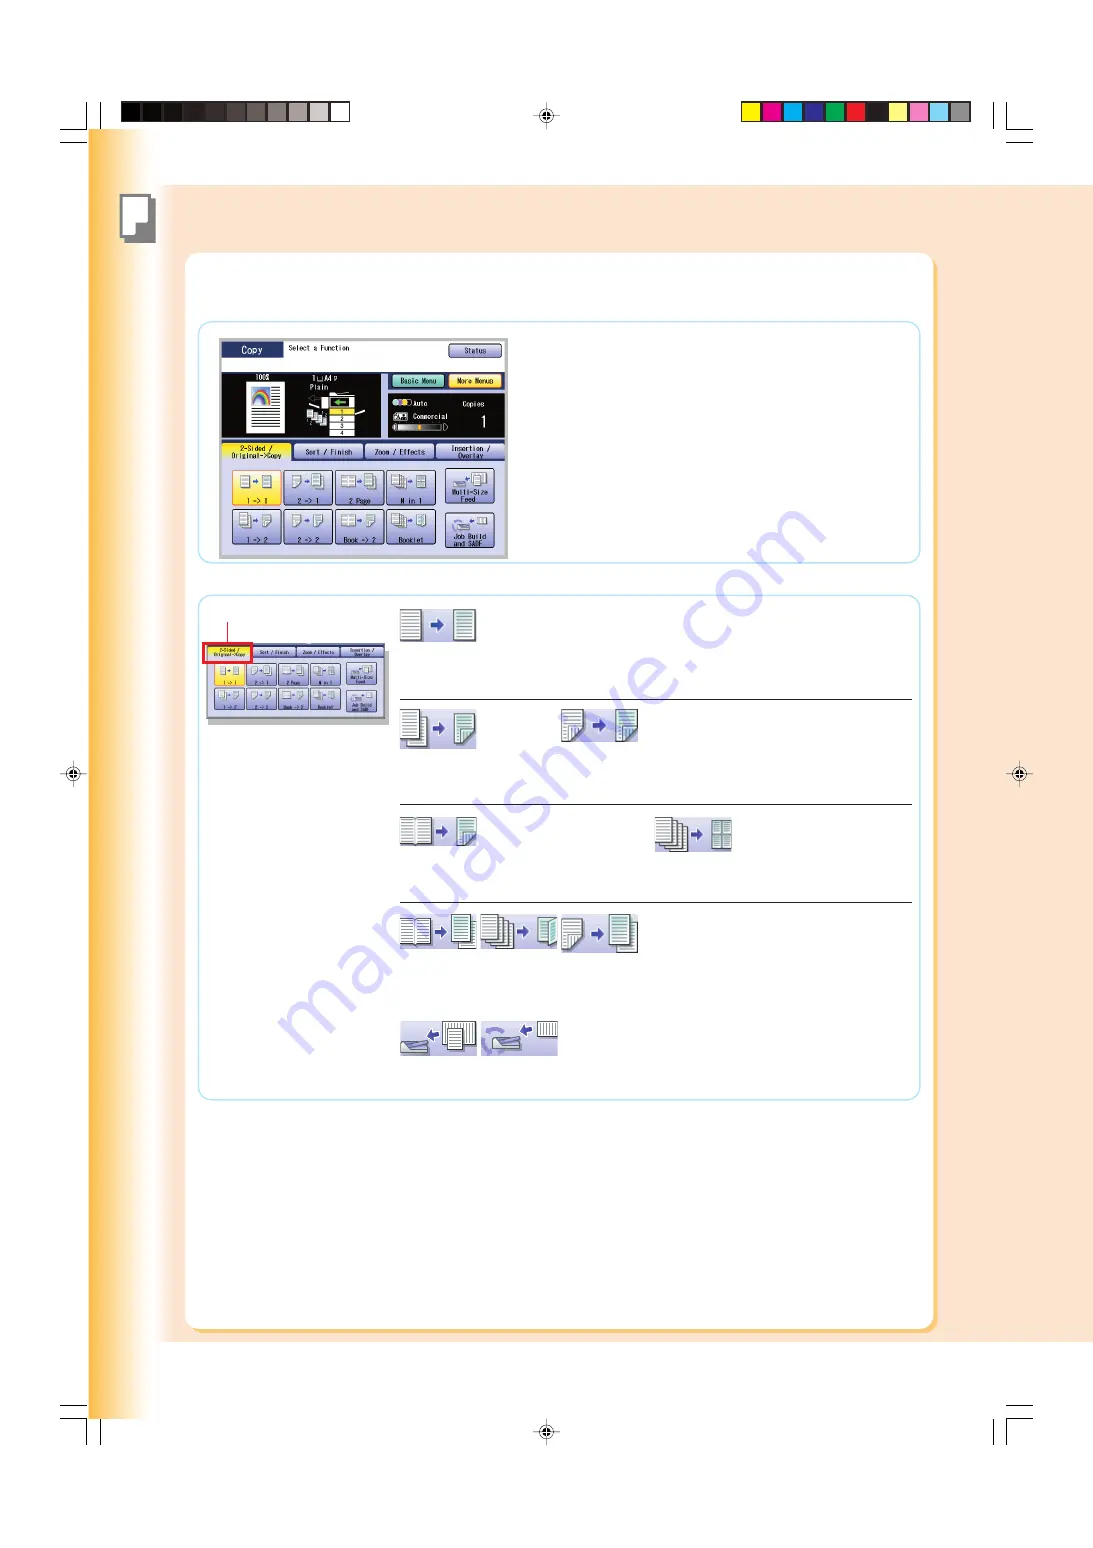
Basic Menu & More Menus

More Menus

1 -> 1

1-Sided Original to
1-Sided Copy (default)

(See pages 30 and 31)

(See pages 32 and 33)

(See pages 34 and 35)

Refer to 

2-Sided Copy

Mode

 in the Operating

Instructions (For Copier) on
the provided CD-ROM.

2-Sided / Original->Copy tab

1 -> 2

1-Sided Original
to 2-Sided Copy

Book -> 2

Book Original to
2-Sided Copy

N in 1

N in 1 Copy

2 -> 2

2-Sided Original
to 2-Sided Copy

2 Page

2 Page
Copy

Booklet

Booklet
Copy

Multi-Size
Feed

2 -> 1

2-Sided
Original to
1-Sided Copy

While in 

Copy

 mode, select "

More Menus

" to configure the

following copy settings.

For other mode settings, refer to 

More Menus Features

 in the

Operating Instructions (For Copier) on the provided CD-ROM.

Job Build
and SADF

002Basic_OP(UK)020_039.pmd

16/11/2006, 13:06

26

Summary of Contents for WORKIO DP-C213

Page 1: ... accessories that may not be installed on your machine English Model No DP C354 C264 Model No DP C323 C263 C213 Operating Instructions For Basic Operations Digital Colour Imaging Systems Product Overview Copying Printing Facsimile Internet Fax Option Problem Solving Appendix Scanning Email Replacing Consumables 000Basic_OP UK _Cover pmd 16 11 2006 13 05 3 ...

Page 2: ...ake when a trouble message appears etc Scan and Email Function Standard on DP C354 C264 for DP C323 C263 C213 when the optional Network Scanner Email Module Hard Disk Drive Main Memory and Image Memory are installed Describes how to scan and send an Email Document Management System CD Print Function Describes how to print with colour change default printer settings or describes the course of actio...

Page 3: ... TIFF or PDF or pictures JPEG format only stored on media other than SD Memory Card by using the same Thumbnails selection method See pages 40 43 Requires optional Printer Controller Module to be installed See page 99 Scan to SD Memory Card The data scanned by this machine can be stored directly to the SD Memory Card Colour Touch Panel Easy operation using the Colour Touch Panel Display Control Pa...

Page 4: ...FQ SS32 84 Replacing Staples DQ SS35 86 Dispose of the Punch Hole Residue 90 Replacing the Battery 92 Table of Contents Product Overview Operating Instructions 2 Useful Office Functions 3 Safety Information 6 Precautions 9 Security Suggestions for Key Operators 12 Information on Disposal for Users of Waste Electrical Electronic Equipment private households 13 Outer Inner View 14 Control Panel 15 C...

Page 5: ...tory Information 100 Index 102 Glossary 105 As an ENERGY STAR Partner Panasonic has determined that this product meets the ENERGY STAR guidelines for energy efficiency This voluntary program specifies certain energy consumption and usage standards This product will automatically power down after a specified period of non use The use of this ENERGY STAR compliant product will reduce energy consumpt...

Page 6: ...ed with your machine When an extension power cord is required always use a properly rated cord 220 240 V 6 5 A If you use a cord with an unspecified current rating the machine or plug may emit smoke or become hot to the touch Do not attempt to repair pull bend chafe or otherwise damage the power cord Do not place a heavy object on the cord A damaged cord can cause fire or electric shocks Never tou...

Page 7: ...Keep SD Memory Card button battery stamp out of the reach of children If a SD Memory Card button battery stamp is swallowed accidentally get medical treatment immediately For Battery disposal or recycling information please contact your local authorities or your local waste officials Operating Safeguards Do not touch areas where these caution labels are attached to the surface may be very hot and ...

Page 8: ... DO NOT USE THIS PRODUCT NEAR WATER FOR EXAMPLE NEAR A BATH TUB WASH BOWL KITCHEN SINK OR LAUNDRY TUB IN A WET BASEMENT OR NEAR A SWIMMING POOL AVOID USING A TELEPHONE OTHER THAN A CORDLESS TYPE DURING AN ELECTRICAL STORM THERE MAY BE A REMOTE RISK OF ELECTRIC SHOCK FROM LIGHTNING DO NOT USE THE TELEPHONE TO REPORT A GAS LEAK IN THE VICINITY OF THE LEAK SAVE THESE INSTRUCTIONS Others The machine h...

Page 9: ...ed service personnel should attempt to service this device due to possible eye injury CAUTION USE OF CONTROLS ADJUSTMENTS OR PERFORMANCE PROCEDURES OTHER THAN THOSE SPECIFIED HEREIN MAY RESULT IN HAZARDOUS RADIATION EXPOSURE Caution Label Precautions 001Basic_OP UK 002_013 pmd 16 11 2006 13 05 9 ...

Page 10: ... Unplug the power cord from the wall outlet before removing covers The machine should not be installed in areas with the following conditions Extremely high or low temperature and humidity The machine should be installed under the following ambient conditions Temperature 10 30 C Relative Humidity 30 80 In areas with chemical fume concentration With unstable or uneven conditions floors etc Direct e...

Page 11: ...tch on the Left Side of the machine wait a few seconds and then turn OFF the Main Power Switch on the Rear Side of the machine If you are not going to use the machine for long periods of time turn OFF the machine using the procedure above Do not turn OFF the Power Switch on the Left Side of the machine or open the Front Cover during copying printing Auto Reset Time The initial setting for Auto Res...

Page 12: ...retrieval of the data by unauthorized personnel The Hard Disk Drive Lock password is required when the equipment is being repaired Furthermore it is essential that the Key Operator personally enter the password to maintain security of the password and prevent unauthorized users To change the initial Hard Disk Drive Lock password refer to the Operating Instructions For Function Parameters and setup...

Page 13: ...ronment which could otherwise arise from inappropriate waste handling Please contact your local authority for further details of your nearest designated collection point Penalties may be applicable for incorrect disposal of this waste in accordance with national legislation For business users in the European Union If you wish to discard electrical and electronic equipment please contact your deale...

Page 14: ... Used for network connection Telephone Jack Option Used for Fax transmissions Main Power Switch Turn the Main Power Switch OFF when it is not used for a long period of time ON OFF Feed Cover 1 Inner Toner Cartridges See pages 78 and 79 Yellow Magenta Cyan Black Toner Waste Container See pages 82 and 83 OPC Drum Units Yellow Magenta Cyan Black See pages 80 and 81 Feed Cover 2 Outer Right Side SD Ca...

Page 15: ... Condition LED Print Data Status Active See page 16 Printer On Line LED Lights when Print function is available Fax On Line LED Lights when sending receiving Facsimile or Internet Fax Print key Used for printing directly from the SD Memory Card see pages 40 43 printing contents from the Mailbox Secure Mailbox deleting changing the jobs waiting to print or setting the printer On line Off line For m...

Page 16: ...See page 18 Setting for Printer Function SD Card Print See pages 40 43 and Others Refer to the Document Management System For PCL Printer Driver on the provided CD ROM Flashes When receiving print data Lights While printing To Brighten To Darken 1 and Clear 2 and Clear Machine Condition LED Warning Indications When the following Warning Indications appear correct the problem according to the displ...

Page 17: ... and reserved job s Completion Notice button Displays the Job Completion Notice via a pop up window on your PC when the copy job is completed Refer to Completion Notice in the Operating Instructions For Copier on the provided CD ROM Copy Size buttons Selects a copy size with preset ratio Original Size buttons Selects an original size manually Paper Output Tray button Selects a Paper Output Tray of...

Page 18: ...s tab Selects a favourite group from the Address Book SD Card Hard Drive tab Sends scanned data to SD Memory Card PCMCIA PC Card Adapter or HDD directly Scroll buttons Displays the other destination screen Destination buttons Displays the registered destinations PC Name Address tabs Selects an alphabetical tab group from the Address Book Addresses Indication Indicates the number of selected addres...

Page 19: ...mail button Selects an Internet Fax Function Search button Searches the destination s from the Address Book Favourites tab Selects a favourite group from the Address Book Program Group tab Selects a program group dial from the Address Book Scroll buttons Displays the other destination screen Destination buttons Displays the registered destinations Address tabs Selects an alphabetical tab group fro...

Page 20: ... the following type flawed originals Drawing papers Transparencies Labeling paper Heavy weight papers Thin Art papers Film Thermal papers Papers which are curled ripped creased folded punched glued stapled or self adhesive Originals of assorted mixed width size Pressure sensitive or carbon backed papers Paper which is still wet with colour ink or white out On the Platen Ex Book Original Ex Sheet O...

Page 21: ... eye fatigue or eye injury When copying a thick original do not use excessive force to press it against the Platen Glass The Glass may break and cause injuries Copying a thick booklet If there are less than 5 mm of white margin on originals the edge of the copied paper may get blurred in white To avoid the problem change the setting of Digital Skyshot Mode to No For setting of Digital Skyshot Mode...

Page 22: ... machine When the desired size of paper is not set in the Paper Tray use the Sheet Bypass See pages 76 and 77 Face Down Align with top center Full Size Copy Original Size and Copy Size are automatically selected Ex A4 Size Original Size A4 Auto Colour Copy Mode Selection Colour Copy Mode is automatically selected when coloured originals are detected Colour Original Copy Size A4 Colour Copy Monochr...

Page 23: ...s 24 39 3 Press the Start key 5 After finishing copying press the Reset key to return the machine to the initial screen of the current active mode NOTE Original Copy size is automatically selected If you want to stop the job while making copies select Stop on the above screen 002Basic_OP UK 020_039 pmd 16 11 2006 13 06 23 ...

Page 24: ...te or Full Colour automatically 2 Colour and 1 Colour settings must be selected manually refer to Selecting the Colour Mode in the Operating Instructions For Copier on the provided CD ROM OK Confirms settings Cancel Cancels settings Recall Recalls the registered settings Save Saves the settings More Settings Selects additional settings While in Copy mode select Basic Menu to configure the followin...

Page 25: ...nt System and PCL Printer Driver and then set up each software Refer to Completion Notice in the Operating Instructions For Setting Up of provided booklet A Job Completion Notice is displayed via a pop up window on the Desktop of your PC when the Copy Job is completed Select alphabetical group Indicates PC list into selected alphabetical group When Completion Notice is selected Refer to Confirming...

Page 26: ...ded Original to 2 Sided Copy Book 2 Book Original to 2 Sided Copy N in 1 N in 1 Copy 2 2 2 Sided Original to 2 Sided Copy 2 Page 2 Page Copy Booklet Booklet Copy Multi Size Feed 2 1 2 Sided Original to 1 Sided Copy While in Copy mode select More Menus to configure the following copy settings For other mode settings refer to More Menus Features in the Operating Instructions For Copier on the provid...

Page 27: ... Auto Zoom Edge Book Margin Stamping Centering Image Repeat Cover Page Insertion Transparency Interleaving Overlay Form Overlay File Edit Insertion Overlay tab When optional Finisher is not installed See pages 36 and 37 When optional Finisher is installed See pages 36 and 37 Sort Finish tab Sort Non Sort Rotate Sort Rotate Group Shift Sort Shift Group Staple Sort Punch Sort Non Sort 002Basic_OP UK...

Page 28: ... Output Tray and select a Paper Tray Do not try to change paper size with Copy Size button because selected copy size will be changed Ex Reduction A4 R A3 Select a Copy Size Ex Enlargement Original Size A4 R Copy Size A3 3 From ADF Landscape Orientation Portrait Orientation From Platen Glass Landscape Orientation Portrait Orientation Press the Copy key if the machine is set to other function mode ...

Page 29: ...ent active mode NOTE A3 B4 A4 A5 A3 100 87 71 50 B4 115 100 82 58 A4 141 122 100 71 A5 200 173 141 100 The exact ratio is automatically selected Copy Size Landscape Paper Tray will be selected according to the copy size When the suitable paper is not in the paper tray use the sheet bypass See pages 76 and 77 Original Size Landscape 002Basic_OP UK 020_039 pmd 16 11 2006 13 06 29 ...

Page 30: ...aten Glass See pages 20 and 21 1 Select More Menus 3 Select 2 Sided Original Copy and then select 1 2 or 2 2 4 1 2 Two 1 Sided originals are copied to one 2 Sided copy 2 2 Platen is not available One 2 Sided original is copied to one 2 Sided copy 2 2 Copy Select 2 2 copy mode when copying one 2 Sided original onto one 2 Sided copy Same as the original Press the Copy key if the machine is set to ot...

Page 31: ...t Long Edge or Short Edge Select OK 2 Enter the desired number of copies Up to 999 7 Press the Start key 8 or Long Edge Style Long Edge Style Short Edge Style Short Edge Style Long Edge Short Edge When copying from the Platen Glass place the next original and follow the instructions described on the touch panel display When setting Edge or Margin in 2 Sided copy mode the printing position may diff...

Page 32: ...Sided Original Copy and then select Book 2 4 You cannot select Book 2 when the Multi Size Feed is selected Blank page is copied onto the front side and 1st page is copied onto the back side of the same paper 2nd and 3rd pages are copied onto the next paper For adding a cover page to copies refer to More Menus Features in the Operating Instructions For Copier on the provided CD ROM Place the Book o...

Page 33: ... mode NOTE Select OK 7 1 2 1 2 Select a Book Format 1 or 1st Page with Image 1st Page Blank Select the Orientation 2 or Landscape Portrait When copying from the Platen Glass place the next original and follow the instructions described on the touch panel display The first through last page are copied The first page and beyond are copied but the last page is not copied The first page is not copied ...

Page 34: ...d 21 1 Select More Menus 3 2 in 1 Copy 4 in 1 Copy 8 in 1 Copy For Portrait orientation 2 in 1 Copy 4 in 1 Copy 8 in 1 Copy For Landscape orientation Ex 4 in 1 Copy If you copy 4 sheets of originals which are printed on 1 side They are reduced and copied onto 1 side of a single sheet of paper Select 2 Sided original Copy and then select N in 1 4 You cannot select N in 1 when the Multi Size Feed is...

Page 35: ...ace the next original and follow the instructions described on the touch panel display Select N in 1 mode Ex 2 in 1 screen 5 Copy 2 originals onto 1 sheet Copy 4 originals onto 1 sheet Copy 8 originals onto 1 sheet 2 in 1 4 in 1 8 in 1 Select an Original Orientation Ex 2 in 1 screen 6 Select the copy layout format and then select OK 7 For 2 in 1 For 4 in 1 For 8 in 1 or Portrait Landscape 002Basic...

Page 36: ...de 5 When optional Finisher is not installed Sort Rotate Sort Non Sort or Rotate Group 1 1 1 2 4 1 Rotate Sort A4 or A5 size only 1 1 1 1 When loading both A4 A5 and A4 R A5 R sized paper multiple copy sets are sorted automatically and stacked in alternate direction rotation of 90 degrees 4 2 3 1 Rotate Group A4 or A5 size only When loading both A4 A5 and A4 R A5 R sized paper multiple copies of i...

Page 37: ...n When copying from the Platen Glass place the next original and follow the instructions described on the touch panel display When the optional Punch Unit is installed When optional 1 Bin Saddle Stitch Finisher is installed Punch Select the Orientation For Portrait For Landscape Select the Staple Position Ex Portrait Original Ex Portrait Original Staple Position Punch Position Copy Copy Descriptio...

Page 38: ...e detected correctly If there are less than 5 mm of white margin on originals the edge of the copied paper may get blurred in white Ex Name card printed on both side Original Size less than A5 Copy Size A4 Front Side Image ABC ABC DEF Face Down Align with top left corner Place Original on the Platen Glass Feature is not available when using the ADF 1 Leave the ADF open while making copies Press th...

Page 39: ...ollow the instructions described on the touch panel display For Sort mode only Place the back side of the Original on the Platen Glass 8 Face Down Align with top left corner Leave the ADF open while making copies Press the Start key 6 Select Yes or No to copy the back side of the original 7 The message is changed according to the sort mode For Non Sort The message Another Original is displayed Sel...

Page 40: ...ring the Printer Driver Settings in the Document Management System PCL Printer Driver on provided CD ROM Printing from PC Select SD Print 2 Thumbnail Index Print Any commercial Genuine SD Memory Card up to 1 GB can be used For acceptable memory card for PCMCIA PC Card Adapter Type II 3 3V Operating Voltage Only refer to the PCMCIA PC Card Adapter s manual When the printing result differs from the ...

Page 41: ...lder for digital camera images or Scan Img by changing the setting of the Function Parameter 28 SD PC Card Def Dir Printer Settings Printer User For more details on this setting refer to Printer Settings in the Operating Instructions For Function Parameters on the provided CD ROM The default display type can be set to display either Thumbnail or File List by changing the setting of the Function Pa...

Page 42: ...able Size Set the Frame size in which the image will be printed without changing the horizontal to vertical ratio The frame size is different from the printed image size Select an orientation or Image Size Frame Size Portrait Format X Y Y X Y X Landscape Format Frame Frame For Fixed Size Select the desired preset Image size The paper should be larger than the frame size Horizontal x Vertical 100mm...

Page 43: ...d Adapter After printing is completed remove the SD Memory Card or PCMCIA PC Card Adapter from the Card Slot 10 Close the Slot Cover Slot Cover Do not remove the PCMCIA PC Card Adapter or the SD Memory Card while the Access Indicator flashes When re inserting the SD Memory Card into the slot please pull it out completely Access Indicator For Individual Index Print When printing from SD Memory Card...

Page 44: ...ided CD ROM When transferring scanned data to your PC it is necessary first to install the Panasonic Document Management System software and set up the scanner configuration on your PC For more details refer to the Operating Instructions For Setting Up of provided booklet 3 Scan to PC Scanned data will be directly transferred to your PC By using installed provided software Panasonic Document Manag...

Page 45: ...to Scanner Settings in the Document Management System For Communications Utility on the provided CD ROM Close the Slot Cover Slot Cover Slot Cover Do not remove the SD Memory Card while the Access Indicator flashes When re inserting the SD Memory Card into the slot please pull it out completely Access Indicator 5 Select SD Card After selecting the destination the display will be changed to Basic M...

Page 46: ...er or Darker 7 Levels Resolution 200 dpi 300 dpi 400 dpi or 600 dpi Select a File Name Date Time Custom Custom file name Select a File Type JPEG PDF Compressed PDF When choosing Black within the Scanning Colour Mode only PDF or TIFF file is available for selection Refer to Scanner Settings in the Operating Instructions For Scanner and Email on the provided CD ROM When Original Size is selected Sel...

Page 47: ...selected Refer to Scanner Settings in the Operating Instructions For Scanner and Email on the provided CD ROM Select the original orientation When 2 Sided Original is selected Long Edge Scans both sides of the original facing them in the same direction Short Edge Scans both sides of the original facing them in the opposite direction 004Basic_OP UK 044_051 pmd 16 11 2006 13 07 47 ...

Page 48: ... select OK 4 Enter the Email Address Up to 60 characters Select OK Keyboard Button Names To input upper case letter s To input numbers and or symbols To move the cursor to the left or right side To erase the character before the cursor Select 21 Add New Email Address To input a space between characters To select pre registered domain name To search address from LDAP server by entering the name For...

Page 49: ...ress and then select OK 6 Enter the Key Name Up to 15 characters Select OK Select whether you wish to add this New Email Address to Favourites 7 To enter other PC destination addresses Repeat steps 4 to 7 or To exit this setting mode Press the Reset key 8 Key Names are used to select destinations on the touch panel display 004Basic_OP UK 044_051 pmd 16 11 2006 13 07 49 ...

Page 50: ...ok the address must be registered in advance See pages 48 and 49 For more details refer to Scan Email Operations in the Operating Instructions For Scanner and Email on the provided CD ROM Sending the scanned data via Email When scanning from the ADF read the Notice for ADF See pages 20 and 56 Face Down Align with top center Press the Scan Email key if the machine is set to other function mode Mono...

Page 51: ...e Keyboard Keyboard Allows manual input of the Email Address Subject etc Email Addressing Select Keyboard Address Book Returns to the Address Book screen Select To Cc Bcc or From Select an Email Address Select Close Enter the Email Address Select OK Select Basic Menu to select the required setting mode See page 46 and 47 Select Basic Menu After Selecting OK the screen returns to the Email screen T...

Page 52: ...ddress Book in the Operating Instructions For Facsimile and Internet Fax on the provided CD ROM For DP C354 C264 up to 1000 addresses can be registered For DP C323 C263 C213 up to 200 addresses can be registered In case the optional HDD is installed up to 1000 addresses can be registered Address Book Facsimile Select 01 Add Telephone Number 4 NOTE 005Basic_OP UK 052_061 pmd 16 11 2006 13 07 52 ...

Page 53: ...to get an outside line dial it first then select Pause to enter a pause represented by a before dialling the full number Ex 9 Pause 5551234 9 5551234 If you are using Pulse dialling and you wish to change toTone dialling in the middle of dialling select represented by a The dialling mode will change from Pulse to Tone after dialling the digit Ex 9 Pause 5551234 9 5551234 A symbol appears when Tone...

Page 54: ... to Address Book in the Operating Instructions For Facsimile and Internet Fax on the provided CD ROM For DP C354 C264 up to 1000 addresses can be registered For DP C323 C263 C213 up to 200 addresses can be registered In case the optional HDD is installed up to 1000 addresses can be registered Address Book Internet Fax Select 02 Add Email Address 4 005Basic_OP UK 052_061 pmd 16 11 2006 13 07 54 ...

Page 55: ...ct character To delete press Back Space and re enter the correct character See page 48 Enter the Key Name for the address book and then select OK 7 Enter the Key Name Up to 15 characters Select OK Enter the name of the destination and then select OK 6 Enter the destination name Up to 15 characters Select OK Select IFax and then select OK 8 When selecting PC the registered address is displayed on b...

Page 56: ...on automatically and not transmit the portion of the original that exceeds the standard size P portion P A A Rotation XMT Scanning Direction The portion labeled P that exceeds the standard original size is not sent Sending Non Standard Size Originals When an oversized original is sent to another machine sometimes it is reduced in accordance with the other party s recording paper size Ex A A3 size ...

Page 57: ... the touch panel display or press the Stop key on the control panel For Auto Reset NOTE The initial setting for Auto Reset Time is 1 minute If you do not touch any key for 1 minute the touch panel display will be back to the initial screen of the active function automatically 20 seconds before resetting the Continue screen is displayed to extend the auto reset time for another 1 minute If you wish...

Page 58: ...mile and Internet Fax on the provided CD ROM Sending Originals Facsimile Place Original s on the ADF or Platen Glass 1 2 When scanning from the ADF read the Notice for ADF See pages 20 and 56 Face Down Align with top center Press the Fax key if the machine is set to other function mode 3 Select Basic Menu or More Menus to configure the desired Fax mode settings See page 59 Telephone Line You can s...

Page 59: ...the contrast level Each time the button is selected the original will be scanned lighter Darker If you wish to scan an original with darker contrast select the button to increase the contrast level Each time the button is selected the original will be scanned darker Resolution There is a possibility that the printing quality is determined by the reception capability of the remote station when usin...

Page 60: ...e transaction journal refer to Reading Reports Lists in the Operating Instructions For Facsimile and Internet Fax on the provided CD ROM Sending Originals Internet Fax Place Original s on the ADF or Platen Glass See pages 20 21 56 and 57 1 2 Press the Fax key if the machine is set to other function mode 3 Select Basic Menu or More Menus to configure the desired Internet Fax mode settings See page ...

Page 61: ...ted the original will be scanned lighter Darker If you wish to scan an original with darker contrast select the button to increase the contrast level Each time the button is selected the original will be scanned darker Resolution There is a possibility that the printing quality is determined by the reception capability of the remote station when using the Photo S Fine or 600dpi modes If this happe...

Page 62: ...isplay J Turn the Power Switch on the Left Side and the Main Power Switch on the Rear of the machine to OFF and back ON If the error code does not clear call the authorized Panasonic dealer Does E indicator and message appear on the display Turn the Power Switch on the Left Side and the Main Power Switch on the Rear of the machine to OFF and back ON If the machine still does not accept the next jo...

Page 63: ...playing Status Normally Status is displayed in grey on each function screen However Status is displayed in yellow if the paper tray is empty or toner becomes low Select Status that is displayed in yellow to confirm the status details 1 Select Status in yellow Ex Copy function screen 2 Check the status and then select Close Ex Paper Empty Select Paper Empty Check the empty paper tray and then selec...

Page 64: ...um Unit is not installed See pages 80 and 81 U29 OPC Drum Unit requires replacement See pages 80 and 81 User Error Codes U Codes Machine Error Codes E Codes User U Jam J Machine E Error Codes NOTE A Blinking Maintenance and Toner Toner Waste Container Indicators The machine will complete the current job and stop operating To continue using the machine temporarily while waiting for a replacement to...

Page 65: ...erify that the media type selection in the control panel matches the media loaded on the trays Ex Select Transparency when Transparencies are loaded in the Sheet Bypass See pages 66 69 70 and 77 Jam Error Codes J Codes ATTENTION The display indicates the section of the misfed paper Remove the misfed paper and check to see if the misfeed indicator has been cleared If other locations indicate presen...

Page 66: ...Paper Tray 1 3 Remove the Misfed Paper 4 Insert the Paper Tray 1 5 Close the Feed Cover 1 6 Misfed Paper Close the Sheet Bypass 7 Sheet Bypass Feed Cover 1 Misfed Paper Feed Cover 1 ATTENTION Do not touch the belt and the STR for optimum copy quality and performance of the machine Belt STR 007Basic_OP UK 066_075 pmd 16 11 2006 13 08 66 ...

Page 67: ...tion Remove the Misfed Paper 3 Close the ADU Cover 4 Close the Sheet Bypass 5 Open the Sheet Bypass 1 Open the ADU Cover 2 Sheet Bypass Sheet Bypass ADU Cover Misfed Paper ADU Cover 007Basic_OP UK 066_075 pmd 16 11 2006 13 08 67 ...

Page 68: ...pass 6 Feed Cover 1 Misfed Paper Right Side Cover Misfed paper is transported downward by turning the knob Do not forcibly pull out the misfed paper upward as toner may adhere to the transfer unit and blot the next copy with toner Follow the steps below to remove the misfed paper Right Side Cover ATTENTION Sheet Bypass Do not touch the belt and the STR for optimum copy quality and performance of t...

Page 69: ... Cover 3 Transport Cover Open the Feed Cover 2 and then remove the Misfed Paper Pull out the Paper Tray 2 2 1 Paper Feed Section Paper Tray 2 Remove the Misfed Paper 3 Insert the Paper Tray 2 and then close the Feed Cover 2 4 Misfed Paper Feed Cover 2 Press the button on the Transport Cover to open 007Basic_OP UK 066_075 pmd 16 11 2006 13 08 69 ...

Page 70: ...he Paper Tray 3 or 4 3 Remove the Misfed Paper 4 Insert the Paper Tray 3 or 4 5 Close the Option Feed Cover 6 Paper Feed Section Optional Paper Tray 3 or 4 Removing Misfed Paper Misfed Paper Misfed Paper Option Feed Cover Option Feed Cover 007Basic_OP UK 066_075 pmd 16 11 2006 13 08 70 ...

Page 71: ...o place 3 Open the Finisher Top Cover and then remove the Misfed Paper 4 Release Button Push the Release Button to free the Finisher from the machine Misfed Paper Slowly release your hand from the Finisher Top Cover and then the cover is closed automatically 5 Finisher Top Cover Finisher Top Cover 007Basic_OP UK 066_075 pmd 16 11 2006 13 08 71 ...

Page 72: ...isfed Paper Open the Finisher Top Cover 2 Close the Finisher Top Cover 4 Release Button Misfed Paper Finisher Top Cover Staple Cover Paper Transport Knob Push the Release Button to free the Finisher from the machine Black Arrow Finisher Top Cover Mark When optional Punch Unit is installed Align the mark with the Black Arrow as illustrated below 007Basic_OP UK 066_075 pmd 16 11 2006 13 08 72 ...

Page 73: ... Inner Cover 9 Remove the Misfed Paper 10 Slide the Finisher back until it locks into place 12 Close the Staple Cover 8 Misfed Paper Staple Cover Close the Inner Cover 11 Misfed Paper Inner Cover Inner Cover 007Basic_OP UK 066_075 pmd 16 11 2006 13 08 73 ...

Page 74: ...he Exit Unit and then remove the Misfed Paper 5 Close the Exit Unit 6 ADF Section Removing Misfed Paper Open the Inner Cover and then remove the Misfed Paper 2 Remove the Misfed Paper 4 Misfed Paper Misfed Paper ADF Tray Misfed Paper Exit Unit Exit Unit 007Basic_OP UK 066_075 pmd 16 11 2006 13 08 74 ...

Page 75: ...Open the ADF 8 9 10 Close the ADF Cover ADF Cover Pull down the ADF Tray and then close the Inner Cover 7 ADF Tray Remove the Misfed Paper and then close the ADF Misfed Paper 007Basic_OP UK 066_075 pmd 16 11 2006 13 08 75 ...

Page 76: ...ype Plain Glossy or Recycled in the Paper Tray refer to General Settings Key Operator in the Operating Instructions For Function Parameters on the provided CD ROM Fan the paper and straighten the stack when loading paper to avoid the double feeding or paper jam Adding Paper Printing Media Paper Tray Add Paper Upper Limit Indicator Paper Capacity 550 sheets 80g m2 Paper Weight 64 105g m2 Paper Tray...

Page 77: ...printing media type and then select OK 8 Select the best suited media type see page 98 to match the one loaded in step 3 above Adjust the Side Guides 3 Incorrect adjustment may cause the paper to wrinkle misfeed or skew If the paper size is not detected remove the paper and press the Reset key Then load the paper again Ensure to change the media type selection in the control panel when changing th...

Page 78: ...ack toner runs out all Copy Print functions cease to operate Even if one of the colour toner runs out only monochrome copying printing will be available Replacing Toner Cartridge Front Cover Toner Cartridge Toner Cartridge Shake the new Toner Cartridge to loosen its contents 4 New Toner Cartridge Shake it well 10 15 times Shake it up and down and then turn the bottom up and repeat Make sure that t...

Page 79: ...direction of the arrow 5 Tape Unlock Mark Lock Mark Do not open the Shutter otherwise toner will spill If the Toner Cartridge is not turned to Lock Mark properly you cannot close the Front Cover Never dispose of toner toner cartridge or a toner waste container into an open flame Toner remaining in the cartridge can cause an explosion burns and or injuries For disposal or recycling information cont...

Page 80: ...your hands with the toner on the surface of the OPC Drum Unit Replacing the OPC Drum Unit Toner Waste Container Exercise care not incline the container or Toner may spill Drum Release Knob Old OPC Drum Unit Yellow Magenta Cyan Black Identify the location of the colour OPC Drum Unit requiring replacement 3 Pull the old OPC Drum Unit out of the machine 5 Hold by the frame while pulling it out Open t...

Page 81: ...OPC Drum Unit with the ones on the machine and then insert the OPC Drum Unit into the machine up to the Black Arrow on the Drum Protective Cover 7 ATTENTION Insert the Toner Waste Container into the machine until it stops 11 Toner Waste Container Exercise care not incline the container or Toner may spill Green Arrows Black Arrows Drum Protective Cover Colour Label Drum Protective Cover Peel off th...

Page 82: ...and carefully unzip the plastic bag Pull the new Toner Waste Container out of the box and remove the plastic wrapping it will be reused in step 4 covering the new container 4 Place the old Toner Waste Container on top of the opened Front Cover Cover the old Toner Waste Container with the plastic wrapping which was removed in step 2 3 Pull out the old Toner Waste Container out of the machine 5 Plac...

Page 83: ...tly close the Front Cover 10 Insert the Cleaner back inside the Front Cover 8 Toner Waste Container new Front Cover Insert and pull out the Cleaner several times Clean the remaining 3 Slots in the same manner as step and Cleaner Cleaner Slot Cleaner Insert the Cleaner felt side down into the LSU Aperture Slot Correct Incorrect Cleaner To the Slot 008Basic_OP UK 076_089 pmd 16 11 2006 13 10 83 ...

Page 84: ...e 2 When the Staple jams an error message will be displayed Remove the jammed staple from the staple cartridge as illustrated Replacing Staples FQ SS32 Staple Cartridge FQ SS32 Stapler Cover Staple Cartridge Add Staples indicator illuminates Jammed Staple 008Basic_OP UK 076_089 pmd 16 11 2006 13 10 84 ...

Page 85: ... Sort and the Staple Position See pages 36 and 37 8 Staple Cartridge To check the stapling operation place original s on the ADF 6 Press the Start key 9 Select Sort Finish Select Staple Sort Check the stapling operation Staple Case Empty Face Up Up to 70 sheets 80g m2 If the above screen is not displayed press the Copy key Stapler Cover 008Basic_OP UK 076_089 pmd 16 11 2006 13 10 85 ...

Page 86: ...d Remove the jammed staple from the staple cartridge as illustrated Replacing Staples DQ SS35 Staple Cartridge DQ SS35 Open the Staple Cover Turn the Knob on the Stapler Unit clockwise Staple Cover Until it Stops Add Staples indicator illuminates Jammed Staple 008Basic_OP UK 076_089 pmd 16 11 2006 13 10 86 ...

Page 87: ... Tape 7 Remove the Staple Case Empty 5 Insert the Staple Cartridge 8 Push on each side of the Cartridge and then remove the cover Insert it all the way in until it locks Staple Cartridge Staple Case Empty Press both sides Staple Cartridge Tape Staple Case new Slide the new staple case into the staple cartridge and then push the cover to close 008Basic_OP UK 076_089 pmd 16 11 2006 13 10 87 ...

Page 88: ... Cover 10 Select Sort Finish Staple Sort and the Staple Position See pages 36 and 37 12 Press the Start key 13 Face Up Up to 70 sheets 80g m2 Select Sort Finish Select Staple Sort Stapler Unit Staple Cover Check the stapling operation Until it Locks If the above screen is not displayed press the Copy key 008Basic_OP UK 076_089 pmd 16 11 2006 13 10 88 ...

Page 89: ...Replacing Consumables 89 memo 008Basic_OP UK 076_089 pmd 16 11 2006 13 10 89 ...

Page 90: ...3 Dispose of the Punch Hole Residue Insert the Punch Hole Residue Container Empty 4 Slide the Finisher back until it locks into place 5 Punch Hole Residue Container Full Punch Hole Residue Container Empty When the Container becomes full with punch hole residue an error message is displayed Release Button Push the Release Button to free the Finisher from the machine 009Basic_OP UK 090_093 pmd 16 11...

Page 91: ...Replacing Consumables 91 memo 009Basic_OP UK 090_093 pmd 16 11 2006 13 10 91 ...

Page 92: ...ype of battery only Ensure that the battery is installed with correct polarity Replacing the Battery The machine has an internal battery Product No CR2032 which maintains the date and time When the battery requires replacement the Status button changes from Grey to Yellow See page 63 If the status indicates Replace Battery replace it by following the procedures below The service life of the batter...

Page 93: ...older upside down and then insert it into the machine 6 Fasten it with the Screw 7 New Battery Battery Holder Screw side of battery should be facing upwards Replace only with the same or equivalent type of battery Old Battery Turn the Battery Holder upside down 3 009Basic_OP UK 090_093 pmd 16 11 2006 13 10 93 ...

Page 94: ...64 C263 Up to 21 ppm DP C213 Enlargement Ratios Preset 115 122 141 173 200 Variable From 101 to 400 in 1 increments Reduction Ratios Preset 87 82 71 58 50 Variable From 99 to 25 in 1 decrements Paper Feed Standard Paper Tray 550 sheets x 2 Sheet Bypass 50 Sheets Optional Paper Tray 550 sheets x 2 Paper Weight Paper Tray 64 105 g m2 Sheet Bypass 55 220 g m2 Duplex 64 105 g m2 Quantity Selector Max ...

Page 95: ...4 0 4 Microsoft Windows 2000 operating system 5 Microsoft Windows XP operating system 6 Microsoft Windows Server 2003 operating system Printing Speed Colour Up to 26 sheets minute DP C354 C264 Up to 21 sheets minute DP C323 C263 C213 B W Up to 35 sheets minute DP C354 Up to 32 sheets minute DP C323 Up to 26 sheets minute DP C264 C263 Up to 21 sheets minute DP C213 Resolution dots per inch Max 1200...

Page 96: ...ve Unit DP C354 C264 Standard installed NOTE Please ask your dealer about the detailed setting method of HDD DP C354 C264 Each station can register up to 36 digits for each telephone number including pauses and spaces and up to 15 characters for each station name Image Memory Capacity Standard 3 MB Ringer Equivalence 0 2 B Specifications G3 Facsimile Option Standard Compliance 10Base T Ethernet IE...

Page 97: ...B4 A4 R Paper Weight 64 90 g m2 Stack 6 10 sheets 10 sets 2 5 sheets 20 sets Electrical Requirements Supplied from the machine Dimensions W x D x H 661 mm x 603 mm x 464 mm Mass Weight 37 kg Paper Size A4 B4 A3 Paper Weight 64 90 g m2 Stacking Capacity A4 500 sheets B4 A3 250 sheets Staple Sort A4 30 sheets B4 A3 20 sheets Electrical Requirements Supplied from the machine Dimensions W x D x H 182 ...

Page 98: ...mpatible Compatible Not Compatible Non Sort only Coated Compatible Compatible Not Compatible Non Sort only Labels Compatible Compatible Not Compatible Non Sort only Envelopes Compatible Compatible Not Compatible Not Compatible Transparency Compatible Compatible Non Sort only Non Sort only Do not use the following type flawed paper to avoid image quality related problems mechanical failures or misf...

Page 99: ...contact your local authorized Panasonic dealer for more details Toner Cartridge Black DQ TUS28K Approx 28 000 pages A4 size 5 coverage 1 Except DP C213 DQ TUT20K Approx 20 000 pages A4 size 5 coverage 1 Only DP C213 DQ TUS05K 2 Approx 5 000 pages A4 size 5 coverage 1 Except DP C213 DQ TUT05K 2 Approx 5 000 pages A4 size 5 coverage 1 Only DP C213 Toner Cartridge Cyan DQ TUS20C Approx 20 000 pages A...

Page 100: ...wer supply cord from AC outlet Disconnect the equipment immediately should it ever suffer physical damage which results in the internal parts becoming accessible in normal use In this instance users should have the equipment repaired or dispose of If the power supply cord and or telephone line cord of this equipment are damaged they must be replaced by the special cords supplied by an authorized P...

Page 101: ...ted to the auxiliary telephone port The auxiliary telephone port is specifically designed for 3 wire connected equipment 3 wire connected equipment might not respond to incoming ringing when attached to this port Different characteristics of the equipment at the other end of the call and or variations in line conditions may mean that it will not always be possible to communicate at the higher spee...

Page 102: ...tice 25 Completion Notice button 17 Compressed PDF 46 Confirm Settings 25 Confirm Settings button 17 Control Panel 15 Control Panel Angle Adjustment 3 Copy Count Indication 17 Copy Format 33 Copy Image Indication 17 Copy key 15 Copy Mode Indication 17 Copy Size buttons 17 Copying with Preset Ratios 28 Cover 27 Costom 46 D Darker 24 Date Time 46 Density Scanning Density 24 Destination button 18 19 ...

Page 103: ...tput Tray button 17 Paper Output Tray Indication 17 PCMCIA PC Card Slot 3 PDF 40 46 50 Photo 46 59 61 Placing Originals Copy 20 Placing Originals Facsimile Internet Fax 56 Popup Screen Auto Reset 57 Portrait 31 Power Save Mode 11 Power Switch 11 14 Precautions 9 Preset Jobs 25 Preset Jobs button 17 Print Data LED 16 Printer On Line LED 15 Print key 15 Printing from SD Memory Card PC 40 Program Gro...

Page 104: ...8 Sending Originals Internet Fax 60 S Fine 59 61 Sheet Bypass Labels Envelopes Transparency etc 76 98 Sheet Bypass Capacity 77 Shift Group 27 36 Shift Sort 27 36 Short Edge 31 Sort 27 36 Sort Finish 36 85 88 Sort Finish tab 27 Sort Copy Finishing 36 Specifications 94 98 Stamping 27 Staple 37 Staple Sort 27 36 Start key 15 Status button 17 63 Status LED 16 Std 59 61 Stop key 15 T Table of Contents ...

Page 105: ...ress from a list of available addresses The device retains this IP address for the duration of the session once the device disconnects the IP address becomes available for use again A peripheral storage device that holds spins reads and writes magnetic or optical disks It may be a receptacle for disk cartridges disk packs or floppy disks or it may contain non removable disk platters like most hard...

Page 106: ...r Control Panel A Local Area Network is a computer network system and printer limited to an immediate area such as an Office Factory and University used to integrate and exchange data Liquid Crystal Display The display area of your machine The term memory identifies data storage that comes in the form of chips which holds information that your machine needs to use The word storage is used for memo...

Page 107: ...Address Book TCP IP stands for Transmission Control Protocol Internet Protocol is quite simply a standard set of protocols that govern the basic workings of the Internet that was implemented in 1982 The TCP part is all about ensuring that data is transmitted correctly between 2 computers If any errors occur these are detected the data is retransmitted The data transmitted is split up into small po...

Page 108: ...memo 011Basic_OP UK 108_111 pmd 16 11 2006 13 10 108 ...

Page 109: ...memo 011Basic_OP UK 108_111 pmd 16 11 2006 13 10 109 ...

Page 110: ...memo 011Basic_OP UK 108_111 pmd 16 11 2006 13 10 110 ...

Page 111: ...ce and may be registered in other jurisdictions Monotype is a registered trademark of AMT registered in the U S Patent and Trademark Office and may be registered in other jurisdictions ColorTune is a registered trademark of Agfa Gevaert N V registered in the U S Patent and Trademark Office and may be registered in other jurisdictions Profile Tool Kit Profile Studio and Profile Optimizer are tradem...

Page 112: ...onic Communications Co Ltd Fukuoka Japan http panasonic net 2006 Panasonic Communications Co Ltd All Rights Reserved Unauthorized copying and distribution is a violation of law The contents of these Operating Instructions are subject to change without notice 000Basic_OP UK _Cover pmd 16 11 2006 13 05 2 ...

Reviews: