Panasonic VL-SWD272 Operating Instructions Manual Download Page 14

3.6 Setting the language, date and
time

When you use the main monitor for the first time, you will
be prompted to set the display language, date, and time
settings.

R

The play lamp lights if these settings are not
configured.

1

Press the 

M

N

 button to turn on the display.

2

Press the soft keys under the 

 and 

soft key icons to select the desired language.

3

Press 

.

4

Press 

 again.

5

Set the date and time.

R

Press 

 to select an item (i.e., year, month,

day, etc.).

R

Press 

 or 

 to change the setting.

6

When finished, press 

.

R

A beep sounds and the display turns off.

Changing the language, date and time

You change the language, date, and time settings later
if desired. Press the 

M

N

 button, use the 

,

, and 

 soft keys to navigate to 

Initial

settings

.

Note:

R

The date and time settings may be deleted when
there is a power outage. In this case, reconfigure the
settings.

R

The time may become out of sync over time (about
60 seconds per month).

3.7 Wide/zoom settings and zoom
position settings

These functions are not available for the supplied
doorphone (VL-V522L). You can use these functions
with optional doorphones (page 4).
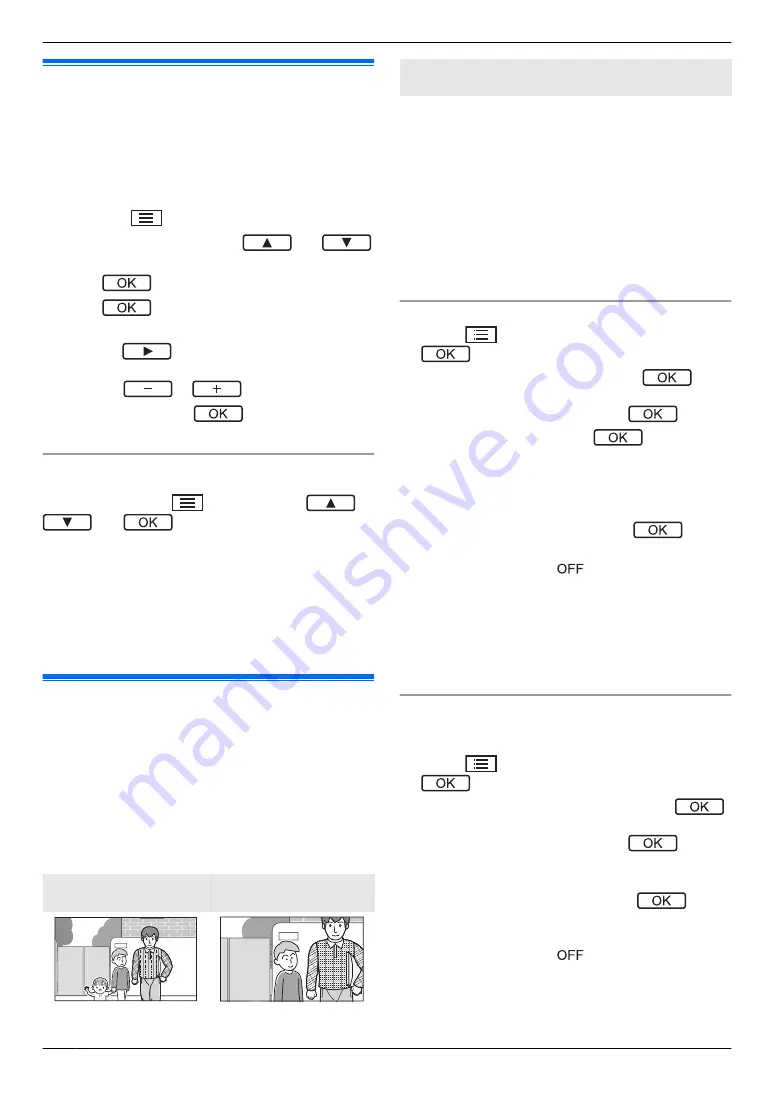
You can configure how doorphone images are initially
displayed on the main monitor. Images can be displayed
in wide mode or in zoom mode. You can choose different
settings for when visitors call you, and for when you are
monitoring.

Wide mode

(default setting)

Zoom mode

Wide mode

(default setting)

Zoom mode

Images are not zoomed.
The full camera image is
displayed.

Images are zoomed.
Images are displayed 2
times larger than wide
display.

Note:

R

The zoom feature uses a digital zoom. As a result,
the image quality of zoomed images is lower than
wide display images.

R

You can switch between wide and zoom modes and
adjust the zoom position while monitoring or on a call.
See page 21.

Selecting wide or zoom
1.

Press 

M

N


®

 select 

Initial settings


®

.

2.

Select 

Wide/Zoom settings


®


.

R

If there are multiple doorphones, select the
doorphone to be configured 

®


.

3.

Select the desired setting 

®


.

When visitors come

: Your settings will be

used when you answer calls from visitors.

When monitoring

: Your settings will be used

when you are monitoring.

4.

Select the desired display mode 

®


.

R

A beep sounds and the settings are changed.

5.

When finished, press 

M

N

.

Note:

R

If you select 

Zoom

, adjust the zoom position so that

people or objects that you want to view are displayed
centrally in the screen.

R

When images are recorded in zoom mode, only the
zoomed area is recorded.

Selecting the zoom position (pan/tilt position)

You can select which area of the image is displayed
when displaying zoomed images.

1.

Press 

M

N


®

 select 

Initial settings


®

.

2.

Select 

Zoom position settings


®


.

R

If there are multiple doorphones, select the
doorphone to be configured 

®


.

R

A zoomed image from the doorphone is
displayed.

3.

Select the desired zoom position 

®


.

R

A beep sounds, the settings are changed, and the
display turns off.

4.

When finished, press 

M

N

.

Note:

R

If you do not perform any operations for 90 seconds
while changing this setting, the setting is cancelled
and the screen turns off.

14

3. Preparation

Summary of Contents for VL-SWD272

Page 1: ...ide is supplied separately This system is an auxiliary system it is not designed to provide complete protection from property loss Panasonic will not be held responsible in the event that property los...

Page 2: ...ric locks and PBXs Using electric locks and PBXs 6 1 Using electric locks 19 6 2 Panasonic PBX integration 19 7 Incoming call operations Incoming call operations 7 1 When another incoming call is rece...

Page 3: ...e label on the rear of the main monitor 1 2 Accessory information 1 2 1 Supplied accessories For the sub monitor Accessory item AC adaptor PNLV226 Rechargeable batteries Charger Quantity 1 2 1 Note R...

Page 4: ...e a different capacity from that of the supplied batteries 2 Contact your building manager for more information 3 When sub monitors and extension monitors are used together a combined maximum of 6 sub...

Page 5: ...f a VL V900 lobby station such as in apartment complexes Operations for Apartment mode are described in 12 VL V900 basic operations Page 35 of this document as well as the Supplemental Information The...

Page 6: ...Procedures Usually written in an abbreviated style The verb may be omitted Unless otherwise stated all procedures are for both the main monitor extension monitor and sub monitor Main monitor extensio...

Page 7: ...t from the power outlet if the product emits smoke an abnormal smell or makes unusual noise or if the product has been dropped or physically damaged These conditions can cause fire or electric shock C...

Page 8: ...gnetic waves Failure to do so may prevent the charger from charging the product Environment main monitor sub monitor R Keep the unit main monitor extension monitor and sub monitor away from electrical...

Page 9: ...factory default after repair R If operations cannot be performed due to the main monitor extension monitor or sub monitor malfunction consult with the place of purchase for appropriate action Note fo...

Page 10: ...displayed TALK button M N Play button M N Press to display the image playing screen when the main monitor is idle It can also be used as a soft key page 11 Page button M N Press to page sub monitors...

Page 11: ...ction buttons A B A Soft key icons Displays the functions that can be operated by M N and M N B is displayed in screens such as the information screen page 12 The arrows displayed in indicate the dire...

Page 12: ...ressing M N when the main monitor is idle The information screen is used to display information such as the current status of the main monitor 3 2 2 Sub monitor monitor display Information screen A St...

Page 13: ...hours A Charge indicator when charging lights when charging is completed off B Hook R Charging may take longer in the following situations When the operating temperature is low page 29 When the sub mo...

Page 14: ...d The full camera image is displayed Images are zoomed Images are displayed 2 times larger than wide display Note R The zoom feature uses a digital zoom As a result the image quality of zoomed images...

Page 15: ...doorphone calls You can transfer a doorphone call between the main monitor sub monitor and extension monitor To transfer a call 1 While talking with the visitor at the doorphone press M N 2 If there a...

Page 16: ...gether 3 Page the other party 4 Talk with the paged party when they answer the call 5 When finished press M N To receive a call 1 When the intercom call is received press M N to talk to the paging par...

Page 17: ...ally recording while monitoring The main monitor extension monitor and sub monitor can manually record images while monitoring R Main monitor extension monitor While monitoring press Up to 8 images wi...

Page 18: ...laying images While playing images you can press to display the options menu and change the following settings To turn off the operation guide select Guide off R While the guide is turned off the soft...

Page 19: ...ock is unlocked See page 23 6 1 2 Unlocking electric locks 1 Press while talking or monitoring R If there are 2 electric locks available select the electric lock to be unlocked press to unlock another...

Page 20: ...incoming call from a doorphone The display changes to the new incoming call the previous incoming call is terminated and then the ringtone sounds and M N flashes To answer the incoming call R Press M...

Page 21: ...olume To adjust the volume heard at the doorphone 1 main monitor and extension monitor only Sound Owner s voice volume select the desired setting To use the voice changer 1 makes the voice heard at th...

Page 22: ...N Note R If you do not perform any operations for 90 seconds while changing these settings or if an incoming call is received the setting is cancelled and the screen turns off R In the following table...

Page 23: ...Connect to the electric lock 2 Connect to the doorphone No connection Unlock for 1 second Unlock for 7 seconds Unlocking buzzer sound On Off For details see page 19 View extension after unlocking 5 E...

Page 24: ...protected images Yes No Initialize settings Default setting 1 Factory setting 3 Select Factory setting when disposing transferring or returning the product Yes No Demo mode 2 3 On Off 1 The following...

Page 25: ...and the screen turns off R In the following table default settings are indicated by Sub menu Settings 1 2 Ringtone Doorphone 1 Sound 1 Sound 2 Sound 3 Sound 4 Normal Repeat Doorphone 2 Sound 1 Sound 2...

Page 26: ...egistration number of the extension monitor to be registered R Make sure to select the same registration number that was selected on the main monitor R Registration is complete when the extension moni...

Page 27: ...nutes 5 Repeater Connect power to the repeater that you want to register and then press PROGRAM A for about 3 seconds R The ID indicator B flashes green A B R The indicator lights when the registratio...

Page 28: ...itor first use the extension monitor to cancel itself and then re register it again as an extension monitor Extension monitors become main monitors again when they are cancelled 28 9 Expanding the sys...

Page 29: ...plied by the main monitor Dimensions mm height width depth Approx 131 99 36 5 excluding protruding sections Mass weight Approx 200 g Operating environment Ambient temperature approx 15 C to 55 C Relat...

Page 30: ...epth Approx 43 81 76 excluding protruding sections Mass weight Approx 70 g excluding the AC adaptor Operating environment Ambient temperature approx 0 C to 40 C Relative humidity non condensing up to...

Page 31: ...one The images of people s faces are dark R Images of people s faces appear dark when there is strong sunlight or a backlight in the area around the doorphone Use the backlight compensation function 2...

Page 32: ...one are noisy causing the sound to cut out or fade Try using the Press to talk mode 15 R When talking with the sub monitor The top part of the sub monitor where the antenna is located on the sub monit...

Page 33: ...al display 8 13 flashes after only using the sub monitor 2 or 3 times after charging R Clean the ends of batteries and with a dry cloth and charge again R It is time to replace the batteries 13 The su...

Page 34: ...een registered on the main monitor 26 11 3 Error messages extension monitor Error messages can be viewed by pressing M N Display Cause Solution Page Cannot connect to the main monitor Please check the...

Page 35: ...s M N to call Searching by first letter of the name 1 Press M N 2 Use the keypad to enter the first letter of the resident s name R Press a key repeatedly to scroll through the letters assigned to tha...

Page 36: ...obby station or camera 1 Press M N R If there are multiple devices select the desired device R The images from the device are displayed R If a camera is connected to the lobby station you can alternat...

Page 37: ...connect the current call if the current call has lower priority or will not be connected if the current call has higher priority Low priority Monitoring Medium priority General calls lobby station to...

Page 38: ...3 Electric lock 23 Initialize settings 24 Lobby connection 23 Operating instructions 24 Play lamp 24 Power supply frequency 22 Register 24 Ring volume 23 Ringtone 23 Select language 22 Time and date s...

Page 39: ...ub monitor 26 Repeater 26 Reset 10 33 Reset button 10 33 S Select language 14 Speaker 10 11 Specifications 29 Supported models 4 T Talk button 10 Time 14 Time and date settings 14 Transferring calls 1...

Page 40: ...PNQP1311YA C0916MM1106...

Reviews: