Panasonic VL-SW250BX Operating Instructions Manual Download Page 1

Thank you for purchasing a Panasonic product.

Please read these Operating Instructions before using the unit and save for future reference.

Operating Instructions

Model Name

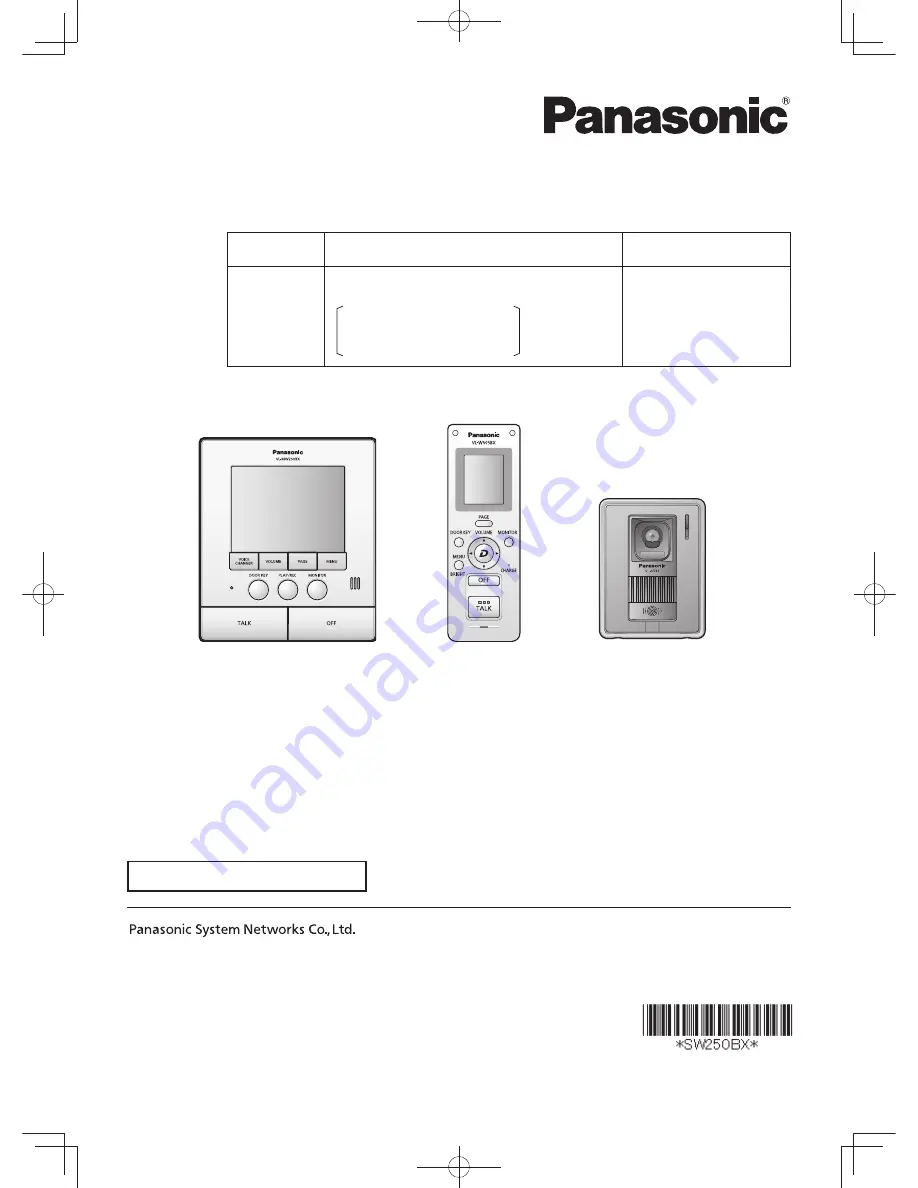
Wireless Video Intercom System

Main Monitor

Model No.

VL-SW250BX

Including:  VL-MW250BX

VL-W605BX
VL-V566BX

VL-MW250BX

1-62, 4-chome, Minoshima, Hakata-ku, Fukuoka 812-8531, Japan

© Panasonic System Networks Co., Ltd. 2010

PNQX2912YA


SV0910SN1090

VL-MW250BX

VL-W605BX

VL-V566BX

Attached Installation Guide

01̲VL-SW250BX.indd   1

01̲VL-SW250BX.indd   1

2010/09/14   11:58:28

2010/09/14   11:58:28

Summary of Contents for VL-SW250BX

Page 1: ...ireless Video Intercom System Main Monitor Model No VL SW250BX Including VL MW250BX VL W605BX VL V566BX VL MW250BX 1 62 4 chome Minoshima Hakata ku Fukuoka 812 8531 Japan Panasonic System Networks Co...

Page 2: ...eiving another call during a call or while monitoring 22 Monitoring the outside Door station monitor 23 Recording Recording an image 24 L Auto recording 24 L Manual recording 25 Viewing recorded image...

Page 3: ...ion in these Operating Instructions Product name Main monitor station Main monitor Sub monitor station Wireless monitor Door station Door station Accessory information Included items For the sub monit...

Page 4: ...s Please contact the dealer where you purchased VL SW250BX or VL MW250BX N When using with a lobby station LConnection Connect the lobby station to terminal D1 D2 on the rear of the main monitor stati...

Page 5: ...ptor or power cord to be excessively pulled bent or placed under heavy objects Operating safeguards LTo reduce the risk of electric shock do not disassemble this unit Refer servicing to an authorized...

Page 6: ...ive material to overheat and cause burns LCharge the battery ies provided or identified for use with the product only in accordance with the instructions and limitations specified in this manual LOnly...

Page 7: ...tions Environment LKeep the unit away from electrical noise generating devices such as fluorescent lamps and motors LThe unit should be kept away from excessive smoke dust high temperature and vibrati...

Page 8: ...g your own image taken and used indiscriminately without consent Others LPanasonic assumes no responsibility for injuries or property damage resulting from failures arising out of improper installatio...

Page 9: ...d the sub monitor station D Water drain holes LThese holes allow rain water to drain Do not cover them E Panel F Speaker G Microphone A B C D E F G N Door station image quality The following phenomena...

Page 10: ...LAllows you to open the door when connecting the door opener sold separately to the main monitor station page 20 H PLAY REC button LViews the recorded image page 26 LRecords the image page 24 I MONITO...

Page 11: ...play LThe monitor display is turned off during standby Display during operation A B E F C D The displayed function is not stated when the corresponding button name means the same as the displayed func...

Page 12: ...Flashes while the door station or the main monitor station is calling Lights up solid while talking H CHARGE indicator LLights up while charging Turns off when charging is complete I Navigator key It...

Page 13: ...Metallic parts Charger stand Charge contacts Metallic parts Antenna built in LDo not cover the antenna with your hand when using the sub monitor station Radio waves may weaken Battery cover LOpen to r...

Page 14: ...tened Recharge the battery immediately L2 beeps sound every 4 seconds and a call is disconnected within about 60 seconds L RECHARGE BATTERY is displayed The battery needs to be recharged While in use...

Page 15: ...enter of the navigator key D button J Indicates that the ringer volume for the door station is set to OFF K Appears when unviewed images from the door station remain in memory Note LImages on the moni...

Page 16: ...after battery replacement it takes about 7 hours to complete charging LIf you use the sub monitor station while charging the charging time becomes longer LLocate the charger where OUT OF RANGE is not...

Page 17: ...NG TONE SETTINGS ANSWERING SETTINGS RECORDING PLAY SETTINGS 2 Press MENU OK then set the current date and time VOICE CHANGER NEXT Select the location for day month year hour minute VOLUME or PAGE Sele...

Page 18: ...her door station during a conversation see page 22 Answering a call by voice sensor Voice answer mode This mode allows you to answer a call by voice without pressing TALK You can operate this feature...

Page 19: ...your voice heard at the door station You can adjust the volume of your voice heard at the door station by setting the main monitor station Main monitor station only 1 Press VOLUME then select OUTGOING...

Page 20: ...rsation ends Using DOOR KEY button When a separate door opener is connected to the main monitor station you can open the door using the main monitor station or the sub monitor station 1 To open the do...

Page 21: ...ress TALK and talk to the paging party 2 Tell the paged party to receive the door call Press OFF LThe paged call is disconnected and the paged party can talk to the visitor 2 When the image taken by t...

Page 22: ...monitor station During a call While monitoring Sub monitor station Main monitor station XX or XX MONITOR TALK OFF OFF TALK MONITOR When answering a call 1 Press the flashing MONITOR button LThe previo...

Page 23: ...When installing 2 door stations When you press MONITOR in step 1 the following is displayed Select the desired door station Press VOLUME or PAGE then press MENU OK Press or then press D OK Note LMoni...

Page 24: ...ash when there are unviewed images PLAY LAMP FLASHING on page 37 LWhen you answer a call the recorded images will be treated as viewed images LIf you receive a call from the other door station while m...

Page 25: ...isappears when recording ends Note LWhen DOOR STATION PIC REC NUMBER is set to 8 PICTURES an image is recorded every second for 8 seconds LManually recorded images will be treated as viewed images To...

Page 26: ...yed When DOOR STATION PIC REC NUMBER is set to 8 PICTURES the 1st image out of 8 images is displayed NTo view a series of 8 continuous images automatically auto playback Press PLAY REC LThe 8 images a...

Page 27: ...ifferent call or monitoring LIf you press and hold VOLUME or PAGE you can switch images quickly and when you release your finger the image is displayed PAGE VOLUME Switches to the next or previous ima...

Page 28: ...image LThe most recently recorded image is displayed When DOOR STATION PIC REC NUMBER is set to 8 PICTURES the 1st image out of 8 images is displayed NTo view a series of 8 continuous images Press LE...

Page 29: ...the 8 continuous images Switches to the next or previous image of the 8 continuous images LIf you press and hold or you can switch images quickly and when you release your finger the image is displaye...

Page 30: ...m the display Sub monitor station 1 While viewing the image press D MENU then select PROTECT by pressing or PICTURE MENU PROTECT DELETE 2 Press D OK L appears on the display 3 To end the operation pre...

Page 31: ...ss VOLUME YES 4 To end the operation press OFF Sub monitor station 1 While viewing the image press D MENU then select DELETE by pressing or PICTURE MENU PROTECT DELETE 2 Press D OK L DELETE or SERIES...

Page 32: ...is heard press TALK 2 When the paged party answers the call talk with the paged party 2 Talk with the other party 3 To end the intercom call press OFF LThe intercom call is disconnected N When using...

Page 33: ...also adjust the ringer volume while receiving a call 1 Press VOLUME RING VOLUME 2 Press PAGE or MENU 1 LYou can also adjust the ringer volume for calls from the door station during standby Press VOLU...

Page 34: ...K L r moves to the selected item 6 To end the operation press OFF Sub monitor station 1 Press MENU then select RING TONE by pressing or 2 Press D OK then select the desired door station by pressing or...

Page 35: ...TTINGS TIME AND DATE SETTINGS RING TONE SETTINGS RECORDING PLAY SETTINGS CONNECTED DEVICE SETTINGS 2 Press MENU OK then select DOOR KEY by pressing VOLUME or PAGE CONNECTED DEVICE SETTINGS DOOR STATIO...

Page 36: ...When receiving a call while setting or no operation is done for about 90 seconds the setting function screen automatically quits Function list of the main monitor station The default setting is indica...

Page 37: ...UTO PLAY 5 16 NOV 20 00 UNPLAYED DOOR STATION PIC REC NUMBER 8 PICTURES 1 PICTURE LYou can select the number of images to be recorded when receiving a call from the door station or monitoring 1 PICTUR...

Page 38: ...ONNECTED DEVICE SETTINGS DOOR STATION CONNECTION DOOR STATION 1 YES AUTO NO DOOR STATION 2 YES AUTO NO LYou can select the setting of the door station LSelect NO for the door station that is not in us...

Page 39: ...TTINGS INITIALIZE SETTINGS INIT DEL ALL PICTURES ONLY INITIALIZE SETTINGS BACK LThis function resets the settings of the main monitor station to the default settings LThe following settings are not af...

Page 40: ...is done for about 90 seconds the setting function screen automatically quits Function list of the sub monitor station The default setting is indicated in bold Item function Setting RING VOLUME DOOR HI...

Page 41: ...e recording time and date to be displayed while viewing the recorded image LWhen 3 SEC is selected Directly after being displayed About 3 seconds later 5 16 NOV 20 00 30 11 16 20 00 CONTRAST LWhen it...

Page 42: ...or using the optional units refer to their separate Operating Instructions For wiring between the optional units and the main monitor station refer to the Installation Guide included separately Syste...

Page 43: ...age 11 While is displayed you cannot answer the call using the main monitor station The display will turn off when the conversation between the door station and the PBX extension ends or if the call d...

Page 44: ...g VOLUME or PAGE FUNCTION SETTINGS TIME AND DATE SETTINGS RING TONE SETTINGS CONNECTED DEVICE SETTINGS REGISTRATION CANCELLATION 2 Press MENU OK then select REGISTRATION by pressing VOLUME or PAGE 3 P...

Page 45: ...itor station XX OFF PAGE MENU VOLUME 1 Press MENU then select REGISTRATION CANCELLATION by pressing VOLUME or PAGE FUNCTION SETTINGS TIME AND DATE SETTINGS RING TONE SETTINGS CONNECTED DEVICE SETTINGS...

Page 46: ...ON REGISTRATION CANCELLATION 3 Press MENU OK then select the device to be canceled by pressing VOLUME or PAGE CANCELLATION CANCEL SUB MONITOR STATION CANCEL REPEATER 4 Press MENU OK then select the de...

Page 47: ...trong light such as sunlight is shining into the lens of the door station Though this may cause the display image to become difficult to see this is not a malfunction Locate the door station away from...

Page 48: ...stall a repeater optional the sound may be improved LThere is an object such as a concrete wall obstructing the signal Move to a place without an obstacle If you install a repeater optional the sound...

Page 49: ...tion has been charged flashes after using it a few times LThe battery is at the end of its life Replace the battery with a new one 52 The sub monitor station the AC adaptor or the charger is warm LThi...

Page 50: ...ringer tone does not sound LNo voices can be heard LThe plug is disconnected from the power outlet or it is about to be disconnected Disconnect the plug and connect it securely again If this does not...

Page 51: ...ub monitor station only Problem Cause Solution Page CAN NOT CONNECT LThe sub monitor station is too far from the main monitor station Move closer to the main monitor station If you install a repeater...

Page 52: ...rt When the battery level flashes after a few calls even if the battery has been charged for about 7 hours replace the battery with a new one 1 Open the battery cover 2 Remove the old battery 3 Insert...

Page 53: ...or station Dimensions Approx height 131 mm x width 99 mm x depth 36 5 mm Excluding protruding sections Mass Weight Approx 200 g Operating environment 10 C to 50 C Up to 90 RH Relative Humidity non con...

Page 54: ...ON PIC REC NUMBER 37 LPICTURE RECORD TIMING 37 LDOOR STATION AUTO RECORDING 37 LDELETE ALL PICTURES 37 LDOOR STATION CONNECTION 38 LLOBBY CONNECTION 38 LDOOR KEY 35 38 LEXTERNAL DEVICE 38 LINITIALIZE...

Page 55: ...n 13 Speaker volume 19 Specifications 53 Sub monitor station 3 12 LCharging 16 LRegistration 44 LCancellation 46 System components 42 T TALK indicator LMain monitor station 10 LSub monitor station 12...

Page 56: ...f purchase Serial number found on the rear of the main monitor station Dealer s name and address Dealer s telephone number Attach your sales receipt here SW250BX OI indb 56 SW250BX OI indb 56 2010 08...

Reviews: