background image

Getting Started

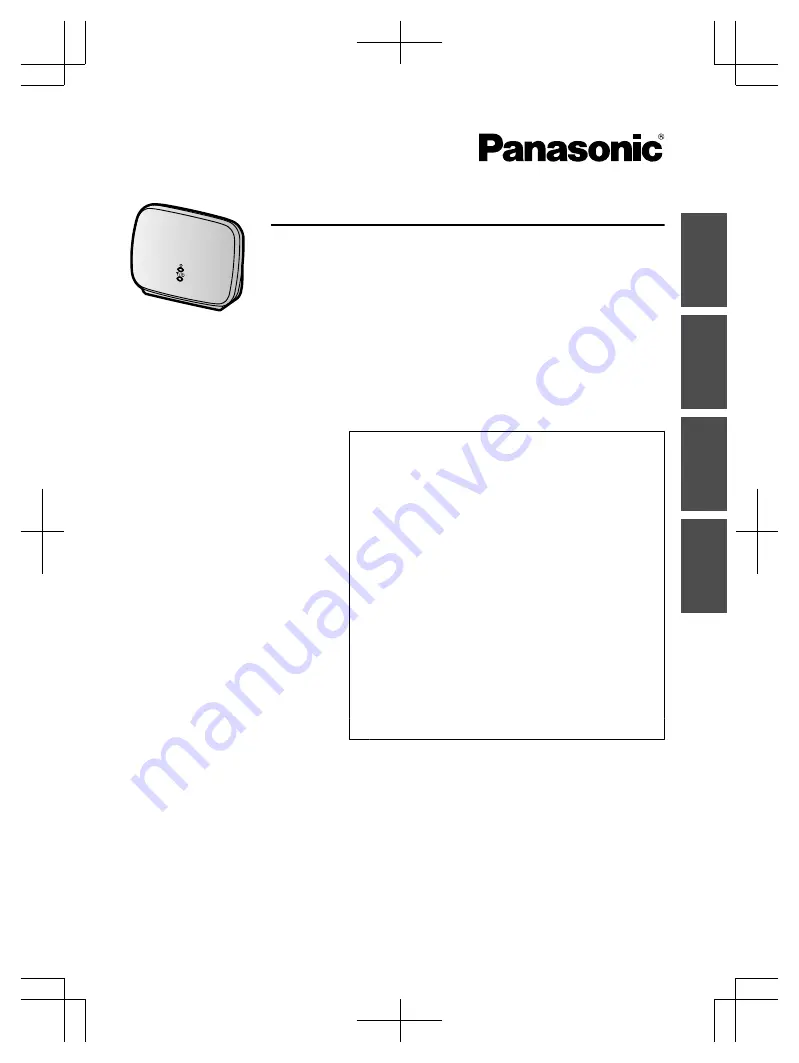
DECT Repeater

Model No.    

VL-FKD2

Table of Contents

Introduction

2

Accessory information

3

For your safety

4

Important safety instructions

5

For best performance

5

Other important information

5

Controls

7

Installation/Registering the repeater to the
main monitor

8

Wall mounting

9

Troubleshooting

10

Cleaning

10

Specifications

10

General information

11

Thank you for purchasing a Panasonic product.
Please read this manual before using the product and save it for future reference.

En
g

lis

h

Po
ls

k

i

R

o

m

â

n

ă

Ma
g

y

a

r

Summary of Contents for VL-FKD2

Page 1: ...st performance 5 Other important information 5 Controls 7 Installation Registering the repeater to the main monitor 8 Wall mounting 9 Troubleshooting 10 Cleaning 10 Specifications 10 General information 11 Thank you for purchasing a Panasonic product Please read this manual before using the product and save it for future reference English Polski Română Magyar ...

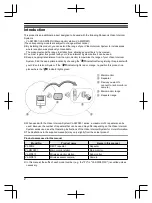
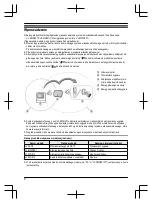
Page 2: ...tercom System If the ID indicator lights red or orange re position this product in a place where the ID indicator lights green E A B C D A Main monitor B Repeater C Device you want to connect to sub monitor or camera D Main monitor range E Repeater range R When used with the Video Intercom System VL SWD501 series a maximum of 2 repeaters can be used Because the number of repeaters that can be used...

Page 3: ...ends the signal away from the main monitor by sending signals directly between repeaters Because the signals are sent between repeaters the same type of device must be connected to both repeaters all sub monitors or all cameras This is useful when you want to connect to the same type of devices over long distances Accessory information Supplied accessories Accessory item Quantity AC adaptor PQLV21...

Page 4: ...umulated dust may cause an insulation defect from moisture etc resulting in a fire R Unplug the product from the power outlet if the product emits smoke an abnormal smell or makes unusual noise or if the product has been dropped or physically damaged These conditions can cause fire or electric shock Confirm that smoke has stopped emitting and contact an authorised service centre R Hold the main bo...

Page 5: ...r to another location for better reception Environment R Keep the product away from electrical noise generating devices such as fluorescent lamps and motors R The product should not be exposed to direct sunlight R Do not place heavy objects on top of the product R When you leave the product unused for a long period of time unplug the product from the power outlet R The product should be kept away ...

Page 6: ... your waste disposal service or the point of sale where you purchased the items Penalties may be applicable for incorrect disposal of this waste in accordance with national legislation For business users in the European Union If you wish to discard electrical and electronic equipment please contact your dealer or supplier for further information Information on Disposal in other Countries outside t...

Page 7: ...ng sent Lit orange Signals are not being sent ID indicator Flashing green Currently registering to the main monitor Off Not registered to the main monitor Lit green Strong Indicates the signal level of the main monitor R Determine the installation location of the repeater by checking the signal level shown with the indicator Lit orange Lit red Weak Flashing red Signals do not reach the repeater an...

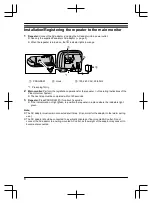
Page 8: ...r Operating Instructions of the Video Intercom System R The next step must be completed within 120 seconds 3 Repeater Press PROGRAM A for about 3 seconds R If the indicators do not light green re position the repeater in a place where the indicators light green Note R The AC adaptor must remain connected at all times It is normal for the adaptor to feel warm during use R The AC adaptor should be c...

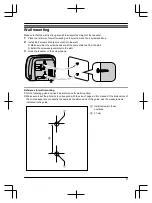
Page 9: ...stance from the wall R Install the screws perpendicular to the wall 3 Hook the repeater on the screw heads Reference for wall mounting Print the following guide and use it as a reference for wall mounting R Make sure to set the print size to correspond with the size of pages in this manual If the dimensions of the printed paper are not exactly the same as the dimensions of this guide use the measu...

Page 10: ...en the repeater is too close to the main monitor the sub monitor or camera only receive signals from the main monitor thus making the repeater ineffective Install the repeater in a location where the sub monitor or camera are used and is as far away from the main monitor as possible while still staying within signal range of the main monitor Cleaning Wipe the product with a soft dry cloth For exce...

Page 11: ...other relevant provisions of Radio Telecommunications Terminal Equipment R TTE Directive 1999 5 EC Declarations of Conformity for the relevant Panasonic products described in this manual are available for download by visiting http www ptc panasonic eu Contact to Authorised Representative Panasonic Testing Centre Panasonic Marketing Europe GmbH Winsbergring 15 22525 Hamburg Germany Ecodesign inform...

Page 12: ...12 Notes ...

Page 13: ...5 Jak uzyskać najlepszą wydajność 5 Inne ważne informacje 6 Sterowanie 7 Montaż rejestrowanie wzmacniacza sygnału w głównym monitorze 8 Montaż ścienny 9 Rozwiązywanie problemów 10 Czyszczenie 10 Dane techniczne 10 Informacje ogólne 11 Dziękujemy za zakup produktu firmy Panasonic Prosimy przeczytać tę instrukcję przed użyciem produktu i zachować ją do późniejszych konsultacji Polski ...

Page 14: ...ie świecić na zielono E A B C D A Główny monitor B Wzmacniacz sygnału C Podłączane urządzenie mo nitor podrzędny lub kamera D Zasięg głównego monitora E Zasięg wzmacniacza sygnału R System wideodomofonowy z serii VL SWD501 umożliwia korzystanie z maksymalnie 2 wzmacniaczy sygnału Ponieważ liczba możliwych do wykorzystania wzmacniaczy sygnału może być różna w zależności od używanej serii systemu wi...

Page 15: ...ększenie zasięgu sygnału z głównego monitora poprzez przesyłanie sygnału bezpośrednio mię dzy wzmacniaczami Ponieważ sygnał jest przesyłany między wzmacniaczami sygnału do obu wzmacniaczy należy podłączyć ten sam typ urządzeń tylko monitory podrzędne lub tylko kamery To przydatne kiedy chcesz połączyć urządzenia tego samego typu na dłuż szych odcinkach Informacje na temat akcesoriów Dostarczone ak...

Page 16: ... zasilacz sieciowy do gniazda zasilania W przeciwnym razie może dojść do porażenia prądem elektrycznym i lub nadmiernego nagrzewania się a w rezultacie do pożaru Nie używaj uszkodzonych zasilaczy sieciowych ani gniazd zasilania R Regularnie usuwaj kurz itp z zasilacza sieciowego odłączając go od gniazda zasilania i wycierając suchą szmatką Nagromadzony kurz w połączeniu z wilgocią może powodować p...

Page 17: ...sygnału nie będzie żadnych przeszkód z dala od urządzeń elektronicznych takich jak telewizory radioodbiorniki komputery urządzenia bezprzewodowe czy cyfrowe telefony bezprzewodowe odwrócony od radionadajników np anten zewnętrznych lub stacji telefonii komórkowej Staraj się nie instalować wzmacniacza sygnału przy oknie R Zasięg i jakość głosu zależą od lokalnych warunków środowiskowych R Jeśli odbi...

Page 18: ... w razie nieprawidłowego postępowania z odpadami W celu uzyskania informacji o zbiórce oraz recyklingu zużytych urządzeń elektrycznych i elektronicznych oraz akumulatorów prosimy o kontakt z władzami lokalnymi miejscowymi służbami zajmującymi się utylizacją odpadów lub punktem sprzedaży w którym dokonano zakupu Za niewłaściwe pozbywanie się tych odpadów mogą grozić kary przewidziane przepisami pra...

Page 19: ... Pomarańczowa świeci Sygnał nie jest przesyłany Kontrolka ID Zielona pulsuje Trwa rejestrowanie w głównym monitorze Wyłączone Nie zarejestrowano w głównym monitorze Zielona świeci Silny Informuje o sile sygnału głównego monitora R Określmiejscemontażuwzmacniaczasyg nału na podstawie siły sygnału pokazywa nej przez kontrolkę Pomarańczowa świeci Czerwona świeci Słaby Czerwona pul suje Sygnał nie doc...

Page 20: ...za sygnału Instrukcja obsługi systemu wideodomofonowego R Następną czynność należy wykonać w ciągu 120 sekund 3 Wzmacniacz sygnału Naciskaj PROGRAM A przez około 3 sekundy R Jeśli kontrolki nie świecą na zielono przenieś wzmacniacz sygnału w miejsce gdzie kontrolki będą świecić na zielono Uwaga R Zasilacz sieciowy musi być przez cały czas podłączony To normalne że zasilacz nagrzewa się w czasie uż...

Page 21: ...dległości od ściany R Zamontuj wkręty prostopadle do ściany 3 Zawieś wzmacniacz sygnału na łbach wkrętów Szablon do montażu ściennego Wydrukuj poniższy szablon i wykorzystaj go jako pomoc podczas montażu ściennego R Pamiętaj aby ustawić wielkość wydruku odpowiednio do wielkości stron niniejszej instrukcji Jeśli wymiary papieru do drukowania nie są dokładnie takie same jak wymiary tej instrukcji uż...

Page 22: ...o monitora Kiedy wzmacniacz sygnału znajduje się zbyt blisko głównego mo nitora monitor podrzędny lub kamera odbierają sygnał tylko z głów nego monitora przez co wzmacniacz sygnału jest nieskuteczny Zainstaluj wzmacniacz sygnału w miejscu używania monitora pod rzędnego lub kamery w maksymalnej odległości od głównego mo nitora lecz nadal w zasięgu jego sygnału Czyszczenie Produkt należy czyścić mię...

Page 23: ...anowieniami Dyrektywy 1999 5 WE w sprawie radiowych i telekomunikacyjnych urządzeń końcowych R TTE Deklaracje zgodności produktów Panasonic opisanych w niniejszej instrukcji można pobrać ze strony http www ptc panasonic eu Dane kontaktowe autoryzowanego przedstawiciela Panasonic Testing Centre Panasonic Marketing Europe GmbH Winsbergring 15 22525 Hamburg Niemcy Informacje na temat ekoprojektu Info...

Page 24: ...12 Notatki ...

Page 25: ...Pentru o funcţionare optimă 5 Alte informaţii importante 5 Butoane de comandă 7 Instalarea înregistrarea repetorului la monitorul principal 8 Montarea pe perete 9 Depanarea 10 Curăţarea 10 Specificaţii 10 Informaţii generale 11 Vă mulţumim că aţi cumpărat un produs Panasonic Vă rugăm să citiţi acest manual înainte de a utiliza produsul şi să îl păstraţi pentru referinţe ulterioare Română ...

Page 26: ...prinde în roşu sau portocaliu repoziţionaţi acest produs într un loc în care indicatorul ID se aprinde în verde E A B C D A Monitor principal B Repetor C Dispozitivul la care doriţi să vă conectaţi monitor secun dar sau cameră D Raza de acţiune a monitoru lui principal E Raza de acţiune a repetorului R Atunci când se utilizează un sistem Video Intercom seria VL SWD501 pot fi folosite maxim 2 repet...

Page 27: ...ună Acest lucru extinde raza de acţiune a semnalului de la monitorul principal trimiţând semnale direct între repe toare Deoarece semnalele sunt trimise între repetoare trebuie conectat acelaşi tip de dispozitiv la ambele repe toare numai monitoare secundare sau numai camere Acest lucru este util atunci când doriţi să vă conectaţi la acelaşi tip de dispozitive pe distanţe lungi Informaţii despre a...

Page 28: ...aţi adaptoare de c a sau prize de curent deteriorate R Îndepărtaţi regulat praful etc de pe adaptorul de c a după ce l aţi scos din priza de curent şi apoi ştergeţi l cu o cârpă uscată Praful acumulat poate determina apariţia unor defecte de izolare produse de umezeală etc şi se pot produce incendii R Dacă produsul scoate fum are un miros ciudat sau face un zgomot anormal sau dacă aţi scăpat produ...

Page 29: ...cvenţă de exemplu antenele externe ale staţiilor telefoanelor mobile Evitaţi instalarea repetorului în apropierea unei ferestre R Acoperirea şi calitatea semnalului depind de condiţiile locale de mediu R Dacă recepţia într o locaţie a repetorului nu este satisfăcătoare mutaţi repetorul într o altă locaţie pentru o recepţie mai bună Mediul de lucru R Păstraţi produsul la distanţă faţă de dispozitiv...

Page 30: ... locală serviciul de eliminare a deşeurilor sau punctul de vânzare de unde aţi achiziţionat articolele În cazul eliminării incorecte a acestor deşeuri se pot aplica penalităţi în conformitate cu legislaţia naţională Pentru utilizatorii comerciali din Uniunea Europeană Dacă doriţi să aruncaţi echipamente electrice şi electronice vă rugăm să contactaţi dealerul sau furnizorul dumneavoastră pentru in...

Page 31: ...rto caliu Semnalele nu se trimit Indicator ID Clipeşte în ver de În curs de înregistrare la monitorul principal Oprit Nu se înregistrează la monitorul principal Aprinsă în verde Puternic Indică nivelul semnalului monitorului principal R Stabiliţi locaţia de instalare a repetorului verificând nivelul semnalului afişat prin in termediul indicatorului Aprinsă în porto caliu Aprinsă în roşu Slab Clipe...

Page 32: ...e operare ale sistemului Video Intercom R Următorul pas trebuie finalizat în decurs de 120 de secunde 3 Repetorul apăsaţi PROGRAM A timp de aproximativ 3 secunde R Dacă indicatorii nu se aprind în verde repoziţionaţi repetorul într un loc în care indicatorii se aprind în verde Notă R Adaptorul de c a trebuie să rămână conectat în permanenţă Este normal ca adaptorul să se încălzească în timpul util...

Page 33: ...eaşi distanţă faţă de perete R Montaţi şuruburile perpendicular pe perete 3 Fixaţi repetorul pe capetele şuruburilor Schemă de referinţă pentru montarea pe perete Imprimaţi următoarea schemă şi utilizaţi o ca referinţă pentru montarea pe perete R Aveţi grijă să setaţi dimensiunea de imprimare pentru a corespunde cu dimensiunea paginilor din acest manual În cazul în care dimensiunile hârtiei imprim...

Page 34: ...petorul este prea aproape de monitorul principal monitorul secundar sau camera recepţionează semnale numai de la monitorul principal făcând ca repetorul să nu aibă niciun efect Instalaţi repetorul într o locaţie în care sunt utilizate monitorul se cundar sau camera şi în care se află cât de departe posibil de monitorul principal rămânând totodată în raza de acţiune a sem nalului monitorului princi...

Page 35: ...radio şi echipamentele terminale de telecomunicaţii R TTE 1999 5 CE Declaraţiile de conformitate pentru respectivele produse Panasonic prezentate în acest manual pot fi descărcate vizitând http www ptc panasonic eu Informaţii de contact ale reprezentantului autorizat Panasonic Testing Centre Panasonic Marketing Europe GmbH Winsbergring 15 22525 Hamburg Germania Informaţii privind proiectarea ecolo...

Page 36: ...12 Note ...

Page 37: ...ény érdekében 5 Egyéb fontos információk 5 Kezelőszervek 7 Telepítés A jelismétlő regisztrálása a központi monitorhoz 8 Fali rögzítés 9 Hibaelhárítás 10 Tisztítás 10 Műszaki adatok 10 Általános tudnivalók 11 Köszönjük hogy Panasonic terméket vásárolt Mielőtt használatba venné a terméket kérjük olvassa el ezt a használati utasítást és tartsa is meg a jövőbeli hivatkozás céljából Magyar ...

Page 38: ...ilágít helyezze át a terméket egy olyan helyre ahol a ID visszajelző már zölden világít E A B C D A Központi monitor B Jelismétlő C A csatlakoztatni kívánt eszköz másodlagos monitor vagy kamera D A központi monitor hatósugara E A jelismétlő hatósugara R Ha a VL SWD501 sorozatú videokaputelefon rendszerrel használja legfeljebb 2 jelismétlőt használhat Mivel a használható jelismétlők száma a használ...

Page 39: ...záltal hogy a jeleket közvetlenül jelismétlők között küldi Mivel a rendszer a rádiós jeleket a jelismétlők között küldi így ugyanannak az eszköztípusnak mindkét jelismétlőhöz csatlakoznia kell minden másodlagos monitor és kamera esetén Ez hasznos ha ugyanolyan típusú eszközöket kíván csatlakoztatni nagy távolságokon belül Információk a tartozékokról Mellékelt tartozékok Tartozék Mennyiség Hálózati...

Page 40: ...zatot R Rendszeresen távolítsa el a port és egyéb szennyeződéseket a hálózati adapterről úgy hogy kihúzza azt a fali csatlakozóaljzatból majd száraz ruhával megtörli A felgyülemlett por által felszívott nedvesség stb károsíthatja a szigetelést ami tüzet okozhat R Ha a termék füstöt bocsát ki furcsa szaga van szokatlan hangot ad ki leesett vagy fizikailag megsérült húzza ki a terméket a konnektorbó...

Page 41: ...ztosított lefedettség és a hangminőség a helyi környezeti feltételektől függ R Ha a jelismétlő számára az egyik helyen nem megfelelő a vétel tegye át egy másik helyre ahol jobb a vétel Környezet R Tartsa távol a terméket elektromos zajkeltőktől például a fénycsövektől és és a motoroktól R Ne tegye ki a terméket közvetlen napsütésnek R Ne tegyen nehéz tárgyakat a termék tetejére R Ha a terméket hos...

Page 42: ...ladékkezelő képviselettel a helyi viszonteladóval vagy a szervizképviselettel A helyi előírásoktól és jogszabályoktól függően büntetésre számíthat az aki a hulladék kezelésekor szabályellenesen jár el EU székhelyű üzleti felhasználók figyelmébe Az elhasznált elektromos és elektronikus berendezések kezelésével kapcsolatos további információkért forduljon viszonteladójához vagy márkakereskedőjéhez A...

Page 43: ...ncssárga színnel világít A jelek nem kerülnek küldésre ID visszajelző Zölden villog A központi monitorhoz való regisztrálás van folyamatban Ki A készülék nincs regisztrálva a központi monitorhoz Zölden világít Erős A központi monitor jelerősségét jelzi R A visszajelző által mutatott jelerősség alapján keresse meg a legjobb felszerelési helyet a jelismétlő számára Narancssárga színnel világít Piros...

Page 44: ...kaputelefon rendszerhez kapott Kezelési utasítás R A következő lépést 120 másodpercen belül kell végrehajtani 3 Jelismétlő Nyomja meg és tartsa lenyomva a PROGRAM A gombot 3 másodpercig R Ha a visszajelzők nem zölden világítanak helyezze át a jelismétlőt egy olyan helyre ahol a visszajelzők zölden világítanak Megjegyzés R A hálózati adapter mindig maradjon csatlakoztatva Ha az adapter használat kö...

Page 45: ... távolságra legyenek R A csavarokat a falra merőlegesen szerelje 3 Helyezze a jelismétlőt a csavarokra Referencia a falra szereléshez Nyomtassa ki az alábbi segédletet és használja azt referenciaként a falra szereléshez R Ellenőrizze hogy a nyomtatási méret megegyezzen a kézikönyv oldalainak méretével Ha a kinyomtatott papír méretei nem pontosan egyeznek a segédlet méreteivel akkor használja a seg...

Page 46: ...lő túl közel van a központi monitorhoz akkor a másodlagos monitor vagy a kamera csak a központi monitortól érkező jeleket fogja fogadni így a jelismétlő hatástalan marad A jelismétlőt olyan helyre szerelje ahol a másodlagos monitor vagy a kamera használatban van és a központi monitortól a lehető legmesszebb de még mindig a központi monitor hatósugarán belül végezhető el a telepítés Tisztítás Puha ...

Page 47: ...it és egyéb vonatkozó rendelkezéseit A kézikönyvben leírt vonatkozó Panasonic termékek megfelelőségi nyilatkozatai a következő oldalról tölthetők le http www ptc panasonic eu Helyi márkaképviselet Panasonic Testing Centre Panasonic Marketing Europe GmbH Winsbergring 15 22525 Hamburg Germany Környezetbarát tervezésre vonatkozó információk A környezetbarát tervezésre vonatkozó információk az 1275 20...

Page 48: ...1 62 4 chome Minoshima Hakata ku Fukuoka 812 8531 Japan http www panasonic com Panasonic System Networks Co Ltd 2015 PNQX7867ZA C1015MM0 ...

Reviews: