background image

24

8.13. Remove the Contact metals

1. Remove the Cabinet assy. (See section 8.12.)
2. Remove the Tape from the Contact metals.
3. Remove the screws (

×

8 ).

4. Remove the Contact metal side (L, R).
5. Remove the screws (

×

6 ).

6. Remove the Contact metal top.
7. Remove the screws (

×

15 ).

8. Remove the Contact metal bottom A.

8.14. Remove the C1-Board

1. Remove the Contact metal bottom A. (See section 8.13.)
2. Disconnect the flexible cables (CB1, CB2, CB3, CB4,

CB5, CB6 and CB7).

3. Disconnect the flexible cables (C10 and C11).
4. Remove the screws (

×

) and remove the C1-Board.

8.15. Remove the C2-Board

1. Remove the Contact metal bottom A. (See section 8.13.)
2. Disconnect the flexible cables (CB8, CB9, CB10, CB11,

CB12, CB13, CB14 and CB15).

3. Disconnect the flexible cables (C20, C21 and C23).
4. Disconnect the connector (C25).
5. Remove the screws (

×

) and remove the C2-Board.

8.16. Remove the K-Board

1. Remove the Contact metal bottom B. (See section 8.11.)
2. Remove the claw (

×

1 ).

3. Disconnect the connector (K1) and Remove the K-Board

from LED Panel.

8.17. Replace the Plasma panel

Caution:

Place the Plasma panel on a flat surface of a table (cov-
ered by a soft cloth) and a cushion.

A new plasma panel itself without Contact metals is fragile. 

To avoid the damage to new plasma panel, carry a new 

plasma panel taking hold of the Contact metals.

1. Place a carton box packed a new plasma panel on the flat

surface of the work bench.

2. Open a box and without taking a new plasma panel.
3. Attach the cabinet assy and each P.C.Board and so on, to

the new plasma panel.

Summary of Contents for TX-PF42S30

Page 1: ... Panasonic Corporation 2011 Unauthorized copying and distribution is a violation of law ORDER NO PCZ1104084CE Plasma Television Model No TX P42S30E TX P42S30J TX PF42S30 GPF14D E Chassis ...

Page 2: ...ssembly Instructions 21 8 1 Remove the Rear cover 21 8 2 Remove the AC inlet 21 8 3 Remove the P Board 21 8 4 Remove the Side terminal cover 21 8 5 Remove the Tuner unit 21 8 6 Remove the A Board 22 8 7 Remove the Speakers 22 8 8 Remove the SN Board 22 8 9 Remove the SS Board 22 8 10 Remove the Stand bracket and the M8 nut inlet metals 23 8 11 Remove the Contact metal bottom B 23 8 12 Remove the P...

Page 3: ... 1 2 Touch Current Check 1 Plug the AC cord directly into the AC outlet Do not use an isolation transformer for this check 2 Connect a measuring network for touch currents between each exposed metallic part on the set and a good earth ground such as a water pipe as shown in Figure 1 3 Use Leakage Current Tester Simpson 228 or equivalent to measure the potential across the measuring network 4 Check...

Page 4: ... of the assembly 3 Use only a grounded tip soldering iron to solder or unsolder ES devices 4 Use only an anti static solder removal device Some solder removal devices not classified as anti static ESD protected can generate electrical charge sufficient to damage ES devices 5 Do not use freon propelled chemicals These can generate electrical charges sufficient to damage ES devices 6 Do not remove a...

Page 5: ...e solder has a higher melting point than standard solder Typically the melting point is 50 70 F 30 40 C higher Please use a high temperature soldering iron and set it to 700 20 F 370 10 C Pb free solder will tend to splash when heated too high about 1100 F or 600 C If you must use Pb solder please completely remove all of the Pb free solder on the pins or solder area before applying Pb sol der If ...

Page 6: ...unction Board Name Function P Power Supply Non serviceable P Board should be exchange for service C1 Data Driver Lower Right C2 Data Driver Lower Left SN Scan Drive A Main AV input processing SS Sustain Drive K Remote receiver Power LED C A T S sensor ...

Page 7: ...bove signals are reformatted for optimal viewing on your display PC signal is magnified or compressed for display so that it may not be possible to show fine detail with sufficient clarity Signal name COMPONENT HDMI 525 480 60i 60p 625 576 50i 50p 750 720 60p 50p 1 125 1 080 60i 50i 1 125 1 080 60p 50p 24p Signal name Horizontal frequency kHz Vertical frequency Hz 640 480 60 Hz 31 47 60 00 750 720...

Page 8: ...on the available services at the following website English only http panasonic jp support global cs tv Aerial input VHF UHF Operating Conditions Temperature 0 C 35 C Humidity 20 80 RH non condensing Connection Terminals AV1 SCART 21 Pin terminal Audio Video in Audio Video out RGB in Q Link AV2 input VIDEO RCA PIN Type 1 1 0 V p p 75 Ω AUDIO L R RCA PIN Type 2 0 5 V rms COMPONENT input Y 1 0 V p p ...

Page 9: ...cement of ICs When Peaks IC IC8000 is replaced EEPROM IC8902 should be also replaced with new one the same time When EEPROM IC8902 is replaced Peaks IC IC8000 is not necessary to be replaced the same time After the replacement of IC SELF CHECK should be done to generate the final KEY data How to SELF CHECK While pressing VOLUME button on the main unit press MENU button on the remote control for mo...

Page 10: ...e Mode 6 1 2 Key command 1 button Main items Selection in forward direction 2 button Main items Selection in reverse direction 3 button Sub items Selection in forward direction 4 button Sub items Selection in reverse direction RED button All Sub items Selection in reverse direction GREEN button All Sub items Selection in forward direction VOL button Value of sub items change in forward direction i...

Page 11: ...GENCY ON Y C Delay OPT 1 00010100 OPT 2 11101110 OPT 3 00000001 OPT 4 00010000 EDID CLK MID MIRROR 00 See Option Mirror AMR SELECT OFF VSUS LOW See Vsus selection AGING ALL WHITE Built in test patterns can be displayed ALL BLUE WITH WHITE OUTSIDE FRAME ALL GREEN ALL RED LOW STEP WHITE LOW STEP BLUE LOW STEP GREEN LOW STEP RED WHITE DIAGONAL STRIPE RED DIAGONAL STRIPE GREEN DIAGONAL STRIPE BLUE DIA...

Page 12: ...History Number of LED blinking indication From left side Last SOS before Last three occurrence before 2nd occurrence after shipment 1st occurrence after shipment This indication will be cleared by Self check indication and forced to factory shipment setting 6 3 3 POWER ON Time On Off Note To display TIME COUNT menu highlight position then press MUTE for 3 sec Time Cumulative power on time indicate...

Page 13: ...lectable Initial POS Select programme number Selection Off 0 to 99 Off give priority to a last memory Initial VOL Level Adjust the volume when each time power is switched on Selection Range Off 0 to 100 Off give priority to a last memory Maximum VOL Level Adjust maximum volume Range 0 to 100 Button Lock Select local key conditions Selection Off SETUP MENU ALL Off altogether valid SETUP only F key ...

Page 14: ...Vs 6 5 2 Preparation Make pwd file as startup file for a or b in a empty SD card 1 Insert a empty SD card to your PC 2 Right click a blank area in a SD card window point to New and then click text document A new file is created by default New Text Document txt 3 Right click the new text document that you just created and select rename and then change the name and extension of the file to the follo...

Page 15: ...llowing password for a or b by using remote control a For Board replacement 2770 b For Hotel 4850 Data will be copied from TV set to SD card It takes around 2 to 6 minutes maximum for copying 4 After the completion of copying to SD card remove SD card from TV set 5 Turn off the TV set Note Following new folder will be created in SD card for data from TV set a For Board replacement user_setup b For...

Page 16: ...nt 2771 b For Hotel 4851 Data will be copied from SD card to TV set 4 After the completion of copying to SD card remove SD card from TV set a For Board replacement Data will be deleted after copying Limited one copy b For Hotel Data will not be deleted and can be used for other TVs 5 Turn off the TV set Note 1 Depending on the failure of boards function of Data copy for board replacement does not ...

Page 17: ...eception screen and while pressing VOLUME button on the main unit press MENU button on the remote con trol for more than 3 seconds 7 1 2 Screen display 7 1 3 Check Point Confirm the following parts if NG was displayed 7 1 4 Exit Disconnect the AC cord from wall outlet or switch off the power with Power button on the main unit DISPLAY Check Ref No Description Check P C B TUN TU4801 TUNER A BOARD ST...

Page 18: ... Green is lit then turns red blinking a few seconds later See 7 2 3 Only red is lit Blinking Times Contents Check point 1 Panel information SOS PD5 Start SOS 3 P 3 3V SOS A Board 4 Power SOS P Board 5 P 5V SOS A Board 6 Driver SOS1 SN Energy recovery circuit A SN FPC DET SN Board A SN FPC 7 Driver SOS2 SN Connector DET SN Scan and Logic IC SN Board 8 Driver SOS3 SS FPC DET SS Energy recovery circu...

Page 19: ...19 7 4 No Picture ...

Page 20: ...20 7 5 Local screen failure Plasma display may have local area failure on the screen Fig 1 is the possible defect P C B for each local area Fig 1 ...

Page 21: ...e P C B wait 1 minute after power was off for dis charge from electrolysis capacitors 1 Disconnect the connectors P2 P6 P9 P11 P34 and P35 2 Remove the screws 5 and remove the P Board 8 4 Remove the Side terminal cover 1 Remove the screws 2 2 Remove the Side terminal cover 8 5 Remove the Tuner unit 1 Remove the Side terminal cover See section 8 4 2 Unlock the cable clampers to free the cable 3 Dis...

Page 22: ... R 8 8 Remove the SN Board 1 Disconnect the flexible cables SN21 SN22 SN23 SN24 SN25 SN26 SN27 and SN28 connected to the SN Board 2 Disconnect the connector SN2 3 Disconnect the flexible cable SN20 4 Remove the screws 8 and remove the SN Board 8 9 Remove the SS Board 1 Remove the Tuner unit See section 8 5 2 Disconnect the connector SS11 3 Disconnect the flexible cable SS33 4 Disconnect the flexib...

Page 23: ...s 9 and remove the Stand bracket 5 Remove the M8 nut inlet metals L R fastening screws 2 each and remove the M8 nut inlet metals L R 8 11 Remove the Contact metal bot tom B 1 Remove the Stand bracket See section 8 10 2 Remove the screws 6 6 3 Remove the Contact metal bottom B 8 12 Remove the Plasma panel sec tion from the Cabinet assy 1 Place the Cabinet assy on a flat surface of a table cov ered ...

Page 24: ...CB8 CB9 CB10 CB11 CB12 CB13 CB14 and CB15 3 Disconnect the flexible cables C20 C21 and C23 4 Disconnect the connector C25 5 Remove the screws 4 and remove the C2 Board 8 16 Remove the K Board 1 Remove the Contact metal bottom B See section 8 11 2 Remove the claw 1 3 Disconnect the connector K1 and Remove the K Board from LED Panel 8 17 Replace the Plasma panel Caution Place the Plasma panel on a f...

Page 25: ...play will be displayed during TEST and CONF stage Press 5 button to display the On Screen Display 3 Press VOL button to set to LOW 4 In LOW setting a If no several dead pixel is visible remarkably in white pattern press 3 button to go to CONF stage b If the several dead pixels are visible remarkably in white pattern Set to HIGH by press VOL button Press 3 button to go to CONF stage if the symptom ...

Page 26: ...er automatic adjustment 3 The OSD character of sub contrast returns to black When NG is displayed adjustment failure 4 End Note Sub contrast adjustment is unadjusted for AV HD input But when needing the adjustment cho sen manually please refer to alterna tive method Steps Remarks Another procedure Connect IIC cable bus controller cable after banner OSD appear And after SRQ L begin an adjustment 2 ...

Page 27: ...te or Split colour bar receive component signal as shown below 2 Goes into service mode 3 Push 1 or 2 key and goes into adjustment mode for CONTRAST Adjustment 1 The colour key yellow button of remote control is pushed 2 The OSD character of sub contrast becomes red Inside under automatic adjustment 3 The OSD character of sub contrast returns to black When NG is displayed adjustment failure 4 End ...

Page 28: ...select METHOD 01 4 A number key 5 is operated and INNER PATTERN is displayed 5 Select G CUTOFF item using the number key 3 or 4 and set to 80 using the volume key or Also B CUTOFF and R CUTOFF set to 80 6 Set G DRIVE at D0 7 Touch the signal receiver of color analyzer to the INNER PATTERN center and adjust B drive and R drive so x y become the COLOR TEMP COOL in the below table1 8 All RGB drive in...

Page 29: ...select CVBS YUV HDMI No inputting is possible Forbid Analog RF with no signal 2 A number key 1 and 2 are operated and WB ADJ is displayed Check that the color temp is NORMAL 3 A number key 0 is operated and select METHOD 03 4 A number key 5 is operated and INNER PATTERN is displayed 5 Select G CUTOFF item using the number key 3 or 4 and set to 80 using the volume key or Also B CUTOFF and R CUTOFF ...

Page 30: ...30 ...

Page 31: ...31 ...

Page 32: ...32 ...

Page 33: ... GEN DATA DRIVER POWER MICOM SUSTAIN CONTROL SUB1 8V LAN CON I F DCDCIN SPEAKER L SIF_OUT PWM SUB3 3V F15V F15V HP_L R Parallel_ TS CI ANALOG ASIC DVB_CVBS SUB9V PEAKS LDA3 DCDC ARC HDMI2 DCDC P 5V SUB1 5V CPU BUS SPI FLASH OUT LO1_L R STM REMOTE_IN STB3 3V LO2_L R SUB1 2V K SUB5V SOS4_PS LP1 SOS7_SC2 LO1_L R P 3 3V TUNER USB I F ARC HDMI2 C A T S_SENSOR REMOTE_RECEIVER K1 CI BUFFER SUB5V SOS8_SS ...

Page 34: ...KS LDA3 P 15V 5V IF_AGC IC2001 SUB1 8V PEAKS EEPROM RF 5V IC3001 DMD_ IIC0 SD CARD 15 1 8V IC8601 RIN AUDIO AMP IC8604 AV1 AV1 SD3 3V IIC1 PWM RF_CVBS SPEAKER USB SW G_LED_ON 5 9 V USB SW TUNER PANEL_MAIN_ON 15V SW_OFF_DET IFD2 P 5V_DET 3 3V 3 2 SUB5V SOS4_PS DVB_CVBS Parallel_TS CI_OUT TUNER_SUB_ON DCDCEN2 3 DRVRST IFD_OUT1 IIC1 VIDEO F15V SDVOLC C A T S AV1_VIN STB5V_SW_ON STB1 2V CI BUFFER IC49...

Page 35: ... D_UHZ 55 P 3 3V DTV_RST 8 2 DCDCEN0 2 5V LP1_XRSTSYS DCDCEN 12 P 5V SOS8_SS C A T S IC9400 01 02 VIDEO DATA SOS8_SS DCDCEN 14 SUSTAIN CONTROL SCAN CONTROL XRSTSYS 11 G_LED_ON IIC0 2 SPI FLASH STB5V_SW_ON SOS7_SC2 SOS6_SC1 X0 CN0100 A32 LP1 16 REMOTE RECEIVER 2 5V 8 IIC0 IIC1 STM_IIC SBO0 SBI0 5 P_S0 DRVRST STBRST PDP_DRVRST PANEL_SOS 30 P 3 3V SOS_DCC UHZ 1 2 SW_OFF_DET LVDS DATA 7 REMOTE_IN SDVO...

Page 36: ...PANEL_MAIN_ON P_S0 SN2 UVP 1 P6 SOUND15V 3 Relay for prevention of inrush current P11 P34 FET SW AC Vin Detection 1 P35 3 FEED BACK Fuse Live Neutral P Relay for AC input cutting 1 TUNER_SUB_ON 15 Vsus 2 OCP OVP P 15V AC CORD FILTER PHOTO COUPLER SOS4_PS PHOTO COUPLER 6 POWER SUPPLY 11 3 PHOTO COUPLER T501 OCP ERROR DET STANDBY VOLTAGE CONVERTER MAIN CONVERTER POWER FACTOR CONTROL POWER MICOM LATC...

Page 37: ...SL IC16786 87 FPC PROTECTOR BUFFER CMH USL PDP SCAN BUFFER LED G INVERTER IC14804 06 IC16152 Q16422 SN2 IC16501 Q16041 USH BUFFER IC16784 85 CERS CML 18 IC16151 IC16502 IC16243 IC14604 06 P 15V CRC2 BUFFER Q16607 IC16691 IC16131 INV AND SHUNT REG CSH IPD CIRCUIT Q16001 Q16002 VSCN F VSCN GEN UEH Q16021 Q16022 IC16724 D16714 OC2 PC16897 2 IC16132 SIU 5V NAND UEH USL SHUNT REG IC16191 IC16792 93 13 ...

Page 38: ...38 ...

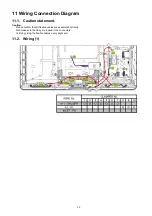
Page 39: ...Diagram 11 1 Caution statement Caution Please confirm that all flexible cables are assembled correctly Also make sure that they are locked in the connectors Verify by giving the flexible cables a very slight pull 11 2 Wiring 1 ...

Page 40: ...40 11 3 Wiring 2 ...

Page 41: ...Model No TX P42S30E J PF42S30 Schematic Diagram Note S 1 ...

Page 42: ...Model No TX P42S30E J PF42S30 Replacement Parts List Note S 2 ...

Page 43: ...Model No TX P42S30E J PF42S30 A Board 1 16 S 3 ...

Page 44: ...Model No TX P42S30E J PF42S30 A Board 2 16 S 4 ...

Page 45: ...Model No TX P42S30E J PF42S30 A Board 3 16 S 5 ...

Page 46: ...Model No TX P42S30E J PF42S30 A Board 4 16 S 6 ...

Page 47: ...Model No TX P42S30E J PF42S30 A Board 5 16 S 7 ...

Page 48: ...Model No TX P42S30E J PF42S30 A Board 6 16 S 8 ...

Page 49: ...Model No TX P42S30E J PF42S30 A Board 7 16 S 9 ...

Page 50: ...Model No TX P42S30E J PF42S30 A Board 8 16 S 10 ...

Page 51: ...Model No TX P42S30E J PF42S30 A Board 9 16 S 11 ...

Page 52: ...Model No TX P42S30E J PF42S30 A Board 10 16 S 12 ...

Page 53: ...Model No TX P42S30E J PF42S30 A Board 11 16 S 13 ...

Page 54: ...Model No TX P42S30E J PF42S30 A Board 12 16 and K Board S 14 ...

Page 55: ...Model No TX P42S30E J PF42S30 A Board 13 16 S 15 ...

Page 56: ...Model No TX P42S30E J PF42S30 A Board 14 16 S 16 ...

Page 57: ...Model No TX P42S30E J PF42S30 A Board 15 16 S 17 ...

Page 58: ...Model No TX P42S30E J PF42S30 A Board 16 16 S 18 ...

Page 59: ...Model No TX P42S30E J PF42S30 C1 Board 1 2 S 19 ...

Page 60: ...Model No TX P42S30E J PF42S30 C1 Board 2 2 S 20 ...

Page 61: ...Model No TX P42S30E J PF42S30 C2 Board 1 2 S 21 ...

Page 62: ...Model No TX P42S30E J PF42S30 C2 Board 2 2 S 22 ...

Page 63: ...Model No TX P42S30E J PF42S30 SN Board 1 6 S 23 ...

Page 64: ...Model No TX P42S30E J PF42S30 SN Board 2 6 S 24 ...

Page 65: ...Model No TX P42S30E J PF42S30 SN Board 3 6 S 25 ...

Page 66: ...Model No TX P42S30E J PF42S30 SN Board 4 6 S 26 ...

Page 67: ...Model No TX P42S30E J PF42S30 SN Board 5 6 S 27 ...

Page 68: ...Model No TX P42S30E J PF42S30 SN Board 6 6 S 28 ...

Page 69: ...Model No TX P42S30E J PF42S30 SS Board 1 2 S 29 ...

Page 70: ...Model No TX P42S30E J PF42S30 SS Board 2 2 S 30 ...

Page 71: ...Model No TX P42S30E J PF42S30 A Board Foil side S 31 ...

Page 72: ...Model No TX P42S30E J PF42S30 A Board Component side S 32 ...

Page 73: ...Model No TX P42S30E J PF42S30 K Board S 33 ...

Page 74: ...Model No TX P42S30E J PF42S30 C1 Board S 34 ...

Page 75: ...Model No TX P42S30E J PF42S30 C2 Board S 35 ...

Page 76: ...Model No TX P42S30E J PF42S30 SN Board Foil side S 36 ...

Page 77: ...Model No TX P42S30E J PF42S30 SN Board Component side S 37 ...

Page 78: ...Model No TX P42S30E J PF42S30 SS Board S 38 ...

Page 79: ...14 F1G1C104A077 C 0 1UF 16V 1 C2017 F1G1C104A077 C 0 1UF 16V 1 C2026 F1G1H1020008 C 1000PF 50V 1 C2752 F1G1E1030005 C 0 01UF 25V 1 C2810 ECJ1VB1H103K C 0 01UF 50V 1 C2811 F1J1A106A087 C 10UF 10V 1 C2815 ECJ1VB1H103K C 0 01UF 50V 1 C2821 ECJ1XB1C104K C 0 1UF Z 16V 1 C3001 F1G1A105A047 C 1UF 10V 1 C3002 F1G1A105A047 C 1UF 10V 1 C3003 F1G1C104A077 C 0 1UF 16V 1 C3004 F1G1C104A077 C 0 1UF 16V 1 C3005 ...

Page 80: ... 10V 1 C4546 F1G1A105A047 C 1UF 10V 1 C4548 F1G1A105A047 C 1UF 10V 1 C4800 F1G1A105A047 C 1UF 10V 1 C4801 F1G1A105A047 C 1UF 10V 1 C4802 F1G1H220A565 C 22PF 50V 1 C4803 F1G1C104A077 C 0 1UF 16V 1 C4804 F1G1C104A077 C 0 1UF 16V 1 C4805 F1G1C104A077 C 0 1UF 16V 1 C4807 F1J1A106A043 C 10UF 10V 1 C4808 F1G1C104A077 C 0 1UF 16V 1 C4811 F1J1A106A043 C 10UF 10V 1 C4812 F1G1H1020008 C 1000PF 50V 1 C4816 F...

Page 81: ...32 ECJ1VB1A105K C 1UF 10V 1 C5440 F1K1E106A136 C 10UF 25V 1 C5442 F1G1C223A081 C 0 022UF 16V 1 C5443 F1J1A106A043 C 10UF 10V 1 C5444 F1J1A106A043 C 10UF 10V 1 C5447 F1G1A333A032 C0 033UF 10V 1 C5448 F1G1H5610004 C 560 pF 50 V 1 PAVCCZ C6750 F1J1A475A087 C 4 7UF 10V 1 C6751 F1J1A106A087 C 10UF 10V 1 C6787 F1J1A106A087 C 10UF 10V 1 C6788 F1J1A106A087 C 10UF 10V 1 C8001 F1G1C104A077 C 0 1UF 16V 1 C80...

Page 82: ...1E106A136 C 10UF 25V 1 C8114 F1K1E106A136 C 10UF 25V 1 C8116 F1K1E106A136 C 10UF 25V 1 C8118 F1K1E106A136 C 10UF 25V 1 C8120 F1J0G2260001 C 22 UF 4 V 1 C8122 F1J0G2260001 C 22 UF 4 V 1 C8124 F1J0G2260001 C 22 UF 4 V 1 C8126 F1J0G2260001 C 22 UF 4 V 1 C8128 F1J0G2260001 C 22 UF 4 V 1 C8200 F1G1C104A077 C 0 1UF 16V 1 C8201 F1G1C104A077 C 0 1UF 16V 1 C8202 F1G1C104A077 C 0 1UF 16V 1 C8203 F1G1C104A07...

Page 83: ...220UF 6 3V 1 C8631 F2H0J2210005 C 220UF 6 3V 1 C8632 F1J1A106A087 C 10UF 10V 1 C8633 F1G1C104A077 C 0 1UF 16V 1 C8636 F1J1A106A043 C 10UF 10V 1 C8637 F1J1A106A087 C 10UF 10V 1 C8638 F1G1C104A077 C 0 1UF 16V 1 C8639 F1J1A106A087 C 10UF 10V 1 C8640 F1G1C104A077 C 0 1UF 16V 1 C8641 F1J1A106A043 C 10UF 10V 1 C8642 F1J1A106A087 C 10UF 10V 1 C8643 F1G1C104A077 C 0 1UF 16V 1 C8644 F1G1C104A077 C 0 1UF 16...

Page 84: ...G1C104A077 C 0 1UF 16V 1 C9105 F1G1C104A077 C 0 1UF 16V 1 C9106 F1G1H5610004 C 560 pF 50 V 1 PAVCCZ C9108 F1G1C104A077 C 0 1UF 16V 1 C9300 F1G1C104A077 C 0 1UF 16V 1 C9301 F1G1H150A565 C 15PF 50V 1 C9302 F1G1H180A565 C 18PF 50V 1 C9308 F1G1C104A077 C 0 1UF 16V 1 C9311 F1G1C104A077 C 0 1UF 16V 1 C9312 F1J1A106A087 C 10UF 10V 1 C9313 F1G1C104A077 C 0 1UF 16V 1 C9328 F1G1C104A077 C 0 1UF 16V 1 C9330 ...

Page 85: ... C1AB00003457 IC 1 PAVCCZ IC5000 AN34044A VF IC 1 PAVCCZ IC5002 C0DBGHC00003 IC 1 IC5440 C0DBAYY00931 IC 1 PAVCCZ IC6750 C0CBCAG00031 IC 1 IC6776 C0DBAGF00030 IC 1 IC8000 MN2WS0200LE IC 1 PAVCCZ IC8100 C0DBAYY00715 IC 1 IC8200 C3ABUY000009 IC 1 PAVCCZ IC8201 C3ABTY000025 IC 1 IC8403 C0JBAZ003032 IC 1 PAVCCZ IC8404 C0DBZYY00382 IC 1 PAVCCZ IC8601 C1CB00003491 IC 1 IC8602 C0DBZYY00450 IC 1 PAVCCZ IC...

Page 86: ...00020 CHIP INDUCTOR 1 L4803 J0JGC0000020 CHIP INDUCTOR 1 L4805 J0JGC0000020 CHIP INDUCTOR 1 L4807 J0JCC0000278 CHIP INDUCTOR 1 L4900 G1C150MA0426 INDUCTION COIL 1 PAVCCZ L4901 G1C150MA0426 INDUCTION COIL 1 PAVCCZ L4902 G1C150MA0426 INDUCTION COIL 1 PAVCCZ L4903 G1C150MA0426 INDUCTION COIL 1 PAVCCZ L5440 G1C6R8MA0445 INDUCTION COIL 1 PAVCCZ L8001 J0JCC0000287 CHIP INDUCTOR 1 L8002 J0JHC0000045 CHIP...

Page 87: ...J 1 16W 1 R0908 D0GA272JA023 M 2 7KOHM J 1 16W 1 R0909 D0GA272JA023 M 2 7KOHM J 1 16W 1 R0910 D0GA272JA023 M 2 7KOHM J 1 16W 1 R0911 EXB28V332J M 3 3 KOHM 1 32 W 1 R0912 D0GA101JA015 M 100 OHM J 1 16W 1 R0913 D0GA101JA015 M 100 OHM J 1 16W 1 R0951 D0GA473JA015 M 47KOHM J 1 16W 1 R0952 D0GA102JA023 M1KOHM J 1 16 W 1 R1201 D0GA103JA015 M 10KOHM J 1 16W 1 R1202 D0GA103JA015 M 10KOHM J 1 16W 1 R1305 D...

Page 88: ...3179 D0GA331JA023 M 330 OHM J 1 16W 1 R3180 D0GA331JA023 M 330 OHM J 1 16W 1 R3181 D1BD75R0A066 M 75 0 OHM J 1 8 W 1 R3182 D1BD75R0A066 M 75 0 OHM J 1 8 W 1 R3183 D1BD75R0A066 M 75 0 OHM J 1 8 W 1 R3184 D0GA104JA023 M100KOHM J 1 16 W 1 R3185 D0GA104JA023 M100KOHM J 1 16 W 1 R3186 D0GA333JA023 M 33KOHM J 1 16W 1 R3187 D0GA333JA023 M 33KOHM J 1 16W 1 R3190 D0GA222JA023 M 2 2KOHM J 1 16W 1 R3191 D0GA...

Page 89: ...KOHM J 1 10W 1 R4971 D1BB1403A055 M 140KOHM J 1 10W 1 R4972 D0GA103JA015 M 10KOHM J 1 16W 1 R4973 D0GA103JA015 M 10KOHM J 1 16W 1 R4974 D0GA101JA015 M 100 OHM J 1 16W 1 R4975 D0GA473JA015 M 47KOHM J 1 16W 1 R4976 D0GA103JA015 M 10KOHM J 1 16W 1 R4978 D0GA101JA015 M 100 OHM J 1 16W 1 R4979 D0GA101JA015 M 100 OHM J 1 16W 1 R4984 D0GA473JA015 M 47KOHM J 1 16W 1 R4985 D0GA103JA015 M 10KOHM J 1 16W 1 R...

Page 90: ...28V220J M 22 OHM 1 32 W 1 R8228 EXB28V220J M 22 OHM 1 32 W 1 R8229 EXB28V220J M 22 OHM 1 32 W 1 R8230 D0GA220JA023 M22 OHM J 1 16 W 1 R8231 D0GA220JA023 M22 OHM J 1 16 W 1 R8232 D0GA220JA023 M22 OHM J 1 16 W 1 R8301 D0GA471JA023 M 470OHM J 1 16W 1 R8302 D0GA360JA023 M 36 OHM J 1 16W 1 PAVCCZ R8303 D0GA360JA023 M 36 OHM J 1 16W 1 PAVCCZ R8304 D1BA6201A014 M 6 2KOHM J 1 16 W 1 R8305 D1BA6201A014 M 6...

Page 91: ... M 56 OHM 1 32 W 1 R8635 EXB28V101JX M 100 OHM 1 32 W 1 R8636 D0GA220JA023 M22 OHM J 1 16 W 1 R8637 D0GA272JA023 M 2 7KOHM J 1 16W 1 R8638 D0GA272JA023 M 2 7KOHM J 1 16W 1 R8639 D0GA103JA015 M 10KOHM J 1 16W 1 R8640 D0GA103JA015 M 10KOHM J 1 16W 1 R8648 D0GA273JA023 M 27K OHM J 1 16W 1 R8656 D0GA103JA015 M 10KOHM J 1 16W 1 R8661 D0GA103JA015 M 10KOHM J 1 16W 1 R8681 D1BA75R0A014 M 75 OHM J 1 16 W ...

Page 92: ...10 D0GA103JA015 M 10KOHM J 1 16W 1 R8914 D0GA472JA023 M 4 7KOHM J 1 16W 1 R8921 D0GA223JA023 M 22K OHM J 1 16W 1 R8964 D0GA472JA023 M 4 7KOHM J 1 16W 1 R8972 EXB2HV680J M 68 OHM 1 16 W 1 R9035 D0GA103JA015 M 10KOHM J 1 16W 1 R9103 D0GA101JA015 M 100 OHM J 1 16W 1 R9104 D0GA101JA015 M 100 OHM J 1 16W 1 R9105 D0GA473JA015 M 47KOHM J 1 16W 1 R9198 EXB28V101JX M 100 OHM 1 32 W 1 R9203 D0GA272JA023 M 2...

Page 93: ... 1 C14606 F1G1H391A731 C 390PF 50V 1 C14607 F1G1H1020008 C 1000PF 50V 1 C14608 F1G1H391A731 C 390PF 50V 1 C14609 F1G1H391A731 C 390PF 50V 1 C14612 F1H1C105A145 C 1 uF 16 V 1 C14616 F1H1C105A145 C 1 uF 16 V 1 C14620 F1H1C105A145 C 1 uF 16 V 1 C14629 F1H1C105A145 C 1 uF 16 V 1 C14633 F1H1C105A145 C 1 uF 16 V 1 C14651 F1L2E104A028 C 0 10UF 250V 1 C14652 F1L2E104A028 C 0 10UF 250V 1 C14803 F1H1C105A14...

Page 94: ...F 16 V 1 C16243 ECJ1VB1H103K C 0 01UF 50V 1 C16244 F1J1A106A087 C 10UF 10V 1 C16271 F2A1E221B726 E 220UF 25V 1 PAVCCZ C16280 F1K1E105A029 C 1UF 25V 1 C16286 F1H1H104A970 C 0 1UF 50V 1 C16287 F1H1H104A970 C 0 1UF 50V 1 C16314 F2A2E141A217 E 140UF 250V 1 C16315 ECJ1VB1A105K C 1UF 10V 1 C16316 ECJ1XB1C104K C 0 1UF Z 16V 1 C16317 ECJ1VB1A105K C 1UF 10V 1 C16318 F1J1H104A717 C 0 1UF 50V 1 C16319 F1J1H1...

Page 95: ...1 PAVCCZ C16794 F1J1A106A087 C 10UF 10V 1 C16795 F2A1E221B726 E 220UF 25V 1 PAVCCZ C16796 F1K1E475A134 C 4 7UF 25V 1 C16797 F1H1H104A970 C 0 1UF 50V 1 C16813 F2A2T1210001 E 120UF 220V 1 PAVCCZ C16833 F1K2J222A014 C 2200PF 630V 1 C16834 F1K2J222A014 C 2200PF 630V 1 C16842 F2A2C1010028 E 100UF 160V 1 PAVCCZ C16843 ECJ1VB1A105K C 1UF 10V 1 C16844 F1J1H104A717 C 0 1UF 50V 1 C16854 F1J1H104A717 C 0 1UF...

Page 96: ...229 F1K2A224A033 C 0 22UF 100V 1 PAVCCZ C17230 F1K2A224A033 C 0 22UF 100V 1 PAVCCZ C17233 F1K2A224A033 C 0 22UF 100V 1 PAVCCZ C17235 F1K2A224A033 C 0 22UF 100V 1 PAVCCZ C17236 F1K2A224A033 C 0 22UF 100V 1 PAVCCZ C17239 ECJ1XC1H102J C 1000PF J 50V 1 C17240 ECJ1XC1H102J C 1000PF J 50V 1 C17241 ECJ1XC1H102J C 1000PF J 50V 1 C17242 ECJ1XC1H102J C 1000PF J 50V 1 C17243 ECJ1XC1H102J C 1000PF J 50V 1 C17...

Page 97: ...P000055 DIODE 1 D16317 B0ECKP000055 DIODE 1 D16401 B0FCCN000003 DIODE 1 D16407 B0JCME000093 DIODE 1 D16411 B0ADCJ000100 DIODE 1 D16413 B0ACCJ000048 DIODE 1 D16421 B0FCBN000001 DIODE 1 PAVCCZ D16432 B0ECKP000055 DIODE 1 D16433 B0ECKP000055 DIODE 1 D16461 B0FCCN000003 DIODE 1 D16473 B0ACCJ000048 DIODE 1 D16474 B0ACCJ000048 DIODE 1 D16481 B0FCCN000003 DIODE 1 D16491 B0ACCJ000048 DIODE 1 D16492 DZ2J04...

Page 98: ...48 DIODE 1 D17102 B0ACCJ000048 DIODE 1 D17103 B0JCCD000020 DIODE 1 PAVCCZ D17201 B0ACCJ000048 DIODE 1 D17202 B0ACCJ000048 DIODE 1 D17203 B0JCCD000020 DIODE 1 PAVCCZ IC14601 AN16520A VT IC 1 PAVCCZ IC14602 AN16520A VT IC 1 PAVCCZ IC14603 AN16520A VT IC 1 PAVCCZ IC14604 AN16520A VT IC 1 PAVCCZ IC14605 AN16520A VT IC 1 PAVCCZ IC14606 AN16520A VT IC 1 PAVCCZ IC14801 AN16520A VT IC 1 PAVCCZ IC14802 AN1...

Page 99: ...1 PC16131 B3PBE0000058 IC 1 PAVCCZ PC16191 B3PBE0000060 IC 1 PAVCCZ PC16251 B3PBA0000580 IC 1 PAVCCZ PC16301 B3PBA0000580 IC 1 PAVCCZ PC16461 B3PBE0000058 IC 1 PAVCCZ PC16462 B3PBE0000060 IC 1 PAVCCZ PC16480 B3PBA0000580 IC 1 PAVCCZ PC16581 B3PBA0000580 IC 1 PAVCCZ PC16603 B3PBA0000580 IC 1 PAVCCZ PC16685 B3PBA0000496 IC 1 PC16723 B3PBA0000580 IC 1 PAVCCZ PC16896 B3PBA0000580 IC 1 PAVCCZ PC16897 B...

Page 100: ...0007 TRANSISTOR 1 Q17201 B1ABCN000007 TRANSISTOR 1 R14604 D0GD220JA052 M 22 OHM J 1 4W 1 PAVCCZ R14605 D0GB103JA065 M 10K OHM J 1 10W 1 R14901 D0GD331JA052 M 330 OHM J 1 4W 1 PAVCCZ R14902 D0GD331JA052 M 330 OHM J 1 4W 1 PAVCCZ R14904 D0GD3R3JA052 M 3 3 OHM J 1 4W 1 PAVCCZ R14907 D0GD331JA052 M 330 OHM J 1 4W 1 PAVCCZ R14908 D0GD331JA052 M 330 OHM J 1 4W 1 PAVCCZ R14911 D0GD181JA052 M 180 OHM J 1 ...

Page 101: ...GF102JA048 M 1 0 KOHM J 1 3W 1 PAVCCZ R16197 D0GB220JA065 M 22 OHM J 1 10W 1 PAVCCZ R16230 D0GD470JA052 M 47 OHM J 1 8W 1 PAVCCZ R16231 D0GB472JA065 M 4 7KOHM J 1 10W 1 R16241 EXB38V470J M 47 OHM 1 16 W 1 R16242 EXB38V472JV M 4 7 kOHM 1 16 W 1 R16243 D0GB103JA065 M 10K OHM J 1 10W 1 R16244 D0GB273JA065 M 27K OHM J 1 10W 1 PAVCCZ R16245 D0GB472JA065 M 4 7KOHM J 1 10W 1 R16246 D0GD222JA052 M 2 2KOHM...

Page 102: ...0GF102JA048 M 1 0 KOHM J 1 3W 1 PAVCCZ R16506 D0GD100JA059 M 10 OHM J 1 4W 1 R16507 D0GB220JA065 M 22 OHM J 1 10W 1 PAVCCZ R16508 D0GB220JA065 M 22 OHM J 1 10W 1 PAVCCZ R16512 D0GB473JA065 M 47KOHM J 1 10W 1 PAVCCZ R16515 D0D52R2KA005 M 2 2 OHM J 5W 1 PAVCCZ R16517 D0GB473JA065 M 47KOHM J 1 10W 1 PAVCCZ R16522 D0GB101JA065 M 100 OHM J 1 10W 1 R16525 D0GB4R7JA065 M 4 7 OHM J 1 10W 1 PAVCCZ R16526 D...

Page 103: ...0GD222JA052 M 2 2KOHM J 1 8W 1 PAVCCZ R16654 D0GD470JA052 M 47 OHM J 1 8W 1 PAVCCZ R16658 D1BD6491A077 M6 49KOHM D 1 10W 1 PAVCCZ R16661 D0GD100JA059 M 10 OHM J 1 4W 1 R16662 D1BB1002A087 M 10KOHM J 1 10W 1 R16663 D1BD9091A077 M 9 09KOHM D 1 10W 1 PAVCCZ R16664 D0GF102JA047 M 1 0 KOHM J 1 3W 1 R16665 D0GD222JA052 M 2 2KOHM J 1 8W 1 PAVCCZ R16666 D1BB1003A087 M100KOHM D 1 10W 1 PAVCCZ R16668 D0GF10...

Page 104: ... R16919 D1BB1582A055 M15 8KOHM 1 10W 1 PAVCCZ R16920 D0GB101JA065 M 100 OHM J 1 10W 1 R16921 D1BB2152A055 M 21 5KOHM 1 10W 1 PAVCCZ R16922 D1BB9531A055 M9 53KOHM J 1 10W 1 R16923 D1BB5111A055 M5 11KOHM J 1 10W 1 R16924 D1BB1152A055 M 11 5KOHM 1 10W 1 PAVCCZ R16931 D1BF2R70A021 M 2 7 OHM 1 4W 1 R16932 D0GD223JA052 M 22KOHM J 1 4W 1 PAVCCZ R16937 D0GB184JA065 M 180KOHM J 1 10W 1 PAVCCZ R16939 D0GD10...

Page 105: ...R17203 D0GB101JA065 M 100 OHM J 1 10W 1 R17204 D0GB101JA065 M 100 OHM J 1 10W 1 R17205 D0GZ1R0JA020 M 1 OHM J 1 2W 1 R17207 D0GZ1R0JA020 M 1 OHM J 1 2W 1 R17209 D1BB49R90002 M 49 OHM J 1 10W 1 R17210 D1BB49R90002 M 49 OHM J 1 10W 1 R17211 D1BB49R90002 M 49 OHM J 1 10W 1 R17212 D1BB49R90002 M 49 OHM J 1 10W 1 R17213 D0GB101JA065 M 100 OHM J 1 10W 1 R17214 D0GB101JA065 M 100 OHM J 1 10W 1 R17215 D0G...

Page 106: ...TOR 1 SN24 K1MND6BA0264 6P CONNECTOR 1 SN25 K1MND6BA0264 6P CONNECTOR 1 SN26 K1MND6BA0264 6P CONNECTOR 1 SN27 K1MND6BA0264 6P CONNECTOR 1 SN28 K1MND6BA0264 6P CONNECTOR 1 SS11 K1KY03B00006 3P CONNECTOR 1 SS33 K1MY20BA0345 20P CONNECTOR 1 SS61 K1MN13B00091 13P CONNECTOR 1 SS66 K1MN13B00091 13P CONNECTOR 1 T16471 G4DYA0000253 SWITCHING TRANS 1 PAVCCZ T16472 G4DYA0000252 SWITCHING TRANS 1 PAVCCZ ZA16...

Page 107: ...Model No TX P42S30E J PF42S30 Exploded View 1 S 67 ...

Page 108: ...Model No TX P42S30E J PF42S30 Exploded View 2 S 68 ...

Page 109: ...Model No TX P42S30E J PF42S30 Packing 1 S 69 ...

Page 110: ...Model No TX P42S30E J PF42S30 Packing 2 S 70 ...

Page 111: ...PG0E4050 PAPER CAP 0 25 PAVCCZ 32 TQB0E2143A INSTRUCTION BOOK GERMAN 1 PAVCCZ P42S30E 32 TQB0E2143B INSTRUCTION BOOK DUTCH 1 PAVCCZ P42S30E 32 TQB0E2143C INSTRUCTION BOOK ITALIAN 1 PAVCCZ P42S30E 32 TQB0E2143D INSTRUCTION BOOK FRENCH 1 PAVCCZ P42S30E 32 TQB0E2143E INSTRUCTION BOOK SPANISH 1 PAVCCZ P42S30E 32 TQB0E2143F INSTRUCTION BOOK SWEDISH 1 PAVCCZ P42S30E 32 TQB0E2143G INSTRUCTION BOOK NORWEG...

Page 112: ...E0986 REAR COVER 1 PAVCCZ P42S30E 51 TTU0E0988 REAR COVER 1 PAVCCZ PF42S30 51 TTU0E0990 REAR COVER 1 PAVCCZ P42S30J 52 TUX0EA024 M8 NUT INLET METAL 2 PAVCCZ 53 TXFEA01RLUE SPEAKER L R ASSY 2 PAVCCZ 54 TXFKP01REUE SIDE TERMINAL COVER ASSY 1 PAVCCZ 55 TXFKY01REUE CABINET ASSY 1 PAVCCZ TXJA11REUE SPEAKER LEAD A11 SPL SPR 1 PAVCCZ XSB3 6FJ SCREW HDMI SIDE 1 1 XTB4 12GFJ SCREW CAB CONTACT 12 12 XTB4 12...

Reviews: