background image

39

Smart Card

<Only for the model with Smart Card slot>

You need software to use a Smart Card.
You can insert the following cards.

z

PC Card Type 

I

 (3.3 mm) or 

II

 (5.0 mm) to the PC Card slot (A)

z

Smart Card to the Smart Card slot (B)

CAUTION

z

Do not:
• Hit, bend, or drop the card.
• Touch the contact part with fingers or metal object.
• Place the card in very hot location for a long time.
• Remove the card immediately after inserting it.

„

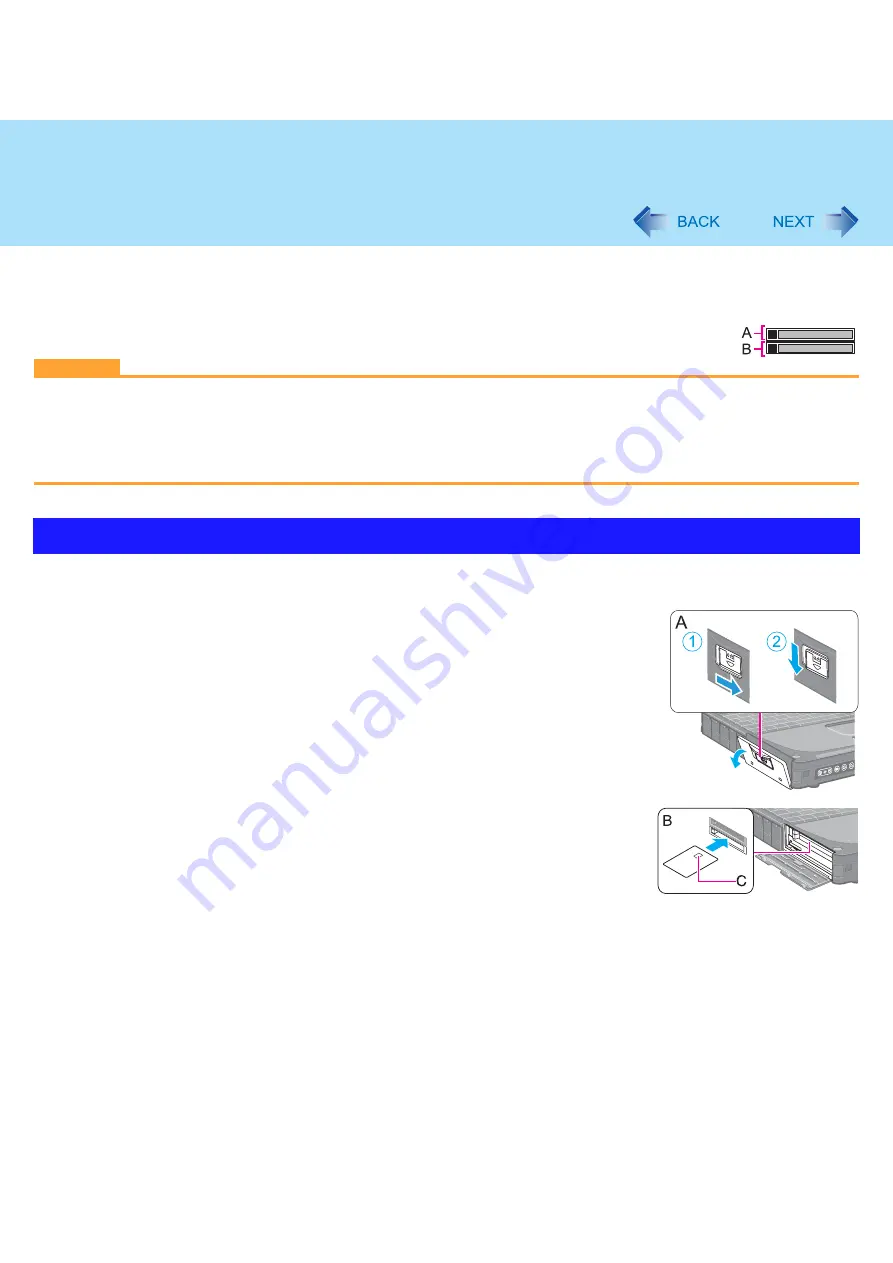
To insert the card

1

Open the cover.

A

Slide the latch (A) to the right to unlock the cover.

B

Slide the latch (A) down, and open the cover.

2

Inset the Smart Card to the lower slot (B) with the contact part 
(C) in front.

z

Insert the card until it securely fits into the slot.

Inserting/Removing the Smart Card

Summary of Contents for Toughbook CF-19KHRAG2M

Page 1: ...1 Reference Manual Personal Computer Model No CF 19 Series We recommend that this Reference Manual be printed...

Page 2: ...detected right click on the notification area and click Connect to a network and then click in the Connect to a network screen z Sound e g MP3 WMA and video e g MPG WMV recorded in PC Cards and SD Me...

Page 3: ...ogging on to Windows It may not appear in some application conditions Key Function Pop up icon Fn F1 Fn F2 LCD brightness Fn F1 down Fn F2 up Fn F3 Display switching page 46 When an external display i...

Page 4: ...n F5 down Fn F6 up NOTE z When fine tuning the sound volume press and hold Fn and press F5 or F6 intermittently Fn F7 Activate sleep page 17 Fn F9 Remaining battery level page 26 Fn F10 Activate hiber...

Page 5: ...key combination A Press Fn once Locked B Press another key Lock released z When using successive Fn key combinations A Press Fn twice Locked B Press another key Fn key remains locked until you press F...

Page 6: ...p or the Windows logon screen or the Wel come screen is displayed Button Function LCD Brightness down up Input Panel Tablet PC Input Panel on off z This button does not work on the Welcome screen Ente...

Page 7: ...an change the functions of the Input Panel Enter Rotation buttons 1 Open the setting screen Click Start Control Panel Hardware and Sound Set tablet buttons to perform certain tasks 2 Click the tablet...

Page 8: ...Do not apply too much pressure when operating the touchscreen Only a light touch is required to operate the touchscreen Applying too much pressure may damage the surface When the touchscreen becomes...

Page 9: ...unctions or damage to the touchscreen Do not apply excessive force to the touchscreen Do not lift the computer while holding the LCD screen or allow the screen to be twisted Do not place any objects o...

Page 10: ...en calibration 1 Run Touch Screen Calibration Utility Click Start Control Panel Additional Options Tablet Calibration 2 Using the stylus touch each of the 9 target marks one by one Tablet PC Settings...

Page 11: ...loth The screen is specially treated to prevent dirt from adhering to the surface so dirt can be removed easily using a dry cloth use only the approved soft cloth If the dirt does not come off easily...

Page 12: ...ther than where the screen was touched or if the LCD resolution changes recalibrate the touchscreen Perform the procedure of Digitizer Calibration below NOTE z Perform this calibration for each user 1...

Page 13: ...handwriting again 1 Double click on the notification area Alternatively you can click Start All Programs Panasonic Panasonic Hand Writing NOTE z Select the image size before handwriting by clicking Op...

Page 14: ...t operate Touch Screen Calibration Utility page 10 but you can operate Tablet PC settings page 10 only for model with touchscreen Do not set the resolution larger than that of the internal LCD The com...

Page 15: ...utomatically set to the default angle z When switching from Laptop mode to Tablet mode or vice versa z When Windows is started up z When another user logs on with the Fast User Switching function 3 Cl...

Page 16: ...e Windows password for security in sleep or hibernation In the default setting you are requested to enter the Windows password when the computer resumes z Do not enter sleep or hibernation in the cond...

Page 17: ...Wait until the power indicator blinks green sleep or goes off hibernation z It may take one or two minutes to enter sleep or hibernation z At the beep 1 immediately release the power switch After rel...

Page 18: ...er tablet buttons or power switch Use an external mouse or other peripheral devices Connect or disconnect the AC adaptor Close or open the display Shut down or restart Windows Enter sleep or hibernati...

Page 19: ...setting for hibernation may change unexpectedly when you change the setting for sleep Confirm that the time to enter hibernation is 1 080 minutes default setting or longer below Hibernation 1 After th...

Page 20: ...s Reducing internal LCD brightness will reduce power consumption z Turn off the computer when it is not in use You can also turn off only the wireless LAN wireless WAN or Bluetooth power z Disconnect...

Page 21: ...less LAN standby power saving function Enabling this function disables the Wake Up from wireless LAN function to save power in sleep hibernation Disable this function if you want to use the Wake Up fr...

Page 22: ...The Intel R GMA Driver for Mobile screen appears B Click Notebook Apply and OK C Click Display Settings D Click Power Settings E Click Intel R Display Power Saving Technology to add a check mark F Mov...

Page 23: ...r your password again in Confirm New Password and press Enter 6 In Setup Notice press Enter 7 Press F10 and then select Yes and press Enter CAUTION z Do not forget your password If you forget your Sup...

Page 24: ...tup Utility page 74 CAUTION z For the data being read written on the original computer the Setup Utility settings must be the same as when the hard disk was removed z You cannot use the hard disk lock...

Page 25: ...y pack is discharging the power to 80 1 of normal temperature mode page 27 Do not remove the battery pack in this status Red The remaining battery is approximately 9 or less Blinking red The battery p...

Page 26: ...ctual remaining battery charge in the cases as below To correct the display perform the Battery Recalibration page 29 The battery indicator remains red The indicator lights orange and the display show...

Page 27: ...ivalent to an 80 charge level for normal temperature mode z After switching from Normal Temperature to High Temperature or vice versa the remaining battery capacity will not be displayed correctly unt...

Page 28: ...ams and Windows then confirm that the power indicator is off z If you have a fully charged spare battery turn off the computer replace the battery and turn the computer on again z Connect the AC adapt...

Page 29: ...ration C When the message requests shut down of Windows click Yes The battery recalibration starts After the battery pack is fully charged discharging starts When the discharging is completed the powe...

Page 30: ...for the first time Charging starts automatically when the AC adaptor is connected to the computer z Use only the specified battery pack with your computer z In sleep do not remove replace the battery...

Page 31: ...ttery pack until it securely fits the connector B Close the cover until it clicks C Slide the latch C to the left to lock the cover CAUTION z Make sure the latch is securely locked otherwise the batte...

Page 32: ...ion area and click More power options 2 Click Create a power plan click the basic plan and input the name of power plan 3 Click Next 4 Change the settings and click Create z To change the settings or...

Page 33: ...of CardBus PC card attached An error may occur z Dummy cards are inserted into both of the slots at the factory First remove the dummy cards page 40 Step 1 z Be sure to insert each dummy card when th...

Page 34: ...he notification area and select the card then click OK z This step is not necessary when removing the card after turning off the computer 2 Open the cover and remove the card A Press the eject button...

Page 35: ...card is inserted power consumption increases Remove the card when it is not in use especially when oper ating by battery power z To connect peripheral devices SCSI IEEE 1394 etc using a PC Card or an...

Page 36: ...devices For further information refer to the instruc tion manual of the devices Handling and storage cautions z Store the SD Memory Card in the case after removing it from the computer z Do not Disass...

Page 37: ...data may be damaged or the card access may no longer be performed normally z Note that Panasonic assumes absolutely no liability for any loss of data recorded by the user or any other damages direct...

Page 38: ...d confirm the SD Memory Card indicator B is off 1 Disable the card function A Click on the notification area and select the card then click OK z This step is not necessary when removing the card after...

Page 39: ...the card Touch the contact part with fingers or metal object Place the card in very hot location for a long time Remove the card immediately after inserting it To insert the card 1 Open the cover A Sl...

Page 40: ...40 Smart Card To remove the card 1 Open the cover and draw the card straight out...

Page 41: ...tremely sensitive to static electricity and can be affected even by static electricity from the human body When inserting and removing RAM modules do not touch the terminals or internal components and...

Page 42: ...pack CAUTION z Set the cover and battery pack correctly so that they do not fall when you carry the computer NOTE z If it is hard to insert or to press down the RAM module do not try forcibly but che...

Page 43: ...z To boot the computer from a USB floppy disk drive or a USB CD DVD drive be sure to connect the USB drive to the USB port on the computer not to the USB port on the port replicator or the car mounter...

Page 44: ...steps below A Turn off the computer and connect to the port replicator or to the car mounter B Connect the external mouse or trackball to the port replicator or to the car mounter C Turn on the comput...

Page 45: ...ys depending on the displays used z When you use high resolution displays the display color resolution or refresh rate may be changed switching to Notebook in Intel R GMA Driver for Mobile We recommen...

Page 46: ...display during computer operations 1 Press Fn F3 Each time you press the key combination Internal LCD Simultaneous display External display The extended desktop function allows you to use the working...

Page 47: ...he display to notebook only Follow the steps below A Right click the desktop and click Graphics Options B Click Output To Notebook C Right click the desktop and click Graphics Options D Click Output T...

Page 48: ...vice z You may need to install the driver again when connecting the device to another port z If the computer enters sleep or hibernation while a USB keyboard or mouse is connected touching the USB key...

Page 49: ...r further information refer to the instruction manual of the IEEE 1394 device NOTE z You may need to install the driver for the IEEE 1394 device Follow the on screen instructions or refer to the instr...

Page 50: ...n the event of a lightning strike 1 Open the cover and connect the telephone jack A to the com puter by using the telephone cable included B z Hold the cable so that the shape of the connector C match...

Page 51: ...k mark for Allow the device to receive fax calls and click OK 4 Click Start Computer System properties Device Manager z A standard user needs to enter an administrator password 5 Double click Modems a...

Page 52: ...model with touchscreen or tablet buttons Do not touch the digitizer only for model with digitizer z The computer cannot resume if the telephone is not connected to the internal modem e g you cannot u...

Page 53: ...r resuming the computer z Connect the AC adaptor z The Power On by LAN function is off under the following conditions When you turn the computer off by sliding the power switch for four seconds or lon...

Page 54: ...es Device Manager double click Net work adapters Marvell Yukon 88E8055 PCI E Gigabit Ethernet Controller and click Advanced 6 Click Wake From Shutdown in Property and select On in Value and then click...

Page 55: ...on troller 3 Click Power Management add to enable or remove to disable check marks of Allow the computer to turn off this device to save power and Allow this device to wake the computer and then click...

Page 56: ...For further information about Wireless LAN page 61 z For further in formation about Bluetooth page 66 z For further information about Wireless WAN Refer to the instruction manual of the wireless devi...

Page 57: ...LAN Bluetooth wireless WAN will remain ready irrespective of the wireless switch setting z It may take some time to turn off wireless communication after switching the wireless switch off z If the IE...

Page 58: ...status on each time with the dialog box Display a dialog each time you set the wireless switch to ON so you can choose which wireless device to enable Turns on the following device Only selected devi...

Page 59: ...already been installed at the factory z To use the utility set Wireless Switch to Enable in the Advanced menu of the Setup Utility page 73 z The utility does not automatically disable the Bluetooth c...

Page 60: ...ing LAN Cable ON Enables the Wireless Connection Disable Utility to monitor the LAN port and disables wire less connection when a LAN cable is connected Monitoring LAN Cable OFF Disables the Wireless...

Page 61: ...ess LAN function together with the Fast User Switching function z The transmission rate will be lower when a microwave oven is used near by z To use wireless LAN set Wireless LAN to Enable default in...

Page 62: ...ake settings for the access point to recognize the com puter 1 Turn the wireless LAN on 2 Click or on the notification area and click Connect to a network If your computer is already connected to anot...

Page 63: ...E802 11a 5 GHz wireless LAN standard is restricted by law z The Wireless Switch Utility icon or indicates the on off status of wireless LAN and or Bluetooth and or wire less WAN not the setting of IEE...

Page 64: ...low the computer to turn off this device to save power and Allow this device to wake the computer and click OK CAUTION z Even if the Wake Up from wireless LAN function is enabled it will be disabled o...

Page 65: ...by a computer A Click Start Computer System properties Device Manager z A standard user needs to enter an administrator password B Double click Network adapters Intel R Wireless WiFi Link 4965AG and...

Page 66: ...th your hand or body z To use Bluetooth set Bluetooth to Enable default in the Advanced menu of the Setup Utility page 73 z The transmission rate will be lower when a microwave oven is used near by To...

Page 67: ...rd disk drive z Carefully remove insert the hard disk drive since the hard disk drive is extremely sensitive to shock Note that static electricity may affect some internal components 1 Turn off the co...

Page 68: ...30 CAUTION z Confirm that the latch is surely locked so that it does not fall when you carry the computer NOTE z You can erase the data before changing the hard disk drive Operating Instructions Hard...

Page 69: ...you start the Setup Utility with Supervisor Password z You can make the settings of all items of the Setup Utility When you start the Setup Utility with User Password z Note the following In the Adva...

Page 70: ...e the factory presets Information Menu Language English Japanese Model No Computer information cannot be changed Serial No CPU Type CPU Speed BIOS Embedded Controller System Memory Available Memory Ha...

Page 71: ...n Touchscreen Mode is set to Auto Depending on the touchscreen mode setting either Touchscreen or Tablet is displayed Display The display during the Windows start up process When an external display i...

Page 72: ...model with internal modem Disable Enable LAN Disable Enable Serial Port A Disable Enable Auto I O IRQ Can be changed only when Serial Port A is set to Enable 3F8 IRQ4 2F8 IRQ3 3E8 IRQ11 2E8 IRQ10 Seri...

Page 73: ...Enable PC Card Slot Disable Enable ExpressCard Slot Only for model without SmartCard slot Can be changed only when Wireless WAN is set to Enable Disable Enable Smart Card Only for model with Smart Car...

Page 74: ...isplayed on Panasonic boot screen However F2 and F12 will work even if the message is not displayed Disable Enable Boot First Menu Disable Enable Hard Disk Lock Disable Enable User Password Protection...

Page 75: ...PCI LAN z To boot from the following devices make the settings as below z You can select the boot device during start up of the computer too Press Esc soon after Panasonic boot screen is displayed Bo...

Page 76: ...s to CMOS and reboot Exit Without Saving Changes To exit without saving the changes to CMOS Get Default Values To return the settings to the default values Load Previous Values To load the previous va...

Page 77: ...the loupe window click the Hide button B Alternatively you can click any part out of the loupe window or press and hold Alt and right click z To change the loupe window size drag the bottom right corn...

Page 78: ...ple Ctrl Alt C Click either Right click or Left click to use in combination with the key s selected in step B above z When using the keyboard A Click Keyboard B Click the text box and then press the k...

Page 79: ...the CPU memory and supported system 1 Click Start All Programs Panasonic DMI Viewer The DMI Viewer screen appears 2 Click the item to display the detailed information To save the information as a tex...

Page 80: ...k environment set Never for Put the computer to sleep and Hibernate after page 19 The Windows files included in the Windows Vista DVD ROM are contained in the following folders c windows support migwi...

Page 81: ...ediately after resuming Wait approximately one minute Cannot enter sleep or hibernation automatically z Disconnect peripheral devices The computer does not resume z If you slide and hold the power swi...

Page 82: ...change the volume by press ing Fn F5 or Fn F6 z Activate the Windows sound function When it is not active the volume does not change even if is displayed When logging on e g resuming the computer aud...

Page 83: ...h immediately after you start Windows z Close the applications and press the Rotation button until the operations match the rotation angle The operations do not match in some applications or when you...

Page 84: ...g settings Wireless LAN in the Advanced menu of the Setup Utility Confirm that Wireless LAN is set to Enable page 73 Wireless Switch Slide the wireless switch to ON Wireless Switch Utility Confirm tha...

Page 85: ...iver compatible with the connected mouse If the mouse does not work even after installing the driver set Touch Pad to Disable in the Main menu of the Setup Utility page 71 USB floppy disk drive does n...

Page 86: ...depending on the device If the setting does not work try other settings in the Setup Utility The Serial Port B of the port replicator or the car mounter does not work z Set Serial Port B to Auto in th...

Page 87: ...libration page 12 Only for model with touchscreen Cannot input using the touchscreen z Set Touchscreen Mode to Auto or Tablet in the Main menu of the Setup Utility page 71 Cannot use scroll function o...

Page 88: ...curity Platform TPM may not work Only for model with wireless LAN Wireless LAN cannot be used Only for model with Bluetooth Bluetooth cannot be used In these cases log off all users without using Fast...

Page 89: ...r Disable the automatic save function for management information his tory in Hard Disk Status of PC Information Viewer and click OK A standard user needs to enter an administrator password z As long a...

Page 90: ...s a bitmap file in 256 colors z When using the extended desktop page 46 a copy of the primary device screen is saved z The default key combination to copy is Ctrl Alt F8 You can change it in the follo...

Page 91: ...and the Windows logo are registered trademarks or trademarks of Microsoft Corporation of the United States and or other countries Intel Core Centrino and PROSet are either registered trademarks or tr...

Reviews: