background image

English

6


Take care

Warning

● 

Do not remove covers and never 

modify the TV yourself as live 

parts are accessible and risk 

of electric shock when they are 

removed. There are no user 

serviceable parts inside.

● 

Do not expose the TV to rain 

or excessive moisture. This 

TV must not be exposed to 

dripping or splashing water 

and objects filled with liquid, 

such as vases, must not be 

placed on top of or above 

the TV.

● 

Do not insert foreign objects into the TV through the 

air vents.

● 

If the TV is used in an area where insects may easily 

enter the TV.
It is possible for insects to enter the TV, such as small 

flies, spiders, ants, etc. which may cause damage to 

the TV or become trapped in an area visible on the 

TV, e.g. within the screen.

● 

Do not use an unapproved pedestal / mounting 

equipment. Be sure to ask your local Panasonic 

dealer to perform the setup or installation of approved 

wall-hanging brackets.

● 

Do not apply any strong force or impact to the display 

panel.

● 

Ensure that children do not climb on the TV.

● 

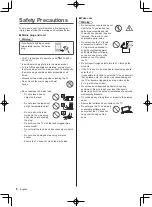
Do not place the TV on sloping 

or unstable surfaces, and 

ensure that the TV does not 

hang over the edge of the 

base.

Safety Precautions

To help avoid risk of electrical shock, fire, damage or 

injury, please follow the warnings and cautions below:


Mains plug and lead

Warning

If you detect anything unusual, 

immediately remove the mains 

plug.

● 

This TV is designed to operate on AC   220-240 V,  

50 / 60 Hz.

● 

Insert the mains plug fully into the mains socket.

● 

To turn Off the apparatus completely, you must pull 

the mains plug out of the mains socket. Consequently, 

the mains plug should be easily accessible at all 

times.

● 

Disconnect the mains plug when cleaning the TV.

● 

Do not touch the mains plug with wet 

hands.

● 

Do not damage the mains lead.

 •

Do not place a heavy 

object on the lead.

 •

Do not place the lead near 

a high temperature object.

 •

Do not pull on the lead. 

Hold onto the mains plug 

body when disconnecting 

the plug.

 •

Do not move the TV with the lead plugged into a 

mains socket.

 •

Do not twist the lead, bend it excessively or stretch 

it.

 •

Do not use a damaged mains plug or mains 

socket.

 •

Ensure the TV does not crush the mains lead.

Summary of Contents for TH-65HZ2000U

Page 1: ...tain them for future reference Please carefully read the Safety Precautions of this manual before use The images shown in this manual are for illustrative purposes only For more detailed instructions please refer to eHELP Built in Operating Instructions How to use eHELP p 23 image TH 65HZ2000U Operating Instructions OLED TV English Model No TH 65HZ2000U ...

Page 2: ...t Notice 3 Safety Precautions 6 Accessories 9 Installing the TV 9 Installing the wall hanging bracket 14 Connections 14 Identifying Controls 19 First time Auto Tuning 21 Watching TV 22 How to Use eHELP 23 FAQs 24 Maintenance 25 Specifications 25 ...

Page 3: ...DMI and HDMI High Definition Multimedia Interface and the HDMI Logo are trademarks or registered trademarks of HDMI Licensing Administrator Inc in the United States and other countries Dolby Dolby Vision Dolby Atmos Dolby Audio and the double D symbol are trademarks of Dolby Laboratories Manufactured under license from Dolby Laboratories Confidential unpublished works Copyright 2012 2019 Dolby Lab...

Page 4: ... name etc pay special attention to the trustworthiness of the provider Registered information may be registered in the server etc of provider Before repairing transferring or discarding this TV be sure to erase the information according to the terms and conditions etc of provider Do not display any still part of the image for a long period In such cases the still part of the image remains dimly on...

Page 5: ...C Video that was encoded by a consumer engaged in a personal activity and or was obtained from a video provider licensed to provide AVC Video No license is granted or shall be implied for any other use Additional information may be obtained from MPEG LA LLC See http www mpegla com Panasonic and its affiliates make no representations or warranties of any kind with respect to the USB devices and the...

Page 6: ...Ensure that children do not climb on the TV Do not place the TV on sloping or unstable surfaces and ensure that the TV does not hang over the edge of the base Safety Precautions To help avoid risk of electrical shock fire damage or injury please follow the warnings and cautions below Mains plug and lead Warning If you detect anything unusual immediately remove the mains plug This TV is designed to...

Page 7: ...aused by radio wave interference when using the built in wireless LAN keep the TV away from other devices that use 2 4 GHz and 5 GHz signals such as other wireless LAN devices microwave ovens and mobile phones When problems occur due to static electricity etc the TV might stop operating to protect itself In this case turn the TV off at the Mains power On Off switch then turn it back on Warning Sta...

Page 8: ...sion and explosion Bluetooth wireless technology Caution The TV uses the 2 4 GHz radio frequency ISM band Bluetooth To avoid malfunctions or slow response caused by radio wave interference keep the TV away from the devices such as other wireless LAN devices other Bluetooth devices microwaves mobile phones and the devices that use 2 4 GHz signal Ventilation Caution Allow sufficient space at least 1...

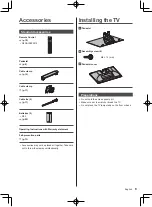
Page 9: ...o not place the TV temporarily on the floor or desk Accessories Standard accessories Remote Control p 19 N2QAYA000218 Pedestal p 9 Cable clamp p 12 Cable clamp p 11 Cable tie 2 p 11 Batteries 2 R03 p 20 Operating Instructions with Warranty statement Fall prevention parts p 13 Accessories may not be placed all together Take care not to throw them away unintentionally ...

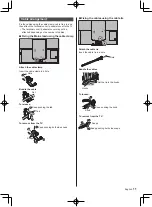
Page 10: ...he terminal cover pedestal cover p 12 Terminal cover Connecting the aerial and external equipment p 14 Assembling the pedestal Insert the pedestal firmly otherwise it may come off when setting up the TV Do not apply any strong force to the speaker part in front of this TV Do not assemble the pedestal by any method other than those specified below A B Speaker part in front of this TV ...

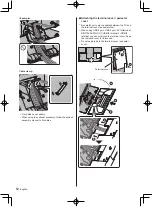
Page 11: ...s Snaps Cable arrangement Fix the cables using the cable clamp cable tie etc and then attach the terminal cover pedestal cover to the TV The terminal cover pedestal cover may not be attached depending on the number of cables Fixing the Mains lead using the cable clamp Attach the cable clamp Insert the cable clamp in a hole Hole Bundle the cable Set To release Keep pushing the tab Tab To remove fro...

Page 12: ...2 port USB 3 port AV IN terminal DIGITAL AUDIO OUT HDMI3 terminal or HDMI4 terminal you cannot attach the terminal cover Keep the removed cover for future use Do not apply load to the terminal cover pedestal cover Terminal cover C Example Cable clamp Fix cables as necessary When using the optional accessory follow the option s assembly manual to fix cables ...

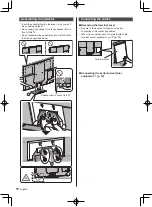
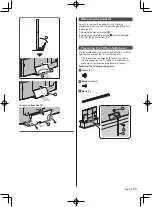
Page 13: ...tal 3 Pull out the pedestal from the TV Preventing the TV from falling over It is recommended to secure the pedestal to a furniture as shown to prevent the TV from falling over This information is designed to reduce the risk of injuries caused by the TV falling over However no measure can guarantee protection in all cases Attaching the fall prevention parts Screw 1 Wood screw 1 Band 1 F E D C To r...

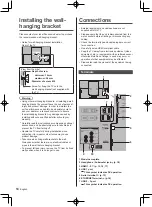
Page 14: ...anging bracket Holes for wall hanging bracket installation Rear of the TV 300 mm 300 mm View from the side Depth of screw minimum 14 mm maximum 28 mm Diameter of screw M6 Screw for fixing the TV onto the wall hanging bracket not supplied with the TV Warning Using other wall hanging brackets or installing a wall hanging bracket by yourself have the risk of personal injury and product damage In orde...

Page 15: ...ble 75 Ω coaxial and correct terminating plug are required to obtain optimum quality picture and sound If a communal aerial system is used you may require the correct connection cable and plug between the wall aerial socket and the TV Your local Television Service Centre or dealer may be able to assist you in obtaining the correct aerial system for your particular area and the accessories required...

Page 16: ...er definition signals than Mode1 Set to Mode1 when the image or sound in HDMI input is not played properly Connect the 4K compatible equipment to HDMI terminal using a 4K compatible cable and you can watch content in 4K format Supporting HDR does not increase the peak brightness capabilities of the TV panel HDMI Auto Setting Setup Menu Reproduces the image more precisely with the expanded colour g...

Page 17: ...t Amplifier listening with external speakers To enjoy multi channel sound from external equipment e g Dolby Digital 5 1ch connect the equipment to the amplifier For information about the connections read the manuals of the equipment and amplifier TV HDMI cable Amplifier with speaker system External equipment DVD Player etc Use HDMI2 to connect the TV to an amplifier which has eARC Enhanced Audio R...

Page 18: ...r The subwoofer output from the TV is the same for both L and R For information about the headphone terminal output settings refer to eHELP Search by Purpose Settings Sound TV Audio cable 3 5 mm stereo mini plug audio pin plug USB HDD for recording Use USB 1 port for connecting the USB HDD For details refer to eHELP Search by Purpose Recording VIERA Link Use HDMI1 4 for VIERA Link connection For d...

Page 19: ...LP Search by Purpose Home Apps 15 LIGHT Lights the buttons for about 5 seconds Press again to turn off the button lights 16 Input mode selection TV switches to Digital TV Analogue TV AV switches to AV input mode from Input Selection list 17 EXIT Returns to the normal viewing screen 18 Cursor buttons Makes selections and adjustments 19 Return Returns to the previous menu page 20 HOME Displays Home ...

Page 20: ...rts and it takes approx 10 minutes Regular maintenance takes approx 80 minutes When regular maintenance is necessary the message appears on the screen after turning the TV off with the remote control Follow the on screen instructions During the panel maintenance a white horizontal line appears on the screen for a while This is not a malfunction For information about panel maintenance refer to eHEL...

Page 21: ...omatically search for available TV channels and give options to set up the TV These steps are not necessary if the setup has been completed by your local dealer Please complete connections p 14 18 and settings if necessary of the connected equipment before starting Auto Tuning For information about the settings for the connected equipment read the manual of the equipment 1 Plug the TV into a live ...

Page 22: ...atching TV 1 Turn power on TV or Remote Control Mains power On Off switch should be on p 20 2 Select Digital TV or Analogue TV 3 Select a channel up down or To select a channel position with 2 or more digit e g 399 ...

Page 23: ...explanation for a better understanding of the operation of each feature 1 Display eHELP or Help eHELP If the eHELP has been accessed previously since the TV was turned on the confirmation screen is displayed to select whether to go to the First page or to the Last viewed page 2 Select the menu select access To access How to use green Keyword Search Search the content of eHELP in the keyword Search...

Page 24: ...al when the equipment is connected via HDMI Set HDMI Auto Setting Setup Menu to Mode1 p 16 No sound is produced from the connected HDMI equipment Set the audio output format of the connected HDMI equipment to PCM Parts of the TV become hot Parts of the TV may become hot These temperature rises do not pose any problems in terms of performance or quality When pushed with a finger the display panel m...

Page 25: ...use peeling of the paint The surface of the display panel is specially treated and may be easily damaged Take care not to tap or scratch the surface with your fingernail or other hard objects Do not allow the cabinet and pedestal to make contact with a rubber or PVC substance for a long time This may degrade surface quality Mains plug Wipe the mains plug with a dry cloth at regular intervals Moist...

Page 26: ...C Playback from NTSC Video recorders VCR Aerial input Standard Belling Lee connector VHF UHF Operating conditions Temperature 0 C 35 C Humidity 20 80 RH non condensing Built in wireless LAN Standard compliance and Frequency range 1 IEEE802 11a n ac 5 15 GHz 5 35 GHz 5 47 GHz 5 85 GHz IEEE802 11b g n 2 400 GHz 2 4835 GHz Security WPA2 PSK TKIP AES WPA PSK TKIP AES WEP 64 bit 128 bit Bluetooth wirel...

Page 27: ...sher Drive Highbrook East Tamaki Private Bag 14911 Panmure Auckland Tel 09 272 0100 Customer Care Center Email Customerservice nz panasonic com www panasonic co nz NEW ZEALAND Panasonic Australia Pty Limited ACN 001 592 187 ABN 83 001 592 187 Locked Bag 505 Frenchs Forest NSW 2086 www panasonic com au ...

Page 28: ...uld note this serial number in the space provided below and retain this book plus your purchase receipt as a permanent record of your purchase to aid in identification in the event of theft or loss and for Warranty Service purposes Model Number Serial Number Web Site http www panasonic com Panasonic Corporation 2020 English Printed in Malaysia ...

Reviews: