background image

14

T

Q

BJ

233

8

Wireless Connections

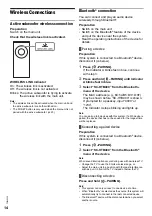
Active subwoofer wireless connection 

Preparation

Switch on the main unit.

Check that the wireless link is activated.

WIRELESS LINK indicator

On: The wireless link is activated.
Off: The wireless link is not activated.
Blinks: The active subwoofer is trying to activate 

the wireless link with the main unit.

Note:

The wireless link will be activated when the main unit and 
the active subwoofer are both switched on.

The I/D SET button is only used when the main unit is not 
paired with the active subwoofer. (

~

20)

Bluetooth

®

 connection

You can connect and play an audio device 
wirelessly through Bluetooth

®

.

Preparation

Switch on the main unit.

Switch on the Bluetooth

®

 feature of the device 

and put the device near the system.

Read the operating instructions of the device for 
details.

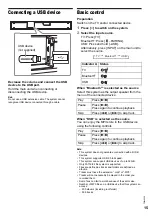
Pairing a device

Preparation

If this system is connected to a Bluetooth

®

 device, 

disconnect it (

~

below).

1

Press [

–PAIRING].

If the Indicator A blinks fast in blue, continue 
with step 3.

2

Press and hold [

–PAIRING] until Indicator 

A blinks fast in blue.

3

Select “SC-HTB490” from the Bluetooth

®


menu of the device.

The MAC address (e.g., 6C:5A:B5:B3:1D:0F) 
may be shown before “SC-HTB490” is shown.
If prompted for a passkey, input “0000” or 
“1234”.
The Indicator A stops blinking and lights up.

Note:

You can pair up to 8 devices with this system. If a 9th device is 
paired, the device that has not been used for the longest time 
will be replaced.

Connecting a paired device

Preparation

If this system is connected to a Bluetooth

®

 device, 

disconnect it (

~

below).

1

Press [

–PAIRING].

2

Select “SC-HTB490” from the Bluetooth

®


menu of the device.

Note:

When sound interruption occurs during use with a wireless TV: 

Change the TV to use the 5 GHz wireless range, or

Adjust the main unit to a position with the least interference, 
such as put it in front of the TV instead of below the TV.

Disconnecting a device

Press and hold [

–PAIRING].

Note:

This system can only connect to one device at a time.

When “Bluetooth

®

” is selected as the source, this system will 

automatically try to connect to the last connected device.

The Bluetooth

®

 device will be disconnected when you select 

another source.

Summary of Contents for SC-HTB490

Page 1: ... reference Your system and the illustrations can look differently EG Included Installation Instructions The installation work should be done by a qualified installation specialist 9 to 13 Before commencing work carefully read these installation instructions and the operating instructions to ensure that installation is performed correctly Please keep these instructions You may need them when mainta...

Page 2: ...es This unit may receive radio interference caused by mobile telephones during use If such interference occurs please increase separation between this unit and the mobile telephone Set the unit up on an even surface away from direct sunlight high temperatures high humidity and excessive vibration This system might get warm after prolonged usage This is normal Do not be alarmed AC mains lead The ma...

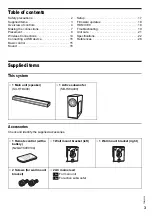
Page 3: ... updates 18 HDMI CEC 18 Troubleshooting 19 Unit care 21 Specifications 22 References 26 Supplied items This system Accessories Check and identify the supplied accessories 1 Main unit speaker SU HTB490 1 Active subwoofer SB HWA490 1 Remote control with a battery N2QAYC000134 1 Wall mount bracket left 1 Wall mount bracket right 2 Screws for wall mount bracket 2 AC mains lead 1 5 m For main unit 1 2 ...

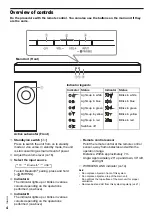
Page 4: ...rations performed above F Remote control sensor Point the remote control at the remote control sensor away from obstacles and within the operation range Distance Within approximately 7 m Angle Approximately 20 up and down 30 left and right G WIRELESS LINK indicator 14 Note Do not place objects in front of this system Do not place objects on top of the main unit Do not block the top surface of the ...

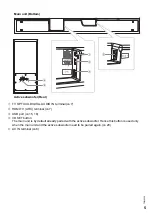
Page 5: ...minal 7 C USB port 15 18 D I D SET button The main unit is by default already paired with the active subwoofer Hence this button is used only when the main unit and the active subwoofer need to be paired again 20 E AC IN terminal 8 Main unit Bottom Active subwoofer Rear ...

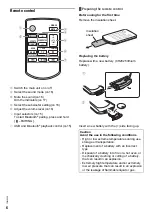
Page 6: ... with a new battery CR2025 lithium battery Insert a new battery with the side facing up MUSIC TV MUTE CINEMA STANDARD SOUND MODE INPUT SUBWOOFER PAIRING SPORTS NEWS DIMMER USB Caution Avoid the use in the following conditions High or low extreme temperatures during use storage or transportation Replacement of a battery with an incorrect type Disposal of a battery into fire or a hot oven or mechani...

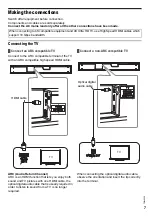
Page 7: ...Channel ARC is an HDMI function that lets you enjoy both sound and TV pictures with one HDMI cable the optical digital audio cable that is usually required in order to listen to sound from a TV is no longer required Connect a non ARC compatible TV When connecting the optical digital audio cable observe the orientation and insert the tip correctly into the terminal When connecting to 4K compatible ...

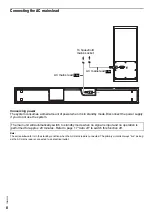
Page 8: ... in the standby condition when the AC mains lead is connected The primary circuit is always live as long as the AC mains lead is connected to an electrical outlet The main unit will automatically switch to standby mode when no signal is input and no operation is performed for approx 20 minutes Refer to page 17 Auto off to switch this function off AC mains lead 1 5 m To household mains socket AC ma...

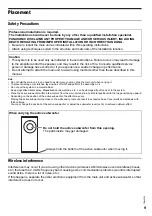
Page 9: ...ms sound is interrupted sound skips there is a lot of noise etc If this happens separate the other electronic equipment from the main unit and active subwoofer so that interference does not occur Professional installation is required The installation should never be done by any other than a qualified installation specialist PANASONIC DISCLAIMS ANY PROPERTY DAMAGE AND OR SERIOUS INJURY INCLUDING DE...

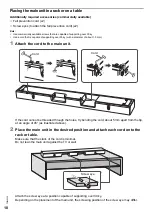
Page 10: ... 5 mm 1 Attach the cord to the main unit If the cord cannot be threaded through the holes try bending the cord about 5 mm apart from the tip at an angle of 45 as illustrated above 2 Place the main unit in the desired position and attach each cord onto the rack or table Make sure that the slack of the cord is minimal Do not lean the main unit against the TV or wall Attach the screw eye at a positio...

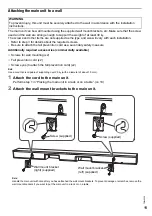
Page 11: ...Fall prevention cord x2 Screw eyes to attach the fall prevention cord x2 Note Use a cord that is capable of supporting over 30 kg with a diameter of about 1 5 mm 1 Attach the cord to the main unit Perform step 1 in Placing the main unit in a rack or on a table 10 2 Attach the wall mount brackets to the main unit Note Handle the main unit with care after you have attached the wall mount brackets To...

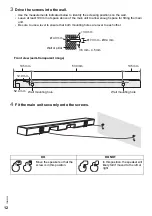
Page 12: ...e sure to use a level to ensure that both mounting holes are level to each other Front view semi transparent image 4 Fit the main unit securely onto the screws DO DO NOT Move the speaker so that the screw is in this position In this position the speaker will likely fall if moved to the left or right 30 mm Ø7 0 mm Ø9 4 mm 3 5 mm 4 5 mm Wall or pillar Ø4 0 mm 135 mm 530 mm 135 mm 52 4 mm Wall mounti...

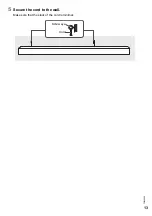
Page 13: ...13 TQBJ2338 5 Secure the cord to the wall Make sure that the slack of the cord is minimal Screw eye Cord ...

Page 14: ...e with step 3 2 Press and hold PAIRING until Indicator A blinks fast in blue 3 Select SC HTB490 from the Bluetooth menu of the device The MAC address e g 6C 5A B5 B3 1D 0F may be shown before SC HTB490 is shown If prompted for a passkey input 0000 or 1234 The Indicator A stops blinking and lights up Note You can pair up to 8 devices with this system If a 9th device is paired the device that has no...

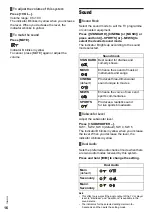
Page 15: ...an enjoy the MP3 store in the USB device using the following controls Note This system does not guarantee connection with all USB devices This system supports USB 2 0 full speed This system can support USB devices of up to 32 GB Only FAT16 32 file system is supported Files are defined as tracks and folders are defined as albums Tracks must have the extension mp3 or MP3 Tracks will not necessarily ...

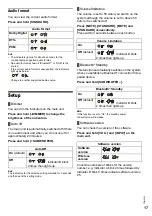
Page 16: ...ator B blinks in yellow when you increase the level When you decrease the level the indicator A blinks in yellow Dual Audio Sets the preferred audio channel mode when there are two audio modes received by this system Press and hold 4 9 to change the setting Note This effect only works if the audio output of the TV or player is set to Bitstream and Dual Mono is available in the sound source The ind...

Page 17: ...e system although the volume is set to above 50 before it is switched off Press MUTE STANDARD MUTE and STANDARD consecutively Press within 3 seconds between each button Bluetooth Standby This function automatically switches on the system when you establish a Bluetooth connection from a paired device Press and hold SUBWOOFER Note If this function is set to On the standby power consumption will incr...

Page 18: ...HDMI CEC Consumer Electronics Control function See the operating instructions for connected equipment for operational details Preparation Confirm that the HDMI connection has been made 7 Power on link When the TV is switched on the main unit also switches on automatically Power off link When the TV is switched off the main unit also switches off automatically This function does not work when Bluet...

Page 19: ...system and then switch on again The device is connected but audio cannot be heard through the system For some built in Bluetooth devices you have to set the audio output to SC HTB490 manually Read the operating instructions of the device for details Sound from the device is interrupted The device is out of the 10 m communication range Move the device nearer to the system Remove any obstacle betwee...

Page 20: ...atus and inform the dealer Active subwoofer No power Make sure the AC mains lead of the active subwoofer is connected After switching on the subwoofer it immediately switches off Disconnect the AC mains lead and consult your dealer No sound from the subwoofer Check that the active subwoofer is switched on Check that the WIRELESS LINK indicator switched on 14 The WIRELESS LINK indicator does not sw...

Page 21: ...will set back to code 1 after system reset refer to Remote control code on how to change to code 2 Unit care Disconnect the AC mains lead before maintenance Clean this system with a soft dry cloth When dirt is heavy wring a cloth moistened in water tightly to wipe the dirt and then wipe it with a dry cloth When cleaning the speakers use a fine cloth Do not use tissues or other materials towels etc...

Page 22: ...4 1 48 kHz Audio word size 16 bits Channel count 2 channels USB device file system FAT16 FAT32 For Software update Audio format section TV ARC input LPCM Max 2 ch Dolby Digital DTS Digital Surround Optical digital input LPCM Max 2 ch Dolby Digital DTS Digital Surround Speaker section Front speakers Built in Full range 4 5 x 12 cm cone type x 2 Active subwoofer Woofer 16 cm cone type x 1 Bluetooth ...

Page 23: ...ting Europe GmbH Panasonic Testing Centre Winsbergring 15 22525 Hamburg Vokietija Slovensko Izjava o skladnosti DoC Panasonic Corporation v tem dokumentu izjavlja da je izdelek v skladu z bistvenimi zahtevami in drugimi pomembnimi določbami Direktive 2014 53 EU Stranka lahko naloži izvod izvirnega DoC o naših izdelkih RE s strežnika DoC http www ptc panasonic eu Naslov pooblaščenega predstavnika P...

Page 24: ...rgring 15 22525 Hamburg Германия Român Declaraţie de Conformitate DoC Panasonic Corporation declară prin prezenta că acest produs este conform cu cerinţele esenţiale şi alte prevederi relevante ale Directivei 2014 53 UE Clienţii pot descărca o copie a DoC ului original al produselor noastre RE de la adressa noastră DoC din Internet http www ptc panasonic eu Contactaţi Reprezentantul Autorizat Pana...

Page 25: ...nd active subwoofer 2404 2476 MHz 10 dBm Kablosuz türü Frekans bandı Maksimum güç dBm e i r p Bluetooth Main unit 2402 2480 MHz 10 dBm 2 4 GHz wireless system Main unit and active subwoofer 2404 2476 MHz 10 dBm Disposal of Old Equipment and Batteries Only for European Union and countries with recycling systems These symbols on the products packaging and or accompanying documents mean that used ele...

Page 26: ... due to radio wave interference if this unit is located too close to other Bluetooth devices or the devices that use the 2 4 GHz band This system may not function properly if radio waves from a nearby broadcasting station etc is too strong Intended usage This system is for normal general use only Do not use this system near an equipment or in an environment that is sensitive to radio frequency int...

Page 27: ...Bruk anbefalt tilbehør Fjern ikke deksler Dette apparatet må ikke repareres på egen hånd Overlat servicearbeider til kvalifisert servicepersonell FORSIKTIG Produkt For å redusere faren for brann elektrisk støt eller skade på apparatet Ikke plasser apparatet i en bokhylle et innebygget kabinett eller et annet lukket sted Pass på at apparatet er godt ventilert Apparatets ventilasjonsåpninger må ikke...

Reviews: