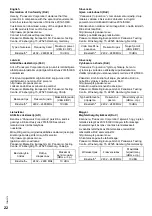
Panasonic SC-AKX520 Operating Instructions Manual Download Page 12

12

T

Q

BJ

227

2

12

Play menu

 CD 


 USB 

1

Press [PLAY MENU].

 USB 

Press [PLAY MENU] repeatedly to select 
“PLAYMODE”.

2

Press [

R

T

] to select the setting and then press 

[OK].

Note:

• During random playback, you cannot skip to tracks which 

have been played.

• The setting is cancelled when you open the disc tray or 

disconnect the USB device.

Link mode

 BLUETOOTH 

You can change the link mode to suit the connection type.

Preparation

If this system is connected to a Bluetooth

®

 device, 

disconnect it (

~

11).

1

Press [PLAY MENU] repeatedly to select 
“LINK MODE”.

2

Press [

R

T

] to select the mode and then press 

[OK].

Note:

• When enjoying video contents with this function, the video 

and audio output may not be synchronised. In this case, 
select “MODE 1”.

• Select “MODE 1” if the sound is interrupted.
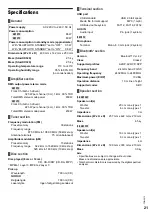
Note on disc

• This system can play CD-R/RW with CD-DA or MP3 

format content.

• Before playback, finalise the disc on the device it was 

recorded on.

• Some CD-R/RW cannot be played because of the 

condition of the recording.

Note on USB device

• This system does not guarantee connection with all 

USB devices.

• This system supports USB 2.0 full speed.
• This system can support USB devices of up to 32 GB.
• Only FAT 12/16/32 file system is supported.

Note on MP3 file

• Files are defined as tracks and folders are defined as 

albums.

• Tracks must have the extension “.mp3” or “.MP3”.
• Tracks will not necessarily be played in the order you 

recorded them.

• Some files can fail to work because of the sector size.

MP3 file on disc

• This system can access up to:

– 255 albums (including root folder)
– 999 tracks
– 20 sessions

• Disc must conform to ISO9660 level 1 or 2 (except for 

extended formats).

MP3 file on USB device

• This system can access up to:

– 800 albums (including root folder)
– 8000 tracks
– 999 tracks in one album

OFF PLAYMODE

Cancel the setting.

1-TRACK

1


Play one selected track.
Press [

2

/

3

] or [

5

/

6

] to 

select the track.

1-ALBUM

1


Play one selected MP3 album.
Press [

R

T

] to select the MP3 

album.

RANDOM

RND

Play all tracks randomly.

1-ALBUM RANDOM

1


RND

Play all tracks in one selected MP3 
album randomly.
Press [

R

T

] to select the MP3 

album.

ALL REPEAT

Repeat all tracks.

1-TRACK REPEAT

1


Repeat 1-TRACK.

1-ALBUM REPEAT

1


Repeat 1-ALBUM.

RANDOM REPEAT

RND


Repeat random playback.

1-ALBUM 
RANDOM REPEAT

1


RND


Repeat 1-ALBUM RANDOM.

MODE 1

Emphasis on connectivity.

MODE 2 (default) Emphasis on sound quality.

Summary of Contents for SC-AKX520

Page 1: ...Stereo System Model No SC AKX520 SC AKX320 This illustration shows SC AKX320 Thank you for purchasing this product For optimum performance and safety please read these instructions carefully Please k...

Page 2: ...moderate climates This unit may receive radio interference caused by mobile telephones during use If such interference occurs please increase separation between this unit and the mobile telephone Thi...

Page 3: ...carefully This appliance is supplied with a moulded three pin mains plug for your safety and convenience A 5 ampere fuse is fitted in this plug Should the fuse need to be replaced please ensure that...

Page 4: ...erference example airports hospitals laboratories etc Licenses Sales and Support Information For the United Kingdom and Ireland Customer Communications Centre For customers within the UK 0344 844 3899...

Page 5: ...ced by magnetism When you play at high levels for a long period it can cause damage to the speakers and decrease the life of the speakers Decrease the volume in these conditions to prevent damage When...

Page 6: ...e reception is best For the United Kingdom and Ireland Connect the FM outdoor antenna Use an outdoor antenna if reception is poor CAUTION Keep the antenna plug adaptor out of reach of children to prev...

Page 7: ...antennas away from the speaker cables and the AC mains lead to avoid picking up noise AKX520 Attaching the ferrite core A Pull on the tab to open B Put the speaker cables onto one of the concave surfa...

Page 8: ...repeatedly to select the source On the main unit To start Bluetooth pairing press and hold D Basic playback control E View the setup menu F View the content information G Select or confirm the option...

Page 9: ...ction Press DJ1 to DJ6 to select the desired function To cancel press the selected DJ1 to DJ6 again P Disc tray Q AKX520 Microphone jack R Volume or multi control knob S Remote control sensor Distance...

Page 10: ...shown for a few seconds Using the main unit 1 Press and hold until PAIRING is shown 2 Select SC AKX520 or SC AKX320 from the Bluetooth menu of the device Note You can pair up to 8 devices with this s...

Page 11: ...t work Viewing available information CD USB BLUETOOTH You can view the available information such as MP3 album and track number on the display panel Press DISPLAY repeatedly Example MP3 album and trac...

Page 12: ...ystem supports USB 2 0 full speed This system can support USB devices of up to 32 GB Only FAT 12 16 32 file system is supported Note on MP3 file Files are defined as tracks and folders are defined as...

Page 13: ...s the same preset number Selecting a preset station 1 Press PLAY MENU repeatedly to select TUNE MODE Or press 8 on the main unit to select PRESET Continue with step 3 2 Press R T to select PRESET and...

Page 14: ...OX repeatedly to select the setting Note The system switches to repeat mode automatically when you switch on DJ jukebox DJ jukebox is switched off when you switch off the system or change to another s...

Page 15: ...ess SOUND repeatedly to select MIC VOL Or press and hold MIC VOL until MIC VOL is shown 3 Press R T to adjust the volume of the microphone and then press OK Or turn VOLUME MULTI CONTROL to adjust the...

Page 16: ...ocal level or change the audio mode depending on the source ECHO Add an echo effect to the sound KEY CONTROL Change the key of a song Note The setting is cancelled when you change to another source TE...

Page 17: ...time to wake you up Preparation Set the clock 1 Press SETUP repeatedly to select TIMER ADJ 2 Press R T to set the start time and then press OK 3 Do step 2 again to set the end time 4 Press R T to sel...

Page 18: ...n may not work when a microphone is connected Bluetooth standby This function automatically switches on the system when you establish a Bluetooth connection from a paired device 1 Press SETUP repeated...

Page 19: ...of the USB device Large content size or large memory USB device takes longer time to read Bluetooth Pairing cannot be done Check the Bluetooth device condition The device is out of the 10 m communica...

Page 20: ...nimum of 4 seconds TEMP NG The temperature protection circuit has been activated and the system will switch off Let the unit cool down before switching it on again Check that the ventilation opening o...

Page 21: ...tion USB port USB standard USB 2 0 full speed Media file format support MP3 mp3 USB device file system FAT12 FAT16 FAT32 AUX IN Audio input Pin jack 1 system AKX520 Microphone Terminal Mono 6 3 mm jac...

Page 22: ...2014 53 EU Stranka lahko nalo i izvod izvirnega DoC o na ih izdelkih RE s stre nika DoC http www ptc panasonic eu Naslov poobla enega predstavnika Panasonic Marketing Europe GmbH Panasonic Testing Cen...

Page 23: ...med de grunnleggende kravene og andre relevante bestemmelser i direktivet 2014 53 EU Kundene kan laste ned en kopi av den originale samsvarserkl ringen DoC for v rt RE utstyr fra v r DoC server http w...

Page 24: ...Bm e i r p Bluetooth 2402 2480 MHz 10 dBm Kablosuz t r Frekans band Maksimum g dBm e i r p Bluetooth 2402 2480 MHz 10 dBm Disposal of Old Equipment and Batteries Only for European Union and countries...

Page 25: ...h nd Overlat servicearbeider til kvalifisert servicepersonell FORSIKTIG Produkt For redusere faren for brann elektrisk st t eller skade p apparatet Ikke plasser apparatet i en bokhylle et innebygget k...

Reviews: