background image

3

1 Safety Precautions

1.1.

General Guidelines

1.

IMPORTANT SAFETY NOTICE

There are special components used in this equipment which are important for safety. These parts are marked by   in the
Schematic Diagrams, Circuit Board Layout, Exploded Views and Replacement Parts List. It is essential that these critical parts
should be replaced with manufacturer’s specified parts to prevent X-RADIATION, shock, fire, or other hazards. Do not modify
the original design without permission of manufacturer.

2. An Isolation Transformer should always be used during the servicing of AC Adaptor whose chassis is not isolated from the AC

power line. Use a transformer of adequate power rating as this protects the technician from accidents resulting in personal
injury from electrical shocks. It will also protect AC Adaptor from being damaged by accidental shorting that may occur during
servicing.

3. When servicing, observe the original lead dress. If a short circuit is found, replace all parts which have been overheated or

damaged by the short circuit.

4. After servicing, see to it that all the protective devices such as insulation barriers, insulation papers shields are properly

installed.

5. After servicing, make the following leakage current checks to prevent the customer from being exposed to shock hazards.

1.1.1.

Leakage Current Cold Check

1. Unplug the AC cord and connect a jumper between the two prongs on the plug.
2. measure the resistance value, with an ohmmeter between the jumpered AC plug and each exposed metallic cabinet part on

the equipment such as screwheads, connectors, control shafts, etc. When the exposed metallic part has a return path to the
chassis, the reading should be between 1M

Ω

 and 5.2M

Ω

. When the exposed metal does not have a return path to the chas-

sis, the reading must be 

1.1.2.

Leakage Current Hot Check

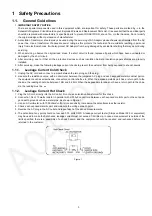
1. Plug the AC cord directly into the AC outlet. Do not use an isolation transformer for this check.
2. Connect a 1.5k

Ω

, 10 watts resistor, in parallel with a 0.15

μ

F capacitors, between each exposed metallic part on the set and a

good earth ground such as a water pipe, as shown in Figure 1.

3. Use an AC voltmeter, with 1000 ohms/volt or more sensitivity, to measure the potential across the resistor.
4. Check each exposed metallic part, and measure the voltage at each point.
5. Reverse the AC plug in the AC outlet and repeat each of the above measurements.
6. The potential at any point should not exceed 0.75 volts RMS. A leakage current tester (Simpson Model 229 or equivalent)

may be used to make the hot checks, leakage current must not exceed 1/2 milliamp. In case a measurement is outside of the
limits specified, there is a possibility of a shock hazard, and the equipment should be repaired and rechecked before it is
returned to the customer.

Figure. 1

Summary of Contents for SA-PM250EB-S

Page 1: ...r and Adjustment 4 1 4 Protection Circuitry 4 1 5 Caution For Fuse Replacement 4 1 6 Safety Part Information 5 2 Warning 6 2 1 Prevention of Electro Static Discharge ESD to Electrostatically Sensitive ES Devices 6 2 2 Precaution of Laser Diode 7 2 3 Service caution based on Legal restrictions 7 2 4 Handling Precaution for Traverse Unit 8 3 Service Navigation 10 3 1 Service Information 10 3 2 Notes...

Page 2: ...UPPLY CIRCUIT 16 6 4 MAIN DAMP CIRCUIT 17 6 5 MAIN CD MOTOR DRIVER CIRCUIT 18 6 6 MAIN USB TUNER CIRCUIT 19 7 Printed Circuit Board 20 7 1 MAIN P C B Side A 20 7 2 MAIN P C B Side B 21 7 3 TUNER P C B 22 8 Exploded View and Replacement Parts List 23 8 1 Cabinet Parts Location 23 8 2 Packaging 24 8 3 Mechanical Repacement Parts List 25 8 4 Electrical Replacement Parts List 27 ...

Page 3: ...shock hazards 1 1 1 Leakage Current Cold Check 1 Unplug the AC cord and connect a jumper between the two prongs on the plug 2 measure the resistance value with an ohmmeter between the jumpered AC plug and each exposed metallic cabinet part on the equipment such as screwheads connectors control shafts etc When the exposed metallic part has a return path to the chassis the reading should be between ...

Page 4: ...should be 200 mA For GT 1 4 Protection Circuitry The protection circuitry may have operated if either of the following conditions are noticed No sound is heard when the power is turned on Sound stops during a performance The function of this circuitry is to prevent circuitry damage if for example the positive and negative speaker connection wires are shorted or if speaker systems with an impedance...

Page 5: ...PLATE GS GSX 23 RGN3453D K NAME PLATE GT 29 RMV0442 SMPS COVER SHEET 301 RAE1028Z V TRAVERSE UNIT A2 K2CA2YY00257 AC CORD GT A2 K2CP2YY00061 AC CORD GS GSX A2 K2CQ2YY00119 AC CORD GS GSX A2 K2CT2YY00097 AC CORD GS GSX A3 RQT9926 B O I BOOK En GS GSX A3 RQT9931 G O I BOOK Cn Ar GS GSX A3 RQT9932 K O I BOOK Co GT C1702 F0CAF224A105 0 22uF C1710 F1BAF471A013 470pF C1725 F0CAF104A105 0 1uF C1727 F1BAF...

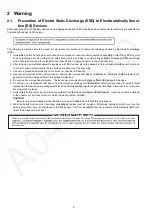
Page 6: ... solder or unsolder ES devices 4 Use only an anti static solder removal device Some solder removal devices not classified as anti static ESD protected can generate electrical charge sufficient to damage ES devices 5 Do not use freon propelled chemicals These can generate electrical charges sufficient to damage ES devices 6 Do not remove a replacement ES device from its protective package until imm...

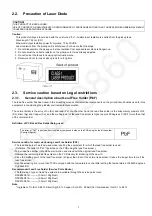
Page 7: ...al solder Definition of PCB Lead Free Solder being used Service caution for repair work using Lead Free Solder PbF The lead free solder has to be used when repairing the equipment for which the lead free solder is used Definition The letter of PbF is printed on the PCB using the lead free solder To put lead free solder it should be well molten and mixed with the original lead free solder Remove th...

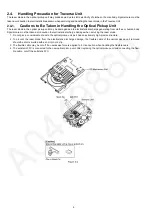
Page 8: ... Special care must be taken avoid caution to electrostatic discharge damage when servicing the laser diode 1 Do not give a considerable shock to the optical pickup unit as it has an extremely high precise structure 2 To prevent the laser diode from the electrostatic discharge damage the flexible cable of the optical pickup unit removed should be short circuited with a short pin or a clip 3 The fle...

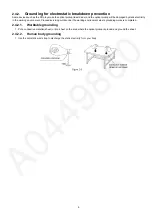
Page 9: ...tricity in the working environment Proceed servicing works under the working environment where grounding works is completed 2 4 2 1 Worktable grounding 1 Put a conductive material sheet or iron sheet on the area where the optical pickup is placed and ground the sheet 2 4 2 2 Human body grounding 1 Use the anti static wrist strap to discharge the static electricity form your body ...

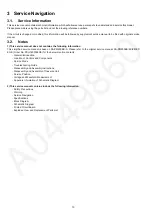
Page 10: ...tion This simplified service manual is base on SA PM250EB S Please refer to the original service manual SA PM250EB EC EE EF EG S Order No PSG1403006CE for the below mention contents General Introduction Location of Controls and Components Service Mode Troubleshooting Guide Disassembly and Assembly Instructions Disassembly and Assembly of Traverse Unit Service Position Voltage and Waveform Measurem...

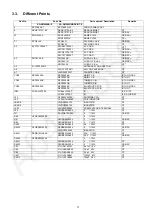
Page 11: ...5069AB REP5069BB TUNER P C B RTL GS GSX REP5069DB TUNER P C B RTL GT PCB4 REP5069AC REP5069BC BLUETOOTH P C B RTL GS GSX REP5069DC BLUETOOTH P C B RTL GT IC52 VUEALLPT094 VUEALLPT087 IC E S D GT VUEALLPT091 IC E S D GS GSX L52 G2A380Y00002 ANTENNA COIL GT L54 G1C4R7MA0495 CHIP INDUCTOR GT LB8018 J0JDC0000102 INDUCTOR GT LB8019 J0JDC0000102 INDUCTOR GT JK52 K4AC02B00042 JK AM ANTENNA TERMINAL GT L5...

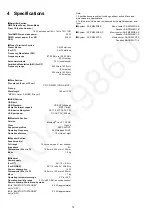
Page 12: ...ss Class 2 Supported profiles A2DP AVRCP Operating Frequency 2 4 GHz band FH SS Operation distance 10 m Line of sight Q Speaker Section Speaker unit s Full range 10 cm cone type x 1 per channel Impedance 6 Ω Dimensions W x H x D 139 mm x 224 mm x 136 mm Mass 1 3 kg Q General Power supply For GT AC 110 V 60 Hz For GS GSX AC 110 to 240 V 50 60 Hz Power consumption 14 W Dimensions W x H x D 184 mm x ...

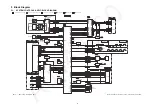
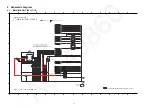
Page 13: ...01 VOL JOG BLUETOOTH PAIRING S903 TREBLE S902 BASS S901 PLAY PAUSE S909 FF S906 STOP S907 SELECTOR S904 REW S905 POWER S900 EJECT S910 127 XIN PLL 128 XOUT PLL X8001 M VDET PCONT SMPS CUT PCONT3 84 PCONT3 STBY CONTROL 93 M VDET 38 DC DET PWR DC DET PWR 77 STBY CTRL USB ENABLE 105 USB OVC 106 TRV CCW TRV CW SDOUT CLVOUT FDOUT TDOUT INNER SW OPEN SW LCD DRIVER C0HBA0000268 IC900 CD INTERFACE P C B C...

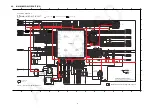
Page 14: ...A DA US US DA SU SU DA DA DA SU R8024 100K R8028 100K FL_CS FL_DO 100 R8047 FL PCONT 6 8 7 5 2 1 4 3 J0JAD0000007 RX8007 100P C8054 6 8 7 5 2 1 4 3 RX8008 J0JAD0000007 USB_OVC USB_EN BT_UART_RTS DC_DET_AMP BT_PCONT PW_STBY3R3V LB8004 J0JYC0000656 R8208 10K 10 C8032 0 1 C8064 R8050 100K 8 6 5 7 4 2 1 3 RX8010 D1H81014A042 0 1 C8031 J0JHC0000118 LB8009 2 1 7 8 4 3 6 5 RFKWFPM250EM 16M FLASH MEMORY I...

Page 15: ... 7 4 2 1 3 RX8001 D1H81014A042 C8059 100P C8005 C8002 100P C8004 1000P 100P C8003 100P DSP_MUTE DSP_ERR R8222 2 2K J0JYC0000656 LB8015 DSP_RESET J0JYC0000656 LB8013 J0JYC0000656 LB8014 C8001 0 1 C8000 0 1 3 1 2 4 5 IC8002 C0EBE0000338 RESET R8114 0 R8000 100 C8029 100P C8030 0 1 LB8010 J0JYC0000656 J0JYC0000656 LB8011 C8035 0 1 C8036 10 C8033 0 1 J0JYC0000656 LB8012 C8026 0 022 2 1 7 8 5 4 3 6 C3E...

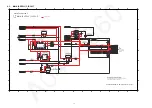
Page 16: ... R1105 R1100 100K LB1100 J0JYC0000656 C1137 1 C1187 100P J0JYC0000656 LB1101 2 2K R1150 R1129 150K 3 1 2 4 5 C0DBEYY00146 9V VOLTAGE REGULATOR IC1104 0 R1104 J0JGC0000063 LB1102 R1116 56K 1 C1130 1 C1131 DA PW_LCD9V DA VP_GND MI PW_STBY1R55V R1145 0 0 1 C1183 B0JCGD000016 D1103 3 1 2 B0ADDH000009 D1104 C1136 1 0 R1101 5 6 R1142 5 6 R1143 0 1 C1190 23 2K R1141 10K R1130 100P C1189 C1120 1 R1144 0 D...

Page 17: ... L400 R431 22K J0JYC0000366 LB402 C433 10 R435 100K 100K R437 100K R436 C434 10 R434 100K J0JYC0000366 LB404 LB405 J0JYC0000366 J0JYC0000366 LB403 C436 1000P 1000P C435 C458 0 01 0 01 C457 C405 15P C407 2700P C406 0 027 C404 12P R413 1 5K R412 1M R414 1 5K R416 100K 2 3 1 4 H0J245500110 X400 C438 1000P 1000P C437 25V220 C410 DVDD LRCK3 GND1 VCCP1 OUT1P DGND HPMUTE OUT1N GNDP2 BSP2N GNDP2 25 OUT2N ...

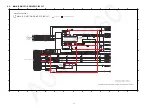
Page 18: ...0V10 C5019 1 2K R5009 2 1 27 5 24 25 22 17 19 18 15 16 30 20 21 7 11 10 13 14 12 8 29 9 23 6 3 4 26 28 IC5001 C0GBY0000213 5CH MOTOR DRIVER 2 2M R5038 R5036 0 R5007 0 LB5002 J0JYC0000656 C5027 10 0 1 C5028 0 01 C5002 C5025 10 C5001 10 0 01 C5026 J0JYC0000656 LB5001 FWD REGO1 REV TRB_1 REGO2 VINSL VOSL VOSL VOFC VOFC VCC FIN VOTR VOTR VINFC NC BIAS PVCC FIN GND NC VCTL VOLD VINLD VINTK TRB_2 VOLD V...

Page 19: ...L54 GT G1C4R7MA0495 C61 LB52 0 C62 0 1 7 9 8 4 5 1 3 2 6 CN51 4 12 1 2 14 T1 17 19 18 16 15 20 3 13 THERMAL PAD 5 11 10 8 9 7 6 IC52 G2 G3 G1 JK51 1000P LB51 J0JYC0000656 VA51 B0ZBZ0000156 DGND PW_3R3V TU_INT TU_SDIO TU_RESET TUN_BCK TU_SCLK TUN_DATA TUN_LRCK 560 1K R64 0 220 220 0 1 SEN RST SCLK VIO VDD RCLK SDIO DOUT GND RFGND AMI FM ANT DCLK LIN RIN DFS 2 2K R65 0 VUEALLPT087 GT VUEALLPT091 GS ...

Page 20: ... R8029 R8005 IC8004 IC5001 C8033 C8032 C8031 C8030 C8029 C8026 C8025 C8023 C8022 C8021 C8020 C8019 C8018 C8017 C8015 C8013 C8009 R8114 C8007 C8005 C8006 C8003 C8002 C8001 R8085 R8084 R5008 LB8008 R8067 LB8004 R8066 LB8003 LB8002 LB8001 LB8000 C6012 C6013 LB5001 Q8000 R8209 LB8103 LB8105 LB8104 R437 R436 R435 R434 R8210 LB5003 C5009 C5010 LB1110 LB1112 LB8110 LB8111 LB8114 LB1109 LB8102 LB8107 R500...

Page 21: ...8002 IC8002 C8049 R8001 IC8001 C8048 R8000 LB8017 C8045 R8206 C8044 C8043 C1137 C8042 C1136 C8041 C8040 RX8011 IC1106 RX8010 C8038 RX8009 C8036 RX8008 C8035 RX8007 RX8005 RX8003 RX8002 RX8001 C8024 C8016 R8117 C8010 R8116 R8115 C8008 R8113 LB8015 R8094 R8091 R8090 C8000 R8089 R8088 R8083 R8082 R8081 R1143 LB8009 R8076 R1142 R8070 LB8007 R8069 LB8006 LB8005 LB8011 R8057 R8056 C1187 R6000 R5022 R110...

Page 22: ...OR INDICATION ONLY C TUNER P C B REP5069BB GS GSX REP5069DB GT 3734AB 3734AB 3734AB 3734AB PbF PbF C51 C68 LB51 L51 L54 R60 R64 C69 CN51 C61 C62 C65 C66 C67 IC52 JK51 LB52 R51 R52 R55 R56 R57 R59 VA51 R65 R66 SIDE A SIDE B FM ANT C52 C64 JK52 L52 L53 R81 R82 1 3 2 8 9 6 7 4 5 20 16 15 11 10 6 5 1 1 2 1 6 4 3 1 ...

Page 23: ...1700 JK51 IR921 F1700 CN8003 CN8002 CN8001 CN8000 CN6001 CN7002 CN7001 CN5002 CN5001 CN900 CN400 CN1100 CN51 CD MECHANISM 310 310 301 29 26 26 25 28 27 24 23 22 22 22 22 21 21 21 21 20 19 19 19 19 19 19 18 17 16 15 14 13 12 11 10 9 9 8 8 8 8 8 8 7 7 7 6 5 4 7 4 7 4 7 4 7 4 6 4 6 4 5 4 4 4 3 4 2 4 1 4 3 2 1 g g e e f h h f d d c c b b a a NOTE PART IS NOT SUPPLIED REF IS FOR INDICATION ONLY 1 2 3 4...

Page 24: ...A A6 A4 FM INDOOR ANTENNA A3 O I BOOK A2 AC CORD FOR GT ONLY A2 AC CORD FOR GS GSX ONLY A2 AC CORD FOR GS GSX ONLY A2 FOR GS GSX ONLY A1 1 R C BATTERY COVER A1 REMOTE CONTROL SA PM250GS S SA PM250GSXS SA PM250GT S PACKAGING DRAWING 1 2 3 4 5 6 7 8 9 A B C D E F G H 10 11 12 13 P2 POLYFOAM TOP POLYFOAM BOTTOM NOTE PART IS NOT SUPPLIED ...

Page 25: ...W2 LCD HOLDER BASE 1 12 RMNX1012A W2 LCD HOLDER COVER 1 13 RMKX1020 3 SMPS CHASSIS 1 14 RMXX1008 2 LCD DIFFUSER SHEET 1 15 RSCX1040 2 SMPS SHIELD 1 16 RWJ1A03113XX 3P WIRE BASS BUTTON FUNCTION BUTTON 1 17 RWJ1A04075XX 4P WIRE PANEL FUNCTION BUTTON 1 18 REX1726 1 10P WIRE SMPS MAIN 1 19 XTB3 10JFJ SCREW 6 20 REE1950 13P FFC MAIN LCD 1 21 XTW3 10SFJK SCREW 4 22 RKAX0042 K LEG CUSHION 4 23 RGN3453B K...

Page 26: ...RD 1 GS GSX A2 K2CQ2YY00119 AC CORD 1 GS GSX A2 K2CT2YY00097 AC CORD 1 GS GSX A3 RQT9926 B O I BOOK En 1 GS GSX A3 RQT9931 G O I BOOK Cn Ar 1 GS GSX A3 RQT9932 K O I BOOK Co 1 GT A4 RSAX0002 FM INDOOR ANTENNA 1 A6 N1DYYYY00011 AM LOOP ANTENNA 1 GT A7 J0KG00000037 FERRITE CORE 1 GT Safety Ref No Part No Part Name Description Qty Remarks ...

Page 27: ... AND INDUC TORS L52 G2A380Y00002 ANTENNA COIL 1 GT L54 G1C4R7MA0495 CHIP INDUCTOR 1 GT LB8018 J0JDC0000102 INDUCTOR 1 GT LB8019 J0JDC0000102 INDUCTOR 1 GT JACKS JK52 K4AC02B00042 JK AM ANTENNA TERMINAL 1 GT CHIP JUMPERS L53 D0GBR00J0004 0 1 10W 1 GT W1 ERJ3GEY0R00V 0 1 10W 1 GS GSX RESISTORS R81 D0GAR00J0005 0 1 16W 1 GS GSX R82 D0GAR00J0005 0 1 16W 1 GT R450 D0GB680JA065 68 1 10W 1 GT R6002 D0GBR...

Reviews: