Operating Instructions
IC Recorder
RR-US065
Model No.
Matsushita Electric Industrial Co., Ltd.
Web Site:
http://www.panasonic.co.jp/global/
RQT8524-B
H0206WM0
E
En
Dear customer
Thank you for purchasing this product.
For optimum performance and safety, please read these instructions carefully.
Before connecting, operating or adjusting this product, please read the instructions completely.
Please keep this manual for future reference.
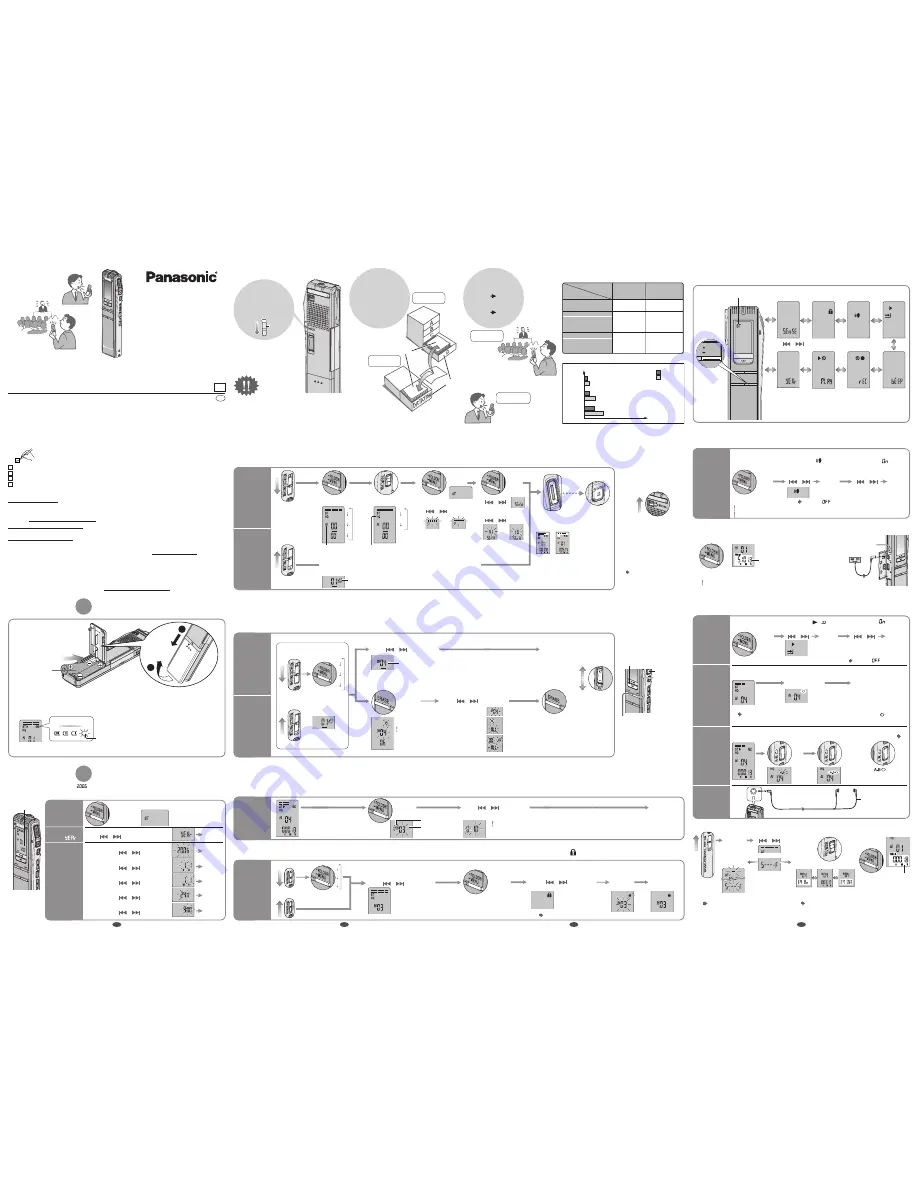
Preparation
1
Inserting batteries
1 Stereo earphones............................................................................ (L0BAB0000172)
2 CD-ROM (Voice Editing Ver.1.0 Premium Edition)
1 USB cable ...................................................................................... (K2KZ4CB00010)
1 Dictation cord .................................................................................(K2KC2CA00003)
Before use
Hint
3
Meeting
recording
Dictation
recording
*
Press [
g
STOP] to stop the operation midway/
cancel the setting.
*
The unit returns to standby if there is no
operation during each setting after 10 seconds
have elapsed.
*
There is no power button.
*
After use, switching to hold
is recommended to save
the batteries and prevent
accidental operations. (The
display will turn off.)
*
Because the settings are
automatically set, you can
record easily to take notes.
*
By combining settings, you
can record the sound that
best suits your needs.
LO (Close)
HI (Distance)
Stereo
Microphone
sensitivity
Microphone
directional [OFF]
(multiple sound sources)
Microphone
directional [ON]
(one-way sound source)
Monaural
Monaural
An interview during
a meeting etc.
A symposium
etc.
A language
lesson etc.
A lesson,
lecture etc.
A normal
meeting etc.
Large-scale
meeting etc.
Recording
settings
Hint
1
Release hold
before use
HOLD
HOLD
HOLD
Combining stereo/monaural, microphone
directional and microphone sensitivity
10 hours 10 minutes
High quality sound
SP
Standard
play
( )
FQ
Fine
quality
( )
HQ
High
quality
( )
Long
recording time
19 hours 30 minutes
19 hours 30 minutes
39 hours
33 hours 20 minutes
66 hours 50 minutes
Stereo
Monaural
Menu display
Press
and hold
While
stopped
Stereo/monaural
setting
ɦ
1
Continuous
play
i
q
/
g
u
Preventing
unnecessary
recording
File lock
ɦ
2
Operation
beep
Setting
the time
ɦ
1 Not displayed during dictation recording.
ɦ
2 Displayed only when there is a recorded file.
ɦ
3 Displayed only when the time is set.
Use [
] to change the menu and [
q
/
g
] to enter
Timer
play
ɦ
2
ɦ
3
Timer
recording
ɦ
3
FOLDER/
MENU
Recording
1
Select meeting
or dictation
recording
2
Select
the folder
3
Select the
recording
mode
4
Select
stereo or
monaural
5
Select the
microphone
sensitivity
6
Recording
Each time
you press
Dictation folder
HQ mode
Dictation recording mode
Monaural recording
(When dictation recording, the following settings are automatically set.)
*
Press to pause
recording.
Press again to
restart the same
file.
*
Is effective with dictation
recording or monaural
sound.
Folder
A
B
C
D
Recording mode
[
g
STOP]
(STOP REC)
Dictation folder
Meeting
recording
Dictation
recording
g
To record a one-way
sound source
more clearly
(microphone directional)
Stereo
Monaural
Stereo
Monaural
Each time
you press
„
‟
[
q
/
g
]
(ENTER)
†
[
]
‡
[
q
/
g
]
(ENTER)
Press
and hold
„
Press
and
hold
‟
[
]
†
[
q
/
g
]
(ENTER)
‡
[
]
•
[
q
/
g
]
(ENTER)
Recording
from a distance
( )
Recording
up-close
( )
or
or
*
Recording
information
is displayed.
(Recording date)
ɫ
(Recording start time)
ɫ
(Recording time)
ɫ
(Total number of files)
[REC/PAUSE]
(START REC)
g
To adjust the
volume
Increase 20
Decrease 0
HQ
FQ
SP
Playing/Erasing
Playing
Erasing
1
Select the
folder
2
Select file or folder
3
Play/Erase
g
Selected file
g
All files in a folder
g
All folders
After selecting, information at the time of
recording is displayed.
g
A-D folder
g
Dictation folder
Use [
] to select
Use [
] to select
(PLAY)
[
q
/
g
]
Press
and hold
You cannot
restore files you
erase.
File number
A
B
C
D
(ERASE)
The dictation
folder is selected
(
)
Play
Erase
Organizing
1
Play the file
2
Enter the
move mode
3
Select the
destination folder
4
Move
Move
1
Select the folder
3
Enter the
menu mode
4
Select “ ”
5
Lock
g
A-D folder
g
Dictation folder
File lock
Destination folder
Number of files in
destination folder
Use [
] to select
g
To unlock
Do the above steps and select the file to unlock in step
2
.
You cannot move a file from A-D folder to
dictation folder, however you can move it
from dictation folder to A-D folder.
Press
and hold
Press
and hold
2
Select the file
Use [
] to select
Use [
] to select
(LOCK)
[
q
/
g
]
(ENTER)
[
q
/
g
]
(ENTER)
[
q
/
g
]
Other recording methods
g
Checking the remaining available
recording time
Press
and
hold
Available
recording time
*
Press again to return to the elapsed
recording time display.
Recording automatically pauses when there is no sound.
1
Enter the
menu mode
3
Select “
”
g
Recording through an external
microphone
(not included)
Plug type:
ø 3.5 mm stereo mini plug
(The built-in microphone
switches off.)
Preventing
unnecessary
recording
VAS: voice
activated
system
( )
Use a plug in power
compatible microphone
stereo.
(ENTER)
[
q
/
g
]
2
Select “ ”
g
To turn the function off
Select “
” in step
3
.
Turn the function off when recording important files.
During
recording
( )
Available recording time also appears when
the remaining time becomes very short.
[
]
[
]
PLUG IN
POWER
(
)
MIC
(ENTER)
[
q
/
g
]
Other play methods
g
Basic operations during
play
Backward
*
Press to return to the
beginning of the file. (Press
twice to return to the
previous file)
*
Press and hold to search.
Forward
*
Press to
go to the
beginning of
the next file.
*
Press and
hold to
search.
Play/Stop
*
While stopped, press again
to begin play from where last
stopped.
Stop
3
Set the end
point (B)
To play one
segment
of a file
repeatedly
(A-B repeat play)
To play
a file
repeatedly
(File repeat play)
1
Play the
file
2
Set the start
point (A)
3
Play
1
Select
the file
2
Set repeat
Press
and hold
Listening
with the
earphones
g
To turn the
function off
Press
Press
Press
Plays the
files in
the folder
continuously
(Continuous play)
1
Enter the
menu mode
2
Select “ , ”
3
Select “
”
[
]
g
To turn the function off
Select “
” in step
3
.
Press
and
hold
(ENTER)
[
q
/
g
]
[
]
(ENTER)
[
q
/
g
]
*
“
”
disappears on
the display.
*
There will be no sound output from the speaker.
g
Changing the playback speed
Select the speed
(×0.5/×0.75/×1.0/×1.5/×2.0)
*
To return to normal playback speed
Move [SPEED CONTROL] to [OFF].
Slow
Fast
Press
and hold
[
]
During
playing
(
)
[
q
/
g
]
MEETING
RECORDING
Microphone
sensitivity
ɦ
1
or
A
B
C
D
g
To turn the function off
Plug type:
ø 3.5 mm stereo mini plug
g
Cutting excessive noise
(Playback equalizer)
Press and hold
On
Off
*
To check the current mode
Press [REC MODE]
briefly.
Recording mode and approximate total recording time of all folders
Each time
you press
(PLAY)
[
q
/
g
]
[
q
/
g
]
Important
business
Urgent
business
DICTATION
RECORDING
(
⏺
refer to “Recording mode and approximate
total recording time of all folders” on page 3)
More than
1 second
(
)
g
Checking the
remaining play time
Remaining
play time
*
Press again to return
to the elapsed play
time display.
( )
During
playing
The first three seconds (approximately) are always recorded.
Stereo earphones
(included)
( )
During
playing
Press [
q
/
g
] once to stop. Then press and hold [
q
/
g
] until “ ”
disappears on the display.
Supplied accessories
1
Enter
the
menu
mode
*
When the year is flashing (e.g.
on the display), begin from step
⊄
below.
Stereo/monaural setting
Use [
] to select
g
Year
g
Month
g
Time display (12/24H)
g
Time
Flashes until the
time is set.
Select
“
”
2
Set the
time
3
*
The clock has
a monthly
accuracy of
+/– 60 seconds
at room
temperature.
Use [
] to select
Preparation
2
Setting the time
(ENTER)
[
q
/
g
]
Use [
] to select
Use [
] to select
Use [
] to select
Press
and hold
*
A menu is displayed.
(
⏺
refer to “Menu
display” on page 4)
(ENTER)
[
q
/
g
]
(ENTER)
[
q
/
g
]
(ENTER)
[
q
/
g
]
(ENTER)
[
q
/
g
]
g
Day
Use [
] to select
(ENTER)
[
q
/
g
]
Hint
2
Recorded
contents are
stored in
folders
FOR
MEETING
*
A maximum of 99 files can be stored
in each folder.
Folder
FOR
DICTATION
File
g
To listen to the
recorded audio
Use the included stereo
earphones.
(
⏺
refer to “Other play
methods” on page 4)
Long cord to the right
Sales and Support Information
(For the United Kingdom and Republic of Ireland)
Customer Care Centre
•
For customers within the UK: 08705 357357
•
For customers within the Republic of Ireland: 01 289 8333
•
Visit our website for product information
•
E-mail: [email protected]
Technical Support for AV Software
• For UK, ROI:08701 505610
Direct Sales at Panasonic UK
•
Order accessory and consumable items for your product with ease and confidence by phoning our Customer
Care Centre Monday-Thursday 9:00am-5:30pm, Friday 9:30am-5:30pm (Excluding public holidays).
•
Or go on line through our Internet Accessory ordering application at www.panasonic.co.uk
•
Most major credit and debit cards accepted.
•
All enquiries transactions and distribution facilities are provided directly by Panasonic UK Ltd.
•
It couldn’t be simpler!
•
Also available through our Internet is direct shopping for a wide range of finished products, take a
browse on our website for further details.
Interested in purchasing an extended guarantee?
Please call 0870 240 6284 or visit our website www.panasonic.co.uk/guarantee.
(
)
Full
Empty
The battery indicator
(displayed during operation)
*
If rechargeable batteries are to be used, rechargeable batteries manufactured by Panasonic are
recommended.
(Rechargeable batteries may not last as long as regular batteries.)
LR03, AAA battery
(not included)
Replace the batteries
1
2
O
P
E
N
Please check and identify the supplied accessories.
Use numbers indicated in parentheses when asking for replacement parts.
(Product numbers correct as of February 2006. These may be subject to change.)
*
Replace the batteries within 30 seconds to preserve the settings. The clock however will stop until
the batteries have been inserted. Recordings remain intact.
*
While setting the time, the clock will return to standby if there is no operation after
10 seconds
have elapsed.
If this happens set again from the start.
2
1
3
4


