86
3-4-3 General settings before external control
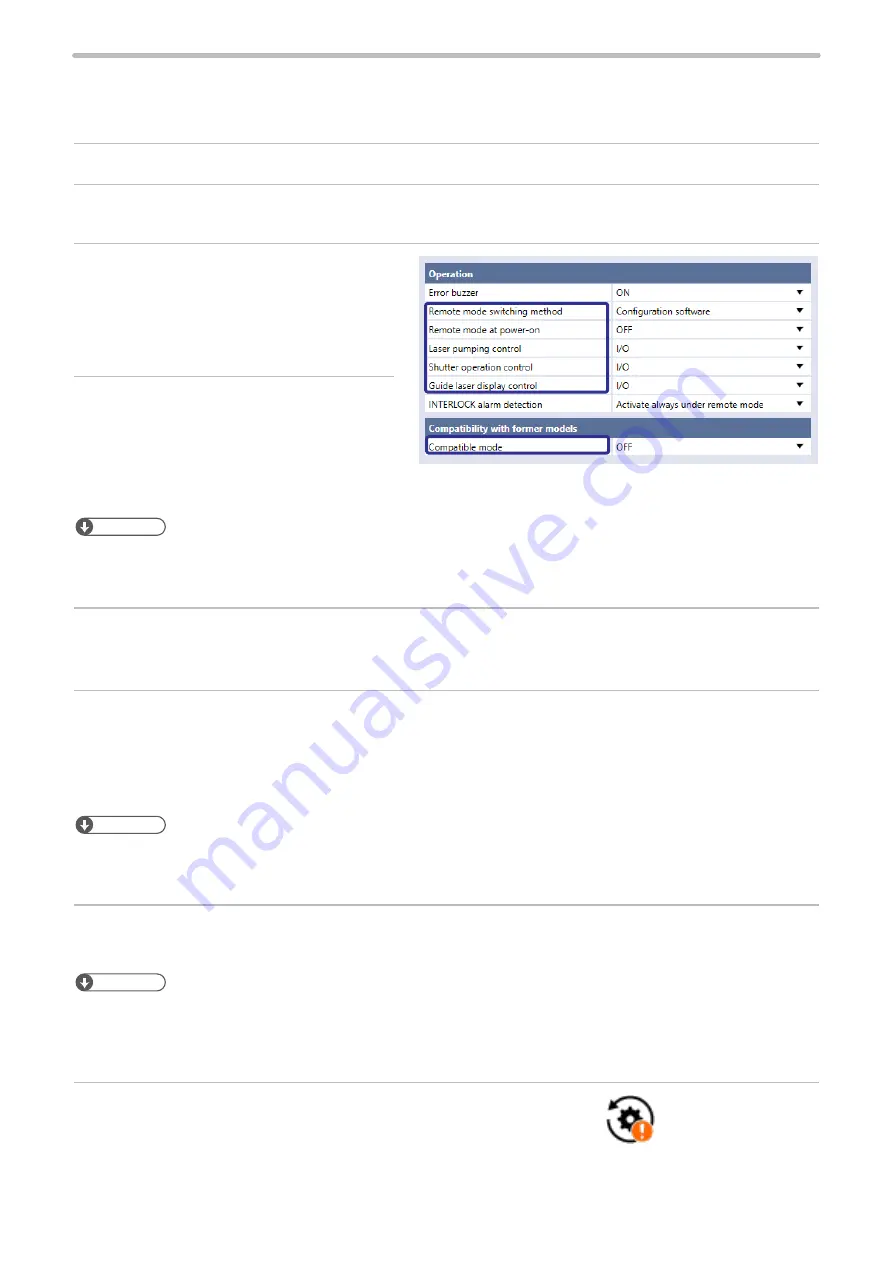
To control the laser marker via I/O or communication commands, configure the following items in advance at the system
settings of Laser Marker NAVI smart.
1.
Establish an online connection between your PC and the laser marking system.
2.
Go to the “System settings” screen.
3.
Select the “Operation/Information” tab.
Configure the settings under “Operation” and
“Compatibility with former models”.
4.
Select the switching method of the remote
mode.
• Configuration software (initial setting)
• I/O
ンㄆㄇㄆㄓㄆㄏㄆ
• LP-RH/LP-ZV: If “Configuration software” is selected for “Remote mode switching method”, you can switch remote mode
on and off by Laser Marker NAVI smart and the touch panel console or commercially available monitor. To use the touch
panel console or monitor, the optional expansion board should be installed on the controller.
5.
When “Configuration software” is selected, select the remote mode status at power-on.
• Remote mode ON
• Remote mode OFF (initial setting)
6.
Select the control method for the following operations between I/O or communication commands.
As the default, I/O control is selected to all settings.
• Laser pumping control
• Shutter operation control
• Guide laser control
ンㄆㄇㄆㄓㄆㄏㄆ
• To use “Test Marking Command (TST)” and “Laser Radiation for Measurement Command (SPT)” of the communication
commands, set the shutter operation control method to “communication commands”.
• If you want to control these I/O operations via optional network unit (EtherNet/IP or PROFINET), select “I/O” here.
7.
If you use the standard communication commands, set “OFF” to “Compatible mode”. If you want to use the same
command format with the former models of LP-400/LP-V series, enable “LP-400/V compatibility”.
ンㄆㄇㄆㄓㄆㄏㄆ
• For the details of the compatible command format with the former models, refer to the “Serial Communication Command
Guide: LP-400/V compatible mode”.
• If you use the optional network (EtherNet/IP or PROFINET) for the command control, you cannot use the command
format of LP-400/V compatible.
8.
Select “Apply to laser marking system” on the left side of the ribbon.
“Apply to laser marking
system” tool
ME-LPRH-SM-3
Summary of Contents for LP-RH Series
Page 19: ...1 Product Overview ME LPRH SM 3...
Page 42: ...2 Laser Marker Installation ME LPRH SM 3...
Page 68: ...3 Operation Method ME LPRH SM 3...
Page 90: ...4 External Control Using I O ME LPRH SM 3...
Page 138: ...5 External Control by Communication Commands ME LPRH SM 3...
Page 147: ...6 Link Control with External Devices ME LPRH SM 3...
Page 172: ...7 Maintenance ME LPRH SM 3...
Page 201: ...Troubleshooting ME LPRH SM 3...
Page 236: ...Index ME LPRH SM 3...
Page 239: ......


