


248
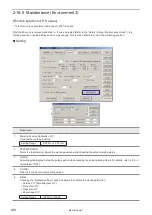
2-16-5 Maintenance (Environment 3)
[Function specific to LP-S series]
*
This function is not implemented in the LP-M/LP-Z series.
After the fiber unit is removed/attached, or focus is adjusted (Refer to the “Safety / Setup / Maintenance Guide”.), the
marking position or guide display position may change. This function allows to correct the marketing position.
Setting
5
1
2
3
4
Description
1
Marking Position Calibration X/Y:
Corrects the marking position.
Setting Range
-2.000 to +2.000 mm
2
TEST MARKING :
Starts the test marking. Adjust the marking position while checking the actual marking status.
3
GUIDE:
Executes guide display. Adjust the guide position while checking the actual marking status. For details, refer to “2-6-2
Guide laser” (P.93).
4
CLOSE:
Returns to the environment setting screen.
5
Detail :
Checking the “Detailed setting” check box allows to calibrate the marking distortion.
•
Paralle. X/Y (Parallelogram X/Y)
•
Pincushion X/Y
•
Trapezoid X/Y
•
Bow-shape X/Y
Setting Range
-10000 to +10000
ME-LPMSZ-OP-7
Summary of Contents for LP-M Series
Page 11: ...1 Basic Operation Procedure ME LPMSZ OP 7 ...
Page 76: ...76 MEMO ME LPMSZ OP 7 ...
Page 77: ...2 Description of Operation Screen ME LPMSZ OP 7 ...
Page 102: ...102 Symbol ME LPMSZ OP 7 ...
Page 255: ...Troubleshooting ME LPMSZ OP 7 ...
Page 276: ...Appendix ME LPMSZ OP 7 ...
Page 304: ...Index ME LPMSZ OP 7 ...
Page 307: ...No 9000 0063 56V ...
Page 308: ... Panasonic Industrial Devices SUNX Co Ltd 2013 2019 March 2019 9000 0063 56V ...