


Making Local Site
Settings
You can register up to 10 local sites. The same unit can
be used in multiple meeting rooms without the need to
change the network or connection mode settings.
Registering a Local Site
1.
Press
[Menu]
.
•
The Menu screen is displayed.
2.
Use
[
][
]
to select
"Select local site"
and
press
[Enter]
.
•
The select local site screen is displayed.
3.
Use
[
][
]
to select
"Not Registered"
and press
[B]
.
•
The local site settings screen is displayed.
4.
Use
[
][
]
to select the following items for input:
•
The following items are displayed over 2 pages.
To view all the items, press
[R]
to move to the
next page, and press
[B]
to move to the
previous page.
•
If you press
[G]
on the first or second pages, the
settings for both screens will be saved.
Note
•
If any required settings are not specified on
either of the screens, the settings will not be
saved even if you press
[G]
on either of the
screens. Save the settings only after you
have specified all the required settings. The
following settings are required:
–
"Local site name"
–
"IP Address"
(when
"Manual"
is
selected for
"IP Address"
)
–
"Subnet mask"
(when
"Manual"
is
selected for
"IP Address"
)
•
If you are currently entering
"Local site
name"
, the next screen will not be
displayed even if you press
[R]
.
•
In IP mode, you cannot configure the
"Encryption Key"
setting. This setting is
available only in NAT Traversal mode.
For details, refer to the following web site:
http://panasonic.net/psn/products/hdvc/
nat_traversal/index.html
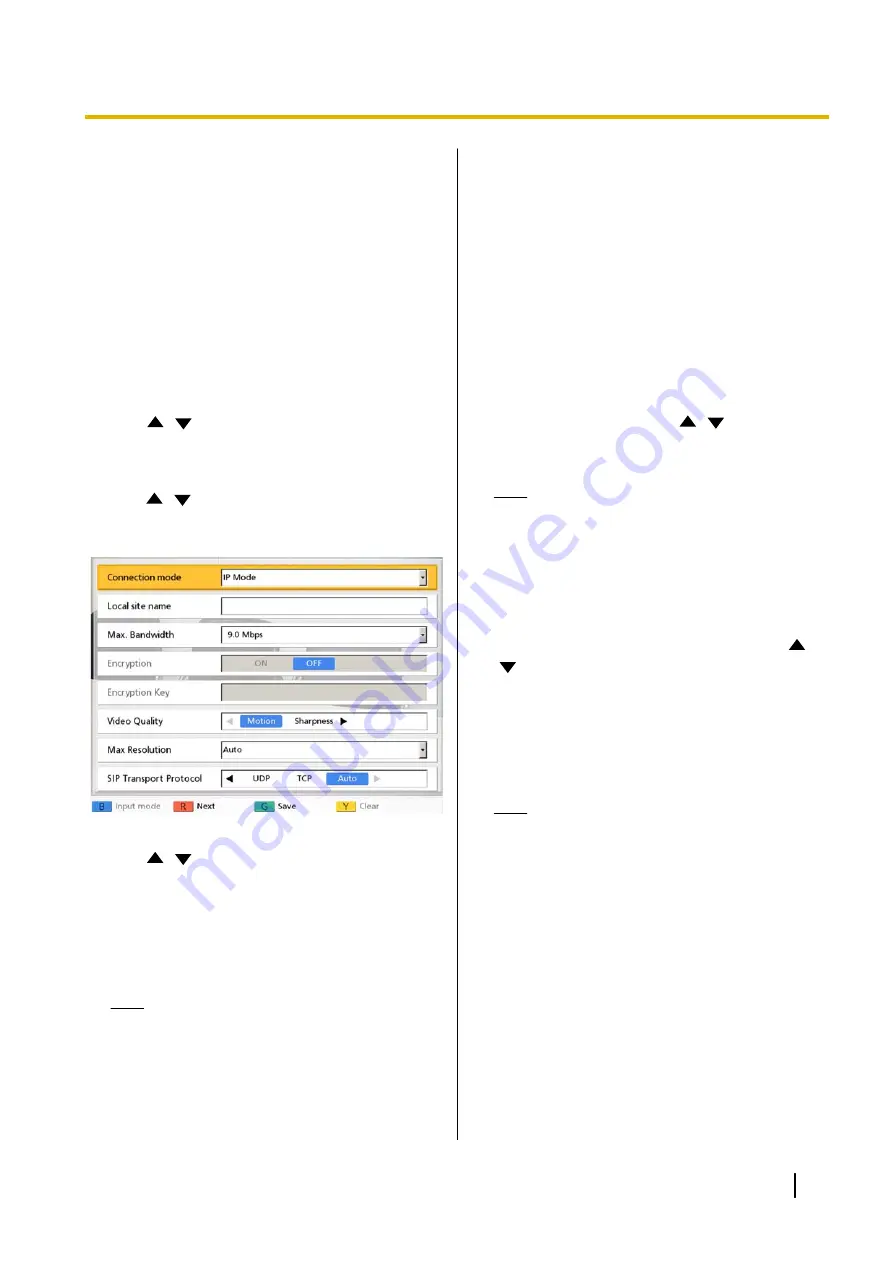
"Connection mode"
: Use
[
][
]
to select a
connection mode (
IP Mode
or
NAT Traversal
Mode
).
Note
•
If a connection mode is selected without
completing network settings, the settings
cannot be saved. Before making local site
settings, change the connection mode
(Page 99) and make network settings
(Page 84).
"Local site name"
: Enter a name for the local site.
"Max. Bandwidth"
: Press
[Enter]
and use
[
]
[
]
to select the maximum allowed bandwidth to
be used (
512 kbps
,
768 kbps
,
1.0 Mbps
,
1.2 Mbps
,
1.5 Mbps
,
2.0 Mbps
,
2.5 Mbps
,
3.0 Mbps
,
3.5 Mbps
,
4.0 Mbps
,
4.5 Mbps
,
5.0 Mbps
,
5.5 Mbps
,
6.0 Mbps
,
6.5 Mbps
,
7.0 Mbps
,
7.5 Mbps
,
8.0 Mbps
,
8.5 Mbps
,
9.0 Mbps
[default],
10.0 Mbps
).
Note
•
The maximum bandwidth during a video
conference call adjusts to that of the party
that has set the lowest bandwidth for the
maximum bandwidth setting among all
participating parties.
•
You cannot select a value that is higher than
the maximum bandwidth set by the dealer.
For details, contact your dealer.
•
When you make a 3-party video conference
call, select a value of
"1.0 Mbps"
or higher.
Otherwise, the image quality and the sound
quality cannot be guaranteed.
•
When you make a 4-party video conference
call, select a value of
"1.5 Mbps"
or higher.
Otherwise, the image quality and the sound
quality cannot be guaranteed.
User Manual
105
Contacts and Settings


