background image

This unit is compatible with Caller ID. To use this feature, you must 
subscribe to the appropriate service offered by your service provider/
telephone company.

Please read these Operating Instructions before using the unit and save for 
future reference.

Charge the handset battery for 7 hours before initial use.

Operating Instructions

2.4 GHz Expandable Digital Cordless Phone

Model No. 

KX-TG3021NZ

with 2 Handsets

Model No. 

KX-TG3022NZ

2.4 GHz Expandable Digital Cordless 

 Answering System

Model No. 

KX-TG3031NZ

with 2 Handsets

Model No. 

KX-TG3032NZ

with 3 Handsets

Model No. 

KX-TG3033NZ

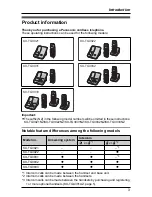
Model shown is KX-TG3021NZ.

Summary of Contents for KX-TG3021NZ

Page 1: ...re using the unit and save for future reference Charge the handset battery for 7 hours before initial use Operating Instructions 2 4 GHz Expandable Digital Cordless Phone Model No KX TG3021NZ with 2 Handsets Model No KX TG3022NZ 2 4 GHz Expandable Digital Cordless Answering System Model No KX TG3031NZ with 2 Handsets Model No KX TG3032NZ with 3 Handsets Model No KX TG3033NZ Model shown is KX TG302...

Page 2: ...ice Using Caller ID service 21 Caller list 22 Programming Programmable settings 24 Answering System Answering system 29 Turning the answering system on off 29 Greeting message 30 Listening to messages using the base unit 30 Listening to messages using the handset 31 Remote operation 32 Answering system settings 33 Voice Mail Service Using Voice Mail service 35 Multi unit Operation Intercom 37 Tran...

Page 3: ...Z KX TG3032NZ KX TG3033NZ Notable feature differences among the following models 1 Intercom calls can be made between the handset and base unit 2 Intercom calls can be made between the handsets 3 Intercom calls can be made between the handsets by purchasing and registering 1 or more optional handsets KX TGA301AZ page 5 Model no Answering system Intercom N 1 N N 2 KX TG3021 3 KX TG3022 r KX TG3031 ...

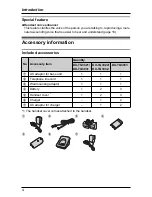
Page 4: ...ear and understand page 18 Accessory information Included accessories 1 The handset cover comes attached to the handset No Accessory item Quantity KX TG3021 KX TG3031 KX TG3022 KX TG3032 KX TG3033 1 AC adaptor for base unit 1 1 1 2 Telephone line cord 1 1 1 3 Wall mounting adaptor 1 1 1 4 Battery 1 2 3 5 Handset cover 1 1 2 3 6 Charger 1 2 7 AC adaptor for charger 1 2 1 2 3 4 5 6 7 ...

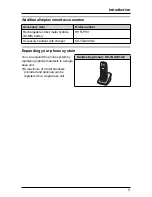
Page 5: ...Rechargeable nickel metal hydride Ni MH battery HHR P107 Accessory handset with charger KX TGA301AZ You can expand the phone system by registering optional handsets to a single base unit LA maximum of 4 total handsets included and optional can be registered to a single base unit Handset optional KX TGA301AZ ...

Page 6: ...is can result in the risk of fire or electric shock 10 Never push any objects through slots in the product This may result in the risk of fire or electric shock Never spill any liquid on the product 11 To reduce the risk of electric shock do not disassemble the product Take the product to an authorised service centre when service is required Opening or removing covers may expose you to dangerous v...

Page 7: ...tning storm LNever install telephone line sockets in wet locations unless the socket is specifically designed for wet locations LNever touch uninsulated telephone wires or terminals unless the telephone line has been disconnected at the network interface LUse caution when installing or modifying telephone lines LDo not touch the plug with wet hands LThe AC adaptor is used as the main disconnect de...

Page 8: ...d from the AC power outlet LThe earpiece on the handset is magnetised and may retain small metallic objects LThis equipment has been tested and found to comply with AS NZS CISPR22 2004 limits for electromagnetic interference Any modifications to any part of the system or to any peripherals may void the EMC compliance of the system or the peripherals LThe product s answering system only responds to...

Page 9: ...ep the product away from electrical noise generating devices such as fluorescent lamps and motors LThe product should be kept free from excessive smoke dust high temperature and vibration LThe product should not be exposed to direct sunlight LDo not place heavy objects on top of the product LWhen you leave the product unused for a long period of time unplug the product from the power outlet LThe p...

Page 10: ... during a power failure We recommend connecting a corded telephone to the same telephone line or to the same telephone socket using a BT double adaptor LThe unit is not designed to be used with rotary pulse dialling services LThe unit s answering system will not answer incoming calls on your FaxAbility number If you subscribe to an ADSL service Please attach a noise filter contact your ADSL provid...

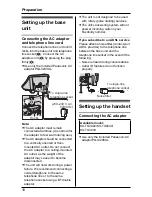
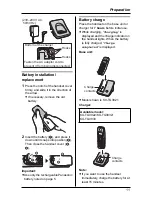
Page 11: ...lace the handset on the base unit or charger for 7 hours before initial use LWhile charging Charging is displayed and the charge indicator on the handset lights When the battery is fully charged Charge completed is displayed Base unit LModel shown is KX TG3021 Charger Note LIf you want to use the handset immediately charge the battery for at least 15 minutes 230 240 V AC 50 60 Hz Fasten the AC ada...

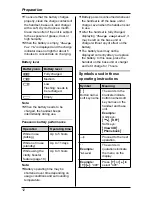
Page 12: ...se LAfter the handset is fully charged displaying Charge completed it may be left on the base unit or charger without any ill effect on the battery LThe battery level may not be displayed correctly after you replace the battery In this case place the handset on the base unit or charger and let it charge for 7 hours Symbols used in these operating instructions Battery icon Battery level 5 Fully cha...

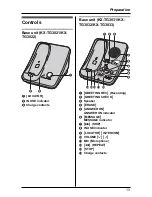
Page 13: ...s Base unit KX TG3031 KX TG3032 KX TG3033 A GREETING REC Recording B GREETING CHECK C Speaker D ERASE E ANSWER ON ANSWER ON indicator F MESSAGE MESSAGE indicator G SKIP H IN USE indicator I LOCATOR INTERCOM J VOLUME K MIC Microphone L REPEAT M STOP N Charge contacts A B C A B C J K M N L D H E F G I ...

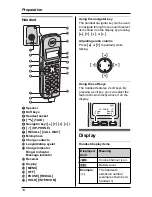
Page 14: ...or key can be used to navigate through menus and to select items shown on the display by pressing V or Adjusting audio volume Press or V repeatedly while talking Using the soft keys The handset features 2 soft keys By pressing a soft key you can select the feature shown directly above it on the display Display Handset display items A K L M P N Q O B B C D E F G H I J Displayed item Meaning J Voice...

Page 15: ...e unit announces the day and time it was recorded KX TG3031 KX TG3032 KX TG3033 1 MENU i 4 1 2 Enter the current day month and year by selecting 2 digits for each Example 15 August 2007 1 5 0 8 0 7 3 Enter the current hour and minute 12 hour clock format by selecting 2 digits for each Example 9 30 0 9 3 0 4 AM PM Select AM or PM 5 Save i OFF Note LIf you make a mistake when entering the date and t...

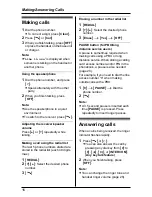
Page 16: ...elect the desired phone number 3 C Erasing a number in the redial list 1 REDIAL 2 V Select the desired phone number 3 Erase i Yes i OFF PAUSE button for PBX long distance service users A pause is sometimes required when making calls using a PBX or long distance service When storing a calling card access number and or PIN in the phonebook a pause is also needed page 20 For example if you need to di...

Page 17: ...hes rapidly After 4 additional minutes on hold the call is disconnected Mute button While mute is turned on you can hear the other party but the other party cannot hear you To mute your voice press Mute LTo return to the conversation press Mute or C Note LWhen this feature is turned on Mute flashes L Mute is a soft key visible on the handset display during a call RECALL button Pressing RECALL allo...

Page 18: ... time may decrease Handset voice enhancer This feature can simulate a band signal above the normal bandwidth limitations achieving a sound which is close to the actual voice You can turn this feature on or off depending on the circumstance Press VE during an outside call to turn on or off this feature Note LWhen this feature is turned on J is displayed LDepending on the condition and quality of yo...

Page 19: ...cursor to the character or number you want to erase then press Clear Enter the appropriate character or number LPress and hold Clear to erase all characters or numbers Finding and calling a phonebook item Searching for a name alphabetically by scrolling through all items 1 Phonebook i Search 2 V Select the desired item 3 Press C to dial the phone number Searching for a name by initial 1 Phonebook ...

Page 20: ... bank account PIN that you have stored in the handset phonebook without having to dial manually 1 During an outside call press MENU 2 V Phonebook i Select 3 Find the desired item page 19 i Call Note LWhen storing a calling card access number and your PIN in the phonebook as one phonebook item press PAUSE to add pauses after the number and PIN as necessary page 16 Copying handset phonebook items Yo...

Page 21: ...al call if the number dialled has the area code prefix included If this is unacceptable dial only the 7 digit local number Do not dial the 0 prefix or the area code Caller ID features When an outside call is being received the calling party s phone number is displayed Caller information for the last 50 callers is logged in the caller list by the most recent call to the oldest LIf the unit cannot r...

Page 22: ...en viewed or answered LIf an arrow is displayed after the number the whole phone number is not shown Press to see the remaining numbers To return to the previous display press Storing your area code We recommend storing your area code before using Caller ID page 21 Calls from the same area will be recorded in the caller list without the area code You do not have to remove it before calling back th...

Page 23: ...ber is not saved in the caller list Storing caller information into the phonebook 1 View CID 2 V Select the desired item i Select LTo edit the number press Edit then edit the number see step 3 on page 23 Editing a caller s phone number before calling back 3 Save LIf there is name information for the caller skip to step 5 4 Enter the name see the character table page 19 i Next i Save 5 OFF Erasing ...

Page 24: ... through the display menus 1 MENU 2 Press V or to select the desired menu i Select LIf there is a sub menu s press V or to select the desired item i Select 3 Press V or to select the desired setting i Save LThis step may vary depending on the feature being programmed 4 OFF Main menu Sub menu 1 Sub menu 2 Page Message play KX TG3031 KX TG3032 KX TG3033 31 V M access 36 Alarm 28 Ringer setting Ringe...

Page 25: ...032 KX TG3033 Ring count 1 33 Recording time 1 34 Remote code 1 33 Voice Mail Store VM access 1 35 Message alert 34 36 LCD contrast Key tone Auto talk 17 Set area code 22 Set tel line Set dial mode 1 44 Set recall time 1 17 Set line mode 1 Set base unit KX TG3031 KX TG3032 KX TG3033 Ringer tone 1 Registration HS registration 38 Deregistration 38 Main menu Sub menu 1 Sub menu 2 Page ...

Page 26: ...etting code System setting 1 Page Alarm 8 1 Once 0 Off 28 Auto talk 2 0 3 1 On 0 Off 17 Copy phonebook 1 item 1 20 Copy phonebook all items 2 20 Date and time 4 1 r 15 Deregistration 0 0 2 38 HS registration 0 0 1 38 Key tone 3 0 2 1 On 0 Off LCD contrast Display contrast 0 1 1 6 Level 1 6 3 Message alert 0 1 On 0 Off 34 36 Ringer tone Handset 1 2 1 3 Tone 1 3 4 7 Melody 1 4 Ringer volume Handset ...

Page 27: ...ing call 5 Generally the line mode setting should not be adjusted If Line in use is not displayed when another phone connected to the same line is in use you need to change the line mode to A 6 This feature allows the unit to automatically adjust the date and time setting when caller information is received To use this feature set the date and time first Set line mode 5 0 5 3 1 A 2 B r Store VM ac...

Page 28: ...larm select Off i Select i OFF 3 Set the desired date and time i Save 4 V Select the desired ringer tone i Save L We recommend selecting a different ringer tone from outside call 5 OFF Note LTo stop the alarm press any dial key or place the handset on the base unit or charger LWhen the handset is in use the alarm will not sound until the handset is in standby mode ...

Page 29: ...he unit automatically switches to another prerecorded greeting message asking callers to call again later If you recorded your own greeting message the same message is still announced to callers even though their messages are not recorded Turning the answering system on off Press ANSWER ON to turn on off the answering system LWhen the answering system is turned on the ANSWER ON indicator lights LW...

Page 30: ...and ask them to leave messages Playing back the greeting message Press GREETING CHECK Erasing your greeting message Press GREETING CHECK and then press ERASE while your greeting message is playing Listening to messages using the base unit When new messages have been recorded the MESSAGE indicator on the base unit flashes Press MESSAGE LThe base unit plays new messages LWhen you have no new message...

Page 31: ...bers only If Caller ID information was received for the call you can call the caller back while listening to the message 1 Press Select during playback LTo edit the number before calling back press Edit and edit the number page 23 2 Call Operating the answering system You can also operate the answering system by pressing dial keys on the handset during playback 1 If pressed within the first 5 seco...

Page 32: ...tion or press 2 to listen to more available operations Operations are presented by voice guidance in the following order Play back all messages Play back new messages Record a message Erase all messages Note LIf you do not press any dial keys within 10 seconds after a voice guidance prompt the unit disconnects your call Remote commands You can press dial keys to access certain answering system fun...

Page 33: ...e 3rd time You can then hang up without being charged for the call 1 MENU i 0 6 1 2 V Select the desired setting 3 Save i OFF For Telecom Call Minder or TelstraClear Message Mailbox service subscribers To receive Call Minder or Message Mailbox messages and use answering system properly please note the following L Call Minder and Message Mailbox are services provided by your service provider teleph...

Page 34: ...tted to each caller The default setting is 3min 1 MENU i 0 6 2 2 V Select the desired setting 3 Save i OFF Message alert You can select whether or not the message indicator on the handset flashes slowly when new messages are recorded The default setting is Off 1 MENU i 0 2 V Select the desired setting 3 Save i OFF Note LWhile message alert is on battery operating time is shortened page 12 ...

Page 35: ...any for details and availability of this service in your area LTo use the Voice Mail service provided by your service provider telephone company rather than the unit s answering system turn off the answering system page 29 Storing the Voice Mail VM access number In order to listen to your Voice Mail messages you must dial your service provider telephone company s Voice Mail access number Once you ...

Page 36: ...ess OFF Note LIf VM is not displayed the Voice Mail access number has not been stored Store the number page 35 LIf the handset still indicates there are new messages even after you have listened to all new messages turn it off by pressing and holding OFF until the handset beeps Message alert You can select whether or not the message indicator on the handset flashes slowly when there are new record...

Page 37: ...l the registered handsets beep for 1 minute LTo stop paging press INTERCOM 2 When you finish talking press INTERCOM Answering an intercom call 1 Press C or s to answer the page 2 When you finish talking press OFF KX TG3031 KX TG3032 KX TG3033 1 Press INTERCOM to answer the page 2 When you finish talking press INTERCOM Note LWhen the ringer volume is set to off the handset or the base unit rings at...

Page 38: ...he page LAfter the paging party disconnects you can talk to the outside caller Registering a handset The included handset and base unit are preregistered If for some reason the handset is not registered to the base unit register the handset 1 Handset MENU i 0 0 1 2 Base unit KX TG3021 KX TG3022 Press and hold LOCATOR until the IN USE indicator flashes KX TG3031 KX TG3032 KX TG3033 Press and hold L...

Page 39: ...the telephone line cord inside the wall mounting adaptor and connect the cord Drive the screws not included into the wall Mount the unit and then slide it down Connect the AC adaptor to power outlet page 10 To remove the wall mounting adaptor While pushing down the lever A remove the adaptor B 2 1 2 1 A B 83 mm 230 240 V AC 50 60 Hz Screws To single line telephone socket AC adaptor cord A B 83 mm ...

Page 40: ...ts should be plugged into the headset socket on the handset Switching a call between the headset and handset speakerphone To switch to the handset speakerphone press s To return to the headset press C Lanyard strap eyelet If you have a lanyard strap not included you can hang your handset from your neck or wrist Thread it through the eyelet as shown and pull to tighten it Available model KX TG3022 ...

Page 41: ...tems to you but there was an error Have the other handset user re send the items to you page 20 Incomplete Phonebook full LThe destination handset s phonebook memory is full Erase unnecessary items from the destination handset s phonebook page 20 Invalid LThere is no handset registered to the base unit matching the extension number you entered No items stored LYour phonebook or redial list is empt...

Page 42: ...0 LUnplug the base unit s AC adaptor to reset the unit Reconnect the adaptor and try again LThe handset has not been registered to the base unit Register the handset page 38 I cannot hear a dial tone LConfirm the telephone line cord is properly connected page 10 LDisconnect the unit from the telephone line and connect a known working telephone If the working telephone operates properly contact our...

Page 43: ...ing LA call is being received Answer the call and start again after hanging up Problem Cause solution I fully charged the battery but 7 continues to flash or 8 is displayed LClean the charge contacts and charge again page 12 LThe battery may need to be replaced with a new one page 11 The handset display is blank LConfirm that the battery is properly installed LFully charge the battery page 11 Whil...

Page 44: ...r details The handset does not ring LThe ringer volume is turned off Adjust it page 26 The base unit does not ring 1 LThe ringer volume is turned off Adjust it page 17 I cannot make a call LAnother handset is in use Try again later LIf the above remedy does not solve the probrem set the dialling mode Press MENU 0 5 1 Save OFF LThe unit is not designed to be used with rotary pulse dialling services...

Page 45: ... LOther telephone equipment such as a monitored Burglar Alarm or the modem in the SKY Digital decoder may be interfering with this unit Disconnect the other equipment and try again LThe caller requested not to send caller information page 21 Problem Cause solution I cannot listen to messages from a remote location LA touch tone phone is required for remote operation LEnter the remote code correctl...

Page 46: ...rox 210 g KX TG3031 KX TG3032 KX TG3033 Approx 250 g Power consumption KX TG3021 KX TG3022 Standby Approx 1 5 W Maximum Approx 4 5 W KX TG3031 KX TG3032 KX TG3033 Standby Approx 1 5 W Maximum Approx 4 7 W Power output 125 mW max Power supply AC adaptor 230 240 V AC 50 60 Hz Dimensions Approx height 156 mm width 48 mm depth 33 mm Mass Weight Approx 150 g Power output 125 mW max Power supply Ni MH b...

Page 47: ...Handset locator 37 Headset optional 40 Hold 17 I Intercom 37 K Key tone 26 L Line mode 27 M Making calls 16 Memory capacity message recording 29 Message alert 34 36 Missed calls 21 Mute 17 N Navigator key 14 P Pause 16 Phonebook 19 Phonebook copy 20 Power failure 10 R Recall 17 26 Recording time 34 Redial list 16 Registration 38 Remote code 33 Remote operation 32 Ring count 33 Ringer off 17 26 Rin...

Page 48: ... Fukuoka 812 8531 Japan Copyright This material is copyrighted by Panasonic Communications Co Ltd and may be reproduced for internal use only All other reproduction in whole or in part is prohibited without the written consent of Panasonic Communications Co Ltd 2007 Panasonic Communications Co Ltd All Rights Reserved Serial No Date of purchase found on the bottom of the base unit Name and address ...

Reviews: