background image

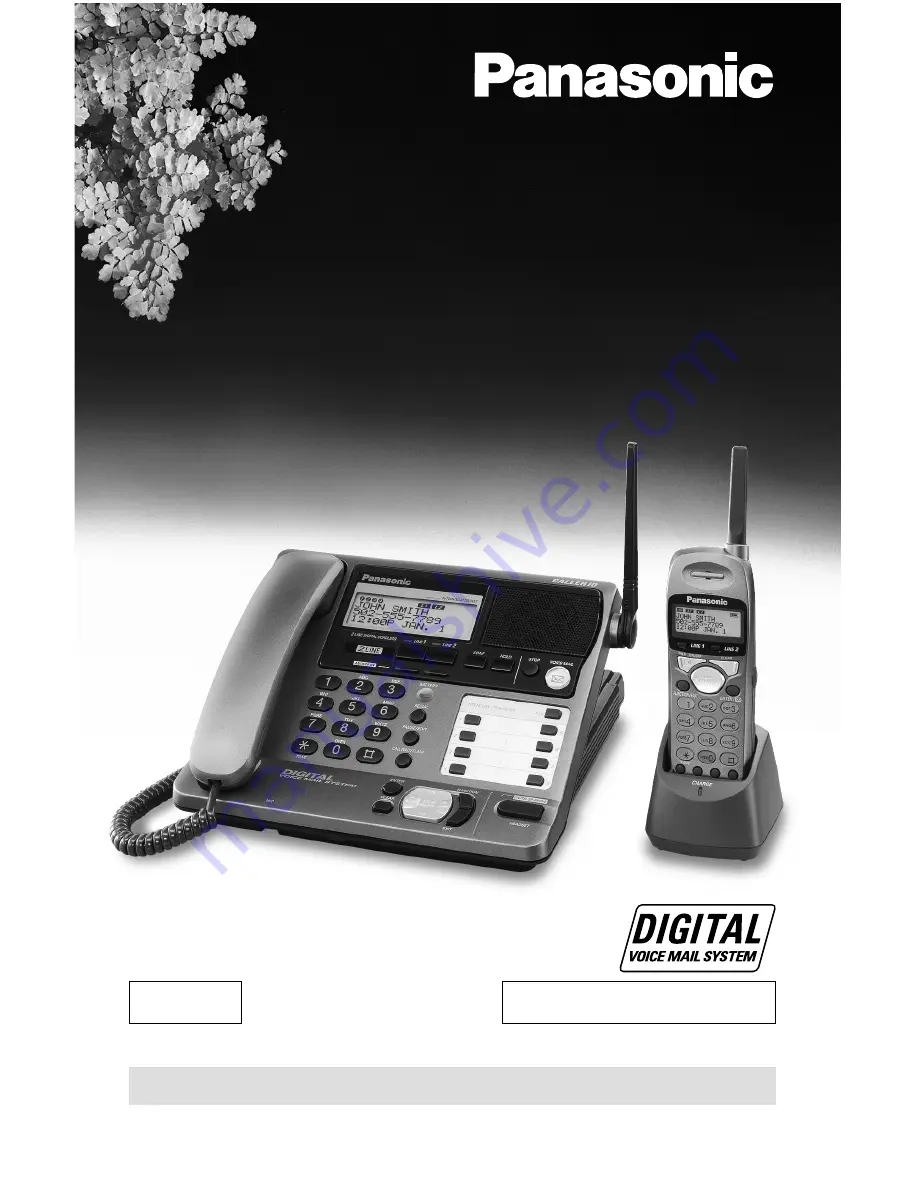
Caller ID Compatible

2.4GHz Multi-Handset Cordless Phone System

Model No. 

KX-TG2000B

Pulse-or-tone dialing capability

Operating Instructions

PLEASE READ BEFORE USE AND SAVE.

Charge the handset battery for about 8 hours before initial use.

2-LINE

Panasonic World Wide Web address:  http://www.panasonic.com

for customers in the USA or Puerto Rico 

Summary of Contents for KX-TG2000B

Page 1: ...l No KX TG2000B Pulse or tone dialing capability Operating Instructions PLEASE READ BEFORE USE AND SAVE Charge the handset battery for about 8 hours before initial use 2 LINE Panasonic World Wide Web address http www panasonic com for customers in the USA or Puerto Rico ...

Page 2: ...ephone company services After subscribing to Caller ID this phone will display a caller s name and phone number Call Waiting Caller ID which displays a second caller s name and phone number while the user is on another call on the same line requires a subscription to both Caller ID and Call Waiting Attach your purchase receipt here For your future reference Serial No Date of purchase found on the ...

Page 3: ... P P507 PQP50AA61 4 Wire Telephone Line Cord with Green Plugs p 14 15 one Handset Cord p 13 Order No PQJA212N Charger p 16 Order No PQLV30001Z Belt Clip p 85 Order No PQKE10101Z1 one one 2 Wire Telephone Line Cord with Transparent Plugs p 15 one CHARGE To use more than one cordless handset please purchase the optional cordless handset KX TGA200B The charger is included To order contact your dealer...

Page 4: ...ireless radio waves For maximum distance and noise free operation the recommended base unit location is Away from electrical appliances such as a TV personal computer or another cordless phone In a HIGH and CENTRAL location with no obstructions such as walls Raise the antenna The battery is beneath this cover Note If you use the cordless handset near a microwave oven which is being used noise may ...

Page 5: ...dless Handset 28 Answering Calls 30 Using the Other Line During a Conversation 31 Intercom 32 Making Intercom Calls 32 Answering Intercom Calls 33 Transferring a Call 34 Conference 35 Using the Directory 36 Storing Names and Numbers in the Directory 36 Dialing from the Directory 38 Base Unit Handset Base Unit Handset Base Unit Handset Base Unit Handset Base Unit Handset Base Unit Handset Base Unit...

Page 6: ...election 49 Setting Call Restriction Numbers 50 Incoming Call Tone 51 Setting the PIN 52 Registering Optional Cordless Handsets Using the PIN 53 Canceling Cordless Handset Registration 54 Selecting the Line Mode 55 Erasing the Directory Caller List and Redial List 55 Chapter 4 Voice Mail System Automated Attendant System Answering System Voice Mail System 56 Setting the Mailbox Password 57 Automat...

Page 7: ...s 76 Message Menu Mode 77 Automatic Message Delete Feature 77 Erasing All Messages in Mailboxes 78 Remote Operation from a Touch Tone Phone 79 How to Access the Voice Mail System 79 Pager Call 82 Storing a Pager Number 82 Storing the Pager Display Number 83 Setting the Unit to Call a Pager 84 Chapter 5 Useful Information Using the Handset Belt Clip 85 Wall Mounting for the Charger 85 Using an Opti...

Page 8: ...AUTOMATED ATTENDANT 1 2 3 4 6 7 8 ALL INTERCOM TRANSFER 5 LINE 1 Antenna p 4 13 Display p 11 PAUSE EDIT Button p 39 43 46 CALL WAIT FLASH Button p 46 47 CONF Conference Button p 35 REDIAL Button p 27 LINE 2 Button and Indicator p 26 28 30 31 HOLD Button p 28 31 DIGITAL SP PHONE Speakerphone HEADSET Button and Indicator p 26 30 32 87 MIC Microphone p 26 30 60 66 BATTERY Indicator p 12 INTERCOM TRAN...

Page 9: ...LINE 1 LINE 2 2LINE 2 LINE DIGITAL CORDLESS ANSWER ON AUTOMATED ATTENDANT Headset Jack p 86 LINE 1 ANSWER ON Button and Indicator p 59 65 LINE 2 ANSWER ON Button and Indicator p 59 65 STOP Button p 69 75 CLEAR Button p 37 39 45 54 70 ENTER Button p 18 20 36 44 Navigator Key I H p 18 27 38 41 59 65 EXIT Button p 18 38 41 60 66 FUNCTION Button p 18 36 VOICE MAIL Button p 68 74 Cover Memory Card Memo...

Page 10: ... TUV 8 WXYZ 9 OPER 0 LINE1 LINE2 Antenna Display p 11 TALK Button p 28 30 33 CLEAR Button p 37 39 45 54 73 Navigator Key H I p 18 29 38 41 FUNCTION EXIT Button p 18 38 41 47 TONE Button p 46 REDIAL PAUSE EDIT Button p 29 39 43 46 CALL WAIT FLASH Button p 46 47 LINE 2 Button p 28 30 31 Headset Jack p 88 ENTER Voice Mail Button p 18 61 71 74 CONF Conference Button p 35 INTERCOM HOLD TRANSFER Button ...

Page 11: ... is at least one new message in your mailbox p 71 During playback it will be displayed 12 00AM JAN 1 AHandset In Use Icon C Off invisible The line is free On The line is being used Flashing A call is on hold The Automated Attendant System or Answering System is responding to a call p 58 65 Flashing quickly A call is being received CThe battery icon indicates the battery strength p 17 DThe handset ...

Page 12: ...cator shows the battery strength Full to Medium The indicator lights Low The indicator flashes No power The indicator light is off Installing the Backup Battery in the Base Unit A rechargeable Ni Cd battery works as emergency power during a power failure The fully charged backup battery provides the base unit with a minimum of 20 minutes operation The battery is charged in the base unit while the ...

Page 13: ... all times It is normal for the adaptor to feel warm during use The BATTERY indicator lights while the AC adaptor is connected with the backup battery installed p 12 This is normal Connecting the Handset and AC Adaptor Handset Handset Cord Power Outlet AC 120 V 60 Hz AC Adaptor PQLV12 Fasten the AC adaptor cord to prevent it from being disconnected Hook Raise the antenna ...

Page 14: ...ecting the Telephone Line Cord s Connect the telephone line cord s to the base unit To connect a two line telephone jack Two Line Telephone Jack RJ14C 4 Wire Telephone Line Cord with GREEN Plugs LINE 2 LINE 1 2 GREEN Plug ...

Page 15: ...Jacks RJ11C LINE2 LINE1 4 Wire Telephone Line Cord with GREEN Plugs 2 Wire Telephone Line Cord with TRANSPARENT Plugs If you use the unit as a single line telephone only LINE 2 LINE 1 2 TRANSPARENT Plug Single Line Telephone Jack RJ11C 2 Wire Telephone Line Cord with TRANSPARENT Plugs With this connection you can only use LINE 1 LINE1 ...

Page 16: ... Charge Place the cordless handset on the charger and charge for about 8 hours before initial use Make sure the handset faces forward as shown The CHARGE indicator lights If you charge the discharged battery it will be charged quickly In that case the handset may feel warm This is normal Power Outlet AC 120 V 60 Hz AC Adaptor KX TCA1 Fasten the AC adaptor cord to prevent it from being disconnected...

Page 17: ...he battery life The battery cannot be overcharged Handset battery information After your Panasonic battery is fully charged p 16 Operation While in use TALK Up to about 8 hours While not in use Standby Display prompt Battery strength Handset battery strength You can check the battery strength on the handset display The battery strength is shown as in the chart below Fully charged Medium Low Needs ...

Page 18: ... or save a programming setting 6 When programming is complete a confirmation tone sounds The display will return to the main menu or the sub menu if the function item is in the sub menu You can continue programming other items To return to the standby mode press EXIT Useful information You can go back to the previous display by pressing I except when entering characters or numbers To return to the...

Page 19: ...et 1 Base unit Press FUNCTION 2 Press or until the arrow points to Registration and press H 3 Press or until the arrow points to HS registration and press H 4 Cordless handset Press FUNCTION 5 Press or until the arrow points to Registration and press H 6 While HS registration is at the arrow press H Handset registering 7 Base unit cordless handset Wait until a beep sounds on the base unit and hand...

Page 20: ... Caller ID information will automatically adjust the clock for daylight saving time If a power failure occurs the adjusted date time will be retained for at least 20 minutes with the backup battery fully charged p 12 Readjust if the date time is flashing on the display When entering the time in step 3 you cannot enter numbers greater than 12 Do not use military time To set 13 00 hours enter 0100 a...

Page 21: ...e current settings are displayed 4 Select Puls Pulse or Tone by pressing or for each line To move to the other line press H or I Selecting the Dialing Mode If your lines have touch tone service set to Tone If rotary or pulse service is used set to Pulse Select the mode for each line Your phone comes from the factory set to Tone Make sure that the base unit is in the standby mode Base Unit Dial mod...

Page 22: ...e LOW level You can also select the ringer volume while a call is being received Press or while the unit is ringing To turn the ringer off for each line use the ring group feature p 23 1 Press FUNCTION 2 Press or until the arrow points to Ringer setting and press H 3 While Ringer volume is at the arrow press H The current volume is displayed 4 Press to increase or press to decrease the volume Each...

Page 23: ... line Make sure that the base unit is in the standby mode Base Unit Ring group L2 HExt 123456780 ENTER Save HRing group L1 Ext 123456780 IH 7 Press ENTER A beep sounds The extensions removed from the ring group of the line will not ring and will not receive Caller ID information for incoming calls on the line Ex Extension 1 5 7 and 0 base unit will not ring for incoming calls on LINE 2 To program ...

Page 24: ...ime p 47 Call restrict p 50 Line setting Line selection p 49 Set line mode p 55 Voice mail Set password p 57 Call monitoring p 75 Message menu p 77 Recording mode p 75 Delete message p 78 Remaining space p 76 Auto msg delete p 77 Pager setting Pager number p 82 Pager on off p 84 Pager display p 83 Calling pager p 83 Registration Set PIN p 52 HS registration p 19 53 Deregistration p 54 Initializati...

Page 25: ...ith the base unit and 4 handsets For example 2 pairs of handsets are engaged in separate intercom calls while the base unit is engaged in an external call Allows two external calls while simultaneously conducting one intercom call For example the base unit and a handset are engaged in separate external calls while another handset is engaged in an intercom call with another handset External call on...

Page 26: ...ess DIGITAL SP PHONE and start again from step 1 After a few seconds the display will show the length of the call 3 When the other party answers talk into the MIC microphone 4 To hang up press DIGITAL SP PHONE The indicator lights go out In step 1 you can select a line by pressing a line button whose indicator is not lit instead of pressing DIGITAL SP PHONE If more than one handset is in use you m...

Page 27: ...EDIAL until the desired number is displayed You can scroll between numbers by pressing or To exit the list press EXIT 3 Lift the handset or press DIGITAL SP PHONE To erase an item repeat steps 1 and 2 and press CLEAR If No items stored is displayed the list is empty Hands free Digital Duplex Speakerphone For best performance please note the following Talk alternately with the caller in a quiet roo...

Page 28: ...ect a line by pressing the line button whose line status icon is not displayed instead of pressing TALK If the base unit and another handset or 2 other handsets are in use you may not be able to make a call In that case System is busy Please try again later is displayed If the unit detects a problem an error message will be displayed p 92 To release the hold Press the line button whose indicator i...

Page 29: ...the redial list The last 10 phone numbers dialed with the handset are stored in the redial list 1 Press REDIAL The last number dialed is displayed 2 Press REDIAL until the desired number is displayed You can scroll between numbers by pressing or To exit the list press EXIT 3 Press TALK To erase an item repeat steps 1 and 2 and press CLEAR If No items stored is displayed the list is empty To put a ...

Page 30: ...alling party information will be displayed after the first ring p 40 In order to view the Caller ID information please wait until the second ring to answer a call With the Base Unit You can answer a call by simply lifting the handset To hang up replace the handset Using the digital duplex speakerphone 1 Press DIGITAL SP PHONE The indicator lights The called line indicator light stops flashing 2 Ta...

Page 31: ...You can delete the two tones incoming call tone for the cordless handset You can set the two tones for the base unit See page 51 With the base unit 1 Ex If you are using LINE 1 Press HOLD to put the first call LINE 1 on hold The LINE 1 indicator flashes 2 Press the other line button LINE 2 to make or answer a second call The LINE 2 indicator lights 3 To return to the first call LINE 1 press the li...

Page 32: ...sets ring for 1 minute To stop paging press DIGITAL SP PHONE 2 When the other party s voice is heard lift the handset or talk into the MIC microphone The display will show the length of the call and the handset in use icon 3 To end the intercom replace the handset or press DIGITAL SP PHONE Paging ALL Ex Paging all Handsets Ex Paging Handset 1 Calling 0 1 Intercom 00 00 00 Ex Handset 1 answered Off...

Page 33: ... the intercom replace the handset or press DIGITAL SP PHONE With the cordless handset After the rings press TALK or lift the handset off the charger To end the intercom press TALK or place the handset on the charger During an intercom call If an incoming call is being received the line indicator on the base unit will flash quickly or the handset user will hear two tones incoming call tone p 51 To ...

Page 34: ...d you can announce the transfer If not required go to step 4 If the paged party does not answer press the relevant line button 4 To complete the transfer press TALK or place the handset on the charger To answer a transferred call with the cordless handset Press TALK or lift the handset off the charger after the rings After the paging party hangs up you can talk to the outside caller You can press ...

Page 35: ...age another handset enter the extension number 1 to 8 3 When the paged party answers press CONF to make a conference call To hang up both lines For the base unit replace the handset or press DIGITAL SP PHONE For the cordless handset press TALK or place the handset on the charger To hang up only one line press the line button for the party with which you want to continue talking To put both lines o...

Page 36: ...ER Next 0987654321 ENTER Save If a pause is required for dialing PAUSE can be stored in a phone number in step 5 This counts as one digit p 46 If the display shows Memory is full in step 2 press EXIT and erase other stored items from the directory p 39 Using the Directory Base Unit Handset You can store names and phone numbers in both the base unit and cordless handset directories The base unit ca...

Page 37: ...as shown below 1 2 3 4 5 6 7 8 9 0 1 2 3 4 5 6 7 8 9 10 11 1 A B C a b c 2 D E F d e f 3 G H I g h i 4 J K L j k l 5 M N O m n o 6 P Q R S p q r s 7 T U V t u v 8 W X Y Z w x y z 9 Number of times key is pressed Keys I H CLEAR Moves the cursor to the left Moves the cursor to the right To enter another character using the same number key move the cursor to the next space Erases characters T To Tom ...

Page 38: ... I or H to enter the directory 2 Press the dialing button for the first letter of the desired name until any name with the same initial is displayed see table on page 37 Ex To find Frank press 3 until the first item under F is displayed 3 Press until the name is displayed 4 If using the base unit Lift the handset or press DIGITAL SP PHONE OR If using the cordless handset Press TALK The number is d...

Page 39: ...eed to change the number go to step 7 6 Add a number to the current number Pressing CLEAR erases the digit to the left of the cursor To erase all digits press and hold CLEAR 7 Press ENTER A beep sounds To edit other items start again from step 2 To return to the standby mode press EXIT Erasing an Item in the Directory Make sure that the base unit cordless handset is in the standby mode 1 Press I o...

Page 40: ...lls at the same time each caller s information will be displayed alternately Caller information cannot be displayed in the following cases If the caller dialed from an area which does not provide a Caller ID service the display will show Out of area If the caller has requested not to display his her information the display will show Private caller If your unit is connected to a PBX which does not ...

Page 41: ...XIT 10 new calls H Directory JACK SMITH 1 234 567 8901 3 10P JUN 9 With the cordless handset Make sure that the cordless handset is in the standby mode 1 Press or to enter the list The number of new calls is displayed 2 To search from the most recent call press To search from the oldest call press To scroll between callers press or 3 To exit the list press EXIT 10 new calls H Directory CINDY TURNE...

Page 42: ... DIGITAL SP PHONE In some cases you may have to edit the number before dialing p 43 Ex You may have to delete 1 and the area code If a phone number is not displayed in the caller information you cannot call back that caller With the cordless handset 1 Press or to enter the list The number of new calls is displayed 2 Press or to find the desired caller 3 Press TALK The displayed phone number is dia...

Page 43: ...2 Phone no Area code Phone no Phone no Area code Phone no FRED PARKER 1 234 321 5555 11 20A JAN 12 FRED PARKER 1 234 321 5555 11 20A JAN 12 FRED PARKER 1 321 5555 11 20A JAN 12 FRED PARKER 321 5555 11 20A JAN 12 FRED PARKER 234 321 5555 11 20A JAN 12 a b c d 4 After editing the number you can continue with calling back or storing procedures To call back if using the base unit lift the handset or p...

Page 44: ...n the Caller List into the directory Make sure that the base unit cordless handset is in the standby mode Save directory ENTER Yes 2 Press or to find the desired caller If the number requires editing see page 43 3 Press ENTER 4 Press ENTER again Enter name IH ENTER Save CINDY TURNER 1 234 456 7890 11 20A JAN 12 If the display shows Memory is full in step 4 press EXIT To erase stored items from the...

Page 45: ...st 1 Press or to enter the list 2 Press CLEAR To stop erasing press I 3 Press CLEAR A beep sounds and all entries are erased Clear Make sure this display is shown 0 new call H Directory All clear I No CLEAR Yes All clear 1 Press or to enter the list 2 Press or to find the caller you want to erase from the caller list 3 Press CLEAR A beep sounds and the information is erased To erase other items re...

Page 46: ...5 or the Automated Attendant System or Answering System is responding to the first call on the same line p 58 65 If this function does not operate properly consult your telephone company for details Call Waiting Caller ID Feature Call Waiting Caller ID feature allows the base unit and cordless handset to display a second caller s information After you hear a call waiting tone while talking the dis...

Page 47: ... as call waiting Selecting the flash time for each line The flash time depends on your telephone exchange or host PBX You can select from flash times 700 600 400 300 250 110 100 or 90 ms milliseconds Your phone comes from the factory set to 700 ms Make sure that the base unit is in the standby mode Base Unit Base Unit Handset 4 Select the desired time by pressing or for each line To move to the ot...

Page 48: ...ntil the arrow points to Auto talk and press H The current setting is displayed Auto talk On ENTER Save Selecting the Ringer Pattern You can select the desired ringer patterns of the base unit and cordless handsets 4 patterns are available for each line Your phone comes from the factory set to pattern 1 Programming must be carried out separately for the base unit and cordless handset s Make sure t...

Page 49: ... EXIT 1 Press FUNCTION 2 If using the base unit Press or until the arrow points to Line setting and press H OR If using the cordless handset Press or until the arrow points to Talk selection and press H 3 While Line selection is at the arrow press H The current setting is displayed Auto A free line will be selected LINE 1 has priority when making a call factory preset Line1 Line 1 will be selected...

Page 50: ...rase all the numbers press CLEAR 8 Press ENTER A beep sounds Ex Phone numbers starting with 111 are restricted for handset 2 4 and the base unit To store a second call restriction number start again from step 3 To return to the standby mode press EXIT 1 Press FUNCTION 2 Press or until the arrow points to Dial setting and press H 3 Press or until the arrow points to Call restrict and press H 1 indi...

Page 51: ...nes if a call arrives If you set to ON this incoming call tone will be heard for as long as the other line rings To delete this incoming call tone set to OFF To set the incoming call tone to sound twice set to 2 Your base unit comes from the factory set to OFF Your cordless handset comes from the factory set to ON Programming must be carried out separately for the base unit and cordless handset s ...

Page 52: ...PIN is required for registration of the cordless handsets p 53 Make sure that the base unit is in the standby mode Base Unit Enter new PIN again ENTER Save To change the PIN 1 Press FUNCTION Press or until the arrow points to Registration and press H 2 While Set PIN is at the arrow press H 3 Enter the current PIN and press ENTER 4 Enter a new 4 digit PIN and press ENTER 5 Enter the new PIN again a...

Page 53: ...S registration Enter PIN ENTER Set To return to the standby mode press EXIT The handset number 1 to 8 will be displayed on the handset Handset5 registered Base Unit Cordless Handset Registering Optional Cordless Handsets Using the PIN The included cordless handset has been pre registered with the base unit You will have to register optional cordless handsets Handsets will not operate unless regist...

Page 54: ...press I 6 Press CLEAR A beep sounds and Clear is displayed To cancel registration of another handset start again from step 3 To return to the standby mode press EXIT Deregister Handset3 I No CLEAR Yes Canceling Cordless Handset Registration If you no longer need to use a cordless handset or if you need to register a handset to a different base unit of the same model it may be necessary to cancel t...

Page 55: ...ress or until the arrow points to Set line mode and press H The current settings are displayed Line mode Line1 Line2 A A Erasing the Directory Caller List and Redial List You can erase all entries in the directory caller list and redial list Programming must be carried out separately for the base unit and cordless handset s Make sure that the base unit cordless handset is in the standby mode Base ...

Page 56: ...er of registered handsets The base unit and handset users can use the Voice Mail System by accessing their mailboxes Each cordless handset user can only access his her own mailbox The general delivery mailbox is managed by the base unit user operator The cordless handset users can access this mailbox The following functions are possible listening to messages left in a mailbox p 68 71 transferring ...

Page 57: ...lbox password must be stored using the base unit and each personal mailbox password must be stored using the handset Make sure that the base unit cordless handset is in the standby mode Base Unit Handset 1 Press FUNCTION and press or until the arrow points to Voice mail and press H 2 While Set password is at the arrow press H The password is displayed 3 Enter a password using a 4 digit number If y...

Page 58: ...System is assigned the caller will first hear a greeting message You can record this message yourself or use the pre recorded message p 59 60 Call is received Automated Attendant System The automated attendant announces the greeting message up to 3 times Caller presses the required extension number 1 to 8 and Caller presses 0 and for the operator Call Transfer Status p 63 The extension cordless ha...

Page 59: ...re recorded message is played The relevant line s auto attendant icon will be displayed Auto answering Prerecord greet L1 H Change Auto attendant HAuto answering H Set Line1 Auto attendant Prerecord greet We recommend you record brief greeting messages see sample on next page in order to leave more time for recording new messages If you do not record a greeting message the following pre recorded g...

Page 60: ...8 inches 20 cm away from the MIC microphone To end press H If the elapsed recording time exceeds 2 minutes the unit will stop recording The recorded message will be played To change the message press 1 and start again from step 6 8 Press 2 to select the message The relevant line s auto attendant icon will be displayed Greeting1 record 00 H End Greeting message sample Thank you for calling your com...

Page 61: ...ls leave this mode OFF Handset To select change the recorded greeting message If the line s ANSWER ON indicator lights press the ANSWER ON button to turn it off 1 Press the line s ANSWER ON button and press H within 10 seconds 2 Select Auto attendant by pressing or and press H 3 Select Greeting1 through Greeting5 by pressing or and press H You can go back to the previous display by pressing I 4 To...

Page 62: ...d personal greeting message after reaching your handset s mailbox as follows Sorry no one is available to answer the call Please leave a message at the tone You can also record your own greeting message of up to 2 minutes Handset To erase the recorded message Follow steps 1 and 2 Press 3 while the message is being played The unit will answer with the pre recorded greeting message You can adjust th...

Page 63: ...rator or another extension or leave a message in the general delivery mailbox following the Incomplete Call Handling Menu Caller specifies an extension Handset Answer mode OFF Handset Answer mode ON Incomplete Call Handling Status Busy Call taken within 5 rings The personal greeting message is announced after the second ring The Incomplete Call Handling Menu is announced up to 3 times To leave a m...

Page 64: ...plete Call Handling Menu is announced to guide the caller The caller can leave a message in the general delivery mailbox or call an extension The operator will also be responsible for answering and handling calls that have been transferred Caller specifies the operator Busy Call taken within 5 rings Not answered within 5 rings Talk Incomplete Call Handling Status Records a message Calls another ex...

Page 65: ...by mode To turn on the Answering System and select the pre recorded greeting message If the line s ANSWER ON indicator lights press the ANSWER ON button to turn it off Base Unit 1 Press the line s ANSWER ON button The ANSWER ON indicator lights The current setting is displayed 2 Press H within 10 seconds 3 While Auto answering is at the arrow press H The current setting is displayed 4 Select the n...

Page 66: ...message will be played To change the message press 1 and start again from step 6 8 Press 2 to select the message You can adjust the speaker volume by pressing or You can exit the programming mode any time by pressing EXIT Select greeting Greeting1 none H Set To turn on the Answering System and record a greeting message Greeting message sample Thank you for calling your company name and or number S...

Page 67: ...o 7 or Toll saver p 65 by pressing or and press H You can go back to the previous display by pressing I 4 Select Greeting1 through Greeting5 by pressing or and press H 5 To select the message press 2 OR To change the message Press 1 Press H to start recording After the tone talk into the MIC To end press H Press 2 to select the message If you use the message for the other line it will also be chan...

Page 68: ...nd displayed To repeat this message press 1 To play the next message press 2 To erase this message press 3 To transfer this message press 7 At the end of the last message This is the last message will be heard 3 To end the operation press New messages playback Command menu 1 Repeat 2 Next 3 Erase 7 Transfer Listening to all messages 1 While the base unit is in the standby mode press and hold until...

Page 69: ... seconds of playback the previous message will be played Press 2 or H The next message is played Press STOP To resume playback press STOP If you do not press any button for 60 seconds the unit will return to the standby mode To adjust the speaker volume 8 levels Press or during playback Each time you press or the volume level will change Flash Memory Message Backup Messages are stored indefinitely...

Page 70: ...ed is heard The unit will play the next message The information in the Caller List will not be erased To erase Caller List information see page 45 Transferring a Message After listening to a message left in the general delivery mailbox you can transfer it to other mailboxes 1 During playback or before the start of the next message press 7 Enter the destination mailbox number is announced 2 Enter t...

Page 71: ...e number is displayed After each message playback the Message Menu will be announced and displayed To repeat this message press 1 To play the next message press 2 To erase this message press 3 To transfer this message press 7 At the end of the last message This is the last message will be heard New messages playback Command menu 1 Repeat 2 Next 3 Erase 7 Transfer 3 After listening to all new messa...

Page 72: ...nced 2 Enter the destination mailbox numbers using the corresponding dialing buttons 0 1 to 8 For the general delivery mailbox enter 0 The mailbox numbers and To accept press To cancel press are announced If you make a mistake press and start again from step 1 3 Press The mailbox numbers entered in step 2 will be announced and the next message will be played JACK SMITH 1 234 567 8901 Message 1 To ...

Page 73: ...sword and press If you have new messages listen to all of them 2 Press 4 This is the general delivery mailbox is heard After the number of new messages is announced new messages will be played 3 After listening to all new messages To listen to all messages press 1 To return to your mailbox press 4 To end the operation press Listening to personal mailbox messages from the base unit If the handset b...

Page 74: ...2 OK With the cordless handset 1 While the handset is in the standby mode press If the direct handset access mode is OFF p 57 enter the mailbox password and press If you have new messages listen to all of them 2 Press 2 3 Enter the destination mailbox numbers using the corresponding dialing buttons 0 1 to 8 For the general delivery mailbox enter 0 4 Press Please leave a message at the tone To end ...

Page 75: ...TER Save 3 Select Off or On by pressing or 4 Press ENTER A beep sounds To return to the standby mode press EXIT Call Monitoring Feature While a caller is recording a message in the general delivery mailbox you can monitor the call through the speaker of the base unit If both lines are receiving calls at the same time only the first one can be monitored You can answer the call by lifting the base u...

Page 76: ...e person the caller wishes to speak to where the caller can leave a message To transfer to a personal mailbox calls must be sent through the General Delivery Mailbox by the operator The caller can then enter the extension number and the sign to reach the mailbox The following is how calls must be transferred to the voice mail After you operator answered a call you may announce that person the call...

Page 77: ...e arrow points to Message menu and press H The current setting is displayed 4 Select Off or On by pressing or 5 Press ENTER A beep sounds To return to the standby mode press EXIT Message menu On ENTER Save Automatic Message Delete Feature If this feature is set to ON messages left in all mailboxes will automatically be erased after a month Your phone comes from the factory set to OFF Make sure tha...

Page 78: ...ints to Delete message and press H 4 Enter the mailbox numbers where messages are to be erased using the corresponding dialing buttons 1 to 8 Enter 0 for the general delivery mailbox If you make a mistake press the number again to delete 5 Press H 6 To erase the greeting messages at the same time press or to select Greet Incoming If not required go to step 7 7 Press CLEAR A beep sounds and Clear w...

Page 79: ...he greeting message Automated voice prompt will not come on until the last digit of the password p 57 is entered A beep sounds and then Mailbox No or This is the general delivery mailbox is heard After the number of new messages is announced new messages will be played After each message playback the Message Menu is announced if the Message Menu mode is on p 77 To repeat this message press 1 To pl...

Page 80: ... Press To listen to all messages While the Command Menu is announced p 79 press 1 To deliver your own message You can send an identical message of up to 3 minutes to several mailboxes 1 While the Command Menu is announced p 79 press 2 2 Enter the destination mailbox numbers using the corresponding dialing buttons 0 1 to 8 For the general delivery mailbox enter 0 3 Press 4 Talk clearly after the to...

Page 81: ...ral delivery mailbox to listen to messages 1 While the Command Menu is announced p 79 press 4 This is the general delivery mailbox is heard After the number of new messages is announced new messages will be played 2 After listening to all new messages To listen to all messages press 1 To return to your mailbox press 4 To end the operation press and hang up Calling the Answering System to leave a m...

Page 82: ... already been stored it will be displayed 4 Enter your pager number and press PAUSE twice Enter the access code if required by your pager company and press PAUSE twice again OR If you use a 1 800 pager number with a pager PIN code Enter the 1 800 number and press PAUSE 3 times Enter the pager PIN code and press PAUSE twice If you misdial press CLEAR Digits are erased from the right To erase all th...

Page 83: ...u misdial press CLEAR Digits are erased from the right To erase all the digits press and hold CLEAR 5 Press ENTER A beep sounds To return to the standby mode press EXIT Enter display 2223334444 ENTER Save To check the stored pager number and pager display number 1 Press FUNCTION and select Pager setting by pressing or and press H 2 Select Calling pager by pressing or and press H 3 If using the bas...

Page 84: ...or 5 Press ENTER A beep sounds To return to the standby mode press EXIT If using the base unit Pager will be displayed Pager on off On ENTER Save If another message is received before the unit alerts your pager for a previous message the previous caller information will not be sent to your pager Only the last call received will be sent to your pager If someone else makes or answers another call wi...

Page 85: ... the belt clip To attach the belt clip To remove the belt clip 3 cm 13 16 Wall Template To Power Outlet Screws 3 cm 13 16 Wall Mounting for the Charger The charger can be wall mounted Install screws using the wall template on the right Connect the AC adaptor Mount the charger then slide it down ...

Page 86: ...nds free phone conversation Please use only the Panasonic KX TCA88 headset To order call the accessories telephone number on page 3 With the Base Unit Connecting the headset to the base unit Connect the headset to the headset jack as shown Headset Jack HEADSET Hook Fasten the headset cord to prevent it from being disconnected ...

Page 87: ...the headset during a conversation you can continue the conversation with the speakerphone Making Answering calls 1 Press HEADSET to make or answer a call You can press the line button instead of pressing HEADSET If you misdial when making a call press HEADSET twice and dial again 2 To hang up press HEADSET Intercom 1 To make an intercom call To page all handsets press INTERCOM ALL To page one hand...

Page 88: ...ure to use the headset to talk with the caller If you want to have a normal cordless phone conversation disconnect the headset With the Cordless Handset Connecting the headset to the cordless handset Open the headset jack cover and connect the headset to the headset jack as shown ...

Page 89: ...box 1111 8888 password see page 57 With the base unit The following settings of the base unit and the registered cordless handsets will return to the factory preset 1 Press FUNCTION 2 Press or until the arrow points to Initialization and press H 3 While Function is at the arrow press H Function Factory preset Ringer volume HIGH Ringer pattern Pattern 1 Incoming call tone ON Line selection AUTO Aut...

Page 90: ...ew Panasonic P P507 PQP50AA61 battery To order call the accessories telephone number on page 3 Disconnect the telephone line cord s and open the battery cover by pushing down the tab Replace the battery close the battery cover and reconnect the telephone line cord s Attention The product you have purchased is powered by a nickel cadmium battery which is recyclable At the end of its useful life und...

Page 91: ...rased Readjust the date time p 20 RESET RES ET RESET Button Adding Another Phone If the backup battery has been discharged during a power failure the unit will not work If required you can connect a standard telephone on the same line using the Panasonic T adaptor KX J66 To order call the accessories telephone number on page 3 T Adaptor KX J66 Telephone Line Jack Telephone Line Cord Standard Telep...

Page 92: ...line of the button you pressed is in use You cannot make a call Try again later A paged handset is too far from the base unit A paged handset has not been registered p 19 53 The handset you are canceling has not been registered for cordless handset only p 54 H or I is pressed while the cordless handset is on the charger Lift the handset and try again When trying to store an item in the directory t...

Page 93: ...ut first storing the pager number p 82 You entered a wrong PIN p 52 53 Enter the correct PIN The handsets have not been registered to the base unit when you try to cancel the handset registration p 54 The handset you are registering has already been registered When you tried to register the cordless handset the handset and base unit could not link for some reason such as interference from other el...

Page 94: ...t the handset is registered to the base unit p 19 53 You entered your own mailbox number when transferring or delivering a message p 70 72 74 You tried to access the general delivery mailbox from the handset or access a personal mailbox from the base unit while another user was listening to the messages there p 73 81 The extension number of the INTERCOM button you pressed is invalid when you tried...

Page 95: ...oved from the ring group Add to the ring group p 23 Check the settings p 12 17 The line mode selection is incorrect p 55 Check whether the dialing mode selection is correct p 21 The dialed number is restricted To cancel see page 51 Programming is not possible while the handset is off the cradle or the DIGITAL SP PHONE indicator lights Do not pause for over 60 seconds while programming If 2 cordles...

Page 96: ...Add to the ring group p 23 Other telephone equipment may be interfering with your phone Disconnect it and try again Other electrical appliances connected to the same outlet may be interfering with the Caller ID information Telephone line noise may be affecting the Caller ID information Do not pause for over 60 seconds while searching If another call is received on the same line while the Automated...

Page 97: ...rom the base unit Walk closer to the base unit and try again Raise the base unit antenna Locate the cordless handset and the base unit away from other electrical appliances p 4 Walk closer to the base unit Raise the base unit antenna The ringer volume is set to OFF Select HIGH or LOW p 22 If 2 other handsets or the base unit and another handset are in use the unit may not ring The handset and base...

Page 98: ...re in use you may not be able to page Try again later The handset is too far from the base unit The base unit or the handset is in use You cannot store an item in the directory while the unit is in the talk or intercom mode Do not pause for over 60 seconds while programming To answer the call press TALK or the line button whose line status icon is flashing quickly Start again from the beginning af...

Page 99: ...use button p 46 When the headset is connected p 88 you must use the headset to talk with the caller To have a normal cordless phone conversation disconnect the headset Make sure that the headset is plugged into the headset jack properly p 88 Charge the battery fully p 16 Clean the charge contacts and charge again p 16 17 Install a new battery p 90 This is normal Problem When a second call is recei...

Page 100: ...s 0 Erase unnecessary messages p 70 73 Make sure that the base unit cordless handset is in the standby mode If 2 cordless handsets or the base unit and a handset are in use you may not be able to access the mailbox Try again later If the Automated Attendant System or Answering System is responding to 2 calls on separate lines you cannot access the mailbox Try again later You are too far from the b...

Page 101: ...the call press the called line button To resume playback press after hanging up If the caller is not stored in the caller list the caller s information will not be displayed The line mode selection is incorrect See page 55 If you cannot solve your problem call our customer call center at 1 800 211 PANA 7262 Panasonic s e mail address for customer inquiries consumerproducts panasonic com for custom...

Page 102: ...lt in the risk of fire or electric shock 10 Never push any objects through slots in this unit This may result in the risk of fire or electric shock Never spill any liquid on the unit 11 To reduce the risk of electric shock do not disassemble this unit Take the unit to an authorized servicenter when service is required Opening or removing covers may expose you to dangerous voltages or other risks I...

Page 103: ...olyte is corrosive and may cause burns or injury to the eyes or skin The electrolyte may be toxic if swallowed 4 Exercise care in handling batteries in order not to short the battery to conductive materials such as rings bracelets and keys The battery and or conductor may overheat and cause burns 5 Charge the battery ies provided with or identified for use with this product only in accordance with...

Page 104: ...ct the problem with their equipment c Inform the customer of the right to bring a complaint to the Federal Communication Commission pursuant to procedures set out in FCC Rules and Regulations Subpart E of Part 68 The Telephone Company may make changes in its communications facilities equipment operations or procedures where such action is reasonably required in the operation of its business and is...

Page 105: ...ch interference the base of the cordless telephone should not be placed near or on top of a TV or VCR If interference is experienced move the cordless telephone further away from the TV or VCR This will often reduce or eliminate interference Operating near 2 4GHz electrical appliances may cause interference Move away from the electrical appliances Environment do not place the unit in a room where ...

Page 106: ...stration 54 Dialing mode 21 Directory 36 Directory dialing 38 Directory editing 39 Directory erasing 55 Directory name and symbols 37 Directory searching 38 Displays on LCD 11 E Erasing a voice mail message 70 73 Erasing all voice mail messages 78 Error messages 92 Error messages display 92 Error messages voice 94 Extension number Base 32 Extension number Handset 19 32 53 F Factory preset function...

Page 107: ...Redial list erasing 55 Registration Optional Handset 19 53 Remote access 77 79 Remote access operation 79 80 81 RESET button 91 Ring Group 23 Ringer Off 22 23 30 33 Ringer pattern 48 Rotary service 46 58 Rotary service tone dialing 46 S Safety Instructions 102 Setting Ringer volume 22 Shipping product for service Back cover System capability 25 T Toll saver 65 Transferring a voice mail message 70 ...

Page 108: ...the unit to an authorized servicenter prepaid and adequately insured Do not send your unit to the Panasonic Consumer Electronics Company listed below or to executive or regional sales offices These locations do not repair consumer products Panasonic Consumer Electronics Company Division of Matsushita Electric Corporation of America One Panasonic Way Secaucus New Jersey 07094 Panasonic Sales Compan...

Reviews: