Setup Guide
Laser Printer
Model No.
KX-P7100
Thank you for purchasing a Panasonic KX-P7100 Laser Printer.
■
Using the Manuals
Setup Guide:
Refer to this guide for basic setup procedures and necessary precautions for safety and use. Be sure to read
“For Your Safety” on the back of this guide before setting up the printer and keep this document in a safe
place for future reference.
Operating
Instructions:
For detailed information, refer to the Operating Instructions installed on your computer
(see “Step 3: Installing the Printer Software”).
Printed in China
PJQQB0002ZA S0501B0 M
Setup Guide
Model No.
KX-P8415
Color Laser Printer
Color Laser Printer
and Reference Guide
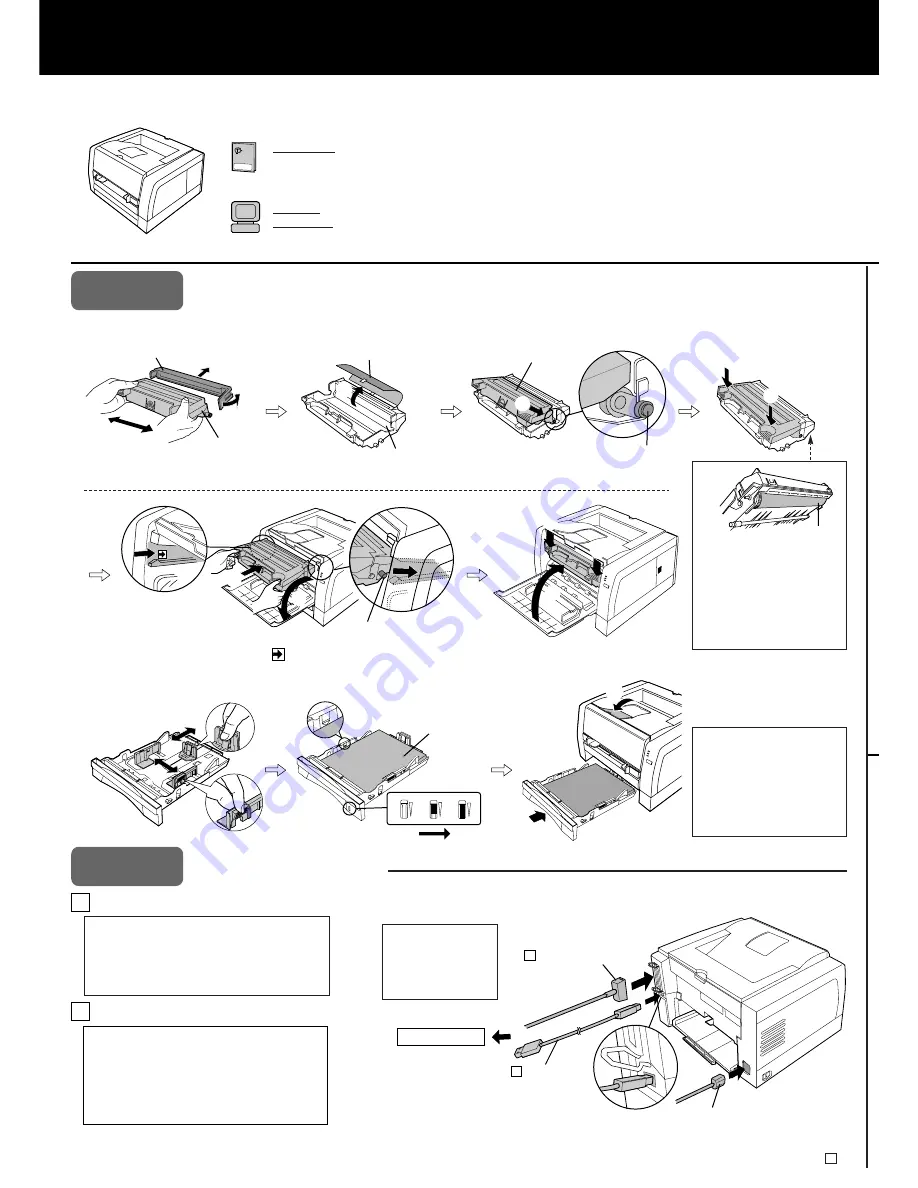
Step 1
Installing the Drum Unit and Loading Paper
Note:
To prevent damage to the drum
unit,
• Do not touch the black drum
surface (A).
• Do not expose to light for
more than 5 minutes.
• Do not expose to direct
sunlight.
#
(Shake)
$
%
Toner cartridge
Shipping cover
&
Drum unit
Protective sheet
Side pin
Toner cartridge
'
(A)
#
#
Note:
• Paper, Transparencies or
Envelopes can be loaded in the
media tray.
•
When loading legal paper, see
“Loading Media and Printing” of
“Settings and Printing” in the
Operating Instructions.
■
Installing the Toner Cartridge and Drum Unit
Connecting Cables
Note:
• Use a shielded cable 2.0 m (6.6 ft) or less in length.
• The printer may not print when connected to a switch
box, network print server or other device. To ensure
reliability of the printer, connect it directly to the
computer USB or Parallel port only.
Step 2
A When using the parallel interface cable:
B When using the USB interface cable:
*
1
Microsoft® Windows® 98 operating system (hereafter Windows 98)
*
2
Microsoft® Windows® Millennium Edition operating system (hereafter Windows Me)
*
3
Microsoft® Windows® 2000 operating system (hereafter Windows 2000)
Note:
• Use a shielded cable 5.0 m (16.4 ft) or less in
length.
• Windows® 98*
1
, Windows Me*
2
or Windows 2000*
3
is required for a USB connection.
• Please note that if more than one KX-P7100
printers are connected in a USB tree, only one of
those printers will perform the print job.
'
Insert the side pins of the toner cartridge
into the slots of the drum unit.
(
(
Push down
*
)
Side pin
,
+
+
Push down
*
Firmly insert the drum unit into the printer [insert the side pins of the
drum unit into the groove (label )].
■
Loading Paper in the Media Tray
Up to here
$
Load paper with
print side down
.
Paper Full
Paper Low or
Empty
%
&
To a computer
Parallel interface
USB interface
#
%
$
A
B
Power cord
Note:
If you do not have a
parallel interface cable
or USB cable, you will
need to purchase one.


