background image

69

For fax advantage assistance, call 1-800-435-7329.

6

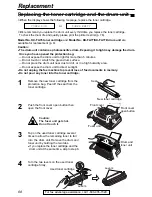
If you replace the drum unit at the same
time, remove the new drum unit from the
protection bag. Remove the protection bar
from the drum unit.

With Panasonic face up on the toner
cartridge, match the red arrows on the
cartridge and the drum unit.

Replacement

Used toner cartridge

1

2

Drum unit

Green drum surface

5

Pull up the right edge of the used toner
cartridge (    ). Remove the cartridge from
the drum unit (

).

The toner may stick to the cartridge and
the drum unit. Be careful in handling.
See page 4 for details.

Do not drop the toner on the green drum
surface.

Put the used toner cartridge into the
protection bag.

2

1

7

Slide the tab of the toner cartridge into
the slot of the drum unit.

Tab

Slot

8a

Firmly press down on the right side of the
toner cartridge to snap into position and...

8b

turn the two levers on the toner cartridge
with firm pressure.

Levers

9

The toner cartridge is installed when the
triangles match.

Triangles

10

Tap on the toner cartridge several times
to allow the toner to fall into the drum unit.
Grab the tabs, and shake the drum and
toner unit horizontally several times.

Tabs

Toner cartridge

Protection bar

New drum unit

New toner 
cartridge 

Drum unit

Hold here.

Red 
arrows

Summary of Contents for KX-FL501

Page 1: ... used only in the U S A FOR FAX ADVANTAGE ASSISTANCE CALL 1 800 HELP FAX 1 800 435 7329 E MAIL TO consumerproducts panasonic com for customers in the U S A or Puerto Rico REFER TO www panasonic com for customers in the U S A or Puerto Rico High Speed Laser Fax with Copier Function Operating Instructions Model No KX FL501 ...

Page 2: ...lephone Protection Act of 1991 requires the following information to be clearly stated either at the top or bottom margin of the first message page when transmitting messages via telephone facsimile date and time of transmission identification of the business entity or person s sending the facsimile and telephone number of the business entity or person s To program this information into your unit ...

Page 3: ...ce objects on the power cord Install the unit where no one can step or trip on the cord 10 Do not overload wall outlets and extension cords This can result in the risk of fire or electric shock 11 Never push any objects through slots in this unit This may result in the risk of fire or electric shock Never spill any liquid on the unit 12 To reduce the risk of electric shock do not disassemble this ...

Page 4: ... toner comes into contact with your skin wash the area thoroughly with soap and water Drum unit Read the instructions on pages 12 and 13 before you begin installation of the drum unit After you have read them open the drum unit protection bag The drum unit contains a photosensitive drum Exposing it to light may damage the drum Once you have opened the protection bag Do not expose the drum unit to ...

Page 5: ...as been disconnected at the network interface Use caution when installing or modifying telephone lines WARNING To prevent the risk of fire or electrical shock do not expose this product to rain or any type of moisture OTHER INFORMATION Keep the unit away from electrical noise generating devices such as fluorescent lamps and motors The unit should be kept free from dust high temperature and vibrati...

Page 6: ...ller ID service from your phone company 26 Viewing and calling back using caller information 27 Confirming caller information using the Caller ID list 28 Storing caller information in ONE TOUCH DIAL and JOG DIAL 29 Voice Contact Talking to the other party after fax transmission or reception 30 Fax Sending Faxes Sending a fax manually 31 Sending a fax using ONE TOUCH DIAL and JOG DIAL 32 Documents ...

Page 7: ... feeding occurs while sending 73 Cleaning Cleaning the inside of the unit 74 General Information Printed Reports Reference lists and reports 76 FCC List of FCC requirements and information 77 Information Limited PANASONIC Facsimile Products Limited Warranty 78 Warranty Servicenter Servicenter directory 79 Directory Specifications Technical data about this product 80 Index Index 82 Copy Copying Mak...

Page 8: ...ude your name shipping address and telephone number credit card type number expiration date and your signature order part number and quantity Internet Visit our web site http www panasonic com store for customers in the U S A or Puerto Rico ONLY If you have any questions about internet orders please contact us at E MAIL panasonicdirect panasonic com TELEPHONE 1 201 348 7292 Toner cartridge 1 compl...

Page 9: ...d how to dial them 4 Help with problems sending receiving faxes 5 How to use the copier function 6 Frequently asked questions and answers 7 Explanation of error messages shown on the display 8 List of available reports 9 How to use the Caller ID service 3 Press PRINTING SET CALLER ID REPORTS ERRORS Q and A COPIER FAX SND RCV JOG DIAL FEATURE LIST QUICK SET UP JOG DIAL ROTATE SET HELP HELP JOG DIAL...

Page 10: ...ecording paper entrance Paper tray Document entrance Speaker Left side of the unit Document guides Document stacker Handset To make or answer calls Recording paper exit Document exit Paper stacker Paper stacker extender Front cover The document stacker and paper stacker may not be shown in all illustrations ...

Page 11: ...reception To store a setting during programming To stop an operation or cancel programming To mute your voice to the other party during conversation Press this button again to resume conversation To send faxes using the IQ FAX function p 36 To turn on off AUTO ANSWER p 40 41 To print a quick reference p 9 Display To select a resolution p 31 50 To make a collated copy p 51 To adjust volumes p 21 To...

Page 12: ... or in a high humidity area Do not expose the drum unit to direct sunlight 3 Slide the tab of the toner cartridge into the slot of the drum unit Tab Slot 4a Firmly press down on the right side of the toner cartridge to snap into position and 4b turn the two levers on the toner cartridge with firm pressure Levers Toner cartridge Red arrows Drum unit Hold here Green drum surface 1 Remove the toner c...
Page 13: ...int quality 7 Push the front cover open button then open the front cover Front cover Front cover open button 8 Install the drum and toner unit by holding the tabs If the lower glass is dirty clean it with a soft dry cloth Drum and toner unit 9 Close the front cover until locked by pushing down on both sides Front cover Lower glass 6 Tap on the toner cartridge several times to allow the toner to fa...

Page 14: ...it lean back until it clicks into place 2 1 Align with the ribs on the document exit Pull the document stacker forward gently until it clicks into place 2 1 2 1 Paper tray Line up the slots in the paper stacker with the pegs on the bottom of the unit then slide until locked Open the paper stacker extender when you use legal size paper The paper stacker can hold approx 100 sheets of printed paper R...

Page 15: ...other side of paper if you are not happy with the print quality 1 Fan the stack of paper to prevent a paper jam 2 Insert the paper into the recording paper entrance The paper should not be over the tab If the paper is not inserted correctly readjust the paper or the paper may jam Tab Recording paper entrance Printing side is back Stack of paper Correct Incorrect Adding paper 1 Remove all of the in...

Page 16: ...is turned on for the first time the unit will print some basic information Note For additional equipment protection we recommend you use a surge protector The following types are available TELESPIKE BLOK MODEL TSB TRIPPE MFG CO SPIKE BLOK MODEL SK6 0 TRIPPE MFG CO SUPER MAX PANAMAX or MP1 ITW LINX The warranty does not cover damage due to power line surges or lightning If you want to connect an an...

Page 17: ...ial keypad Example Aug 10 2001 Press 5 Press Example 6 Enter the correct hour minute by selecting 2 digits for each using the dial keypad Press to select AM or PM Example 3 15PM 1 Press 2 Press until PM is displayed TIME 03 15PM TIME 03 15AM 1 5 0 3 TIME 12 00AM SET M 08 D 10 Y 01 0 0 1 1 8 0 M 01 D 01 Y 00 SET SET DATE TIME 0 1 SYSTEM SET UP MENU 7 Press 8 Press MENU SETUP ITEM SET STOP JOG DIAL ...

Page 18: ...your logo To correct a mistake Press or to move the cursor to the incorrect character and make the correction To delete a character Move the cursor to the character you want to delete and press STOP To insert a character 1 Press or to move the cursor to the position to the right of where you want to insert the character 2 Press Insert to insert a space and enter the character HANDSET MUTE Note You...

Page 19: ... l 5 M N O m n o 6 P Q R S p q r s 7 T U V t u v 8 W X Y Z w x y z 9 0 To select characters with the dial keypad Pressing the dial keys will select a character as shown below To select characters using JOG DIAL Instead of pressing the dial keys you can select characters using JOG DIAL 1 Rotate until the desired character is displayed 2 Press to move the cursor to the next space The character displ...

Page 20: ...phen FLASH STOP Delete MENU Display Note You can enter your facsimile telephone number by rotating If you use press to move the cursor The button replaces the digit with a and the button replaces it with a space Example using the dial keypad 234 5678 Press To enter a hyphen in a telephone number press Hyphen FLASH 2 4 6 7 8 3 5 JOG DIAL JOG DIAL To correct a mistake Press or to move the cursor to ...

Page 21: ...the ringer back on press While the ringer volume is set to off The display will show the following message When a call is received the unit will not ring and will display the following Handset receiver volume 5 levels high to low are available While using the handset press or Monitor volume 8 levels high to low are available While using the monitor press or INCOMING CALL RINGER OFF SET YES SET NO ...

Page 22: ... touch label card see right STOP STOP OR USE JOG DIAL PRESS STATION REGISTERED SET FLASH S02 1114497 S02 SET NAME John LOWER SET DIAL MODE OR USE JOG DIAL PRESS STATION DIRECTORY PROGRAM Helpful hint You can confirm the stored items on the display p 25 or on the telephone number list p 76 Note A hyphen or a space entered in a telephone number counts as two digits To correct a mistake Press or to m...

Page 23: ...Example If you want to enter a hyphen press 6 Press To program other items repeat steps 3 to 6 7 Press to exit the program DIRECTORY PROGRAM NAME REGISTERED SET FLASH NO 5552233 NO SET NAME Alice NAME JOG DIAL OR USE JOG DIAL PRESS STATION DIRECTORY PROGRAM Hyphen FLASH STOP Delete JOG DIAL SET DIRECTORY PROGRAM Display Helpful hint You can confirm the stored items on the display p 25 or on the te...

Page 24: ...y S01 JOG DIAL 1 Rotate until the desired name is displayed Example 2 Press 3 Press to select DELETE To cancel erasing press STOP YES SET NO STOP DELETE OK EDIT DELETE DIRECTORY PROGRAM Mary S01 JOG DIAL Editing a stored name and number Erasing a stored station and item 6 Edit the telephone number For further details see page 23 7 Press REGISTERED SET Display JOG DIAL SET DIRECTORY PROGRAM STOP Yo...

Page 25: ...name has not been stored press and dial the number manually 2 Press or lift the handset The unit will start dialing automatically MONITOR STOP Lisa JOG DIAL To search for a name by initial Example Lisa 1 Rotate until any name is displayed Example 2 Press repeatedly until any name with the initial L is displayed see the character table on page 19 3 Rotate to the right until Lisa is displayed To sto...

Page 26: ...Consult your PBX supplier If the unit cannot receive caller information the unit will show the following The caller dialed from an area which does not provide Caller ID service The caller requested not to send caller information The caller made a long distance call LONG DISTANCE PRIVATE CALLER OUT OF AREA The calling party s name or telephone number will be displayed after the first ring You then ...

Page 27: ...LER ID SEARCH To display the caller s telephone number and the date time of the call Press repeatedly in step 2 Example Mar 14 10 30AM 1 345 678 9012 WENDY ROBERTS NAME TEL NO Handset Display MONITOR JOG DIAL STOP NAME TEL NO CALLER ID SEARCH FAX START Viewing and calling back using caller information You can easily view caller information and call back Important Calling back will not be available...

Page 28: ...activate feature 26 p 55 Confirming caller information using the Caller ID list Printing and erasing the Caller ID list 1 Press to start printing Display The display will show the following after printing 2 Press to exit the program or press to erase all of the stored caller information STOP YES SET NO STOP ALL ERASE OK PRINTING CALLER ID PRINT SET STOP Display CALLER ID PRINT MENU SET 1 Press thr...

Page 29: ...ss then press the desired ONE TOUCH DIAL key Press S06 1345678901 SET NAME WENDY ROBE LOWER S04 1345678901 SET NAME WENDY ROBE S02 1345678901 SET NAME WENDY ROBE SET DIAL MODE OR USE JOG DIAL PRESS STATION DIRECTORY PROGRAM WENDY ROBERTS JOG DIAL USE JOG DIAL 2 NEW CALLS CALLER ID SEARCH Note You can confirm the stored items on the display p 25 or on the telephone number list p 76 You can only sto...

Page 30: ...nctive ring after the current page of the document is received Note If you do not answer within 10 seconds of the distinctive ring the line will be disconnected Talking to the other party after fax transmission or reception You can talk to the other party after a fax message is completed This will save the added expense and time of making another call This feature only works when the other party s...

Page 31: ...nt up to 15 pages FACE DOWN until the unit grabs the document and a single beep is heard Display 3 If necessary press repeatedly to select the desired setting see below 4 Press or lift the handset 5 Dial the fax number Example 6 When the fax tone is heard Press and replace the handset if you are using it OR When the other party answers your call Using the handset ask them to press their start butt...

Page 32: ...TOUCH DIAL LOWER FACE DOWN Document guides RESOLUTION JOG DIAL FAX START STOP Before using this feature program the desired names and telephone numbers into ONE TOUCH DIAL and JOG DIAL p 22 23 If your unit does not send a fax Confirm the stored telephone number on the display and check that the number dialed is answered by the other party s machine p 25 The connecting tone will be heard during dia...

Page 33: ...rs Check that ink paste or correction fluid has dried Do not send the following types of documents Use copies for fax transmission Chemically treated paper such as carbon or carbonless duplicating paper Electrostatically charged paper Heavily curled creased or torn paper Paper with a coated surface Paper with a faint image Paper with printing on the opposite side that can be seen through the front...

Page 34: ... the 30 most recent fax communication results When a new communication occurs the oldest communication result will be erased To print manually see page 76 To print automatically after every 30 new fax communications activate feature 22 p 55 NO 01 02 03 04 05 3332222 9998765 John 555556677 USAGE TIME 00 45 00 58 00 48 02 45 03 50 MODE SND IQ FAX RCV SND SND RCV PAGES 01 02 01 03 05 03 OK OK OK COMM...

Page 35: ...ectory p 23 How your fax is sent to the other party s fax machine Fax server Your unit will send a fax to the fax server The fax server will receive the fax from your unit then send it to the other party s fax machine The other party s fax machine will receive the fax from the fax server If any transmission errors occur between your unit and the fax server your unit will automatically redial the f...

Page 36: ...OUCH DIAL LOWER If you cannot send a fax Contact NetMoves at 1 888 332 9728 The NetMoves customer service center may send you a program update While receiving this update the following message will be displayed for about 3 minutes Display During this time you will not be able to operate the unit and the extension telephone If a loading error occurs the unit will display the following message In th...

Page 37: ...for MANUAL BROAD Enter the fax number and press Example To enter other stations repeat this step up to 20 stations 5 Press after programming all of the desired stations To program another broadcast key repeat steps 2 to 5 6 Press to exit the program STOP OR USE JOG DIAL PRESS STATION REGISTERED SET DIR 3456789 01 DIR 3456789 SET 1 Press Display 2 For BROADCAST 1 2 Press the desired key Rotate to s...

Page 38: ...Y PROGRAM BROADCAST1 JOG DIAL 6 Press to exit the program DIRECTORY PROGRAM JOG DIAL SET DIRECTORY PROGRAM Display STOP Erasing a stored station 1 Rotate until the desired key name is displayed Example 2 Press 3 Press to select DELETE 4 Rotate until the desired station you want to erase is displayed Example JOG DIAL Example ONE TOUCH DIAL 3 To cancel erasing press STOP Sam S03 Dick JOG DIAL ADD DE...

Page 39: ...ANUAL BROAD Note If one of the stations is busy or does not answer the station will be skipped All skipped stations will be redialed up to 2 times after all of the other stations have been called To cancel the broadcast setting 1 Press while the unit displays the following message Display The display will show the following 2 Press SET YES SET NO STOP SEND CANCELED BROADCASTING STOP NO 01 02 03 04...

Page 40: ...ct an external telephone answering machine and set the ring count of the answering machine to less than 4 Set the ring count in FAX ONLY mode of the fax machine to 5 EXT TAM if you use with AUTO ANSWER on When receiving voice calls The answering machine will record voice messages When receiving fax calls The fax machine will disconnect the answering machine and receive documents External telephone...

Page 41: ...f TEL mode p 42 Turn AUTO ANSWER off by pressing AUTO ANSWER When receiving calls You have to answer all calls manually To receive a fax document press for each fax call FAX START Ring Ring Ring Mostly voice calls TEL FAX mode If you are near the unit and want to use it to receive voice calls yourself and fax calls automatically see pages 46 and 47 OFF When the fax machine detects a call matching ...

Page 42: ...duce the receiving document to the proper size and print it If you want to print the original size set feature 37 to off p 56 STOP TEL mode answering all calls manually If the AUTO ANSWER light is on turn it off by pressing Display TEL MODE AUTO ANSWER Note If you do not answer the call within 10 rings the unit will temporarily switch to fax and the caller can send a document Fax reception in memo...

Page 43: ... change the ring count setting rotate until the desired number is displayed and press When receiving calls the unit will automatically answer all calls and only receive fax documents SET JOG DIAL AFTER 3 RINGS PICKUP RCV FAX AUTO ANSWER Line 1 Voice calls Line 2 Fax calls Only a fax machine is connected Activating FAX ONLY mode Note If the AUTO ANSWER light is already on and you wish to change the...

Page 44: ...ecommend you record your message around 10 seconds long and not to pause for more than 4 seconds during the message Otherwise both machines will not function correctly 4 Activate the answering machine 5 Set the receive mode of the fax machine to TEL mode p 42 or FAX ONLY mode p 43 If you set to FAX ONLY mode set the ring count in FAX ONLY mode to 5 EXT TAM feature 06 on page 53 Using FAX ONLY mode...

Page 45: ...ilent pause or fax tone may be recorded on the answering machine Receiving a voice message and fax document in one call The caller can leave a voice message and send a fax document during the same call Inform the caller of the following procedure beforehand 1 The caller calls your fax machine The answering machine will answer the call 2 The caller can leave a message after the greeting message 3 T...

Page 46: ...9 2 If the AUTO ANSWER light is off turn it on by pressing AUTO ANSWER The fax machine will not ring TEL FAX delayed ring count The call is connected Voice call Fax calling tone A call is received The fax machine will ring up to 3 times Silent fax recognition ring count The fax machine will automatically receive documents without ringing The calling party will hear a different ring back tone Ring ...

Page 47: ...telephone If the fax machine activates the fax function press on the fax machine in step 2 to talk with the calling party STOP Voice call Answer the call If the call is not answered the fax machine will activate the fax function for the other party s fax machine that did not send a fax calling tone 0 The fax machine will not ring but the extension telephone will ring twice TEL FAX delayed ring cou...

Page 48: ...de firmly FAX START 1 When the extension telephone rings lift the handset of the extension telephone 2 When document reception is required a fax calling tone slow beep is heard or no sound is heard press pre selected fax activation code firmly 3 Hang up the handset The fax machine will start reception 9 Wall jack Computer Wall jack EXT Answering machine We recommend that you always connect the fax...

Page 49: ...r pager If you want to change this message enter your message up to 30 digits Example 10 Press The unit will dial the stored number PAGER TEST SET MSG 5555 MSG 07734 SET PIN 12345678 PIN SET NO 12025551234 NO SET MODE ON JOG DIAL MODE OFF SET FAX PAGER CALL 7 0 SYSTEM SET UP MENU MONITOR MENU Display JOG DIAL SET 5555 Pager Your pager will display the message you entered in step 9 For example 5555...

Page 50: ...lable before you start copying Resolution Reduction enlargement rate Collation sort FACE DOWN Document guides RESOLUTION STOP COPY ZOOM COPY START COLLATE Display To stop copying Press STOP Note Any transmittable document can be copied p 33 To select the resolution according to the type of document Press repeatedly to select the desired setting FINE For printed or typewritten originals with small ...

Page 51: ...The unit can collate multiple copies in the same order as the original document pages Press until the following is displayed and start copying Display COLLATE ON COLLATE Example Making two copies of a 4 page original document Note The display will show the rate you selected while copying Example Reduction enlargement rate For an enlarged copy the unit will only enlarge the center of the upper part...

Page 52: ...ed setting is displayed This step may be slightly different depending on the feature 5 Press The setting you selected is set and the next feature will be displayed 6 To exit programming press MENU SET JOG DIAL SET JOG DIAL SET ADVANCED MODE JOG DIAL JOG DIAL SYSTEM SET UP MENU Programming by entering the program code number directly You can select a feature by directly entering the program code an...

Page 53: ...s setting is also available after activating FAX ONLY mode p 43 If you are using the unit with an answering machine set to 5 EXT TAM p 44 02 To set your logo YOUR LOGO Up to 30 characters Display Feature Settings How the unit operates 03 To set your facsimile telephone number YOUR FAX NO Up to 20 digits 04 To print and check the sending report for fax transmission results p 34 SENDING REPORT ERROR...

Page 54: ...etting is in bold type If you are using the unit with an answering machine activate this feature and set the remote activation ID to secure the remote operation for the answering machine REMOTE TAM ACT To select ON and enter ID 1 Press 2 Rotate and select this feature 3 Press 4 Rotate to select ON 5 Press 6 Enter your ID from 1 to 5 digits using 0 9 and 7 Press 8 Press MENU SET SET JOG DIAL SET JO...

Page 55: ...feature makes sending documents easier as the transmission speed is slowed down OVERSEAS MODE Display Feature Settings How the unit operates 25 To send a fax automatically at a specified time This allows you to take advantage of low cost calling hours offered by your telephone company The setting can be reserved to take place up to 24 hours in advance DELAYED SEND NEXT FAX ERROR OFF ON fax no hh m...

Page 56: ...st LCD CONTRAST NORMAL DARKER NORMAL For normal contrast DARKER Used when the display contrast is too light See pages 46 and 47 for details 30 To change the number of rings when the unit detects a voice call in TEL FAX mode SILENT FAX RING 3 4 5 6 ON OFF ON The unit will fit a received document onto your recording paper OFF The unit will print the original size 37 To receive a fax document that is...

Page 57: ...ION ON CODE 9 OFF 1 Follow steps 1 3 on page 56 2 Rotate to select ON 3 Press 4 Enter your code from 2 to 4 digits using 0 9 and 5 Press 6 Press Do not enter 0000 MENU SET SET JOG DIAL If you hear slow beeps clear the printing problem or supply paper to print the stored document The beeps will stop 46 To receive a fax automatically when you answer a call and hear a fax calling tone slow beep FRIEN...

Page 58: ...on IQ FAX ON OFF See page 49 for details 70 If you have a pager and wish to know when your unit receives a fax activate this feature FAX PAGER CALL ON OFF 68 ECM stands for Error Correction Mode To send a fax even if there is static interference on the telephone line ECM SELECTION ON OFF This feature is available when the transmitting receiving stations are ECM compatible If documents are in memor...

Page 59: ...FAULT YES NO See pages 46 and 47 for details 1 Follow steps 1 3 on page 58 2 Rotate to select YES 3 Press 4 Press again 5 Press MENU SET SET JOG DIAL 77 To change the receive mode in the AUTO ANSWER setting AUTO ANSWER FAX ONLY TEL FAX FAX ONLY Facsimile only mode p 43 TEL FAX Telephone Facsimile mode p 46 47 The default setting is in bold type 79 To save on toner consumption TONER SAVE ON OFF ON ...

Page 60: ...ment was not received due to memory being full The document was not fed into the unit properly Reinsert the document and try again The other party s fax machine is busy or has run out of recording paper Try again The document was not fed properly Reinsert the document and try again The other party s fax machine rings too many times Send the fax manually dial the number confirm the fax tone and pre...

Page 61: ...ding paper was not fed into the unit properly Reinsert the recording paper p 71 FAILED PICK UP The unit has a document in memory See the other displayed message instructions to print out the document FAX IN MEMORY Memory is full of received documents due to a lack of recording paper or a recording paper jam Install paper or clear the jammed paper When performing memory transmission the document be...

Page 62: ...am occurred Clear the jammed paper p 70 PAPER JAMMED The unit is warming up Wait for a while PLEASE WAIT The other party s fax machine is busy or has run out of recording paper Try again REDIAL TIME OUT The toner cartridge is empty Replace the toner cartridge p 68 TONER EMPTY A transmission error occurred Try again TRANSMIT ERROR The remaining toner is low Replace the toner cartridge as soon as po...

Page 63: ...s wrong Change the setting of feature 13 p 54 Disconnect the unit from the telephone line and connect the line to a known working telephone If the working telephone operates properly contact our service personnel to have the unit repaired If the working telephone does not operate properly contact your telephone company The ringer volume is set to off Adjust it p 21 FAX ONLY mode is set Tell the ot...

Page 64: ...tension telephone and try again Try copying the document If the copied image is clear there may be something wrong with the other party s machine The glass or rollers are dirty Clean them p 74 Use the overseas transmission mode of feature 23 p 55 Add two pauses at the end of the telephone number or dial manually FAX START Cause solution I cannot send documents The other party complains that letter...

Page 65: ...red mode using feature 77 p 59 and press to turn on the AUTO ANSWER light If you want to set TEL mode press to turn off the AUTO ANSWER light The unit is not in AUTO ANSWER mode Press to turn on the AUTO ANSWER light AUTO ANSWER AUTO ANSWER AUTO ANSWER Cause solution ON OFF ON Copying Problem You cannot make a copy during programming Make the copy after programming or stop programming The glass or...

Page 66: ...ctly Program the same code that is programmed on the answering machine to the fax machine with feature 12 p 54 The code may include which is used for certain features provided by telephone companies Change the code on the answering machine to another number which does not include Also change the code of the fax machine with feature 12 p 54 Your answering machine has run out of recording tape Rewin...

Page 67: ...fter power is restored If fax documents are stored in memory they will be lost When power is restored a power down report will be printed out stating which contents in memory have been erased Sample of a power down report NO 01 FAX NOT AVAIL MODE RCV PAGES 01 MEMORY RECEIVE POWER DOWN AT Jan 05 2000 04 30AM YOUR LOGO YOUR FAX NO RESTARTED AT Jan 05 2000 04 31AM FUNCTION OTHER FACSIMILE WARNING CON...

Page 68: ...r in a high humidity area Do not expose the drum unit to direct sunlight Do not unplug the fax machine to prevent loss of fax documents in memory Do not pour any toner into the toner cartridge TONER EMPTY TONER LOW Replacing the toner cartridge and the drum unit Front cover Fuser unit Front cover open button 2 Push the front cover open button then open the front cover Caution The fuser unit gets h...

Page 69: ...ful in handling See page 4 for details Do not drop the toner on the green drum surface Put the used toner cartridge into the protection bag 2 1 7 Slide the tab of the toner cartridge into the slot of the drum unit Tab Slot 8a Firmly press down on the right side of the toner cartridge to snap into position and 8b turn the two levers on the toner cartridge with firm pressure Levers 9 The toner cartr...

Page 70: ...PER JAMMED Caution The fuser unit gets hot Do not touch it Front cover Fuser unit Front cover open button When the recording paper has jammed in the unit 11 Install the drum and toner unit by holding the tabs If the lower glass is dirty clean it with a soft dry cloth Drum and toner unit 12 Close the front cover until locked by pushing down on both sides Waste disposal method Waste material may be ...

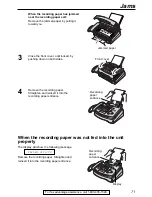
Page 71: ...he following message Remove the recording paper Straighten and reinsert it into the recording paper entrance FAILED PICK UP Front cover Recording paper entrance Recording paper entrance Display When the recording paper was not fed into the unit properly 4 Remove the recording paper Straighten and reinsert it into the recording paper entrance 3 Close the front cover until locked by pushing down on ...

Page 72: ...Note Do not pull out the jammed document forcibly before opening the front cover Front cover 2 Pull down the middle guide while holding the front cover 3 Remove the jammed document carefully 4 Lift the middle guide firmly 5 Close the front cover until locked by pushing down on both sides Caution The fuser unit gets hot Do not touch it Front cover Fuser unit Front cover open button ...

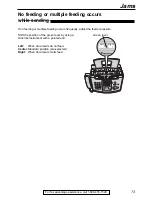
Page 73: ... sending Shift the position of the green lever by using a stick like instrument with a pointed end Left When documents do not feed Center Standard position pre selected Right When documents multi feed Green lever Right Left If no feeding or multiple feeding occurs frequently adjust the feeder pressure ...

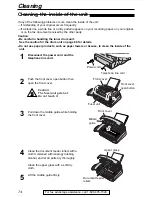
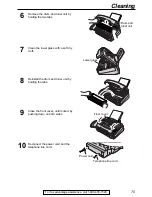
Page 74: ...ived by the other party 2 Push the front cover open button then open the front cover 3 Pull down the middle guide while holding the front cover 4 Clean the document feeder rollers with a cloth moistened with isopropyl rubbing alcohol and let all parts dry thoroughly Clean the upper glass with a soft dry cloth 5 Lift the middle guide firmly Caution The fuser unit gets hot Do not touch it Front cove...

Page 75: ...rum and toner unit Lower glass 8 Reinstall the drum and toner unit by holding the tabs 9 Close the front cover until locked by pushing down on both sides 10 Reconnect the power cord and the telephone line cord Front cover Telephone line cord Power cord 6 Remove the drum and toner unit by holding the two tabs ...

Page 76: ...p 53 59 Telephone number list provides you with names and telephone numbers which are stored in ONE TOUCH DIAL and JOG DIAL Journal report keeps records of fax transmission and reception This report will be printed automatically after every 30 fax communications p 34 Broadcast programming list provides you with items which are stored in the broadcast feature p 37 Printer test list allows you to ch...

Page 77: ...68 If such changes can be reasonably expected to render any customer terminal equipment incompatible with telephone company communications facilities or require modification or alteration of such terminal equipment or otherwise materially affect its use or performance the customer shall be given adequate notice in writing to allow the customer an opportunity to maintain uninterrupted service CAUTI...

Page 78: ...buse neglect mishandling faulty installation misapplication set up adjustments improper operation or maintenance alteration modification power line surge improper voltage supply lightning damage signal reception problems rental use of the product or service by anyone other than a PASC Factory Servicenter or a PASC authorized Servicenter or damage that is attributable to acts of God LIMITS AND EXCL...

Page 79: ... 102 Hollywood FL 33020 GEORGIA 8655 Roswell Road Suite 100 Atlanta GA 30350 ILLINOIS 1709 North Randall Road Elgin IL 60123 MASSACHUSETTS 60 Glacier Drive Suite G Westwood MA 02090 MINNESOTA 7850 12th Avenue South Airport Business Center Bloomington MN 55425 OHIO 2236 Waycross Road Civic Center Plaza Forest Park OH 45240 PENNSYLVANIA 2221 Cabot Blvd West Suite B Langhorne PA 19047 TEXAS 13615 Wel...

Page 80: ...ting Environment 10 C 32 5 C 50 F 90 5 F 20 80 RH Relative Humidity Dimensions H x W x D 190 mm x 417 mm x 345 mm 71 2 x 162 5 x 133 5 Mass Weight Approx 6 5 kg 14 3 lb Power Consumption Standby Approx 5 W Transmission Approx 25 W Reception Approx 200 W Copy Approx 200 W Maximum Approx 560 W When the fuser unit turns on Power Supply 120 V AC 60 Hz Memory Capacity Fax memory Approx 120 pages of mem...

Page 81: ...the amount of content in a received copied or printed document The following is the approximate relationship between image area and toner life for Model No KX FA76 toner cartridge Toner life varies in actual usage 5 image area 10 image area 15 image area Note The image area changes with the depth thickness and size of the characters If you change the toner save setting to on the toner cartridge wi...

Page 82: ...ssages 61 62 Distinctive ring service Feature 31 56 Document jam 72 Document size 33 Document stacker 14 Drum life 81 Drum unit 12 68 E Error correction mode Feature 68 58 Error messages 60 62 Extension telephone 47 48 F Facsimile telephone number Feature 03 20 Fax activation code Feature 41 45 48 57 Fax auto redial 32 FAX ONLY mode 43 Fax receiving 40 41 Fax ring count Feature 06 53 Feeder pressu...

Page 83: ...9 RESOLUTION button 31 50 Ring count FAX ONLY Feature 06 53 Silent fax Feature 30 56 TEL FAX Feature 78 59 Ring detection Feature 31 56 Ringer volume 21 S Sending Broadcast 39 From memory 31 IQ FAX 36 JOG DIAL 32 Manually 31 One touch dial 32 Sending report Feature 04 34 53 Set default Feature 80 59 Silent detection Feature 40 57 Silent fax recognition ring Feature 30 46 47 56 Specifications 80 St...

Page 84: ...er or inadequate packing will be charged to you as an out of warranty cost If our 1 800 HELP FAX technicians determine that your unit may be an out of box failure 5 we will attempt to provide you with a factory new replacement unit6 You must ship a copy of your receipt with your original unit to verify that you purchased the unit within 10 days prior to your 1 800 HELP FAX call Requirements You mu...

Reviews: