background image

Security

Locking the screen

You can lock the screen to prevent accidental operation. You can also enhance security by requiring a PIN,

pattern, or password to prevent the screen from being unlocked.

Configuring the screen lock

1.

Swipe up the home screen, and then in the app list, tap 

[Settings]


®


[Security & location]


®


[Screen

lock]

.

If the screen lock is already configured, you must unlock the unit before configuring a different unlock

method.

2.

Select the desired unlock method and then follow the on-screen instructions.

Note

The risk of unauthorized access to the unit is increased when using the 

[None]

 and 

[Swipe]

 unlock

methods as these methods provide little to no security. For increased security, select an unlock

method that is unknown to others and difficult to guess.

Do not use a password, etc. that you already use for other features.

Locking the screen

Press 

 (power button) while the screen is displayed, or wait for the screen to automatically turn off.

[DeviceManagement] app

You can disable the unit’s individual hardware features to prevent access to certain functions.

IMPORTANT

A password must be set in order to use this feature. If you forget this password, there is no way to

reset it (it is not erased if the unit is reset using the factory data reset utility) and therefore you will

no longer be able to change this feature’s settings. If you forget the password, contact your technical

support representative.

Enabling and disabling certain hardware features

1.

Swipe up the home screen, and then in the app list, tap 

[DeviceManagement]


®


[Device setting

items]

.

2.

Select the desired feature and then select the desired setting.

Repeat this step to change the settings for other features, if desired.

3.

Tap 

[APPLY]

, enter the password and then tap 

[OK]

.

If a password is not set, you will be prompted to create a new one.

Note

Some settings will take place the next time the corresponding hardware component is connected,

mounted, etc.

Adding the USB storage

1.

Swipe up the home screen, and then in the app list, tap 

[DeviceManagement]


®


[Device setting

items]

.

2.

Add USB storage with the following procedures.

[Add device]

: Enter the vendor ID or product ID of the USB storage you want to add.

Operating Instructions - Reference Manual

31

Security

Summary of Contents for FZ-S1 Series

Page 1: ...Operating Instructions Reference Manual Tablet Computer Model No FZ S1 series...

Page 2: ...tem navigation 20 Status bar 20 Notifications panel 20 Icons 20 Customizing the home screen 22 Input 23 Typing and voice input 23 Using the keyboard 23 Connectivity 24 Mobile network models with wirel...

Page 3: ...the system log and diagnosis results 46 Troubleshooting 47 General information 47 Starting up 47 Shutting down 47 Screen 47 Indicator 48 Touch screen operation 48 Connectivity 49 Sound 49 Other 49 Ap...

Page 4: ...assumes no liability for damage incurred from customer misuse or use under other irregular conditions and damage resulting from the use or the unavailable use of the product Panasonic shall not be li...

Page 5: ...the battery status indicator rear camera and photo light Do not use the dedicated stylus when dust or dirt e g oil is on the display or on the tip of the dedicated stylus Otherwise foreign particles...

Page 6: ...is wet wipe off the moisture before connecting with peripheral devices Do not dry the product with an appliance or heat source such as a microwave oven or dryer Use the charger included optional while...

Page 7: ...r trademarks and trade names are those of their respective owners microSDXC Logo is a trademark of SD 3C LLC The N Mark is a trademark or registered trademark of NFC Forum Inc in the United States and...

Page 8: ...chnical support representative Main unit 1 Battery Pack 1 or Model No FZ VZSUT10 Model No FZ VZSUT11 In general FZ VZSUT10 is used in the illustrations but FZ VZSUT11 is used in some illustrations Ope...

Page 9: ...0 of a full charge E Display touch panel page 34 Glove mode Can be operated while using gloves Rain mode Prevents misoperation in wet conditions F Microphone G Expansion bus connector Used when connec...

Page 10: ...ver latch lock F Cover latch G NFC antenna internal When using an NFC card or other NFC device touch the card device to this area of the unit H Wi Fi antenna Bluetooth antenna internal I Nano SIM card...

Page 11: ...y closed when the headset jack is not being used When closing the headset jack cover make sure there is no debris around the cover Opening and closing the USB port cover Opening the cover 1 Put your f...

Page 12: ...e the following to ensure the waterproof and dustproof performance of the unit Make sure the USB port cover is securely closed and locked when the USB port is not being used When closing the USB port...

Page 13: ...card slot Install only microSD cards Hold the microSD card so that the metal terminals are facing down and insert with the notch facing in the same direction of the circled area in the illustration b...

Page 14: ...he procedure is the same as slot 1 1 Insert the Nano SIM card into the Nano SIM card slot Install only Nano SIM cards Hold the SIM card so that the metal terminals are facing down and insert with the...

Page 15: ...down firmly on the outside edges of the battery to seal it closed FZ VZSUT10 FZ VZSUT11 3 Close the cover latch A and lock it B by sliding the switch circled in the illustration toward If the gap abov...

Page 16: ...he cover latch by sliding the switch circled in the illustration away from A and then open the cover latch by sliding it B 2 Insert your fingertip into the groove circled in the illustration lift the...

Page 17: ...l the power options dialog is displayed and then tap Battery Warm Swap You can also operate from Warm Swap in the app list 2 Follow the on screen instructions It may take some time until the indicator...

Page 18: ...ete The unit prevents overcharging of the battery by charging only when the remaining battery level is less than approximately 96 of its full capacity Note When removing the USB connection cable make...

Page 19: ...screen is displayed the screen will turn off Press power button to turn on the display again Releasing the screen lock If you press power button while the display is off the lock screen will be displ...

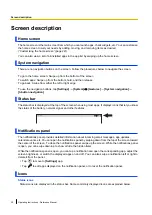
Page 20: ...displays icons that let you know the status of the battery network signal and other features Notifications panel The notifications panel provides detailed information about incoming email messages ap...

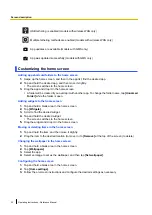
Page 21: ...ctive Airplane mode is active Unit is connected to a Wi Fi network Portable Wi Fi hotspot is active NFC is active Unit is connected to a mobile network models with wireless WAN only Notification icons...

Page 22: ...the home screen 1 Tap and hold a blank area in the home screen 2 Tap Widgets 3 Scroll to find the desired widget 4 Tap and hold the desired widget The screen switches to the home screen 5 Drag the wi...

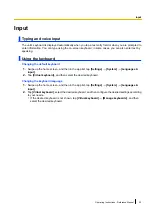
Page 23: ...en and then in the app list tap Settings System Languages input 2 Tap Virtual keyboard and then select the desired keyboard Changing the keyboard language 1 Swipe up the home screen and then in the ap...

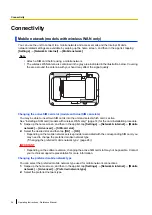
Page 24: ...ly page 14 for the card installation procedure 1 Swipe up the home screen and then in the app list tap Settings Network internet Mobile network Advanced SIM card slot 2 Select the desired slot and the...

Page 25: ...ure that Wi Fi is turned on 2 Select the desired network name If the desired network name is not displayed you may need to enter the network name SSID manually See Entering the network name SSID manua...

Page 26: ...sword etc as desired Using peer to peer Wi Fi connections Wi Fi Direct The unit can establish peer to peer connections with other devices that are compatible with Wi Fi Direct This allows you to direc...

Page 27: ...e The unit searches for nearby Bluetooth devices and the names of Bluetooth devices available for pairing are displayed 2 Tap the name of the device that you want to pair with the unit 3 Follow the on...

Page 28: ...data or any other direct or indirect damage Transferring files in the unit to a computer You can connect the unit to a computer and transfer files Connect the unit s Type C port to a computer using th...

Page 29: ...firmly 2 Slide the cover in the direction of the arrow until you hear a click Close the cover firmly until the red area circled in the illustration of the cover is no longer visible IMPORTANT Observe...

Page 30: ...an SD card page 13 for the card installation procedure Confirming the available space on the SD card Swipe up the home screen and then in the app list tap Settings Storage 30 Operating Instructions R...

Page 31: ...hardware features to prevent access to certain functions IMPORTANT A password must be set in order to use this feature If you forget this password there is no way to reset it it is not erased if the...

Page 32: ...d IP Address to Accept of the selected Filtering Rule and then select the usable connection method or add the allowed server 5 Tap APPLY enter the password and then tap OK If a password is not set you...

Page 33: ...g Capture a screenshot Security mode turns off the screen and sound Display the screen when it is turned off Changing the functions assigned to the buttons 1 Swipe up the home screen and then in the a...
Page 34: ...ustomized silent mode on and off Press the button assigned to customized silent mode in the UserButtonManager app see page 33 Turn on Customized silent mode in the Settings app see Configuring customi...

Page 35: ...may not be able to be operated or may not respond properly to touches when the entire screen is wet or depending on the amount of water on the screen Temporarily press power button to turn off the scr...

Page 36: ...hen the unit is tilted Touch hold delay Allows you to adjust the amount of time that passes before the unit recognizes a long tap as a tap and hold operation Mono audio Combines channels when playing...

Page 37: ...ed to the buttons page 33 Preinstalled apps The unit comes preinstalled with the following apps Barcode Reader Allows you to configure the barcode reader equipped models only Barcode reader settings p...

Page 38: ...ver It is used for analysis during malfunction Button Handler Allows you to select the button handler app Button handler apps developed independently can be set here UserButtonService is set at the ti...

Page 39: ...de is displayed If is displayed swipe the screen to the right and then tap to select video mode 3 Tap to start recording and tap to stop recording You can use the digital zoom by pinching in and out o...

Page 40: ...d configure it as desired Resolution Allows you to set the resolution Quality Allows you to set the picture quality Focus mode 1 Allows you to set the shooting mode according to the subject White bala...

Page 41: ...uch as GPS and GLONASS Note The GNSS antenna is contained in the gray area indicated in the illustration below Covering the area around the antenna with your hand may affect the signal quality Operati...

Page 42: ...der over the NFC antenna NFC cannot be used Turning NFC on and off 1 Swipe up the home screen and then in the app list tap Settings Connected devices Connection preferences 2 Tap the NFC switch to tur...

Page 43: ...ed to the buttons page 33 for more information Using the barcode reader Typically scanned barcodes are entered into the currently selected text field of the app that is in the foreground About the dem...

Page 44: ...N only 4 GPS 5 External SD 6 USB storage 7 Ethernet that you want to diagnose To diagnose a microSD card or USB storage device insert the microSD card or USB storage device into the unit Back up any i...

Page 45: ...1 Swipe up the home screen and then in the app list tap Hardware Diagnostic 11 Sound 2 Tap speak into the unit s microphone and then tap to stop recording 3 Tap SAVE 4 Tap the saved file to check the...

Page 46: ...ts 1 Swipe up the home screen and then in the app list tap Hardware Diagnostic Test Result 2 Select the XML file of a saved test result and then tap OK 3 Check the details and then tap to finish displ...

Page 47: ...e all peripheral devices Screen Nothing appears on the screen The screen turned off automatically sleep because the unit has not been used for a certain period of time Press power button The battery m...

Page 48: ...ow or too high Leave the unit in an environment of 10 C to 35 C 50 F to 95 F for about an hour then charge again The indicator lights in red The remaining battery level is approximately less than 30 o...

Page 49: ...on Open the notifications panel and then turn off Do not disturb mode or configure Do not disturb settings to not mute the unit s sounds To configure Do not disturb settings swipe up the home screen a...

Page 50: ...nternet Some apps do not function after updating the unit s software The apps may not be compatible with the newest version of the unit s software To return the unit to the previous version of the sof...

Page 51: ...e battery cannot be charged temporarily Avoid charging more than once per day Charging the battery too often will cause the battery performance to deteriorate Therefore the unit will not charge the ba...

Page 52: ...reserve the right to interrupt or discontinue this service without prior notice 3 Prohibited actions The following actions are prohibited when using this service If you violate the terms of use by ta...

Page 53: ...update application is set to 00 While the battery is being replaced 7 Intellectual property rights Data provided to you for this service is licensed to you under the same conditions as in the license...

Page 54: ...ation sur l exposition aux radiofr quences RF La valeur de DAS la plus lev e obtenue pour ce produit telle que rapport e l ISDE lors des essais pour une utilisation pr s de l oreille est telle que d c...

Page 55: ...countries with recycling systems This symbol on the products packaging and or accompanying documents means that used electrical and electronic products must not be mixed with general household waste F...

Page 56: ...4 ch W56 100 104 108 112 116 120 124 128 132 136 140 144 ch W58 149 153 157 161 165 ch IEEE 802 11b IEEE 802 11g IEEE 802 11n 2 4 GHz 1 ch 11 ch RF frequency band 2 4 GHz Band 2 412 GHz 2 462 GHz 5 GH...

Page 57: ...Camera Front 5 megapixels Video 1920 x 1080 pixels Still 2592 x 1944 pixels Rear 13 megapixels Video 4096 x 2160 pixels 3840 2160 pixels 1920 1080 pixels Still 4160 3120 pixels GNSS GPS GLONASS Galil...

Page 58: ...ours when using the optional cradle Dimensions W D H 10 without protrusions Approx XXX mm XXX mm XXX mm XXX in x XXX in x XXX in with FZ VZSUT10 excluding the optional devices Weight 11 Approx XXX g X...

Page 59: ...product when using the product in a hot or cold environment When using the product in hot or cold environments some peripherals may not perform properly Confirm the recommended operation environment o...

Page 60: ...Plus warranty has been purchased will receive additional coverage for any failure that occurs due to accidental damage All other terms and conditions of the standard warranty apply and this additional...

Page 61: ...tion all modems must be approved by Panasonic as compatible with the device hardware before installation or use Panasonic s sole responsibility for the warranty or technical support of the software re...

Page 62: ...Panasonic Failures which result from alteration accident misuse introduction of liquid or other foreign matter into the unit abuse neglect installation maladjustment of consumer controls improper mai...

Page 63: ...LIMITED TO THE APPLICABLE WARRANTY PERIOD SET FORTH ABOVE Some states do not allow the exclusion or limitation of incidental or consequential damages or limitations on how long an implied warranty la...

Page 64: ...er Purchase Defective Materials or Workmanship All consumable items including protection film cleaning cloth carry case tether and harness No Coverage Remedy In the event of a warranty claim contact P...

Page 65: ...copy of your purchase receipt and an explanation of the suspected defect PCI will replace in Canada the defective disk s or other media Remedy PCI s entire liability and your only remedy for any breac...

Page 66: ...sommables incluant les pellicules protectrices chiffons de nettoyage tuis de transport longes et sangles Aucune couverture Recours Pour obtenir des informations sur la marche suivre dans le cas o une...

Page 67: ...cative de votre achat et une description du probl me Recours La responsabilit de PCI et votre seul recours dans le cas de toute d faillance couverte par la garantie sur ce support de logiciel est limi...

Page 68: ...attery is returned under this contract and testing determines that it has charge capacity greater than 50 the battery will be returned with an invoice for the retail purchase price of a new battery Th...

Page 69: ...warranty period Panasonic shall have no obligation for any defects in the disk s or other media on which the Programs are furnished resulting from your storage thereof or for defects that have been ca...

Page 70: ...French 41 0 800588017 Italy 39 800986915 Spain 34 0 901101157 UK 44 0 8000884324 e mail toughbooksupport eu panasonic com Czech speaking service 0800 143234 in country only Hungarian speaking service...

Page 71: ...Panasonic Mobile Communications Co Ltd 600 Saedo cho Tsuzuki ku Yokohama city Kanagawa 224 8539 Japan DHQP1081ZA J1 C0421 0...

Reviews: