53
14. Servicing
Mode
14.1 Auto OFF/ON Button
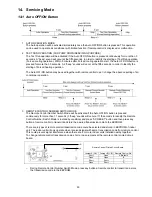
1 AUTO OPERATION MODE
The Auto operation will be activated immediately once the Auto OFF/ON button is pressed. This operation
can be used to operate air conditioner with limited function if remote control is misplaced or malfunction.
2 TEST RUN OPERATION (FOR PUMP DOWN/SERVICING PURPOSE)
The Test Run operation will be activated if the Auto OFF/ON button is pressed continuously for more than 5
seconds. A “beep” sound will occur at the fifth seconds, in order to identify the starting of Test Run operation
(Forced cooling operation). Within 5 minutes after Forced cooling operation start, the Auto OFF/ON button is
pressed for more than 5 seconds. A 2 “beep” sounds will occur at the fifth seconds, in order to identify the
starting of Forced heating operation.
The Auto OFF/ON button may be used together with remote control to set / change the advance setting of air
conditioner operation.
3 REMOTE CONTROL NUMBER SWITCH MODE
The Remote Control Number Switch Mode will be activated if the Auto OFF/ON button is pressed
continuously for more than 11 seconds (3 “beep” sounds will occur at 11th seconds to identify the Remote
Control Number Switch Mode is in standby condition) and press “AC RESET” button and then press any
button at remote control to transmit and store the desired transmission code to the EEPROM.
There are 4 types of remote control transmission code could be selected and stored in EEPROM of indoor
unit. The indoor unit will only operate when received signal with same transmission code from remote control.
This could prevent signal interference when there are 2 or more indoor units installed nearby together.
To change remote control transmission code, short or open jumpers at the remote control printed circuit
board.
Remote Control Printed Circuit Board
Jumper A (J-A)
Jumper B (J-B) Remote Control No.
Short Open A
(Default)
Open Open
B
Short Short
C
Open Short
D
o
During Remote Control Number Switch Mode, press any button at remote control to transmit and store
the transmission code to the EEPROM.
Summary of Contents for CS-AE9NKE
Page 12: ...12 4 Location of Controls and Components 4 1 Indoor Unit 4 2 Outdoor Unit 4 3 Remote Control ...
Page 13: ...13 5 Dimensions 5 1 Indoor Unit ...
Page 14: ...14 5 2 Outdoor Unit ...
Page 15: ...15 6 Refrigeration Cycle Diagram ...
Page 16: ...16 7 Block Diagram ...
Page 17: ...17 8 Wiring Connection Diagram 8 1 Indoor Unit ...
Page 19: ...19 9 Electronic Circuit Diagram 9 1 Indoor Unit ...
Page 20: ...20 9 2 Outdoor Unit ...
Page 23: ...23 10 2 Outdoor Unit 10 2 1 Main Printed Circuit Board ...
Page 29: ...29 ...
Page 91: ...91 Figure 3 Figure 4 16 1 1 3 To remove discharge grille Figure 5 ...
Page 93: ...93 Figure 8 Figure 9 ...
Page 94: ...94 Figure 10 ...

