background image

E

Disconnecting

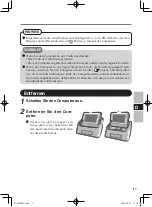
1


Turn off the computer.

2


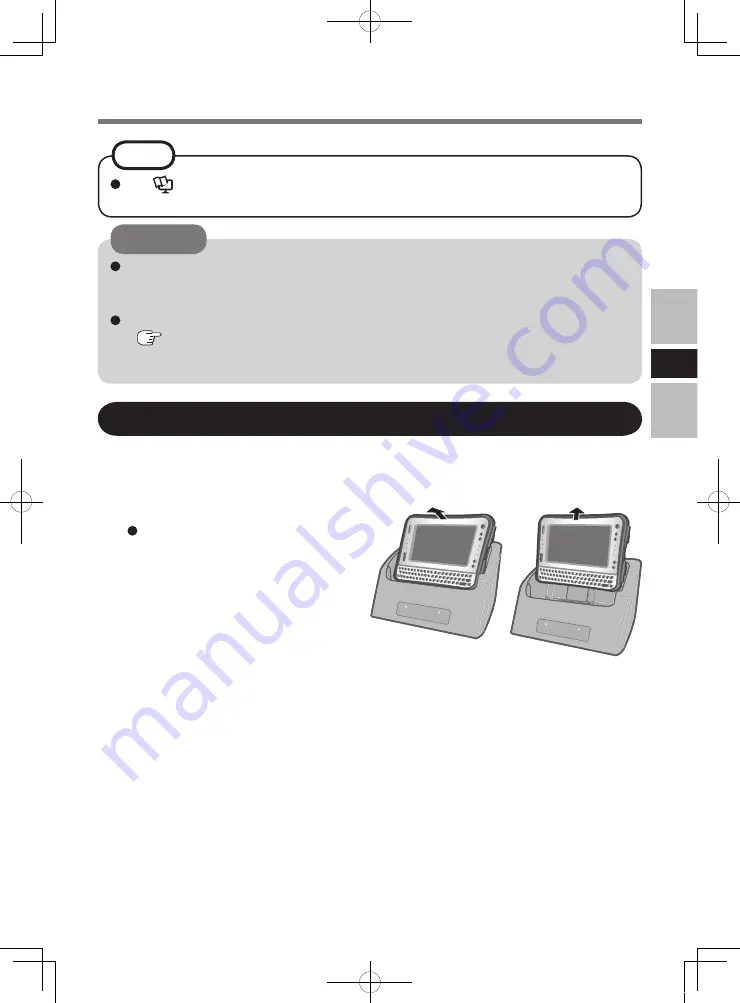
Disconnect the computer.

  Pull the computer slightly forward, 

hold and lift it up.

  See 


Reference Manual

 of the computer for connecting and setting USB devices, 

external displays and LAN.

  While connecting the computer to the Cradle:

• Do not attempt to move the Cradle.

  • It is impossible to remove/insert the battery pack attached to the computer.

  If the computer malfunctions while the Cradle is attached, disconnect the Cradle 

 below) and check to see if the computer operates normally. If the computer 

operates normally, the Cradle may be malfunctioning. Contact Panasonic Technical 

Support.

CAUTION

NOTE

CF-VEBUAU11.indb   9

2009/05/15   19:35:44

Summary of Contents for CF-VEBU11AU

Page 1: ...ANÇAIS INSTRUCTIONS D UTILISATION Introduction 21 Spécifications 21 Précautions d utilisation 22 Nom et fonction des pièces 23 Connexion Déconnexion de l ordinateur 24 Charge de la batterie 26 Installer le pilote 28 日本語 取扱説明書 保証書付き 日本国内向け はじめに 29 安全上のご注意 30 各部の名称と働き 32 パソコンの取り付け 取り外し 33 バッテリーの充電 34 ドライバーをインストールする 36 仕様 38 保証とアフターサービス 38 取扱説明書をよくお読みのうえ 正 しく安全にお使いください ご使用の前に 安全上のご注意 30 ページ を必ずお読みくださ...

Page 2: ...to discard electrical and electronic equipment please contact your dealer or supplier for further information Information on Disposal in other Countries outside the European Union This symbol is only valid in the European Union If you wish to discard this product please contact your local authorities or dealer and ask for the correct method of disposal 36 E 1 Interface Cable Use of an interface ca...

Page 3: ...Produkt entsorgen möchten und fragen Sie nach einer Entsorgungsmöglichkeit 36 G 1 FRANÇAIS Informations relatives à l évacuation des déchets destinées aux utilisateurs d appareils électriques et électroniques appareils ménagers domestiques Lorsque ce symbole figure sur les produits et ou les documents qui les accompagnent cela signifie que les appareils électriques et électroniques ne doivent pas ...

Page 4: ... that to which the receiv er is connected Consult the Panasonic Service Center or an experienced radio TV technician for help Warning To assure continued compliance use only shielded interface cables when connecting to a computer or peripheral Also any changes or modifications not expressly approved by the party responsible for compliance could void the user s authority to operate this equipment T...

Page 5: ...n manuals Item Description Power Supply Input DC 16 V Do not use other than the specified AC adaptor Model No CF AA1633A Battery Charging Slot 2 slots Expansion Bus Connector 19 pin LAN Port IEEE 802 3 10Base T IEEE 802 3u 100Base TX USB Port 4 pin USB 2 0 3 Serial Port Dsub 9 pin male 1 External Display Port Mini Dsub 15 pin female 1 Dimensions width depth height 243 mm 215 mm 92 mm 9 57 8 47 3 6...

Page 6: ...uct on Unstable Surfaces If balance is lost this product may fall over or drop resulting in an injury Do Not Connect a Telephone Line or a Net work Cable Other Than the One Specified Into the LAN Port If the LAN port is connected to a network such as the ones listed below a fire or electric shock may result Networks other than 100BASE TX or 10BASE T Phone lines IP phone Internet Protocol Telephone...

Page 7: ...arefully when connecting each device to the Cradle Inside Front Expansion Bus Connector This connects to the expansion bus connector on the bottom of the computer Page 10 Page 11 Battery charging slots 2 slots Charging status indicators Insert the battery packs to charge Charging is possible while the battery packs are attached to the computer 1 2 Names and Functions of Parts Do not touch the expa...

Page 8: ...ve and tip the computer back to fix it to the Cradle Make sure to turn the computer off for connection disconnection Do not connect or disconnect the Cradle while the computer is powered on or in the sleep Windows Vista standby Windows XP or hibernation mode CAUTION Connecting Refer to the OPERATING INSTRUCTIONS accompanying computer for information on proper handling of the AC adaptor and AC cord...

Page 9: ...ecting the computer to the Cradle Do not attempt to move the Cradle It is impossible to remove insert the battery pack attached to the computer If the computer malfunctions while the Cradle is attached disconnect the Cradle below and check to see if the computer operates normally If the computer operates normally the Cradle may be malfunctioning Contact Panasonic Technical Support CAUTION NOTE CF ...

Page 10: ... the AC adaptor at tached to the Cradle the battery attached to the computer is automatically charged Charge with the battery pack attached to the Cradle 1 Connect the AC adaptor to the Cradle step 2 on page 8 2 Remove the battery pack from the computer Reference Manual 3 Insert the battery pack into the charging slot of the Cradle CF VEBUAU11 indb 10 2009 05 15 19 35 44 ...

Page 11: ... Battery pack or Cradle may not be working properly Quickly remove the battery pack and disconnect the AC adaptor then connect them again If the light continues to blink red the battery pack or Cradle may be faulty Charging has been temporarily terminated as the internal temperature of the battery pack is outside the range possible for charging Charging will start automatically when the temperatur...

Page 12: ...or and do not remove it until installation is complete 1 Connect the CD DVD drive to the USB port of the computer or this cradle 2 Set the Cradle Driver CD ROM into the CD DVD drive 3 Restart the computer 4 Log on to Windows as an administrator Windows Vista 5 When Found New Hardware is displayed click Locate and install driver software recommended 6 When Found New Hardware LAN xxxx is displayed c...

Page 13: ... Einführung Verweist auf Online Handbücher Gegenstand Beschreibung Stromversorgung Eingang DC 16 V Verwenden Sie ausschließlich den vorgeschriebenen Netzadapter CF AA1633A Akkuladefach 2 Steckplätze Erweiterungsbus Anschluß 19 polig LAN Anschluss IEEE 802 3 10Base T IEEE 802 3u 100Base TX USB Anschlüsse 4 polig USB 2 0 3 Serieller Anschluss 9 poliger D Sub Stecker 1 Anschluss für externes Display ...

Page 14: ...laggefahr Stellen Sie dieses Produkt nicht auf insta bilen Oberflächen ab Wenn dieses Produkt aus dem Gleichgewicht gerät kann es umkippen oder herunterfallen was zu Verletzungen führen kann Schliessen Sie niemals Telefonkabel oder von unseren Empfehlungen abweichende Netzwerkkabel an den LAN Anschluss an Falls Sie den LAN Anschluss mit einem anderen Netzwerk wie mit den nachstehend aufgeführten v...

Page 15: ... an der Cradle die Bedienungsanleitung des jeweiligen Geräts gründlich durch Innen Vorderseite Anschluss für Erweiterungsbus Hier wird der Erweiterungsbus an der Unterseite des Computers eingesteckt Seite 18 Akkuladefach 2 Steckplätze Ladestatusanzeigen Die Akkus werden zum Aufladen eingesteckt Die Akkus können auch aufgeladen werden wenn mit dem Computer verbunden sind Seite 19 1 2 Namen und Funk...

Page 16: ...nd kippen Sie ihn nach hinten um ihn in der Cradle zu fixieren Vergewissern Sie sich dass der Computer ausgeschaltet ist bevor er an der Cradle ang eschlossen oder aus ihr entfernt wird Der Computer darf beim Anschließen oder Entfernen weder eingeschaltet noch im Ener giesparmodus Windows Vista Bereitschaftsmodus Windows XP oder Ruhezustand sein VORSICHT Anschließen Informationen zur sachgemäßen H...

Page 17: ...den Computer an der Cradle anschließen Die Cradle darf nicht bewegt werden Der am Computer angebrachte Akku kann weder entfernt noch eingesetzt werden Wenn der Computer in der angeschlossenen Cradle nicht ordnungsgemäß funk tioniert entfernen Sie den Computer aus der Cradle unten und überprüfen Sie ob er normal funktioniert Falls der Computer alleine normal funktioniert ist die Cradle möglicherwei...

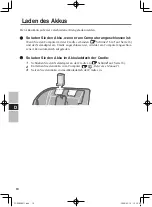
Page 18: ... 3 auf Seite 16 und der Netzadapter am Cradle angeschlossen ist wird der am Computer angeschlos sene Akku automatisch aufgeladen So laden Sie den Akku im Akkuladefach der Cradle 1 Schließen Sie den Netzadapter an der Cradle an Schritt 2 auf Seite 16 2 Entfernen Sie den Akku vom Computer Reference Manual 3 Setzen Sie den Akku in das Akkuladefach der Cradle ein CF VEBUAU11 indb 18 2009 05 15 19 35 4...

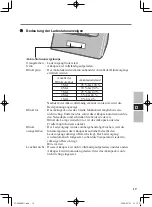
Page 19: ...apter und schließen Sie beide wieder an Blinkt die Lampe weiterhin rot ist das Akkupack oder das Cradle möglicherweise defekt Der Ladevorgang wurde vorübergehend abgebrochen weil die Innentemperatur des Akkupacks außerhalb des für den Ladevorgang zulässigen Bereichs liegt Der Ladevorgang wird automatisch fortgesetzt sobald die Temperatur wieder im zulässigen Bereich liegt Bitte warten Dieses Akkup...

Page 20: ...on wieder ab 1 Schließen Sie das CD DVD Laufwerk an die USB Buchse an des Computers oder dieses Cradle 2 Legen Sie die Cradle Driver CD ROM in das CD DVD Laufwerk ein 3 Starten Sie den Computer neu 4 Melden Sie sich als Administrator bei Windows an Windows Vista 5 Wenn Neue Hardware gefunden angezeigt wird klicken Sie auf Treibersoftware suchen und installieren empfohlen 6 Wenn Neue Hardware gefun...

Page 21: ...duction Se rapporte aux manuels à l écran Caractéristiques Description Alimentation 16 V CC N utilisez que l adaptateur secteur spécifié n de modèle CF AA1633A Logements de charge de la batterie 2 logements Connecteur de bus d extension 19 broches Port LAN IEEE 802 3 10Base T IEEE 802 3u 100Base TX Ports USB 4 broches USB 2 0 3 Port série Prise mâle Dsub à 9 broches 1 Port pour écran externe Mini ...

Page 22: ... S il est déséquilibré ce produit risque de tomber et d entraîner des blessures Ne pas brancher de ligne téléphonique ni de câble réseau autres que ceux spécifiés dans le port pour reseau local Connecter le port pour reseau local à un des réseaux figurant dans la liste ci dessous risque de provoquer un incendie ou une décharge électrique Réseaux autres que 100BASE TX ou 10BASE T Lignes téléphoniqu...

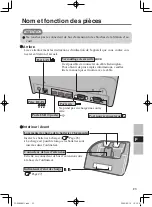
Page 23: ...tion de l appareil que vous voulez con necter en Station d accueil Intérieur Avant Connecteur de bus d extension Est relié au connecteur de bus d extension situé à la base de l ordinateur Page 26 Logements de charge de la batterie 2 logements Indicateurs d état de charge Insérez les batteries à charger La charge est possible lorsque les batteries sont insérées dans l ordinateur Page 27 1 2 Nom et ...

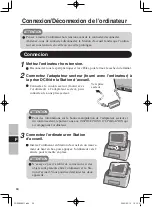
Page 24: ...nt de haut en bas puis appuyez l ordinateur vers l arrière pour le mettre en place Pensez à mettre l ordinateur hors tension avant de le connecter déconnecter Abstenez vous de connecter déconnecter la Station d accueil tandis que l ordina teur est sous tension en veille ou en veille prolongée ATTENTION Connecion Pour des informations sur la bonne manipulation de l adaptateur secteur et du cordon s...

Page 25: ...tez l ordinateur en Station d accueil N essayez pas de déplacer la Station d accueil Il est impossible de retirer insérer la batterie fixée à l ordinateur Si l ordinateur fonctionne mal tandis que la Station d accueil est connecté retirez ce dernier ci dessous et vérifiez que l ordinateur fonctionne normalement Si c est le cas le problème provient peut être de la Station d accueil Contactez le ser...

Page 26: ...eur secteur connecté en Station d accueil la batterie insérée dans l ordinateur se charge automatiquement Charge avec la batterie connectée en Station d accueil 1 Connectez l adaptateur secteur en Station d accueil étape 2 page 24 2 Retirez la batterie de l ordinateur Reference Manual 3 Insérez la batterie dans le logement de charge de la Station d accueil CF VEBUAU11 indb 26 2009 05 15 19 35 48 ...

Page 27: ... possible puis remettezles en place Si la lumière continue de clignoter en rouge la batterie ou la Station d accueil pourraient être défectueux La recharge a été provisoirement interrompue car la température interne de la batterie se situe hors de la plage admise pour la recharge La recharge recommencera automatiquement dès que la température se trouvera de nouveau à l intérieur de cette plage Att...

Page 28: ...la installation ne soit terminée 1 Raccordez le lecteur de CD DVD au port USB de l ordinateur ou cet station d accueil 2 Cradle Driver CD ROM dans le lecteur de CD DVD 3 Redémarrez I ordinateur 4 Ouvrez une session Windows en tant qu administrateur Windows Vista 5 Lorsque Nouveau matériel détecté s affiche cliquez sur Rechercher et installer le pilote logiciel recommandé 6 Lorsque Nouveau matériel...

Page 29: ... マークは 画面で見るマニュアルを意味します この装置は 情報処理装置等電波障害自主規制協議会 VCCI の基準に基づ くクラス A 情報技術装置です この装置を家庭環境で使用すると電波妨害を 引き起こすことがあります この場合には使用者が適切な対策を講ずるよう要求されることがあります 1 J 1 本装置は 落雷等による電源の瞬時電圧低下に対して不都合が生じることが あります 電源の瞬時電圧低下対策としては 交流無停電電源装置等を使用されること をお薦めします 社団法人電子情報技術産業協会のパーソナルコンピューターの瞬時電圧低 下対策規格に基づく表示 3 J 2 1 この記号はヨーロッパ連合内でのみ有効です 本製品を廃棄したい場合は 日本国内の法律等に従って廃棄処理をし てください 36 J 1 ヨーロッパ連合以外の国の廃棄処分に関する情報 CF VEBUAU11 indb 29 2009...

Page 30: ... 注意 傷害を負うことや 財産の損害が発生するおそれが ある内容 です 実行しなければならない内容です 水などの液体がこぼれた り クリップ コインなど の異物が中に入ったりす ると 火災 感電の原因に なります 本機の上に水などの液体が 入った容器や金属物を置か ない 内部に異物が入った場合は すぐ に電源プラグを抜き 本体を本機 から取り外してください その後 販売店にご相談ください 禁止 破損した 内部に異物が入った 煙が出ている 異臭がする 異常に熱い そのまま使用すると 火災 感電の原因になります すぐに電源プラグを抜き パソコン本体を取り外して ください その後 販売店 に修理についてご相談くだ さい 異常が起きたらすぐに電源 プラグを抜き パソコン本 体を取り外す 異常 故障時には直ちに使 用をやめる CF VEBUAU11 indb 30 2009 05 15 19 35 ...

Page 31: ...そばや炎天下など極 端に高温になる場所に放 置すると キャビネット が変形したり 内部の部 品が故障または劣化した りすることがあります このような状態のまま使 用すると ショートや絶 縁不良などにより火災 感電につながることがあ ります 高温の場所に長時間放置し ない 禁止 バランスがくずれて倒れ たり 落下したりして けがの原因になることが あります 不安定な場所に置かない 禁止 火災 感電の原因になる ことがあります 水 湿 気 湯 気 ほ こ り 油煙などの多い場所に置か ない 指定 本機と接続するパ ソコン本体に付属および 指定の別売り商品 以外 の AC アダプターを使用 すると 火災の原因にな ることがあります 必ず指定の AC アダプター を使用する 禁止 CF VEBUAU11 indb 31 2009 05 22 13 14 36 ...

Page 32: ...に付属の取扱説明書をご覧ください シリアルマウスには対応していません 拡張バスコネクターや端子のピンには触らないでください お願い 背面 クレードルに各機器を接続するときは 各機器の説明書をよくお読みください 内部 前面 パソコン下部の拡張バスコネクターと 接続します 拡張バスコネクター バッテリー充電スロッ ト 2スロッ ト バッテリーパックを挿入して充電します 充電状態表示ランプ パソコンにバッテリーパックを装着した状態でも 充電を行えます 35ページ 35ページ 1 2 CF VEBUAU11 indb 32 2009 05 22 16 48 50 ...

Page 33: ...コードのプ ラグを電源コンセントに接続してくだ さい AC アダプターおよび電源コードの取り扱いについては パソコンの 取 扱説明書 をご覧ください お願い 取り付け 必ずパソコンを電源オフにして取り付け 取り外しをしてください 電源オンのときや スリープ Windows Vista スタンバイ Windows XP または休止状態のときは行わないでください お願い 3 クレードルにパソコンを取り付ける クレードルの上からパソコンを挿入し パソコンを奥に少し倒して固定してくだ さい クレードルとパソコンの間に異物が入 らないようにしてください クレード ルおよびパソコンの故障の原因になり ます お願い CF VEBUAU11 indb 33 2009 05 15 19 35 50 ...

Page 34: ...正常な場合はクレードルの不良が考えられます 販売店にご相談ください お願い 取り外し 1 パソコンの電源をオフにする 2 パソコンを取り外す パソコンを少し手前に引き そのまま上へ持ち上げてくだ さい USB 機器 外部ディスプレイ および LAN の接続 設定については パ ソコンの 操作マニュアル をご覧ください お知らせ パソコンの取り付け 取り外し クレードルを使ってバッテリーを充電するには2つの方法があります バッテリーパックをパソコンに装着したまま充電する クレードルに AC アダプターを接続した状態でパソコンを取り付けると 33 ページの手順 1 3 パソコンに装着されているバッテリーが自 動的に充電されます CF VEBUAU11 indb 34 2009 05 22 16 26 10 ...

Page 35: ...す バッテリー残量表示は バッテリーパックの認識完了後に行われます バッテリーパックまたは充電回路が正しく動作していません すぐに バッテリーパックとAC アダプターをクレー ドルから取り外し 取り付け直してください それでも赤色に点滅する場合は ご相談窓口にご相談ください バッテリー パックまたはクレー ドルの故障が考えられます バッテリーパック内部の温度が充電可能な範囲外のため 一時的に 充電できない状態です 温度が充電可能な範囲内になると自動的に 充電が始まります そのままお待ちください バッテリーパックが満充電でなく もう一方のバッテリーパックが充電中 です または バッテリーパックが正しく取り付けられていません 点滅回数 バッテリーの充電状態 5回 4回 3回 2回 1回 95 100 50 94 25 49 5 24 0 4 バッテリーの充電 CF VEBUAU11 indb ...

Page 36: ...ーを接続し 操作が完了するまで取り外さないでください 1 パソコンまたは本機の USB ポートに CD DVD ドライブを 接続する 2 Cradle Driver CD ROM を CD DVD ドライブにセットする 3 パソコンを再起動する 4 管理者のユーザーアカウントでログオンする Windows Vista 5 新しいハードウェアが見つかりました が表示されたら ドライバソフトウェアを検索してインストールします 推奨 をクリックする 6 新しいハードウェアの検出 LAN xxxx が表示されたら 次へ をクリックする 7 閉じる をクリックする Windows XP 5 ハードウェアの追加ウィザードが表示されたら いいえ 今回は接続しません を選び 次へ をクリックする 6 ソフトウェアを自動的にインストールする 推奨 を選び 次へ をクリックする 7 完了 をクリックする CF...

Page 37: ...ックし 接続した CD DVD ドライブを選ぶ 9 nselect フォルダーをダブルクリックし setup exe を ダブルクリックする 画面の指示に従って操作してください 10 ロックされているファイルの検出 が表示されたら 再起動 をクリックする 11 パソコンが再起動したら 8 9 の操作を再度実行する 12 Cradle Driver CD ROM を取り出す 13 パソコンを再起動する CF VEBUAU11 indb 37 2009 05 22 16 26 11 ...

Page 38: ... 15 ピン 1 外形寸法 幅 奥行き 高さ 243 mm 215 mm 92 mm 質量 約 1 2 kg 使用環境条件 温度 湿度 5 C 35 C 30 RH 80 RH 結露なきこと Panasonic Corporation Panasonic Computer Solutions Company 3 Panasonic Way Panazip 2F 5 Secaucus NJ 07094 Panasonic Canada Inc 5770 Ambler Drive Mississauga Ontario L4W 2T3 Importer s name address pursuant to the EU GPSD General Product Safety Directive 2001 95 EC Art 5 Panasonic Computer Products Europ...

Page 39: ... ニ 車両 船舶等に搭載された場合に生ずる故障及び損傷 ホ 本書のご添付がない場合 へ 本書にお買い上げ年月日 お客様名 販売店名の記入のない場 合 あるいは字句を書き換えられた場合 ト 持込修理の対象商品を直接修理窓口へ送付した場合の送料等 はお客様の負担となります また 出張修理を行った場合には 出張料はお客様の負担となります 5 本書は日本国内においてのみ有効です 6 本書は再発行いたしませんので大切に保管してください 7 お近くのご相談窓口はコンピューター本体の取扱説明書の 修理ご 相談窓口 をご参照ください 修理メモ お客様にご記入いただいた個人情報 保証書控 は 保証期間内の 無料修理対応及びその後の安全点検活動のために利用させていただ く場合がございますのでご了承ください この保証書は 本書に明示した期間 条件のもとにおいて無料修理 をお約束するものです 従ってこの保証書によ...

Page 40: ...ご販売店様へ 印欄は必ず記入してお渡しください 切 り 取 り 線 CF VEBU11AU パナソニック株式会社 ITプロダクツ事業部 CF VEBUAU11 indb 40 2009 05 15 19 35 51 ...

Reviews: