background image

33

SQT1040

It can be zoomed up to 13

k

.

1

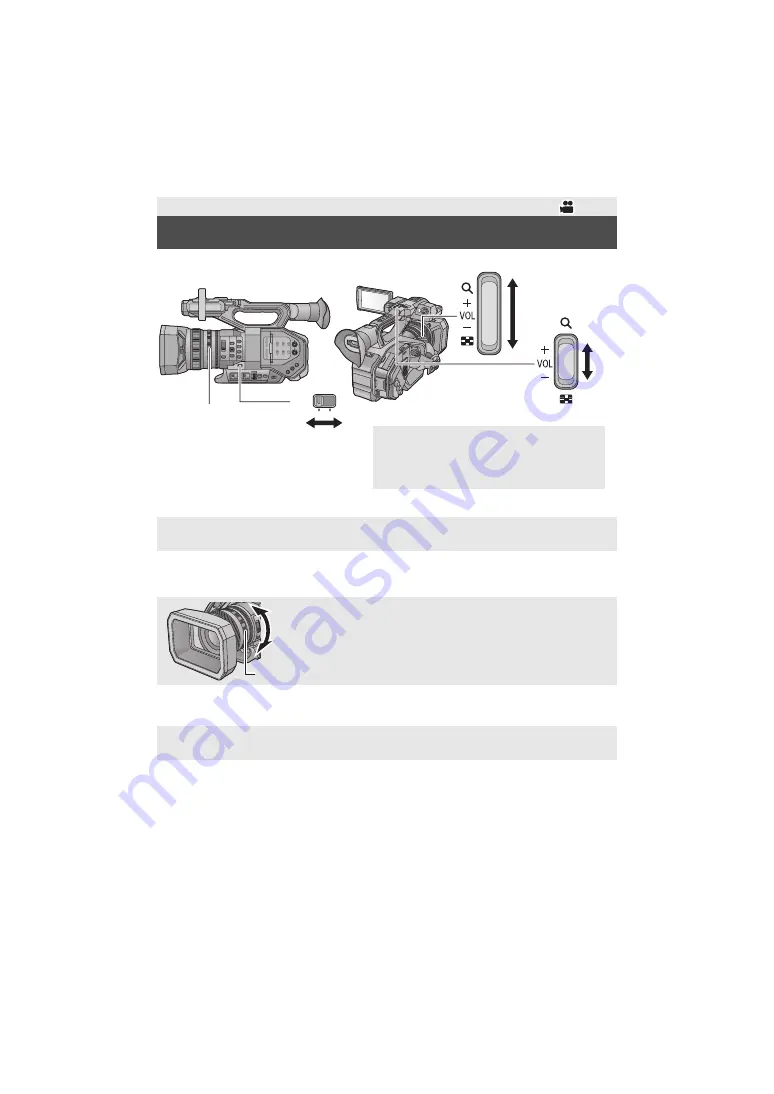
Slide the ZOOM switch.

2

(Set the ZOOM switch to [MANU])

Operate the zoom ring.

(Set the ZOOM switch to [SERVO])

Operate the zoom lever/sub zoom lever.

About the zoom speed

The zoom speed will vary depending on how far the zoom lever is pressed or how fast the zoom 
ring is rotated.

The zoom operation using the sub zoom lever will be performed at a constant speed. Zoom 
speed of the sub zoom lever will vary depending on the setting of [SUB ZOOM].

Recording

Using the zoom

MANU:

Zoom operation can be done using the zoom ring.

SERVO:

Zoom operation can be done using the zoom lever/sub zoom lever.

Zoom ring 

A

A side:

Wide-angle recording (zoom out)

B side:

Close-up recording (zoom in)

T side:

Close-up recording (zoom in)

W side:

Wide-angle recording (zoom out)

TT

T

W

W

W

W

T

T

W

W

ZOOM

MANU

SERVO

A

Zoom ring

B

ZOOM switch

C

Zoom lever

D

Sub zoom lever

A

B

A

B

Summary of Contents for AG-DVX200PB

Page 1: ...hese instructions carefully before using this product and save this manual for future use Please read first This document explains basic operations of the unit For more detailed explanation please refer to Operating Instructions Vol 2 PDF file which is recorded in the enclosed CD ROM Vol 1 SQT1040 ENGLISH F0815MT0 Printed in Japan ...

Page 2: ...sure this unit is well ventilated Do not obstruct this unit s ventilation openings with newspapers tablecloths curtains and similar items Do not place sources of naked flames such as lighted candles on this unit The lightning flash with arrowhead symbol within an equilateral triangle is intended to alert the user to the presence of uninsulated dangerous voltage within the product s enclosure that ...

Page 3: ...alled and used in accordance with the instructions may cause harmful interference to radio communications However there is no guarantee that interference will not occur in a particular installation If this equipment does cause harmful interference to radio or television reception which can be determined by turning the equipment off and on the user is encouraged to try to correct the interference b...

Page 4: ...on AC between 100 V and 240 V But In the U S A and Canada the battery charger must be connected to a 120 V AC power supply only When connecting to an AC supply outside of the U S A or Canada use a plug adaptor to suit the AC outlet configuration When connecting to a supply of greater than AC 125 V ensure the cord you use is suited to the voltage of the AC supply and the rated current of the batter...

Page 5: ... grounding prong The wide blade or the third prong are provided for your safety If the provided plug does not fit into your outlet consult an electrician for replacement of the obsolete outlet 10 Protect the power cord from being walked on or pinched particularly at plugs convenience receptacles and the point where they exit from the apparatus 11 Only use attachments accessories specified by the m...

Page 6: ...ith water If any electrolyte should come into contact with your eyes never rub the eyes Rinse eyes thoroughly with water and then consult a doctor Warning Risk of fire explosion and burns Do not disassemble heat above 60 oC 140 oF or incinerate CAUTION Danger of explosion if battery is incorrectly replaced Replace only with the type recommended by the manufacturer When disposing of the batteries p...

Page 7: ...ork properly Likewise the above also applies in a case where any type of repair is made to the unit About Condensation When the lens the viewfinder or LCD Monitor is fogged up Condensation occurs when there is a change in temperature or humidity such as when the unit is taken from outside or a cold room to a warm room Please be careful as it may cause the lens the viewfinder or LCD monitor to beco...

Page 8: ...ructions The battery pack is referred to as the Battery SDHC Memory Card and SDXC Memory Card are referred to as the SD card Function that can be used for Recording Mode Function that can be used for Playback Mode Scene s recorded with REC MODE set to MOV or MP4 MOV MP4 scene s Scene s recorded with REC MODE set to AVCHD AVCHD scene s Pages for reference are indicated by an arrow for example l 00 ...

Page 9: ...requency Selection 30 Language Selection 30 Selecting a media to record 30 Recording motion picture with this unit 31 Recording still pictures 31 Switching between Auto and Manual Mode 32 Using the zoom 33 Manual Recording 34 Focus 34 White Balance 34 Iris Gain adjustment 35 Manual shutter speed 35 USER button 36 Setting the USER button 36 Using the USER button 36 Functions of the USER button 37 P...

Page 10: ...one holder l 18 Microphone holder mounting screws l 18 12 mm length 0 47 q 2 screws Eye cup l 17 INPUT terminal cap 2 caps 2 Shoulder strap l 17 Lens hood 3 CD ROM Solely for PC Operating Instructions 1 The part number of the battery pack is VW VBD58 Before purchasing an extra battery pack check the optional accessories section To purchase extra accessories contact your dealer 2 The INPUT terminal...

Page 11: ...g media include SDHC Memory Card and SDXC Memory Card Recording to the SD card A variety of recording functions support recording to the SD card This unit supports relay simultaneous background dual codec recording using double card slots Linking to external devices Transfer data files to perform nonlinear editing on another device PC etc This unit supports USB 3 0 2 SD cards are optional and not ...

Page 12: ...available High Speed HDMI cable If possible we recommend using a cable with a length of 3 m 9 84 feet or less 3 To connect to the SDI OUT or VIDEO OUT terminal use a double shielded BNC cable equivalent to 5C FB commercially available USB Host Mode Refer to the following support site for information about an external media device http pro av panasonic net This Site is English only Connecting to an...

Page 13: ...terminal 16 Headphone terminal Excessive sound pressure from earphones and headphones can cause hearing loss Listening at full volume for long periods may damage the user s ears 17 AUDIO OUT terminal 18 Camera remote terminal CAM REMOTE FOCUS IRIS terminal 3 5 mm 0 14 q diameter mini jack ZOOM S S terminal 2 5 mm 0 1 q diameter super mini jack 19 Pin holder Attaches the zoom ring pin removed from ...

Page 14: ... AUTO button 36 Focus ring l 34 37 Zoom ring l 33 38 Zoom ring pin 39 Iris ring l 34 40 User 5 button O I S l 36 41 User 6 button ZEBRA l 36 42 User 7 button WFM l 36 43 Zoom switch MANU SERVO l 33 44 Display Mode check switch DISP MODE CHK 45 Gain switch GAIN l 35 46 White Balance switch WHITE BAL l 34 47 Jog dial SEL PUSH SET l 34 48 Menu button MENU l 41 49 Shutter speed button SHUTTER l 35 50 ...

Page 15: ...27 62 Lens cover open close lever l 16 63 Recording lamp Rear 64 Shoulder strap fixture l 17 65 Eye cup mount l 17 66 Eye sensor 67 Viewfinder l 27 68 Eye cup l 17 69 Open close lever OPEN l 20 70 Battery cover l 20 71 Battery holder l 20 72 Battery release lever BATTERY l 20 73 Built in microphone 74 Recording lamp Front 75 Lens cover l 16 76 Exhaust opening cooling fan 77 Lens LEICA DICOMAR 78 A...

Page 16: ...n RESET TC SET 87 Color Bar Screen button BARS 88 Sub recording start stop button This button functions in the same manner as the recording start stop button Opening closing the lens cover You can open close the lens cover by sliding the lens cover open close lever When this unit is not in use close the lens cover to protect the lens Do not press the lens cover hard This may damage the lens or the...

Page 17: ...he eye cup mount with the corresponding mark on the eyecup 2 Attach the eye cup so that the notch on the eye cup mount is aligned with the protrusion inside the eye cup Push the eye cup in until it reaches the mounting mark D Attaching the Shoulder strap We recommend that you attach the shoulder strap supplied before going out of doors to record so as to avoid dropping this unit 1 Open the buckle ...

Page 18: ...minal XLR 3 pin When wiring the microphone cable use the cable clamper of this unit Keep the microphone holder screw zoom ring pin and INPUT terminal cap out of reach of children to prevent swallowing A Microphone holder attachment part B Microphone holder C Microphone holder mounting screws D AUDIO INPUT1 terminal XLR 3 pin E Microphone cable clamper F Microphone holder screw G External microphon...

Page 19: ...ar to the genuine product are made available to purchase in some markets Some of these battery packs are not adequately protected with internal protection to meet the requirements of appropriate safety standards There is a possibility that these battery packs may lead to fire or explosion Please be advised that we are not liable for any accident or failure occurring as a result of use of a counter...

Page 20: ... close lever and open the battery cover 2 Install the battery by inserting it in the direction shown in the figure Insert the battery until it clicks and locks 3 Close the battery cover Close the battery cover until it clicks and locks Removing the battery Make sure that the power switch is set to OFF and the status indicator is turned off and then remove by holding onto it taking care not to drop...

Page 21: ...breviation for hour min for minute and s for second These times are approximations The indicated charging time is for when the battery has been discharged completely Charging time and recordable time vary depending on the usage conditions such as high low temperature The batteries heat up after use or charging This is not a malfunction Charging Recording time Battery model number Voltage Capacity ...

Page 22: ... this unit Also do not use the AC cable from other equipment with this unit Insert the plugs as far as they will go Even when you use the AC adaptor for recording images keep the battery connected This allows you to continue the recording even if a power failure occurs or the AC adaptor is unplugged from the AC outlet by accident 1 Connect the AC cable to the AC adaptor and the AC outlet 2 Connect...

Page 23: ...mmend that you use an SD card compatible with UHS Speed Class3 when recording in Variable Frame Rate Mode When UHD 2160 59 94p 150M or UHD 2160 50 00p 150M is selected an SDXC Memory Card with a capacity of 64 GB or more and a Speed Class rating of UHS Speed Class3 is required Keep the Memory Card out of reach of children to prevent swallowing Preparation Preparation of SD cards This unit an SDXC ...

Page 24: ...o not j Remove the SD card j Turn the unit off j Insert and remove the USB Cable j Expose the unit to vibrations or shock Performing the above while the lamp is on may result in damage to data SD card or this unit Do not expose the terminals of the SD card to water dirt or dust Do not place SD cards in the following areas j In direct sunlight j In very dusty or humid areas j Near a heater j Locati...

Page 25: ...de If you press the recording start stop button or sub recording start stop button in Playback Mode the mode will be switched to Recording Mode and recording will start Preparation Turning the unit on off Preparation Selecting a mode Recording Mode l 31 The recording screen is displayed You can record motion pictures and still pictures Playback Mode l 39 The thumbnail screen for playback is displa...

Page 26: ... Extract the LCD monitor in the direction as indicated in the figure Hold the LCD monitor extract part A and extract the LCD monitor until it clicks into position 2 Rotate to the position that is easy to view Preparation Using the LCD monitor Viewfinder To retract the LCD monitor Retract as shown in the figure with the LCD facing downward Range of rotation of the LCD monitor It can rotate up to 27...

Page 27: ...n changing a page or performing settings Do not touch the LCD monitor with hard pointed tips such as ball point pens Viewfinder adjustment This setting will not affect the images actually recorded It adjusts the field of view to show the image on the viewfinder clearly 1 Adjust the viewfinder to suit your vision so that you can see the display images clearly Be careful not to trap your fingers whe...

Page 28: ...ttery connect the AC adaptor or attach a charged battery to this unit Leave the unit as it is for approx 24 hours and the battery will maintain the date and time for approx 6 months The battery is still being recharged even if the unit is off The way that time is displayed can be changed in the menu settings DISP SETUP DATE TIME or DATE FORMAT Time difference from the Greenwich Mean Time can be se...

Page 29: ...t available when 4 2 2 10bit is selected j VFR MODE j REC MODE j REC FORMAT j SUB REC BUTTON j 2 SLOTS FUNC j DUAL CODEC REC j INTERVAL REC j PRE REC j TIME STAMP j DOWN CONV j VIDEO OUT OSD j MEDIA SELECT j MEDIA STATUS The following functions are not available when 4 2 2 10bit is selected j DIGITAL ZOOM j REC CHECK j LAST SCN DEL Formatting media If you use the SD cards for the first time for re...

Page 30: ...ct was purchased This function s default setting is 59 94Hz Language Selection You can select the language on the screen display and the menu screen 1 Select the menu l 41 2 Touch the desired setting language SD CARD 1 and SD CARD 2 can be selected separately to record motion pictures or still pictures Set OUTPUT BITS to 4 2 2 8bit l 29 1 Select the menu l 41 OTHER FUNCTION FORMAT MEDIA Use this u...

Page 31: ...n you press the recording start stop button again Before turning on this unit open the lens cover l 16 Set OUTPUT BITS to 4 2 2 8bit l 29 Register CAPTURE to a USER button l 36 1 Change the mode to Recording Mode l 25 Extract the LCD monitor 2 Press the USER button to which CAPTURE is registered or touch the applicable USER button icon to record a still picture For information on the locations of ...

Page 32: ...ode AUTO MANU switch Slide the switch to change Auto Mode Manual Mode is displayed in the Auto Mode In Auto Mode this unit operates according to the AUTO SW menu settings MANU Conditions that disable controls Controls that are disabled in Auto Mode A IRIS is set to ON Iris Ring IRIS button AGC is set to ON GAIN switch the USER button to which SUPER GAIN is registered AUTO SHUTTER is set to ON SHUT...

Page 33: ...the sub zoom lever will be performed at a constant speed Zoom speed of the sub zoom lever will vary depending on the setting of SUB ZOOM Recording Using the zoom MANU Zoom operation can be done using the zoom ring SERVO Zoom operation can be done using the zoom lever sub zoom lever Zoom ring A A side Wide angle recording zoom out B side Close up recording zoom in T side Close up recording zoom in ...

Page 34: ... conditions If so you can adjust the White Balance manually Switch to Manual Mode l 32 1 Set the WHITE BAL switch to PRST The White Balance mode set in WB PRESET will be displayed If it will switch to A or B the White Balance mode is set to Ach or Bch 2 Press the AWB button to switch the White Balance mode The mode will be switched each time the AWB button is pressed P3200K P5600K VAR Recording Ma...

Page 35: ...peed when recording fast moving subjects Use the jog dial to change the settings Switch to Manual Mode l 32 1 Press the SHUTTER button to switch to Manual Shutter Mode A Iris value B Auto iris icon It is displayed in Auto Iris Mode F4 0 0dB A Gain value The gain value changes depending on GAIN ISO DISPLAY CHG setting j When set to GAIN In Auto Gain Mode AGC is displayed in Manual Gain Mode the gai...

Page 36: ...ter For the functions of the USER button that can be registered refer to page 37 Touch INHIBIT if not registering Next Previous page can be displayed by touching 3 Touch EXIT to complete the setting Using the USER button To use the set USER button press USER1 to USER8 button or touch the USER9 to USER12 button icon displayed when you touch the LCD monitor Recording USER button USER SW USER1 to USE...

Page 37: ...m HISTOGRAM HIST Histogram REC CHECK REC C Recording Check LAST SCN DEL LstDel Last Scene Delete DRS DRS DRS FRZ FRAME FRZ Freeze Frame SUPER GAIN S Gain Super Gain 1 AREA AREA Area Mode FOCUS TRANS F Tran Focus Transition 2 CAPTURE Capture Capture EVF LCD DETAIL DETAIL EVF LCD detail IR REC IR REC Infrared Recording LEVEL GAUGE Level Level Gauge BACKGROUND Backgr Background FLASH BAND FBC Flash b...

Page 38: ...IRIS LEVEL j ZEBRA j O I S j SCENE FILE j AF AREA WIDTH j VFR MODE j FOCUS MACRO j i Zoom j LCD EVF OUTPUT SCENE FILE SCN FILE Scene File AUTO REC AutoRec Auto Rec AF AREA AF Area AF area width adjustment VFR VFR Variable Frame Rate Mode FOCUS MACRO F Macro Focus Macro i ZOOM i Zoom i Zoom LOG VIEW ASSIST LogView Log View Assist LCD EVF OUTPUT LCD EVF LCD EVF Output MENU MENU Menu Item Icon Functi...

Page 39: ...160 j Scenes recorded in UHD 3840k2160 j Scenes recorded in FHD 1920k1080 j Scenes recorded as sub recordings with DUAL CODEC REC set to FHD 50Mbps j Scenes recorded as sub recordings with DUAL CODEC REC set to FHD 8Mbps If you have touched the recording mode option AVCHD After you have touched a recording format option one of the following icons will be displayed on each thumbnail j Scenes record...

Page 40: ... icon for a certain period it will disappear To display again touch the screen Motion picture playback Still picture playback 1 Playback Pause 6 Fast rewind playback 5 Fast forward playback Stops the playback and shows the thumbnails 1 Slide show playback of the still pictures in numerical order start pause 2 Plays back the previous picture 1 Plays back the next picture Stops the playback and show...

Page 41: ...MENU button 2 Touch the top menu A 3 Touch the submenu B Next Previous page can be displayed by touching 4 Touch the desired item to enter the setting 5 Touch EXIT to exit the menu setting Menu Using the menu screen MENU MENU ...

Page 42: ...UTTON DISPLAY Switch setting IRIS RING LOW GAIN MID GAIN HIGH GAIN SUPER GAIN O I S HYBRID O I S CUSTOM O I S BLUR AMPLITUDE BLUR FREQUENCY ATW SET ATW SPEED ATW TARGET R ATW TARGET B WB PRESET WB VAR MF ASSIST MF ASSIST MODE FOCUS ASSIST PEAKING COLOR PEAKING LEVEL FOCUS RING DRIVE FOCUS MACRO A IRIS SPEED AREA MODE CUSTOM AF AF SPEED AF SENSITIVITY AF AREA WIDTH WFM WFM TYPE WFM POSITION ZEBRA Z...

Page 43: ...EVF LCD PEAK FREQ Other Functions FORMAT MEDIA MEDIA STATUS REC LAMP CLOCK SET TIME ZONE ALERT SOUND ECONOMY BATT ECONOMY AC SYSTEM FREQ USB MODE SELECT INITIAL SET NUMBER RESET LANGUAGE Maintenance VERSION UPDATE HOUR METER Video Setup 1 REPEAT PLAY RESUME PLAY SCENE PROTECT DELETE Picture Setup 2 SCENE PROTECT DELETE Copy DIFFERENTIAL COPY SELECT COPY User switch USER1 USER2 USER3 USER4 USER5 US...

Page 44: ...ch chemicals its body may be marred and the surface finish may peel off Do not leave rubber or plastic products in contact with the unit for a long time When you use the unit in a sandy or dusty place such as a beach do not let sand or fine dust get into the body and terminals of the unit Also keep the unit away from sea water Sand or dust may damage the unit Care should be taken when inserting an...

Page 45: ...nit Be sure to detach the battery after use If the battery is left attached a minute amount of current continues to flow even if the unit is off Keeping the unit in this state may result in over discharge of the battery This may result in you not being able to use the battery even after it is charged The battery should be stored in the vinyl bag so metal does not come into contact with the termina...

Page 46: ...C outlet If you leave this unit connected the AC adaptor will consume approximately 0 3 W and the battery charger approximately 0 3 W of current Always keep the electrodes of the AC adaptor battery charger and battery clean Install the device near an AC outlet so that the power disconnection device AC mains plug can be accessed easily by hand When disposing of or giving away the SD card note that ...

Page 47: ...ncerned This product is licensed under the AVC Patent Portfolio License for the personal use of a consumer or other uses in which it does not receive remuneration to i encode video in compliance with the AVC Standard AVC Video and or ii decode AVC Video that was encoded by a consumer engaged in a personal activity and or was obtained from a video provider licensed to provide AVC Video No license i...

Page 48: ...ftware categorized as 3 5 are distributed in the hope that it will be useful but WITHOUT ANY WARRANTY without even the implied warranty of MERCHANTABILITY or FITNESS FOR A PARTICULAR PURPOSE Please refer to the detailed terms and conditions thereof included in the OSS LISENCE folder of the attached CD ROM At least three 3 years from delivery of this product Panasonic will give to any third party w...

Page 49: ...D 3840k2160 29 97p 25 00p 12 89 million pixels 4K 4096k2160 24P 13 35 million pixels Lens Optical image stabilizer lens optical 13k motorized zoom F value focal length F2 8 to F4 5 f 12 8 mm to 167 mm 1 2 q to 6 9 16 q 35 mm conversion FHD 1920k1080 28 0 mm to 365 3 mm 1 3 32 q to 14 3 8 q UHD 3840k2160 59 94p 50 00p 37 2 mm to 485 1 mm 1 15 32 q to 19 3 32 q UHD 3840k2160 29 97p 25 00p 30 6 mm to...

Page 50: ...ec 25p mode 1 2 1 3 1 6 1 12 sec Synchro scan shutter When SYSTEM FREQ 59 94Hz 60i 60p mode 1 60 0 to 1 249 8 sec 30p mode 1 30 0 to 1 249 8 sec 24p mode 1 24 0 to 1 249 6 sec When SYSTEM FREQ 50 00Hz 50i 50p mode 1 50 0 to 1 250 0 sec 25p mode 1 25 0 to 1 250 0 sec Shutter open angle 5 0 deg to 180 deg to 360 deg in 0 5 deg steps when angle display is selected VFR recording frame rate When SYSTEM...

Page 51: ...0 00p 50M FHD 1080 25 00p 50M FHD 1080 50 00i 50M Average 50 Mbps VBR When REC MODE AVCHD When SYSTEM FREQ 59 94Hz PS 1080 59 94p Average 25 Mbps VBR PH 1080 59 94i Average 21 Mbps VBR PH 1080 23 98p Average 21 Mbps VBR HA 1080 59 94i Average 17 Mbps VBR HE 1080 59 94i Average 5 Mbps VBR PM 720 59 94p Average 8 Mbps VBR SA 480 59 94i When ASPECT CONVERT SIDE CROP LETTERBOX SQUEEZE Average 9 Mbps V...

Page 52: ...L CODEC REC FHD 50Mbps For main recording REC MODE MOV MP4 UHD 2160 29 97p 100M UHD 2160 25 00p 100M UHD 2160 23 98p 100M Average 100 Mbps VBR For sub recording REC MODE MOV MP4 3 FHD 29 97p 25 00p 23 98p 4 Average 50 Mbps VBR When DUAL CODEC REC FHD 8Mbps For main recording REC MODE MOV MP4 UHD 2160 29 97p 100M UHD 2160 25 00p 100M UHD 2160 23 98p 100M Average 100 Mbps VBR FHD 1080 59 94p FHD 108...

Page 53: ...s 0 dB j6 dB j12 dB selectable menu HDMI OUT terminal 2ch Linear PCM AUDIO OUT terminal 3 5 mm 0 14 q diameter stereo mini jackk1 Output level 600 h 316 mV Headphone output terminal 3 5 mm 0 14 q diameter stereo mini jackk1 Speaker Round type speaker with a diameter of 20 mm 0 79 q k1 Other input output CAM REMOTE terminal 2 5 mm 0 1 q diameter super mini jackk1 ZOOM S S 3 5 mm 0 14 q diameter min...

Page 54: ...Ambient operating temperature 0 oC to 40 oC 32 F to 104 F Ambient operating humidity 10 RH to 90 RH no condensation Mass Weight Approx 210 g Approx 0 46 lbs Dimensions WkHkD 115 mmk37 mmk57 mm 4 17 32 q k1 15 32 qk2 1 4 q Excluding the DC cord portion Battery charger Power source AC 100 V to 240 V 50 Hz 60 Hz 0 4 A Power output DC 8 4 V 1 2 A Ambient operating temperature 0 oC to 40 oC 32 F to 104...

Page 55: ...55 SQT1040 ...

Page 56: ... Panasonic Corporation 2015 Panasonic Corporation Web site http www panasonic com SQT1040 F0815MT0 ...

Reviews: