background image

- 14 -

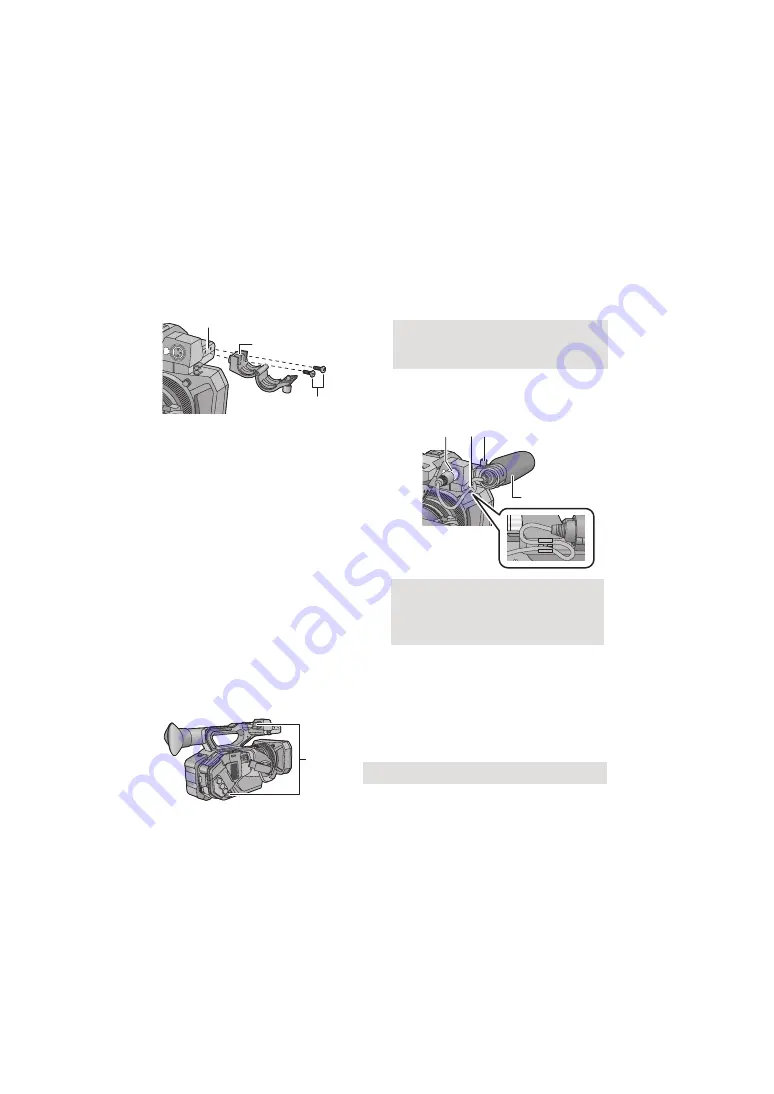
Attaching the front microphone

The microphone holder is set up so that a 21 mm (0.83

q

) external microphone (AG-MC200G: 

optional) can be attached. Check in advance whether the microphone you wish to use can be 
attached.

1

Attach the microphone holder to the microphone holder attachment part.

Attach by using a commercially available screw driver.

When attaching the microphone holder, be sure to tighten the screws firmly even though you 
might hear a squeaking sound.

2

Attach an external microphone 
(optional) to the microphone holder, 
and tighten the microphone holder 
screw.

3

Connect the external microphone to 
the AUDIO INPUT1 terminal (XLR 3 
pin).

When wiring the microphone cable, use the 
cable clamper of this unit.

Keep the microphone holder screw, zoom 
ring pin and INPUT terminal cap out of reach 
of children to prevent swallowing.

Attaching the INPUT terminal cap

Attach the INPUT terminal cap while the AUDIO INPUT1, 2 terminals (XLR 3 pin) are not used.

Attaching the tripod

There are tripod mounting holes that are compatible with 1/4-20UNC and 3/8-16UNC screws. 
Use the size that matches the diameter of the tripod’s fixing screw.

A

Microphone holder attachment part

B

Microphone holder

C

Microphone holder mounting screws

  

D

AUDIO INPUT1 terminal (XLR 3 pin)

E

Microphone cable clamper

F

Microphone holder screw

G

External microphone (optional)

A

INPUT terminal cap

Summary of Contents for AG-DVX200AN

Page 1: ...AG DVX200EN AG DVX200ED Vol 2 Please read these instructions carefully before using this product and save this manual for future use This document explains in detail how to operate this device Concerning basic operation please refer to the enclosed Operating Instructions Vol 1 printed document Vol 2 SQT1051 ENGLISH F0815MT0 ...

Page 2: ...asonic does not accept any responsibility for damages directly or indirectly due to any type of problems that result in loss of recording or edited content and does not guarantee any content if recording or editing does not work properly Likewise the above also applies in a case where any type of repair is made to the unit About Condensation When the lens the viewfinder or LCD Monitor is fogged up...

Page 3: ...t do not have the SDHC logo or 48 GB or more Memory Cards that do not have the SDXC logo are not based on SD Memory Card Specifications Refer to page 21 for more details on SD cards For the purposes of these operating instructions The battery pack is referred to as the Battery SDHC Memory Card and SDXC Memory Card are referred to as the SD card Function that can be used for Recording Mode Function...

Page 4: ...g the Picture Quality 38 Using the zoom 40 Image Stabilizer Function 42 Focus 44 One Push AF 47 Push AF 48 Focus Assist 48 Manual Focus Assist 51 Focus Transition 52 White Balance 55 Iris Gain adjustment 59 Iris adjustment 59 Gain adjustment 61 Manual shutter speed 63 Audio Input 66 Switching Audio Input 66 Adjusting the audio input level 68 Counter display 70 Setting the Time Code 70 Setting the ...

Page 5: ...Copy selected files 128 Playing back the External Media 129 Menu Using the Menu 130 Scene file 130 System mode 141 User switch 149 Switch setting 150 Auto switch setting 157 Recording Setup 159 Audio Setup 166 Output Setup 167 Display setting 171 Other Functions 176 Maintenance 179 Video Setup 179 Picture Setup 180 Copy 180 Display Indications 181 Messages 185 Others Troubleshooting 189 About reco...

Page 6: ...edia include SDHC Memory Card and SDXC Memory Card Recording to the SD card A variety of recording functions support recording to the SD card This unit supports relay simultaneous background dual codec recording using double card slots Linking to external devices Transfer data files to perform nonlinear editing on another device PC etc This unit supports USB 3 0 2 SD cards are optional and not sup...

Page 7: ...lable High Speed HDMI cable If possible we recommend using a cable with a length of 3 m 9 84 feet or less 3 To connect to the SDI OUT or VIDEO OUT terminal use a double shielded BNC cable equivalent to 5C FB commercially available USB Host Mode Refer to the following support site for information about an external media device http pro av panasonic net This Site is English only Connecting to an ext...

Page 8: ...erminal l 114 16 Headphone terminal l 100 113 Excessive sound pressure from earphones and headphones can cause hearing loss Listening at full volume for long periods may damage the user s ears 17 AUDIO OUT terminal l 114 18 Camera remote terminal CAM REMOTE l 113 FOCUS IRIS terminal 3 5 mm 0 14 q diameter mini jack ZOOM S S terminal 2 5 mm 0 1 q diameter super mini jack 19 Pin holder Attaches the ...

Page 9: ...4 36 Focus ring l 44 37 Zoom ring l 40 38 Zoom ring pin 39 Iris ring l 59 40 User 5 button O I S l 42 74 41 User 6 button ZEBRA l 74 88 42 User 7 button WFM l 74 87 43 Zoom switch MANU SERVO l 40 44 Display Mode check switch DISP MODE CHK l 75 96 45 Gain switch GAIN l 61 46 White Balance switch WHITE BAL l 55 47 Jog dial SEL PUSH SET l 55 61 63 98 103 48 Menu button MENU l 30 49 Shutter speed butt...

Page 10: ...2 Lens cover open close lever l 12 63 Recording lamp Rear l 177 64 Shoulder strap fixture l 13 65 Eye cup mount l 13 66 Eye sensor l 28 67 Viewfinder l 27 68 Eye cup l 13 69 Open close lever OPEN l 17 70 Battery cover l 17 71 Battery holder l 17 72 Battery release lever BATTERY l 17 73 Built in microphone 74 Recording lamp Front l 177 75 Lens cover l 12 76 Exhaust opening cooling fan l 31 77 Lens ...

Page 11: ...ser 8 button REC CHECK l 74 80 83 Handle mounting hole Size of the mounting hole j 1 4 20UNCk2 j 3 8 16UNCk2 84 Thumbnail button THUMBNAIL l 23 85 Counter button COUNTER l 70 86 Counter reset Time code setting button RESET TC SET l 72 73 87 Color Bar Screen button BARS l 95 88 Sub recording start stop button l 156 This button functions in the same manner as the recording start stop button 84 85 86...

Page 12: ...od in the direction of the arrow Rotate until it clicks into place Opening closing the lens cover You can open close the lens cover by sliding the lens cover open close lever When this unit is not in use close the lens cover to protect the lens Do not press the lens cover hard This may damage the lens or the lens cover Depending on the various filters or the MC protector attached to the front side...

Page 13: ...eye cup mount with the corresponding mark on the eyecup 2 Attach the eye cup so that the notch on the eye cup mount is aligned with the protrusion inside the eye cup Push the eye cup in until it reaches the mounting mark D Attaching the Shoulder strap We recommend that you attach the shoulder strap supplied before going out of doors to record so as to avoid dropping this unit 1 Open the buckle 2 P...

Page 14: ...t the external microphone to the AUDIO INPUT1 terminal XLR 3 pin When wiring the microphone cable use the cable clamper of this unit Keep the microphone holder screw zoom ring pin and INPUT terminal cap out of reach of children to prevent swallowing Attaching the INPUT terminal cap Attach the INPUT terminal cap while the AUDIO INPUT1 2 terminals XLR 3 pin are not used Attaching the tripod There ar...

Page 15: ... product are made available to purchase in some markets Some of these battery packs are not adequately protected with internal protection to meet the requirements of appropriate safety standards There is a possibility that these battery packs may lead to fire or explosion Please be advised that we are not liable for any accident or failure occurring as a result of use of a counterfeit battery pack...

Page 16: ...nto the battery charger by aligning the arrows We recommend using Panasonic batteries l 18 If you use other batteries we cannot guarantee the quality of this product Do not heat or expose to flame Do not leave the battery ies in a car exposed to direct sunlight for a long period of time with doors and windows closed When this unit is purchased the battery is not charged Charge the battery fully be...

Page 17: ...ry cover Close the battery cover until it clicks and locks Removing the battery Make sure that the power switch is set to OFF and the status indicator is turned off and then remove by holding onto it taking care not to drop l 23 Open the battery cover and slide the battery release lever The battery will be unlocked allowing you to take it out Slide the battery release lever in the direction indica...

Page 18: ...e is not inserted to the external output terminal h is an abbreviation for hour min for minute and s for second These times are approximations The indicated charging time is for when the battery has been discharged completely Charging time and recordable time vary depending on the usage conditions such as high low temperature The batteries heat up after use or charging This is not a malfunction Ch...

Page 19: ...an approximate guide When the LED lamp does not light up even if you press the CHECK button the battery is exhausted Charge the battery How to read the remaining power indicator Lit up Off The display of the remaining power indicator is an approximate guide for the remaining power of the battery When the battery pack is connected to the video camera or the charger refer to the remaining power disp...

Page 20: ...is unit Also do not use the AC cable from other equipment with this unit Even when you use the AC adaptor for recording images keep the battery connected This allows you to continue the recording even if a power failure occurs or the AC adaptor is unplugged from the AC outlet by accident 1 Connect the AC cable to the AC adaptor and the AC outlet 2 Connect the AC adaptor to the DC input terminal DC...

Page 21: ... Card with a capacity of 64 GB or more and a Speed Class rating of UHS Speed Class3 is required Preparation Preparation of SD cards Card type Capacity SDHC Memory Card 4 GB to 32 GB SDXC Memory Card 48 GB to 128 GB When using an SDHC Memory Card SDXC Memory Card with other equipment check the equipment is compatible with these Memory Cards We do not guarantee the operation of SD cards other than t...

Page 22: ...t j Remove the SD card j Turn the unit off j Insert and remove the USB Cable j Expose the unit to vibrations or shock Performing the above while the lamp is on may result in damage to data SD card or this unit Do not expose the terminals of the SD card to water dirt or dust Do not place SD cards in the following areas j In direct sunlight j In very dusty or humid areas j Near a heater j Locations ...

Page 23: ...If you press the recording start stop button or sub recording start stop button in Playback Mode the mode will be switched to Recording Mode and recording will start Preparation Turning the unit on off Preparation Selecting a mode Recording Mode l 33 34 The recording screen is displayed You can record motion pictures and still pictures Playback Mode l 101 The thumbnail screen for playback is displ...

Page 24: ...on the shape of your glasses or the way you hold this unit or when bright light enters the eyepiece the eye sensor may not work correctly You can turn on off the viewfinder by registering EVF ON OFF to a USER button Using the LCD monitor 1 Extract the LCD monitor in the direction as indicated in the figure Hold the LCD monitor extract part A and extract the LCD monitor until it clicks into positio...

Page 25: ...een to select icon or picture Touch the center of the icon Touching the touch screen will not operate while you are touching another part of the touch screen Slide while touching Move your finger while pressing on the touch screen To retract the LCD monitor Retract as shown in the figure with the LCD facing downward Range of rotation of the LCD monitor It can rotate up to 270o towards the lens 270...

Page 26: ... PC l 122 When the LCD EVF OUTPUT is set to EVF this item cannot be set l 24 It adjusts brightness and color density on the LCD monitor 1 Select the menu l 30 2 Touch the desired setting item 3 Touch to adjust settings You can select a value between s16 and r16 4 Touch RETURN Touch EXIT to exit the menu screen When the LCD EVF OUTPUT is set to EVF this item cannot be set l 24 LCD BACKLIGHT DISP SE...

Page 27: ...wfinder Use the jog dial to change the settings l 98 1 Select the menu l 30 2 Rotate the jog dial to move the cursor to the value display A Push the jog dial to select the value display 3 Rotate the jog dial to adjust the setting Pushing the jog dial will set the value you have selected You can select a value between s16 and r16 4 Select RETURN Select EXIT When the LCD EVF OUTPUT is set to LCD thi...

Page 28: ...self Change the mode to Recording Mode l 23 Rotate the LCD monitor towards the lens side Displaying during the recording yourself can be switched by setting SELF SHOOT l 175 Only some indications will appear on the screen when the SELF SHOOT is set to MIRROR When appears return the direction of the LCD monitor to normal position and check the warning alarm indication l 185 The LCD monitor display ...

Page 29: ...connect the AC adaptor or attach a charged battery to this unit Leave the unit as it is for approx 24 hours and the battery will maintain the date and time for approx 6 months The battery is still being recharged even if the unit is off The way that time is displayed can be changed in the menu settings l 173 DISP SETUP DATE TIME or DATE FORMAT Time difference from the Greenwich Mean Time can be se...

Page 30: ...g dial l 98 1 Press the MENU button 2 Touch the top menu A 3 Touch the submenu B Next Previous page can be displayed by touching 4 Touch the desired item to enter the setting 5 Touch EXIT to exit the menu setting Preparation Using the menu screen MENU MENU ...

Page 31: ...displayed on the screen The setting method of the picture quality of the image changes depending on the OUTPUT BITS setting j When 4 2 2 10bit is selected change the OUTPUT FORMAT setting l 147 j When 4 2 2 8bit is selected change the REC MODE and REC FORMAT settings l 141 142 This function is not available in the following cases j During Freeze Frame l 81 j In Variable Frame Rate Mode l 91 The fo...

Page 32: ...xit the message screen Do not turn this unit off or remove the SD card while formatting Do not expose the unit to vibrations or shock SD CARD 1 and SD CARD 2 can be selected separately to record motion pictures or still pictures Set OUTPUT BITS to 4 2 2 8bit l 31 1 Select the menu 2 Touch the media to record motion pictures or still pictures The media is selected separately for motion pictures or ...

Page 33: ...sizes or the recording time exceeds one of the following lengths of time the scene will be divided automatically Recording continues j AVCHD scene approximately 4 GB j MOV MP4 scene when using an SDHC Memory Card approximately 4 GB or 30 minutes j MOV MP4 scene when using an SDXC Memory Card approximately 48 GB or 120 minutes Recording Recording motion picture with this unit ON OFF REC A When you ...

Page 34: ... locations of the USER buttons and information on USER button icons refer to page 74 When still pictures are being recorded the remaining recordable number of still pictures and the still picture indication are displayed About the screen indications while recording still pictures Maximum recordable scenes of a single SD card Recording mode MOV MP4 AVCHD Recordable scenes Approx 89100 Approx 3900 D...

Page 35: ...mber of recordable pictures is 9999 or less When playing back a still picture recorded with this unit in the 17 9 aspect black bands appear on the top and bottom of the screen The 17 9 or 16 9 still pictures recorded using this unit may be cropped at the edges when printed So be sure to check before printing in the store or on your printer Please refer to page 202 about approximate number of recor...

Page 36: ...e the corresponding Manual Mode settings are canceled j Focus l 44 j Iris l 59 j Shutter speed l 63 To enable disable auto switch functions You can enable disable functions that are automatically adjusted in Auto Mode Select the menu Recording Switching between Auto and Manual Mode AUTO MANU switch Slide the switch to change Auto Mode Manual Mode MANU AUTO SW desired setting MENU ...

Page 37: ... A IRIS ON Activates Auto Iris in Auto Mode OFF Activates Auto Iris as a manual mode Use the IRIS button to switch between Auto Iris Mode and Manual Iris Mode AGC ON Activates Auto Gain in Auto Mode OFF Activates Auto Gain as a manual mode The gain is adjusted according to the settings assigned to the GAIN switch AUTO SHUTTER ON Activates Auto Shutter in Auto Mode OFF Activates Auto Shutter as a m...

Page 38: ...itch is at the PRST position or when Automatic White Balance is enabled It does not work with Auto Tracking White Balance Conditions that disable controls Controls that are disabled in Auto Mode A IRIS is set to ON Iris Ring IRIS button AGC is set to ON GAIN switch the USER button to which SUPER GAIN is registered AUTO SHUTTER is set to ON SHUTTER button ATW is set to ON WHITE BAL switch AF is set...

Page 39: ...video signals to prevent white saturation in images Menu item Chroma setting function CHROMA LEVEL Adjusts the color density l 135 CHROMA PHASE Adjusts the color balance l 135 Color correction function Black control function Gamma function GAMMA MODE Sets the optimal tone and contrast of images for the scene to be recorded l 137 BLACK GAMMA Sets the gamma curve for dark areas l 138 BLACK GAMMA RAN...

Page 40: ...US MACRO is set to ON and the zoom position is at the W end subjects at a distance of approximately 10 cm 3 93 q to infinity can be brought into focus l 94 154 1 Slide the ZOOM switch 2 Set the ZOOM switch to MANU Operate the zoom ring Set the ZOOM switch to SERVO Operate the zoom lever sub zoom lever Recording Using the zoom MANU Zoom operation can be done using the zoom ring SERVO Zoom operation...

Page 41: ... available in the following cases j In Variable Frame Rate Mode l 91 j When REC FORMAT or OUTPUT FORMAT is set to a setting with a size of 4K 4096k2160 or UHD 3840k2160 j During Freeze Frame l 81 i Zoom is canceled in the following cases j If you turn the unit off j If you press the THUMBNAIL button j When USB MODE SELECT is set to DEVICE and this unit is connected to a PC l 122 When FAST ZOOM is ...

Page 42: ...s a hybrid of Optical and Electrical Image Stabilizer 1 Register O I S to a USER button l 74 This function is registered to the USER5 button by default 2 Press the USER button to which O I S is registered or touch the applicable USER button icon to switch the Image Stabilizer on off You can also access this function by selecting menu items SW SETUP O I S ON OFF When HYBRID O I S is ON is displayed...

Page 43: ...nner Although larger values allow you to correct significant camera shake more effectively the screen becomes unstable when you are recording from a fixed position We recommend that you set a larger value in situations where images are expected to be quite blurry such as when recording in an unstable position Blur frequency You can change the target frequency range for camera shake correction to a...

Page 44: ...when the distance to the subject is 0 8 m 2 6 feet or more depending on the subject Depending on the zoom magnification this unit may fail to switch to the macro range or go to a non displayed focus value When you perform a zoom operation in the macro range this unit may go out of focus When AF is set to ON and this unit is set to Auto Mode auto focusing is performed regardless of the position of ...

Page 45: ...ing Setting the peaking frequency of EVF LCD DETAIL Select the menu EVF LCD DETAIL is canceled in following cases j If you use Focus Assist l 48 SW SETUP FOCUS RING DRIVE SPEED Adjusts the focus value according to the speed at which the focus ring is rotated COARSE Adjusts the focus value according to the rotational position of the focus ring Since the operation of the focus ring results in a grea...

Page 46: ...lity or tracking performance of Auto Focus Switch to Auto Focus Mode l 44 Set CUSTOM AF to ON 1 Select the menu 2 Touch to adjust settings You can select a value between 0 and 10 Setting a larger value will enhance the tracking performance of focus making it easier to move focus between subjects at varying distances from this unit We recommend that you set a larger value to keep focus on a fast mo...

Page 47: ...dial to set the selected item You can also adjust AF area width by registering AF AREA WIDTH to a USER button l 90 This function is not available in the following cases j In manual focus mode l 44 j When using Area Mode l 82 j During Freeze Frame l 81 One Push AF If you press the PUSH AUTO button in Manual Focus Mode the camera performs high speed focusing until the image is focused Switch to Manu...

Page 48: ...oes not work in following cases j When Auto Focus is used j When a remote control commercially available is connected l 113 Focus Assist Pressing the FOCUS ASSIST button allows you to use Focus Assist Select the menu You can also use Focus Assist by registering FOCUS ASSIST to a USER button l 77 Selecting a Focus Assist method SW SETUP FOCUS ASSIST desired setting EXPAND Magnifies the central area...

Page 49: ...oving the magnified area Touch or slide the screen while touching it to move the magnified area To change the peaking settings When FOCUS ASSIST is set to PEAKING or BOTH in focus portions are highlighted with color F Peaking You can set the peaking color and strength When changing the peaking color Select the menu When setting the peaking strength 1 Select the menu Increases the magnification lev...

Page 50: ...on recorded images The magnified display and peaking are not displayed on an external monitor Freeze Frame is not available when you use Focus Assist l 81 Peaking may not be displayed when you use Digital Zoom l 79 To zoom in and use peaking at the same time we recommend setting FOCUS ASSIST to BOTH and increasing the magnification level of the magnified display Notes on the magnified display of F...

Page 51: ...es to in the macro range Manual focus assist does not work in following cases j When adjusting the focus with the remote control commercially available l 113 To change the Manual Focus Assist setting You can change the way focus is adjusted when Manual Focus Assist is used Switch to Manual Focus Mode l 44 Select the menu Touch EXIT to complete the setting MF ASSIST MODE cannot be set in Auto Focus...

Page 52: ...ll be displayed The screen may not be magnified depending on your settings 3 Adjust the focus by rotating the focus ring 4 Touch ENTER The icon of the item to which the focus position has been registered will be highlighted in yellow To select a different item perform the operations in Steps 2s4 5 Touch EXIT to complete the setting The focus positions of the items you have set will be registered T...

Page 53: ...on is in use focus cannot be adjusted with the focus ring Focus Transition is not available in the following cases j When Auto Focus is used j During Freeze Frame l 81 j In Variable Frame Rate Mode l 91 j When color bars are displayed l 95 j When a remote control commercially available is connected l 113 Focus Transition settings are canceled in the following cases To use Focus Transition again re...

Page 54: ...tart Focus Transition and recording simultaneously You can start Focus Transition and recording simultaneously by enabling FOCUS TRANSITION REC 1 Select the menu 2 Touch the item 3 Touch EXIT to complete the setting 4 When the recording screen is displayed press the USER button to which FOCUS TRANSITION is registered or touch the applicable USER button icon 5 Press the recording start stop button ...

Page 55: ...Press the AWB button to switch the White Balance mode The mode will be switched each time the AWB button is pressed P3200K P5600K VAR If you set the White Balance mode to ATW in either of the following ways even if you press the AWB button the White Balance mode cannot be switched j Pressing the USER button to which ATW is registered l 74 78 j Setting the WHITE BAL switch to the position correspon...

Page 56: ... Auto Mode with ATW set to ON j During Freeze Frame l 81 RB GAIN CONTROL SETTING allows you to fine adjust the color balance for each position of the WHITE BAL switch l 134 Mode Settings ATW ATW 1 It will automatically adjust in accordance with the recording condition LOCK ATW Lock 2 It will lock the setting for ATW l 57 P3200K P3200K Preset value for studio indoor recording halogen lamp etc P5600...

Page 57: ... LOCK to a USER button Please refer to page 74 for details about setting the USER button 1 Set the White Balance mode to ATW 2 Press the USER button to which ATW LOCK is registered or touch the applicable USER button icon To cancel ATW Lock press the USER button or touch the USER button icon again Canceling ATW Lock will return the White Balance mode back to ATW This function is not available in t...

Page 58: ... and then the White Balance The screen goes dark momentarily WB SET OK is displayed and the adjustment ends If you have pressed the AWB button only the White Balance can be adjusted When WB SET OK is displayed the adjustment is complete When the mode of White Balance is set to something other than Ach or Bch the Auto Black Balance is performed by pressing and holding the AWB button Setting is comp...

Page 59: ...E darken the image Value closer to OPEN brighten the image To return to Auto Iris Mode press the IRIS button or set A IRIS to ON and switch to Auto Mode l 36 This item cannot be set during Freeze Frame l 81 Depending on the zoom magnification there are iris values that are not displayed In Auto Gain Mode or Auto Shutter Mode the screen brightness may not change even if you adjust the iris l 61 63 ...

Page 60: ...L setting with a USER button l 88 Utilizing the USER button It is convenient to use following functions of the USER button when it is set to Iris adjustment Please refer to page 74 for details about setting the USER button Customizing Auto Iris motion settings for various recording conditions SW SETUP A IRIS SPEED desired setting FAST NORMAL SLOW SCENE FILE AUTO IRIS LEVEL EFFECT SCENE FILE AUTO I...

Page 61: ...s is performed j Setting AGC to ON and switching to Auto Mode l 36 j Setting any of LOW GAIN MID GAIN and HIGH GAIN to AUTO and setting the GAIN switch to the corresponding position A Gain value The gain value changes depending on GAIN ISO DISPLAY CHG setting j When set to GAIN In Auto Gain Mode AGC is displayed in Manual Gain Mode the gain value is displayed in dB j When set to ISO In Auto Gain M...

Page 62: ...tails about setting the USER button Switch to Manual Mode l 36 Press the USER button to which SUPER GAIN is registered or touch the applicable USER button icon To cancel Super gain press the USER button or touch the USER button icon again To change the gain value of Super Gain Select the menu When GAIN ISO DISPLAY CHG is set to GAIN When GAIN ISO DISPLAY CHG is set to ISO Super Gain is not availab...

Page 63: ...depending on the frame rate in REC FORMAT or OUTPUT FORMAT l 142 147 Synchro Scan values l 65 The shutter speed closer to 1 8000 is faster Recording Manual shutter speed Frame rates Shutter speed 59 94p 59 94i 1 60 0 1 2 1 4 1 8 1 15 1 30 1 60 1 8000 29 97p 1 60 0 1 2 1 4 1 8 1 15 1 30 1 50 1 8000 50 00p 50 00i 25 00p 1 50 0 1 2 1 3 1 6 1 12 1 25 1 50 1 8000 23 98p 24 00p 1 48 0 1 2 1 3 1 6 1 12 1...

Page 64: ...j During Freeze Frame l 81 You may see a band of light around an object that is shining very bright or highly reflective During normal playback image movement may not look smooth If you record an extremely bright object or record under indoor lighting color and screen brightness may change or a horizontal line may appear on the screen In such cases change settings as follows j Set this unit to Aut...

Page 65: ... setting faster by rotating the jog dial while pushing and holding it To minimize flickering and horizontal bands look at the screen while adjusting the shutter speed 4 Push the jog dial to set The set shutter speed will also be applied to the SYNCHRO SCAN menu setting l 132 Shutter speed range for the Synchro Scan setting The shutter speed range varies depending on the size and frame rate in REC ...

Page 66: ...he built in microphone Audio is recorded with the built in microphone 2 ch when the CH1 SELECT switch is set to INT L and the CH2 SELECT switch is set to INT R Recording Audio Input Recording mode Audio recording method MOV Linear PCM LPCM MP4 AVCHD Dolby Digital INT L INPUT1 INPUT2 CH1 SELECT INT R INPUT1 INPUT2 CH2 SELECT AUTO MANU CH 1 AUTO MANU CH 2 LINE INPUT2 MIC 48V LINE INPUT1 MIC 48V A CH...

Page 67: ...n is recorded to channel 1 4 Use the CH2 SELECT switch to select the input signal to be recorded to audio channel 2 INT R Audio from the built in microphone R right ch is recorded to audio channel 2 INPUT1 Audio from a device connected to AUDIO INPUT1 terminal XLR 3 pin is recorded to channel 2 INPUT2 Audio from a device connected to AUDIO INPUT2 terminal XLR 3 pin is recorded to channel 2 Table o...

Page 68: ...CH2 switch for channel 2 1 Set the position of the CH1 or CH2 switch 2 If you have set to MANU Adjust the input level operating the AUDIO LEVEL CH1 AUDIO LEVEL CH2 knobs Adjust confirming the audio level meter Remove while pushing on the PUSH section of the AUDIO INPUT1 2 terminals XLR 3 pin Set the input signal to built in microphone by switching the CH1 SELECT CH2 SELECT switches to INT L or INT...

Page 69: ...n ALC works for either of the audio channels it will also work for the other audio channel 1 Set CH1 switch or CH2 switch to MANU 2 Set AUDIO ALC CH1 AUDIO ALC CH2 to ON 3 Select the menu Using the ALC function AUDIO SETUP AUDIO ALC CH1 or AUDIO ALC CH2 desired setting ON Enables ALC allowing you to record audio with reduced noise OFF Allows you to record natural sounding audio AUDIO SETUP AUDIO A...

Page 70: ...number of frames frame count per second varies depending on the frame rate in REC FORMAT or OUTPUT FORMAT l 142 147 Recording Counter display Counter display Indications Time Code TC 00 00 00 00 or TC 00 00 00 00 Display will change depending on the setting of the DF MODE l 71 User Information l 72 UB 00 00 00 00 Recording Counter l 73 In Recording Mode 0 00 00 or SCN 0 00 00 In Playback Mode SCN ...

Page 71: ...3 j When 2 SLOTS FUNC is set to BACKGROUND l 159 It is automatically set to REC RUN in following cases j In Variable Frame Rate Mode 2 l 91 j During the Interval Recording l 162 2 FREE RUN is also available if the number of frames for the frame rate in REC FORMAT and the number of frames for Variable Frame Rate Mode are the same Example When REC FORMAT is set to FHD 1080 59 94p 50M and the frame r...

Page 72: ... is set to 23 98p set the number of frames to 00 or a multiple of 4 If you enter a different value time code will not be recorded correctly Setting the User Information Eight digit hexadecimal alphanumeric can be entered and displayed as a memo information such as dates control numbers etc into the User Information UB 00 00 00 00 This is displayed only when REC MODE is set to AVCHD l 141 You can s...

Page 73: ...hile the device to be synchronized is referred to as slave 3 On the master device Select the EXT TC LINK menu The time code will be output from the TC PRESET IN OUT terminal To cancel the output of the time code touch EXIT 4 On the slave device Select the EXT TC LINK menu REC COUNTER DISP SETUP REC COUNTER desired setting TOTAL The count continues to increase until the Recording Counter is reset S...

Page 74: ... body and four USER button icons USER9 to USER12 displayed on the LCD monitor Setting the USER button 1 Select the menu It is not possible to register functions to USER9 to USER12 in Playback Mode 2 Touch the item to register For the functions of the USER button that can be registered refer to page 76 Touch INHIBIT if not registering Next Previous page can be displayed by touching 3 Touch EXIT to ...

Page 75: ...le l 89 j Auto Recording l 90 j AF Area Range Adjustment l 90 j Log View Assist l 94 j LCD EVF Output l 24 Switch display not display of the USER buttons Display not display of the USER button icons in the LCD monitor can be switched Select the menu Check the setting of the USER buttons When you use the USER1 to USER7 button When you use the USER8 button When you use the USER9 to USER12 button USE...

Page 76: ...C CHECK REC C Recording Check LAST SCN DEL LstDel Last Scene Delete DRS DRS DRS FRZ FRAME FRZ Freeze Frame SUPER GAIN S Gain Super Gain 1 AREA AREA Area Mode FOCUS TRANS F Tran Focus Transition 2 CAPTURE Capture Capture EVF LCD DETAIL DETAIL EVF LCD detail IR REC IR REC Infrared Recording LEVEL GAUGE Level Level Gauge BACKGROUND Backgr Background FLASH BAND FBC Flash band compensation PRE REC PRE ...

Page 77: ...ate the backlight This makes the image brighter to prevent darkening of a backlit subject appears when it is set It will return to standard Auto Iris Mode when it is canceled l 59 This item cannot be set during Freeze Frame l 81 Register Spotlight to a USER button l 74 Switches to automatic iris control for spotlight Very bright object is recorded clearly appears when it is set It will return to s...

Page 78: ... 74 Fade in fade out effect white can be added to the video and audio that is being recorded Press USER button or touch USER button icon in the recording screen Fade out will start and fade in will start after completing the fade out It will fade out when the button is pressed and held and fade in will start when the button is released Recording will not start even if the fade out is started It is...

Page 79: ...e l 82 j In Variable Frame Rate Mode l 91 j During the Interval Recording l 162 Digital zoom is canceled in following cases j If you turn the unit off j If you press the THUMBNAIL button j When USB MODE SELECT is set to DEVICE and this unit is connected to a PC l 122 Register Histogram to a USER button l 74 A graph with brightness as horizontal axis and number of pixels at that brightness as verti...

Page 80: ... When the setting of REC FORMAT is changed l 142 j Set 2 SLOTS FUNC to SIMULTANEOUS or BACKGROUND l 159 j PRE REC is used l 86 163 j During the Interval Recording l 162 j During Freeze Frame l 81 Register Last Scene Delete to a USER button l 74 Set OUTPUT BITS to 4 2 2 8bit l 31 The motion picture recorded last can be deleted Deleted scenes cannot be restored 1 Press USER button or touch USER butt...

Page 81: ... the frozen image and sounds will be recorded You can perform the following camera operations during Freeze Frame Other camera operations will be disabled j Recording motion pictures j Canceling Freeze Frame j Operating the FOCUS A M switch j Operating the WHITE BAL switch j Operating the GAIN switch This function is not available in the following cases j When using Focus Assist l 48 j In Variable...

Page 82: ...Press the USER button With a USER button icon 1 Touch and hold the recording screen to display operation icons 2 Touch the USER button icon To change the size of the area frame You can rotate the jog dial to change the size of the area frame The area frame is available in three sizes Area Mode SW SETUP AREA MODE desired setting INH Does not apply any effects of Area Mode FOCUS Optimizes the focus ...

Page 83: ...e luminance display frame will not be displayed l 88 155 In addition the luminance level will not be displayed if AREA MODE is set to FOCUS IRIS or FOCUS IRIS Register Focus Transition to a USER button l 74 Switch to Manual Focus Mode l 44 With Focus Transition you can move the current focus position to a pre registered focus position l 52 Register Capture to a USER button l 74 You can record stil...

Page 84: ...e j SCENE FILE l 131 j MASTER DETAIL l 132 j DETAIL CORING l 133 j SKIN TONE DTL l 133 j V DETAIL LEVEL l 133 j KNEE APE LEVEL l 134 j RB GAIN CONTROL SETTING l 134 j CHROMA LEVEL l 135 j CHROMA PHASE l 135 j MATRIX l 135 j COLOR CORRECTION SETTING l 136 j MASTER PED l 137 j GAMMA MODE l 137 j BLACK GAMMA l 138 j BLACK GAMMA RANGE l 138 j KNEE MODE l 138 j KNEE MASTER POINT l 138 j KNEE MASTER SLO...

Page 85: ...ot be displayed correctly j When moving this unit j When pointing this unit up or down at an angle closer to perpendicular Register Background to a USER button l 74 When 2 SLOTS FUNC is set to BACKGROUND you can start stop background recording When the recording destination of motion pictures is set to SD CARD 1 in MEDIA SELECT l 32 SD CARD 2 will be used for background recording The following ins...

Page 86: ... and audio to start before you press the recording start stop button AVCHD scenes will be recorded from approximately 3 seconds before the operation while MOV MP4 will be recorded from approximately 4 seconds before the operation P is displayed on the screen After you start recording the display changes to P REC Aim the unit at the subject beforehand There is no beep sound This function is not ava...

Page 87: ... turn the unit off j If you press the THUMBNAIL button j When USB MODE SELECT is set to DEVICE and this unit is connected to a PC l 122 To change the type of WFM Select the menu This function is not available in the following cases j When using Focus Assist l 48 j During Freeze Frame l 81 j When color bars are displayed l 95 To change the display position of WFM Select the menu You can also change...

Page 88: ... between the zebra display and the marker display every time the button is pressed Zebra 1 Zebra 2 Marker setting canceled It is not displayed when the ZEBRA DETECT 2 MARKER is set to OFF l 171 Zebra display Parts where white saturation color saturation is likely to occur extremely brightly lit or shiny parts are displayed with diagonal lines zebra pattern A Marker display Displays the luminance l...

Page 89: ...Press USER button or touch USER button icon in the recording screen 2 Touch SAVE 3 Touch the name of the scene file All scene number settings will be saved Up to 8 files can be saved If you have touched the name of the existing scene file touch YES to overwrite it 4 Touch EXIT to complete the setting Assigning saved scene files to custom scenes 1 Press USER button or touch USER button icon in the ...

Page 90: ...to stop the recording When HDMI TC OUTPUT is set to ON you can also control recording performed with an external device connected to the HDMI OUT terminal It is not possible to control recording performed with an external device connected to the SDI OUT terminal in the following cases j When REC FORMAT is set to SA 480 59 94i or SA 576 50 00i l 142 j When RESOLUTION is set to DOWN CONV l 115 Regis...

Page 91: ...an be gained Quick motion undercrank recording A fast motion effect is used in scenes showing the flow of clouds people standing in the middle of crowds etc Set a frame rate that provides less frames than the frame rate in REC FORMAT does Example If you set FHD 1080 23 98p 50M to 12 fps and record a motion picture a quick motion effect of 2k can be gained Register VFR mode to a USER button l 74 Se...

Page 92: ...nnot be changed during recording 4 Press the recording start stop button again to stop recording To cancel Variable Frame Rate Mode press USER button or touch USER button icon Frame rates and their effects Quick motion undercrank or slow motion overcrank recording is possible with the following frame rate settings When you set the frame rate to 100 fps or 120 fps the angle of view will change The ...

Page 93: ...ion l 46 j i Zoom l 41 BLACK FADE and WHITE FADE are disabled l 78 Still picture recording cannot be used Even if you press the recording start stop button as soon as recording has started it may take some time until the recording stops The screen may momentarily black out when the frame rate is changed in Step 2 The maximum continuous recordable time for one scene in Variable Frame Rate Mode vari...

Page 94: ...MODE to ON l 140 Press and hold the USER button or touch and hold the USER button icon in the recording screen It will be canceled when the button is released Log View Assist is canceled in the following cases j When starting motion picture recording j When PRE REC is set l 86 163 j When Background recording l 160 Register LCD EVF Output to a USER button l 74 This changes how to turn on off the LC...

Page 95: ... in REC FORMAT or OUTPUT FORMAT l 142 147 The test tone volume differs depending on the TEST TONE setting l 170 You can record color bars as motion pictures but not as still pictures If you press the BARS button while recording color bars as a motion picture you can stop displaying the color bars To display them again stop the recording and press the BARS button Recording Useful functions BARS but...

Page 96: ... A recommend ND filter setting may not be displayed correctly in scenes that are too dark Switching the screen indications mode information display When DATE TIME is set to TIME DATE or DATE TIME To cancel the setting set the DISP MODE CHK switch to ON 1 64 Reduces the amount of light to 1 64 1 16 Reduces the amount of light to 1 16 1 4 Reduces the amount of light to 1 4 OFF Does not use the ND fi...

Page 97: ...en while an operation icon is being displayed or do not touch the icon for a certain period it will disappear To display again touch the screen Mode information display1 Displays the list of functions assigned to the USER buttons USER1 to 8 Mode information display2 Displays the settings assigned to the GAIN switch GAIN L GAIN M GAIN H White Balance modes assigned to the WHITE BAL switch WHITE BAL...

Page 98: ...jog dial when a screen that lets you adjust a value is displayed Example When adjusting the brightness for LCD SET 1 Rotate the jog dial to move the cursor to the value display A Push the jog dial to select the value display 2 Rotate the jog dial to adjust the setting Pushing the jog dial will set the value you have selected The jog dial also allows you to select set operation icons thumbnails etc...

Page 99: ...sts the size of the AF area frame VFR Variable Frame Rate l 91 Changes the frame rate for Variable Frame Rate Mode SHUTTER Shutter speed l 63 Adjusts the shutter speed AREA Area Mode l 82 Changes the area frame setting ASSIST Focus Assist l 48 Changes the magnification level of the magnified display VOLUME Headphone Volume Adjustment l 100 Adjusts the headphone volume ICONS Allows you to display s...

Page 100: ...to adjust the volume Actual volume to be recorded does not change 3 Push the jog dial to finish the adjustment You can also adjust the volume by touching in Step 2 Not performing touch operations after the adjustment allows you to exit the setting Functions Settings to be changed in advance Gain adjustment Switch to Manual Mode l 36 VAR adjustment Set the WHITE BAL switch to PRST and press the AWB...

Page 101: ... Scenes recorded in 4K 4096k2160 j Scenes recorded in UHD 3840k2160 j Scenes recorded in FHD 1920k1080 j Scenes recorded as sub recordings with DUAL CODEC REC set to FHD 50Mbps l 159 161 j Scenes recorded as sub recordings with DUAL CODEC REC set to FHD 8Mbps l 159 161 If you have touched the recording mode option AVCHD After you have touched a recording format option one of the following icons wi...

Page 102: ...eing displayed or do not touch the icon for a certain period it will disappear To display again touch the screen Motion picture playback Still picture playback 1 Playback Pause 6 Fast rewind playback 5 Fast forward playback Stops the playback and shows the thumbnails 1 Slide show playback of the still pictures in numerical order start pause 2 Plays back the previous picture 1 Plays back the next p...

Page 103: ...ck Mode the thumbnails of 9 scenes will be displayed By displaying in 1 scene recording date and time are displayed when playing back motion pictures and recording date and file number when playing back still pictures Speaker Headphone volume adjustment Operate the volume lever sub zoom lever or jog dial to adjust the speaker headphone volume during Motion Picture Playback Mode Adjusting the volum...

Page 104: ...atible standards when playback of video recorded using another device is performed using this device or when video recorded using this device is played back in another device playback may not proceed normally or may not be possible Please check compatibility in the instruction manual of your device Motion pictures recorded with devices other than this unit are not supported by this unit Still pict...

Page 105: ...MOV MP4 scenes are played back as follows j Scenes recorded with REC FORMAT set to FHD 1080 59 94p FHD 1080 29 97p FHD 1080 50 00p FHD 1080 25 00p FHD 1080 23 98p Reverse slow motion playback at 1 second intervals j Scenes recorded with REC FORMAT set to an option other than the above Reverse slow motion playback at 0 5 second intervals Frame by frame Playback During Pause With the playback paused...

Page 106: ...onvenient to use Pause Slow motion Playback and Frame by frame Playback Date the motion picture was recorded will be registered as date of the still picture Quality will be different from the normal still picture Please refer to page 202 about approximate number of recordable pictures Playback Useful functions Recording format Aspect ratio Picture size REC FORMAT setting with a size of 4K 4096k216...

Page 107: ...how playback of the still pictures l 102 Resuming the previous playback If playback of a scene was stopped halfway the playback can be resumed from where it was stopped Select the menu If playback of a motion picture is stopped appears on the thumbnail view of the stopped scene The memorized resume position is canceled if you turn off the unit or press the THUMBNAIL button The setting of RESUME PL...

Page 108: ...o MOV or MP4 and change the system frequency l 141 j When NUMBER RESET is performed l 178 Scenes recorded with the following REC FORMAT settings are grouped separately on the date list A recording format icon will be displayed next to the date is displayed after the date in the list by date for the still pictures created from the motion picture l 106 Recording format Icon to be displayed REC FORMA...

Page 109: ...on Up to 99 scenes can be selected to be deleted When SINGLE is selected in Step 1 Touch the scene still picture to be deleted 3 When MULTI is selected in Step 1 Touch Delete To continuously delete other scenes still pictures repeat Steps 2 3 Editing Deleting scenes still pictures Deleted scenes still pictures cannot be restored so perform appropriate confirmation of the contents before proceeding...

Page 110: ...the scenes still pictures may be deleted When still pictures recorded on an SD card by other products are deleted a still picture other than JPEG that cannot be played back on this unit may be erased Protecting scenes still pictures Scenes still pictures can be protected so that they are not deleted by mistake Even if you protect some scenes still pictures formatting the SD card will delete them P...

Page 111: ...r 2 Select the menu 3 Touch desired items following the screen display It will return to the previous step by touching Return When SELECT SCENES is selected When touched the scene still picture is selected and the indication appears on the thumbnail Touch the scene still picture again to cancel the operation When SELECT DATE is selected When touched the date is selected and surrounded by red Touch...

Page 112: ...pictures that have been recorded on another device may not be copied Data recorded on a PC cannot be copied The settings for the copied motion pictures and still pictures will be cleared if the protected motion pictures or still pictures are copied The order in which the scenes or still pictures were copied cannot be changed If you will delete the motion pictures or still pictures after copying is...

Page 113: ...M S S terminal 2 5 mm 0 1 q diameter super mini jack allows you to remotely control the zoom and start stop recording Do not connect any device other than a remote control to the CAM REMOTE terminals Doing so may change the image brightness or cause the image to be out of focus When a remote control is connected to the FOCUS IRIS terminal Priority for iris adjustment is given to the remote control...

Page 114: ...ding or PRE REC Please note that the image on the screen of this unit and on the external monitor disappears for a few seconds every time you start or stop recording or every time you switch the PRE REC on off These irregularities do not occur when RESOLUTION is set to 1080p or 1080i which outputs images in 1920k1080 This unit is not compatible with the VIERA Link Use a commercially available High...

Page 115: ... with a size of 4K 4096k2160 or UHD 3840k2160 l 142 j During auto recording l 90 168 Setting the external output resolution When connecting this unit to an external monitor or other external device recorder etc select the settings below that match the terminal to be used 1 Select the OUTPUT SEL menu 2 Select the RESOLUTION menu SYSTEM automatically sets the output resolution according to the setti...

Page 116: ...2 2 8bit In Playback Mode When RESOLUTION is set to SYSTEM the resolution of images output to the external device varies depending on the picture size and frame rate in REC FORMAT When SYSTEM FREQ is set to 59 94Hz Resolution of images output to the external device Setting Resolution of images output to the external device Picture size Frame rate in REC FORMAT RESOLUTION setting HDMI OUT terminal ...

Page 117: ...80 23 98p SYSTEM 1080 23 98p 1080 23 98PsF 1080p 1080 59 94p 1080i 1080 59 94i DOWN CONV 480 59 94p 480 59 94i PM 720 1280k720 59 94p SYSTEM 720 59 94p 1080p 1080 59 94p 1080i 1080 59 94i DOWN CONV 480 59 94p 480 59 94i SA 480 750k480 59 94i SYSTEM 480 59 94p 480 59 94i In Playback Mode still picture SYSTEM 1080 59 94p 1080p 1080i 1080 59 94i DOWN CONV 480 59 94p 480 59 94i Setting Resolution of i...

Page 118: ...50 00i HE 1080 50 00i SYSTEM 1080 50 00i 1080p 1080 50 00p 1080i 1080 50 00i DOWN CONV 576 50 00p 576 50 00i Setting Resolution of images output to the external device Picture size Frame rate in REC FORMAT RESOLUTION setting HDMI OUT terminal SDI OUT terminal VIDEO OUT terminal FHD 1920k1080 25 00p SYSTEM 1080 25 00p 1080 25 00PsF 1080p 1080 50 00p 1080i 1080 50 00i DOWN CONV 576 50 00p 576 50 00i...

Page 119: ...p 1080 59 94p 1080i 1080 59 94i UHD 3840k2160 23 98p SYSTEM 2160 23 98p 1080 23 98PsF 1080p 1080 59 94p 1080i 1080 59 94i FHD 1920k1080 59 94p SYSTEM 1080 59 94p 1080p 1080i 1080 59 94i FHD 1920k1080 59 94i SYSTEM 1080 59 94i 1080p 1080 59 94p 1080i 1080 59 94i FHD 1920k1080 29 97p SYSTEM 1080 29 97p 1080 29 97PsF 1080p 1080 59 94p 1080i 1080 59 94i FHD 1920k1080 23 98p SYSTEM 1080 23 98p 1080 23 ...

Page 120: ...TEM 1080 50 00i 1080p 1080 50 00p 1080i 1080 50 00i FHD 1920k1080 25 00p SYSTEM 1080 25 00p 1080 25 00PsF 1080p 1080 50 00p 1080i 1080 50 00i Setting Resolution of images output to the external device Picture size Frame rate in OUTPUT FORMAT RESOLUTION setting HDMI OUT terminal SDI OUT terminal ...

Page 121: ...rates with the driver installed as standard in the OS If using Windows Operation is not guaranteed in the following cases j Operation on an upgraded OS j Operation on an OS other than the one pre installed If using Mac Linking to external devices Connecting to a PC File transfer nonlinear editing OS Windows 10 32 bit 64 bit Windows 8 Windows 8 1 32 bit 64 bit Windows 7 32 bit 64 bit SP1 CPU 1 GHz ...

Page 122: ...select an option other than PC reconnect the USB Cable When using the battery the LCD monitor turns off after about 5 seconds Touch the screen to turn the LCD monitor on A USB 3 0 cable is not supplied with this unit Use a commercially available double shielded USB 3 0 cable with a ferrite core If possible we recommend using a cable with a length of 1 5 m 4 9 feet or less When performing reading w...

Page 123: ...onnect the USB Cable battery or AC adaptor while the access lamp is on or card access icon appears on the unit screen If the screen does not change when the unit is operated while connected to a PC disconnect the battery and or AC adaptor wait approximately 1 minute reconnect the battery and or AC adaptor wait approximately 1 minute again and then turn the unit back on Data may be destroyed when a...

Page 124: ...able in this unit When data not supported by this unit has been recorded on a PC it will not be recognized by this unit Always use this unit to format SD cards Picture size Frame rate Motion picture format Recording setting Y 1920k1080 R 3840k2160 Q 4096k2160 A 59 94 fps B 50 fps C 29 97 fps D 25 fps E 24 fps F 23 98 fps J Interlace recording MOV LPCM K Interlace recording MP4 LPCM Q Progressive r...

Page 125: ... or more partitions j If an external media device is in a format other than FAT32 or exFAT j When connected by using a USB hub You cannot copy scenes recorded on an SDXC Memory Card to an external media device in FAT32 format A Connect this unit to the external device with USB Cable supplied with the external media device B External media device commercially available C USB flash memory commercial...

Page 126: ...enes If you copy protected scenes or still pictures the protection setting of the copied scenes or still pictures are canceled The order in which the scenes were copied cannot be changed OTHER FUNCTION USB MODE SELECT HOST DIFFERENTIAL COPY Copies all scenes and still pictures recorded with this unit that have not been copied yet l 127 SELECT COPY Allows you to select desired scenes still pictures...

Page 127: ...n exFAT Displaying media information The used space of the external media device can be checked Connect this unit to the external media device and touch Playback from External Media Select the menu If you touch CHANGE MEDIA you can switch the display between the SD card 1 SD card 2 and the external media device Differential copy 1 Connect this unit to the external media device to prepare for copyi...

Page 128: ...s selected When touched the scene still picture is selected and the indication appears on the thumbnail Touch the scene still picture again to cancel the operation When SELECT DATE is selected When touched the date is selected and surrounded by red Touch the date again to cancel the operation Up to 99 scenes 99 dates can be selected continuously 5 Touch EXIT when the copy complete message is displ...

Page 129: ...en this unit and the external media device Touch the play mode select icon l 101 and then touch Disconnect the USB Cable from this unit It is also possible to switch the media to play back by touching the play mode select icon When the external media device is connected the external media device can be selected from the displayed media types l 101 In the following cases when you have touched a pla...

Page 130: ...he image settings Change the setting of SCENE FILE menu You can save the settings of the following menu items to the scene number you have selected l 132 to 140 j SYNCHRO SCAN j MASTER DETAIL j DETAIL CORING j SKIN TONE DTL j V DETAIL LEVEL j KNEE APE LEVEL j RB GAIN CONTROL SETTING j CHROMA LEVEL j CHROMA PHASE j MATRIX j COLOR CORRECTION SETTING j MASTER PED j GAMMA MODE j BLACK GAMMA j BLACK GA...

Page 131: ...120fps 3 Touch EXIT to complete the setting When the default setting for SYSTEM FREQ is 59 94Hz This function s default setting is 60fps When the default setting for SYSTEM FREQ is 50 00Hz This function s default setting is 50fps When REC MODE and REC FORMAT are set to settings that are not available for Variable Frame Rate Mode FRAME RATE cannot be set l 91 If you set the frame rate to 100fps or ...

Page 132: ...t setting for SYSTEM FREQ is 50 00Hz This function s default setting is 1 50 0 Adjusts the degree of overall outline correction in images 1 Touch MASTER DETAIL 2 Touch to adjust settings You can select a value between s31 and r31 3 Touch EXIT to exit the menu screen The default setting that is assigned to SCENE1 in CUSTOMIZE SCENE is 0 SYNCHRO SCAN Frame rates SYNCHRO SCAN setting 59 94p 59 94i Wh...

Page 133: ... screen If the background or anything else in the scene has colors similar to the skin color they will also be smoothed If the brightness is insufficient the effect may not be clear If you record a person in the distance the face may not be recorded clearly In this case set SKIN TONE DTL to OFF or zoom in on the face close up to record Adjusts the degree of vertical outline correction in images 1 ...

Page 134: ...0 Touch RETURN If you have touched GAIN OFFSET in Step 2 Touch ON or OFF To make additional changes repeat Steps 2s3 4 Touch EXIT to exit the menu screen The default settings that are assigned to SCENE1 in CUSTOMIZE SCENE are as follows j R GAIN 0 j B GAIN 0 j GAIN OFFSET OFF KNEE APE LEVEL 0 1 2 3 4 5 RB GAIN CONTROL SETTING AWB PRE Setting for the PRST position of the WHITE BAL switch AWB A Sett...

Page 135: ...alue between s31 and r31 3 Touch EXIT to exit the menu screen The default setting that is assigned to SCENE1 in CUSTOMIZE SCENE is 0 Represents the color during the recording 1 Touch MATRIX 2 Touch the desired setting item 3 Touch EXIT to exit the menu screen CHROMA LEVEL CHROMA PHASE MATRIX NORM1 Suitable for recording in the open air or under a halogen lamp NORM2 Suitable for brighter colors tha...

Page 136: ... If you have touched PHASE Making adjustments in the direction corresponds to making adjustments clockwise in the diagram above Conversely making adjustments in the j direction corresponds to making adjustments counterclockwise in the diagram 5 Touch RETURN Touch EXIT to exit the menu screen COLOR CORRECTION SETTING R R Mg Mg Mg Mg B Mg B B B B B Cy B Cy Cy Cy Cy G G G G Yl G Yl Yl Yl Yl Yl R Yl R...

Page 137: ...D is selected we recommend that you set the lens aperture to a level lower than the normal lens iris level approximately 1 2 to fully utilize the feature of the selected setting MASTER PED GAMMA MODE HD This is the video gamma feature for HD High Definition SD This increases gain in darker areas more than HD does FILMLIKE1 This feature reproduces highlight areas more than HD does FILMLIKE2 This fe...

Page 138: ...xposure select the compression level of the high intensity video signals received through the image sensor 1 Touch KNEE MODE 2 Touch the desired setting item 3 Touch EXIT to exit the menu screen This adjusts the knee point position in 0 5 steps when KNEE MODE is set to MANUAL 1 Touch KNEE MASTER POINT 2 Touch to adjust settings You can select a value between 80 0 and 107 0 3 Touch EXIT to exit the...

Page 139: ... l 81 Selects the level of the DRS function 1 Touch DRS EFFECT 2 Touch the desired setting item Higher the value greater the compression level of the highly illuminated area Higher the value greater the noise of the dark area 3 Touch EXIT to exit the menu screen This enables disables Auto Iris Level l 60 Adjusting brightness during the Auto Iris Mode l 60 The default setting that is assigned to SC...

Page 140: ...CHROMA PHASE l 135 j MATRIX l 135 j COLOR CORRECTION SETTING l 136 j MASTER PED l 137 j GAMMA MODE l 137 j BLACK GAMMA l 138 j BLACK GAMMA RANGE l 138 j KNEE MODE l 138 j KNEE MASTER POINT l 138 j KNEE MASTER SLOPE l 139 j DRS l 81 139 j DRS EFFECT l 139 j HIGH SENS MODE l 148 If you set this item to ON you can compensate for and reduce flash band a phenomenon that creates markedly different level...

Page 141: ...g method used l 31 Switch the recording mode of the motion pictures to record Set OUTPUT BITS to 4 2 2 8bit It is not compatible with motion pictures recorded in AVCHD This function is not available in the following cases j When OUTPUT BITS is set to 4 2 2 10bit j In Variable Frame Rate Mode l 91 j During the Interval Recording l 162 j During Freeze Frame l 81 SYSTEM MODE desired setting SYSTEM FR...

Page 142: ...sive scanning High density video signal sending the effective scanning lines simultaneously It will be higher quality image than the interlace The higher the bit rate value is the higher the picture quality becomes except for when the recording format is This exception is due to a difference in compression method It can record with highest quality image in this unit when set to UHD 2160 59 94p 150...

Page 143: ...p FHD 1080 29 97p 50M 29 97p Average 50 Mbps FHD 1080 23 98p 50M 23 98p FHD 1080 59 94i 50M 59 94i UHD 2160 50 00p 150M 50 00Hz UHD 3840k2160 50 00p Average 150 Mbps UHD 2160 25 00p 100M 25 00p Average 100 Mbps FHD 1080 50 00p FHD 1920k1080 50 00p Average 200 Mbps FHD 1080 50 00p 100M Average 100 Mbps FHD 1080 50 00p 50M Average 50 Mbps FHD 1080 25 00p 25 00p Average 200 Mbps FHD 1080 25 00p 50M A...

Page 144: ...94p 50M FHD 1080 29 97p 50M FHD 1080 23 98p 50M FHD 1080 50 00p 50M FHD 1080 25 00p 50M Please refer to page 200 about approximate recordable time When any of the following REC FORMAT settings is selected the angle of view will change j 4K 2160 24 00p 100M j UHD 2160 59 94p 150M UHD 2160 50 00p 150M j REC FORMAT settings with a size of FHD 1920k1080 When the unit is moved a lot or moved quickly or...

Page 145: ...ction Normal recording Interval Rec l 162 VFR Mode l 91 131 Relay recording l 159 Simultaneous recording l 160 Background recording l 160 Dual codec recording l 160 161 4K 2160 24 00p 100M s s s UHD 2160 59 94p 150M s s s s UHD 2160 50 00p 150M s s s s UHD 2160 29 97p 100M s s UHD 2160 25 00p 100M s s UHD 2160 23 98p 100M s s s FHD 1080 59 94p s s s FHD 1080 50 00p s s s FHD 1080 29 97p s s s FHD ...

Page 146: ...4p 50M s s FHD 1080 50 00p 50M s s FHD 1080 29 97p 50M s FHD 1080 25 00p 50M s FHD 1080 23 98p 50M s s FHD 1080 59 94i 50M s s s FHD 1080 50 00i 50M s s s PS 1080 59 94p s s s PS 1080 50 00p s s s PH 1080 59 94i s s s PH 1080 50 00i s s s PH 1080 23 98p s s s HA 1080 59 94i s s HA 1080 50 00i s s HE 1080 59 94i s s s HE 1080 50 00i s s s PM 720 59 94p s s s PM 720 50 00p s s s SA 480 59 94i s s s ...

Page 147: ...system frequency j When you have changed OUTPUT FORMAT from 4K 2160 24 00p to another one j When you have changed OUTPUT FORMAT from a setting other than 4K 2160 24 00p to 4K 2160 24 00p This item cannot be set in the following cases j When OUTPUT BITS is set to 4 2 2 8bit j During Freeze Frame l 81 OUTPUT FORMAT OUTPUT FORMAT System frequency setting Size Picture size Frame rate 4K 2160 24 00p 59...

Page 148: ... this unit 1 Touch CAMERA NUMBER SET 2 Touch to change the Camera Number Numbers between 0 and 9 can be set 3 Touch RETURN Touch EXIT to exit the menu screen This function s default setting is 0 ASPECT CONVERT SIDE CROP Records images in standard 4 3 mode The sides will be cut off LETTERBOX Records images in the 16 9 aspect ratio Black bands at the top and bottom of the picture will be recorded Si...

Page 149: ...4 FOCUS MACRO j USER5 O I S j USER6 ZEBRA j USER7 WFM j USER8 REC CHECK Register functions to USER button icons l 74 For the functions of the USER button that can be registered refer to page 76 The default settings are as follows j USER9 FRZ FRAME j USER10 EVF LCD DETAIL j USER11 ATW LOCK j USER12 MENU Switches the display of the set USER button icons l 75 USER SW desired setting USER1 USER2 USER3...

Page 150: ...000 3 Touch EXIT to exit the menu screen This function s default setting is 0dB Sets the gain value for the M position of the GAIN switch 1 Touch MID GAIN 2 Touch to adjust settings When GAIN ISO DISPLAY CHG l 173 is set to GAIN you can select AUTO or a value between 0dB and 24dB When GAIN ISO DISPLAY CHG is set to ISO you can select AUTO or a value between ISO500 and ISO8000 3 Touch EXIT to exit ...

Page 151: ...reen This function s default setting is 12dB Sets the gain value for the USER button function SUPER GAIN l 62 Switch to Manual Mode l 36 When GAIN ISO DISPLAY CHG l 173 is set to GAIN When GAIN ISO DISPLAY CHG is set to ISO This enables disables the Image Stabilizer l 42 You can set the Hybrid Optical Image Stabilizer l 42 When ON is selected the Image Stabilizer works with customized BLUR AMPLITU...

Page 152: ...ult setting is 0 This fine adjusts the intensity of blue l 57 This function s default setting is 0 BLUR AMPLITUDE 1 2 3 4 5 BLUR FREQUENCY 1 2 3 ATW SET OFF Does not assign ATW to the WHITE BAL switch Ach Sets the White Balance mode to ATW when the WHITE BAL switch is set to A Bch Sets the White Balance mode to ATW when the WHITE BAL switch is set to B PRST Sets the White Balance mode to ATW when ...

Page 153: ... This function s default setting is 3200K When ON is selected focus is automatically adjusted after you adjust it with the focus ring in Manual Focus Mode l 51 You can change the focus position setting for the automatic focus adjustment of MF Assist l 51 Sets the Focus Assist method l 48 You can set the peaking color for Focus Assist l 49 WB PRESET 3200K 5600K VAR WB VAR MF ASSIST ON OFF MF ASSIST...

Page 154: ... into focus when the zoom position is at the W end l 40 This sets the control speed in Auto Iris Mode l 60 You can set an Area Mode effect l 82 When ON is selected Auto Focus works with customized AF SPEED and AF SENSITIVITY settings l 46 You can adjust the focus speed of Auto Focus l 46 This function s default setting is 0 PEAKING LEVEL FOCUS RING DRIVE SPEED COARSE FINE FOCUS MACRO ON OFF A IRIS...

Page 155: ...7 Not displayed when ZEBRA 2 MARKER is set to OFF l 171 Switch between the zebra display and marker display For information on the zebra display and marker display refer to page 88 This sets the display duration of the zebra display AF SENSITIVITY AF AREA WIDTH WFM ON OFF WFM TYPE WAVE VECTOR WAVE VECTOR WFM POSITION TOP LEFT TOP RIGHT BOTTOM LEFT BOTTOM RIGHT ZEBRA ZEBRA 1 ZEBRA 2 MARKER OFF ZEBR...

Page 156: ...sub recording start stop button on the handle can be switched When ON is selected you can use Fast Zoom when operating the zoom with the zoom lever l 41 Enable disable of the sub zoom lever on the handle can be switched Zoom speed will be different depending on the setting The larger the value is the faster the zoom speed becomes and vice versa Changes the zoom magnification setting of Digital Zoo...

Page 157: ...ned text This enables disables Auto Iris for Auto Iris Mode l 36 This enables disables AGC for Auto Iris Mode l 36 Sets the maximum possible gain value for Auto Gain Mode l 62 When GAIN ISO DISPLAY CHG is set to GAIN When GAIN ISO DISPLAY CHG is set to ISO This enables disables Auto Shutter for Auto Mode l 36 i Zoom ON OFF AUTO SW desired setting A IRIS ON OFF AGC ON OFF AGC LIMIT 3 dB 6 dB 9 dB 1...

Page 158: ...ccording to the ambient brightness The value will differ depending on the frame rate of the REC FORMAT or OUTPUT FORMAT This item cannot be set during Freeze Frame l 81 When the shutter speed becomes 1 30 1 24 or 1 25 the screen may be seen as if frames are missed and after images may appear This enables disables ATW for Auto Mode l 36 This enables disables Auto Focus for Auto Mode l 36 AUTO SHUTT...

Page 159: ...le Relay Recording It is possible to continuously record on the SD card in the other card slot even when the available capacity of the SD card runs out during the recording is displayed beside the display of the SD card selected as the recording destination of motion pictures in MEDIA SELECT l 32 When the recording media is switched and Relay Recording starts will disappear from the location and i...

Page 160: ... recorded to the two SD cards will be displayed in red If you press the USER button to which BACKGROUND is registered you can start recording only to the SD card in card slot 2 For information on how to register a function to USER buttons refer to page 74 For information on how to use the USER button to which BACKGROUND is registered refer to page 85 2 Press the recording start stop button again t...

Page 161: ...ng destination runs out of space If the SD card being used as a background recording destination runs out of space during motion picture recording background recording does not restart automatically even if you replace the SD card Dual codec recording Main recording does not stop even if an error occurs in the memory card used for sub recording If an error occurs in the memory card used for main r...

Page 162: ...AT j When the frame rate is set to 59 94i or 29 97p 30 frames for a scene of 1 second j When the frame rate is set to 50 00i or 25 00p 25 frames for a scene of 1 second j When the frame rate is set to 24 00p or 23 98p 24 frames for a scene of 1 second Set OUTPUT BITS to 4 2 2 8bit l 31 I is displayed on the screen The icon changes to I REC after recording starts After recording the setting of Inte...

Page 163: ...080 59 94i 1 or HA 1080 50 00i 2 1 When SYSTEM FREQ l 141 is set to 59 94Hz 2 When SYSTEM FREQ is set to 50 00Hz INTERVAL REC is canceled in the following cases j If you turn the unit off j If you press the THUMBNAIL button j When USB MODE SELECT is set to DEVICE and this unit is connected to a PC l 122 The shortest motion picture recording time is approx 2 second Color balance and focus may not b...

Page 164: ...he length of time before Focus Transition starts l 55 Set OUTPUT BITS to 4 2 2 8bit l 31 You can stamp the date and time of recording on the images you record appears on the screen The display mode and format of the date and time of recording to be stamped vary depending on the settings for DATE TIME and DATE FORMAT l 173 The month of the date and time of recording is recorded in English INFRARED ...

Page 165: ...e and time of recording are displayed on the external monitor screen l 115 It is not possible to stamp the date and time of recording during normal still picture recording The date and time of recording displayed during TIME STAMP recording and the date and time displayed during the playback of the image may not exactly be the same Set SYSTEM FREQ to 59 94Hz l 141 Selects the compensation mode for...

Page 166: ...UDIO ALC CH1 AUDIO ALC CH2 to ON l 69 If you set this item to ON when ALC works for either of the audio channels it will also work for the other audio channel l 69 If you set this item to ON you can reduce the audio noise of audio channel 1 It will record with natural sound when set to OFF l 69 If you set this item to ON you can reduce the audio noise of audio channel 2 It will record with natural...

Page 167: ...T2 terminal XLR 3 pin Output Setup Different menu items are displayed depending on whether this unit is in Recording Mode or Playback Mode All default settings are indicated with underlined text This changes the external output destination l 115 This changes the way in which images are output to an external device l 115 INPUT1 LINE LEVEL 4dBu 0dBu INPUT2 LINE LEVEL 4dBu 0dBu INPUT1 MIC LEVEL 40 dB...

Page 168: ...rding start stop button When ON is selected EDH is superimposed on images of SD signals 480i and 576i output from the SDI OUT terminal In Playback Mode Touch the play mode select icon and set this unit to Motion Picture Playback Mode l 101 This adjusts the gain value of audio signals output from the SDI OUT terminal Set OUTPUT SEL to SDI or SDI AV l 115 In Playback Mode Touch the play mode select ...

Page 169: ...sides of an image will be cut off causing some icons on the external monitor to be hidden from the external monitor screen This sets a frame rate when outputting scenes in the recording format UHD 2160 59 94p 150M or UHD 2160 50 00p 150M from the HDMI OUT terminal When SYSTEM FREQ is set to 59 94Hz When SYSTEM FREQ is set to 50 00Hz DOWN CONV SIDE CROP Outputs images so that they are fit to the he...

Page 170: ...al l 100 Selects the test tone output when color bars are displayed l 95 This sets the setup level of 480i image signals Set SYSTEM FREQ to 59 94Hz l 141 178 AG DVX200PJ PB This function s default setting is 7 5 A AG DVX200EJ EN ED PX This function s default setting is 0 This sets how to turn on off the LCD monitor and viewfinder l 24 HDMI TC OUTPUT ON OFF VOLUME ON OFF TEST TONE OFF Does not outp...

Page 171: ...T to complete the setting This function s default setting is 80 Selects the brightness level of the right leaning zebra patterns on the screen 1 Touch ZEBRA DETECT 2 Touch SET 2 Touch to adjust settings You can select a value between 50 and 105 3 Touch EXIT to complete the setting You can display ZEBRA 2 after setting the level l 88 155 This function s default setting is 100 Displaying of the lumi...

Page 172: ...with the external monitor safety zone A can be switched When REC FORMAT is set to SA 480 59 94i or SA 576 50 00i and ASPECT CONVERT is set to SIDE CROP l 142 148 The safety zone is not displayed on the images that is actually recorded Displays hides the center marker Selects the operation of the Recording Counter during recording l 73 Changes the setting for the shutter speed display GUIDE LINES O...

Page 173: ...his function s default setting is M D Y AG DVX200EJ EN ED This function s default setting is D M Y AG DVX200PX This function s default setting is Y M D This function displays the horizontal vertical tilt of the unit with the electronic level l 85 GAIN ISO DISPLAY CHG GAIN Displays the gain value in dB ISO Displays the gain value in ISO ZOOM FOCUS ZOOM FOCUS setting Zoom value Focus value NUMBER A ...

Page 174: ...ns can be switched Zoom Display Optical Image Stabilizer ND filter Focus Display White Balance Iris Gain Auto Iris Shutter Speed Display can be switched between the remaining recordable time of the SD card and the remaining battery capacity indication This shows or hides indications on the screen except for USER BUTTON DISPLAY GUIDE LINES SAFETY ZONE CENTER MARKER DATE TIME AUDIO LEVEL METER LENS ...

Page 175: ... eye sensor sensitivity l 28 This function s default setting is s4 Switches the mirror function of the LCD monitor when recording yourself l 28 The image on the LCD monitor is displayed mirrored horizontally during recording of yourself when it is set to MIRROR The recording images or playback images on the viewfinder can be selected between color black and white l 28 LCD SET COLOR BRIGHTNESS CONT...

Page 176: ... l 122 In Recording Mode Set OUTPUT BITS to 4 2 2 8bit l 31 The used space and remaining recordable time of the SD card can be checked Touching CHANGE MEDIA switches the unit between the display for the SD card 1 and the display for the SD card 2 Only in Recording Mode remaining recordable time for the selected recording format is displayed Touch EXIT to close the indication The SD card requires s...

Page 177: ...unit automatically turns off to save battery life This unit will not automatically turn off even if the ECONOMY BATT is set to ON in following cases j PRE REC is used l 86 163 j When USB MODE SELECT is set to DEVICE and this unit is connected to a PC l 122 When connected to AC adaptor about 15 minutes have passed without any operation this unit automatically turns off This unit will not automatica...

Page 178: ... l 81 Set the file number of the MOV MP4 and still picture recorded next to 0001 Folder number is updated and file number will start from 0001 l 123 To reset the folder number format the SD card and then perform NUMBER RESET You can select the language on the screen display and the menu screen SYSTEM FREQ USB MODE SELECT HOST For connecting to the USB HOST terminal Type A of the unit DEVICE For co...

Page 179: ... mode select icon and set this unit to Motion Picture Playback Mode l 101 Playback of the first scene starts after playback of the last scene finishes when set to ON l 107 If playback of a scene was stopped halfway the playback can be resumed from where it was stopped when set to ON l 107 Scenes can be protected so that they are not deleted by mistake Even if you protect some scenes formatting the...

Page 180: ... still picture l 109 Copy Press the THUMBNAIL button to switch this unit to the Playback Mode This copies all scenes and still pictures recorded with this unit that have never been copied to another device to the external media device connected to this unit l 127 This allows you to select and copy the scenes still pictures You can copy between the SD cards in this unit or from either of them to th...

Page 181: ...ing is not possible l 31 Automatic recording l 90 Auto Mode l 36 Remaining battery power l 19 White Recording to card possible motion picture Green Card is being recognized motion picture R 1h20m Remaining time for motion picture recording l 33 REC Relay recording l 159 Simultaneous recording l 160 Background recording l 160 Dual codec recording l 160 161 H SENS High sensitivity recording mode l 1...

Page 182: ...0p 23 98p Frame rate l 142 FBC Flash band compensation l 86 140 ATW LOCK P3200K P5600K VAR Ach Bch White Balance l 55 VFR Variable Frame Rate mode l 91 131 LT BOX When ASPECT CONVERT is set to LETTERBOX l 148 ND 1 4 ND 1 16 ND 1 64 ND filter l 96 99 Luminance level l 82 88 Luminance display frame l 88 SA Center Marker l 172 AGC ISO AUTO 0dB ISO500 Gain value l 61 SHUTTER Multi Manual Function l 99...

Page 183: ...IO ALC CH1 AUDIO ALC CH2 and AUDIO ALC LINK are enabled and audio cannot be recorded l 92 Audio level meter l 68 Sound recording disabled l 92 Auto iris mode l 59 Backlight Compensation l 77 Spotlight l 77 OPEN F2 0 Iris value l 59 S E ALC A REC Z00 Zoom magnification l 40 iZ99 1 00 i Zoom magnification l 40 99 Fast Zoom l 40 White Card recording possible status still picture Number of recording p...

Page 184: ...107 100 0001 Still picture folder file name Protected motion pictures still pictures l 110 Recording mode When thumbnails are displayed l 101 Recording format When thumbnails are displayed l 101 142 10 Scene Number In 9 scene display in thumbnail mode l 101 TC 00 00 00 00 No 0010 59 94p 150M NOV 15 2015 15 30 ICONS 4K UHD FHD DU50 DU8 PH PS HA HE PM SA Playback of the external media device l 129 A...

Page 185: ...RECORD INCOMPATIBLE CONTROL DATA The content versions do not match This is displayed when the SD card contains scenes recorded with another device for example Match the device and content version ERROR OCCURRED RECORDING IS STOPPED This is displayed when the SD card is removed during recording or data cannot be written to the SD card correctly Check the SD card CANNOT RECORD THE NUMBER OF SCENES H...

Page 186: ...en found The management information will be automatically recovered after this message is displayed VFR ON NO AUDIO RECORDING Audio cannot be recorded if you change the frame rate when using Variable Frame Rate Mode To record audio disable Variable Frame Rate Mode CANNOT REC Recording cannot be performed with this unit when OUTPUT BITS is set to 4 2 2 10bit To perform recording with this unit set ...

Page 187: ...o delete scenes recorded with another device for example Match the device and content version CARD ERROR PLEASE REFORMAT This is displayed when the SD card cannot be formatted Check the SD card Replace the SD card in the card slot at which the error has occurred UNABLE TO FORMAT Formatting is not possible due to for example a problem with the SD card Check the SD card Cannot delete data on card Th...

Page 188: ...he connected external media device During copying between SD cards or copying to an external media device Display Description Behavior and cause PLEASE CHECK THE EXTERNAL MEDIA Copying cannot be performed due to for example a problem with the copy destination media device Check the copy destination media device THIS SCENE CANNOT BE COPIED Cannot copy contains recordings from other devices This is ...

Page 189: ...y has a limited life If the operating time is still too short even after the battery is fully charged the battery has worn out and needs to be replaced This unit cannot be operated though it is turned on This unit does not operate normally Remove the battery or AC adaptor wait about 1 minute and then reconnect the battery or AC adaptor Then about 1 minute later turn on the unit again Conducting th...

Page 190: ...to record a scene which is hard to bring into focus in Auto Focus Mode use the Manual Focus Mode to adjust the focus l 37 44 Audio is not recorded Variable Frame Rate Mode or Interval Recording is enabled l 91 162 is displayed and audio is not recorded in Variable Frame Rate Mode Audio is not recorded for Interval Recording Color or brightness of the image changes or you may see horizontal bars in...

Page 191: ...though this unit is correctly connected to an external monitor images cannot be seen The images are squeezed horizontally Please read the operating instructions of your external monitor and select the channel that matches the input used for the connection Change the setting of the unit depending on the cable connecting to the external monitor l 115 Even when this unit is connected to the external ...

Page 192: ... the unit reconnect the USB Cable Select another USB terminal on the PC Check the operating environment l 121 Connect the USB Cable again after restarting the PC and turning on this unit again When the USB Cable is disconnected an error message will appear on the PC To disconnect the USB Cable safely double click the icon in the task tray and follow the instructions on the screen Others Problem Ch...

Page 193: ...s may become slower There are two ways to update the firmware 1 Use the dedicated tool P2_Status_Logger to check and apply the update Only customers registered as members to PASS P2 Asset Support System can log in to PASS to use the dedicated P2_Status_Logger tool With P2_Status_Logger you can check the version information of the device used and jump to the page to download the required firmware F...

Page 194: ...chemicals its body may be marred and the surface finish may peel off Do not leave rubber or plastic products in contact with the unit for a long time When you use the unit in a sandy or dusty place such as a beach do not let sand or fine dust get into the body and terminals of the unit Also keep the unit away from sea water Sand or dust may damage the unit Care should be taken when inserting and r...

Page 195: ... Be sure to detach the battery after use If the battery is left attached a minute amount of current continues to flow even if the unit is off Keeping the unit in this state may result in over discharge of the battery This may result in you not being able to use the battery even after it is charged The battery should be stored in the vinyl bag so metal does not come into contact with the terminals ...

Page 196: ...utlet If you leave this unit connected the AC adaptor will consume approximately 0 3 W and the battery charger approximately 0 3 W of current Always keep the electrodes of the AC adaptor battery charger and battery clean Install the device near an AC outlet so that the power disconnection device AC mains plug can be accessed easily by hand When disposing of or giving away the SD card note that For...

Page 197: ...y after the unit is turned on The normal brightness will be restored when the unit s internal temperature rises LCD monitor viewfinder Extremely high precision technology is employed to produce the LCD Monitor screen The result is more than 99 99 effective dots with a mere 0 01 of the dots inactive or always lit However this is not a malfunction and does not affect the recorded picture Extremely h...

Page 198: ...he registered trademarks or trademarks of the manufacturers who developed the system or product concerned This product is licensed under the AVC Patent Portfolio License for the personal use of a consumer or other uses in which it does not receive remuneration to i encode video in compliance with the AVC Standard AVC Video and or ii decode AVC Video that was encoded by a consumer engaged in a pers...

Page 199: ...not be used simultaneously Recording function to be set Currently set recording function Interval Rec VFR Mode Relay recording Simultaneous recording Background recording Dual codec recording Interval Rec l 162 s VFR Mode l 91 131 Relay recording l 159 s s Simultaneous recording l 160 Background recording l 160 s s Dual codec recording l 160 161 s s PRE REC l 86 163 s s s Capture l 83 s s Black Fa...

Page 200: ...ume after a few seconds For information on the maximum continuous recordable time for one scene in Variable Frame Rate Mode refer to page 93 The recordable time may be reduced if recording with a lot of action is recorded or recording of short scene is repeated The recordable times depends on the recording condition or card type to be recorded For information on picture sizes frame rates and bit r...

Page 201: ... 00i 50M Recording format System frequency setting l 141 SD card 4 GB 16 GB 64 GB PS 1080 59 94p 59 94Hz 19 min 1 h 20 min 5 h 20 min PH 1080 59 94i 21 min 1 h 30 min 6 h PH 1080 23 98p HA 1080 59 94i 30 min 2 h 8 h 30 min HE 1080 59 94i 1 h 30 min 6 h 40 min 27 h 30 min PM 720 59 94p 1 h 4 h 15 min 17 h 10 min SA 480 59 94i 1 h 4 h 16 h 30 min PS 1080 50 00p 50 00Hz 19 min 1 h 20 min 5 h 20 min P...

Page 202: ...ss The number of recordable pictures depends on the recording condition or card type to be recorded The memory capacity indicated on the label of an SD card is the total of the capacity for copyright protection and management and the capacity which can be used on the unit a PC etc Others Approximate number of recordable pictures Picture size Aspect ratio Memory Card 4 GB 16 GB 64 GB 4096k2160 17 9...

Page 203: ...Panasonic Corporation Web site http www panasonic com ...

Reviews: