2
GENERAL GUIDELINES
1. When servicing, observe the original lead dress. If a
short circuit is found, replace all parts, which have been
over-heated or damaged by the short circuit.
2. After servicing, see to it that all the protective devices
such as insulation barriers, insulation papers shields are
properly installed.
3. After servicing, make the following leakage current
checks to prevent the customer from being exposed to
shock hazards.
LEAKAGE CURRENT COLD CHECK
1. Unplug the AC cord and connect a jumper between the
two prongs on the plug.
2. Measure the resistance value, with an ohm meter,
between the jumpered AC plug and each exposed
metallic cabinet part on the equipment such as
screwheads, connectors, control shafts, etc. The
resistance value must be more than 5M
.
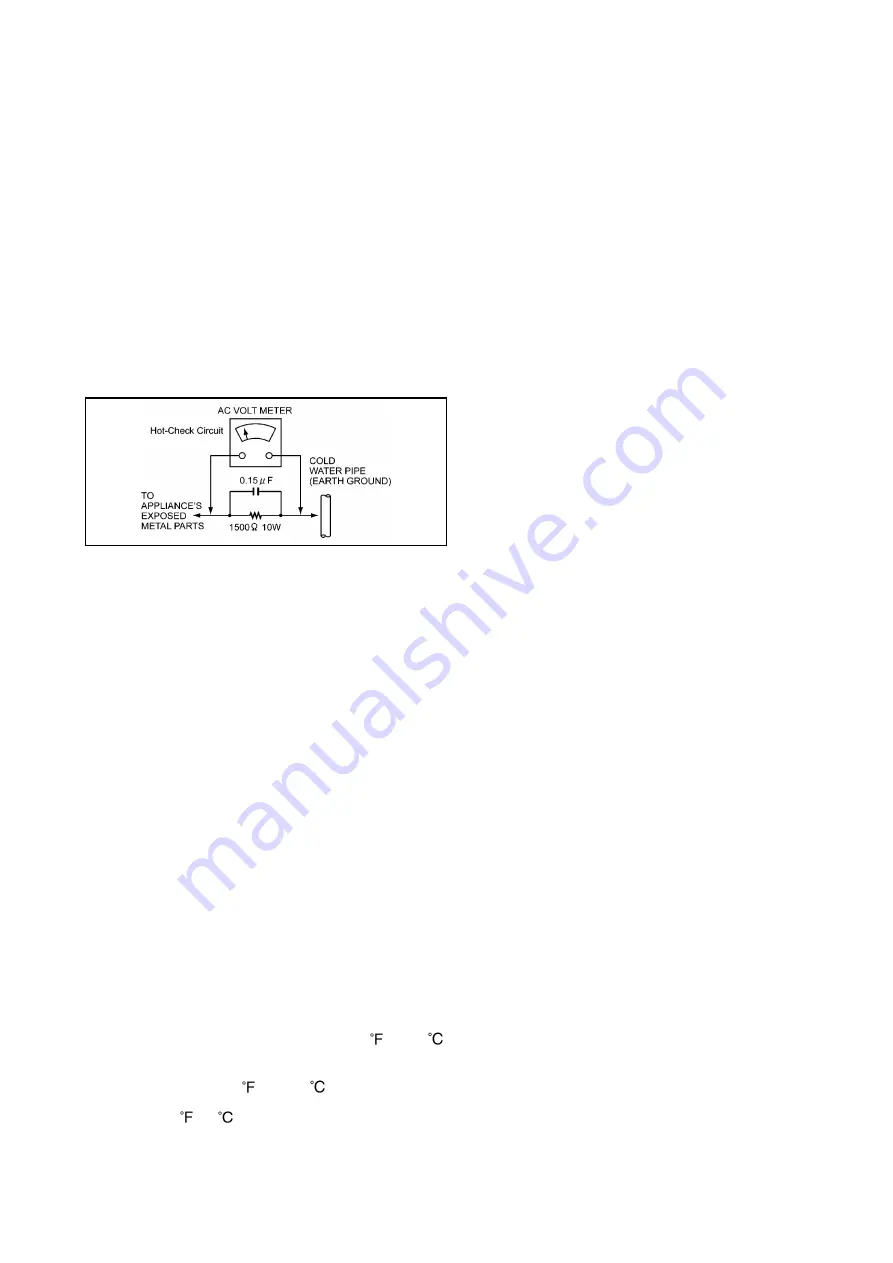
Figure1
LEAKAGE CURRENT HOT CHECK (See Figure 1)
1. Plug the AC cord directly into the AC outlet.
Do not use an isolation transformer for this check.
2. Connect a 1.5K
, 10W resistor, in parallel with a 0.15
F
capacitor, between each exposed metallic part on the set
an a good earth ground such as a water pipe, as shown
in Figure1.
3. Use an AC voltmeter, with 1000 ohms/volt or more
sensitivity, to measure the potential across the resistor.
4. Check each exposed metallic part, and measure the
voltage at each point.
5. Reverse the AC plug in the AC outlet repeat each of the
above measurements.
6. The potential at any point should not exceed 0.15 volts
RMS. A leakage current tester (Simpson Model 229
equivalent) may be used to make the hot checks,
leakage current must not exceed 0.1 milliamp. In case a
measurement is outside of the limits specified, there is a
possibility of a shock hazard, and the equipment should
be repaired and rechecked before it is returned to the
customer.
ABOUT LEAD FREE SOLDER (PbF)
Distinction of Pbf PCB:
PCBs (manufactured) using lead free solder will have a PbF
stamp on the PCB.
Caution:
1. Pb free solder has a higher melting point than standard
solder; Typically the melting point is 50–70 (30-40 )
higher. Please use a high temperature soldering iron. In
case of the soldering iron with temperature control,
please set it to 700
20 (370
10 ).
2. Pb free solder will tend to splash when heated too high
(about 1100 /600 ).
ELECTROSTATICALLY SENSITIVE (ES) DEVICES
Some semiconductor (solid state) devices can be damaged
easily by static electricity. Such components commonly are
called Electrostatically sensitive (ED) Devices. Examples of
typical ES devices are integrated circuits and some
field-effect transistors and semiconductor “chip” components.
The following techniques should be used to help reduce the
incidence of component damage caused by static electricity.
1. Immediately before handling any semiconductor
component or semiconductor-equipped assembly, drain
off any electrostatic charge on your body by touching a
known earth ground.
Alternatively, obtain and wear a commercially available
discharging wrist trap device, which should be removed
for potential shock reasons prior to applying power to the
unit under test.
2. After removing an electrical assembly equipped with ES
devices, place the assembly on a conductive surface
such as aluminum foil, to prevent electrostatic charge
buildup or exposure of the assembly.
3. Use only a grounded tip soldering iron to solder or
unsolder ES devices.
4. Use only an anti-static solder removal device classified
as “anti-static” can generate electrical charges sufficient
to damage ES devices.
5. Do not use freon-propelled chemicals. These can
generate electrical charges sufficient to damage ES
devices.
6. Do not remove a replacement ES device from its
protective package until immediately before you are
ready to install it.
(most replacement ES devices are package with leads
electrically shorted together by conductive foam,
aluminum foil or comparable conductive material).
7. Immediately before removing the protective material
from the leads of a replacement ES device, touch the
protective material to the chassis or circuit assembly into
which the device will be installed.
CAUTION: Be sure no power is applied to the chassis or
circuit, and observe all other safety precautions.
8. Minimize bodily motions when handling unpackaged
replacement ES devices. (Otherwise hamless motion
such as the brushing together of your clothes fabric or
the lifting of your foot from a carpeted floor can generate
static electricity sufficient to damage an ES device).
X-RADIATION
WARNING
1. The potential source of X-radiation in EVF sets is the
High Voltage section and the picture tube.
2. When using a picture tube test jig for service, ensure
that jig is capable of handling 10kV without causing
X-Radiation.
Note:
It is important to use an accurate periodically
calibrated high voltage meter.
3. Measure the High Voltage. The meter (electric type)
reading should indicate 2.5kV, ±0.15kV. If the meter
indication is out of tolerance, immediate service and
correction is required to prevent the possibility of
premature component failure. To prevent an X-Radiation
possibility, it is essential to use the specified picture
tube.
SAFETY PRECAUTIONS
Summary of Contents for AG-AC30PJ
Page 4: ...3 Model No AG AC30PJ PB ...
Page 5: ...4 ...
Page 6: ...5 ...
Page 7: ...6 ...
Page 8: ...7 Model No AG AC30EJ ...
Page 9: ...8 ...
Page 12: ...11 ...
Page 14: ......
Page 16: ...13 ...
Page 17: ...14 ...
Page 37: ...24 8 2 PCB Location ...
Page 41: ...28 Fig D4 8 3 3 Removal of the Zoom Lever Unit Power SS Unit Grip Unit Fig D5 Fig D6 ...
Page 42: ...29 8 3 4 Removal of the Side Case L Unit Fig D7 Fig D8 ...
Page 43: ...30 8 3 5 Removal of the XLR Rear P C B Unit AV Jack P C B DC Remote Jack P C B Fig D9 Fig D10 ...
Page 44: ...31 Fig D11 8 3 6 Removal of the Sub Radiation Plate Unit Fig D12 ...
Page 45: ...32 8 3 7 Removal of the LED Light P C B Fig D13 8 3 8 Removal of the XLR Front Unit Fig D14 ...
Page 48: ...35 Fig D21 8 3 13 Removal of the Microphone Fig D22 ...
Page 49: ...36 8 3 14 Removal of the Handle Case L Unit Fig D23 8 3 15 Removal of the ND Case Fig D24 ...
Page 53: ...40 8 3 22 Removal of the Main P C B Fig D32 Fig D33 8 3 23 Removal of the Handle Unit Fig D34 ...
Page 55: ...42 Fig D39 8 3 26 Removal of the Battery Catcher P C B Fig D40 ...
Page 56: ...43 8 3 27 Removal of the Speaker Fig D41 8 3 28 Removal of the EVF Unit Fig D42 ...
Page 57: ...44 Fig D43 ...
Page 60: ...49 Level Shot Adjutment Chart ...
Page 62: ...51 9 1 2 Adjustment Items Adjustment item as follows ...
Page 65: ...54 ...
Page 66: ...55 ...
Page 67: ...56 ...
Page 68: ...57 ...
Page 69: ...58 ...
Page 70: ...59 ...
Page 71: ...60 ...
Page 72: ...61 ...
Page 85: ......
Page 86: ......
Page 116: ......
Page 119: ...1 5 2 6 R L 6 5 5 1 R L 6 5 5 2 F P 6 5 5 1 D 6 5 5 1 D 6 5 5 2 M K 1 M K 2 ...
Page 120: ......
Page 122: ...MK1 MK2 C3901 D3901 C3902 D3902 ...
Page 125: ...M K 3 M K 4 D 6 5 0 1 D 6 5 0 2 D 6 5 0 3 D 6 5 0 4 D 6 5 0 5 D 6 5 0 6 D 6 5 0 7 D 6 5 0 8 ...
Page 126: ...8 7 2 5 1 CL6501 CL6502 CL6503 RL6504 RL6505 FP6501 MK1 MK2 ...
Page 127: ...1 5 2 6 4 1 M K 1 M K 2 R L 6 9 3 6 F P 6 9 3 6 F P 6 9 3 7 ...
Page 128: ...1 ET6931 RL6937 ...
Page 131: ...1 4 2 3 M K 3 M K 4 J K 6 3 0 1 ...


