HygroPro
II
User's Manual
77
Appendix B. HygroPro
II
Field Service Update User Manual
Appendix B. HygroPro
II
Field Service Update User Manual
B.1 Setup
B.1.1 Required Tools
•
Power Supply (capable of delivering 20V at 20mA)
•
5 Wire Cable with 6 Pin Female M8 connector for the HygroPro
II
•
2 Wire RS485 Cable with USB adapter
•
Windows Laptop PC
•
TeraTerm Software (open source terminal emulator)
B.1.2 Hardware Setup
1.
Connect the RS485 wires to the 5 Wire Cable
a.
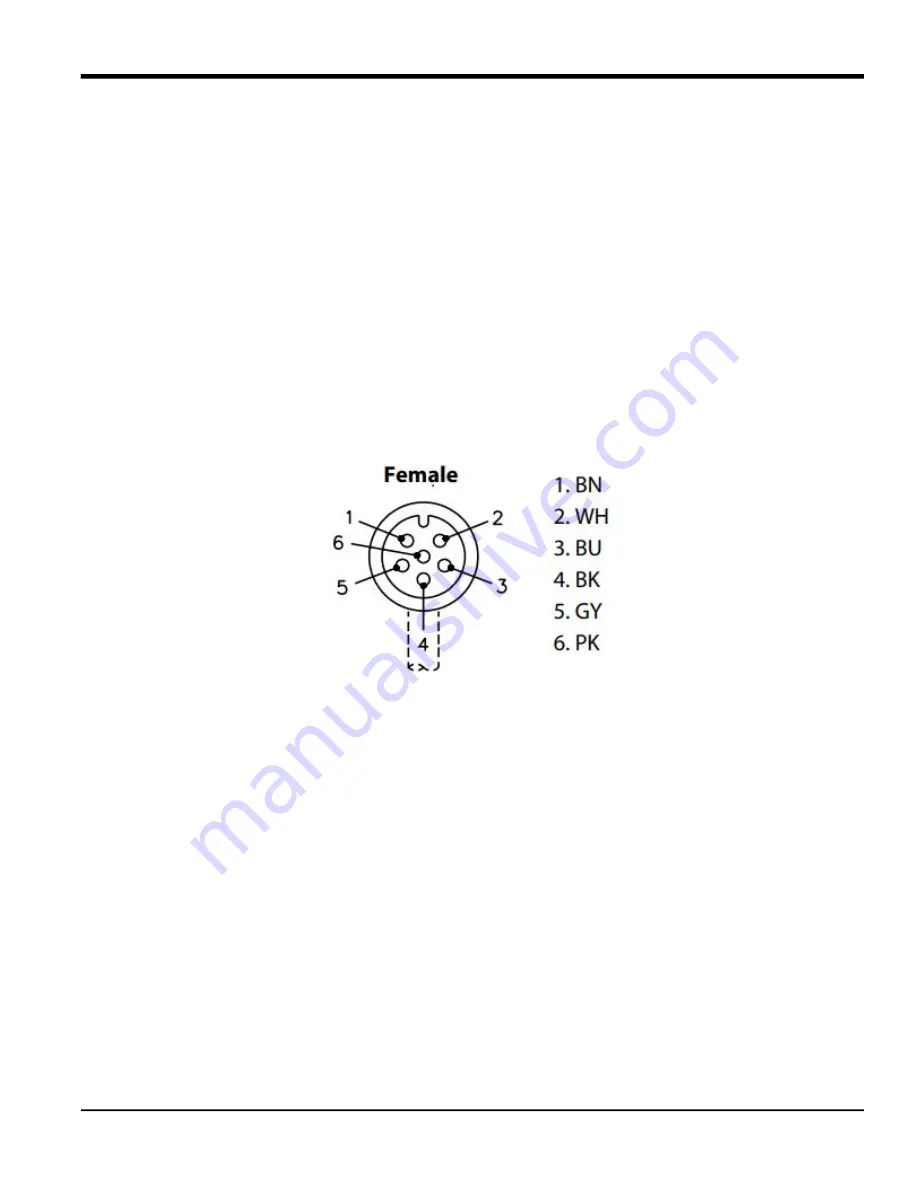
Connect the RS485 Data+ (A) to the wire corresponding to Pin 2 of the M8 connector (usually White)
b.
Connect the RS485 Data – (B) to the wire corresponding to Pin 4 of the M8 connector (Usually Black)
Figure 21: Pin Out for 6 Pin Female M8 Connector
2. Connect the 5 Wire cable to the power supply
a.
With the power supply turned off
b.
Connect the negative lead of the power supply to the wire corresponding to Pin 1 (usually Brown)
c.
Connect the positive lead of the power supply to the wire corresponding to Pin 3 (usually Blue)
d.
Do not turn on
the power supply
3. Connect the 6 Pin M8 Connector to the HygroPro
II
4. Connect the USB plug of the RS485 adapter to your laptop
5. Set up the values for the power supply, but do not power on the device
a.
Set the Voltage to 20 V
b.
Set the current to 20 mA
Summary of Contents for HydroProII
Page 1: ...panametrics com 910 331 A November 2022 HygroProII Moisture Transmitter User s Manual...
Page 2: ......
Page 4: ...ii no content intended for this page...
Page 12: ...Preface x HygroProII User s Manual no content intended for this page...
Page 42: ...Chapter 2 Operation 30 HygroProII User s Manual no content intended for this page...
Page 52: ...Chapter 4 Specifications 40 HygroProII User s Manual no content intended for this page...
Page 102: ...Warranty 90 HygroProII User s Manual no content intended for this page...
Page 103: ......


