Chapter 1. Programming Site Data
36
DigitalFlow™ XMT868i Programming Manual
1.4.3
Entering Communications Data
The Model XMT868i flowmeter is equipped with an RS232 or an RS485 serial interface. MODBUS (RS485), MODBUS/TCP,
Ethernet and Foundation-Bus options are available. When the MODBUS, MODBUS/TCP or Foundation Field Bus options
are present, the XMT868i may also have the standard RS232/RS485 serial interface. When the Ethernet option is
present, the RS232/RS485 serial interface is not present.
Note:
To set Fieldbus communications parameters, see Appendix E,
Foundation Fieldbus Communications
.
The serial port is used to transmit stored data and displayed readings to a personal computer by connecting the
meter’s serial interface to the serial port of the PC. In addition, the Model XMT868i can receive and execute remote
commands, using
PanaView
software, using this link.
Use the
COMM
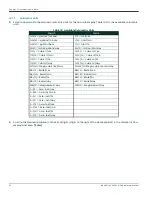
option to set the communications port and MODBUS parameters. While following the programming
instructions, refer to Figure 31 on page 10.
1.4.3.1
Setting Up the Serial Port
1.
To enter this submenu from the
Global PROGRAM
menu, scroll to
COMM
and press
[Enter]
.
2.
Enter a
Meter Address
number between 1 and 254 and press
[Enter]
.
The default number is 1.
A meter address is only necessary for communication with the Panametrics
PanaView
software. See the
PanaView
User’s Manual
for more information.
IMPORTANT:
If the meter address or baud rate is changed, communication with PanaView must be re-established
with the new address number.
3.
Scroll to the desired
Baud Rate
(300 to 19,200) and press
[Enter]
.
IMPORTANT:
The Ethernet option requires that the meter’s baud rate is set to the same rate as the Ethernet option.
The factory default is 9600 baud. If a different baud rate is desired, first change the meter’s rate, and
then change the Ethernet’s baud rate setting by using the Device Discovery utility.
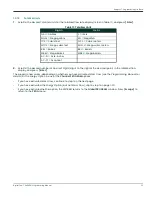
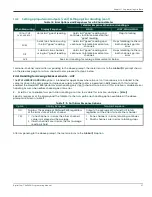
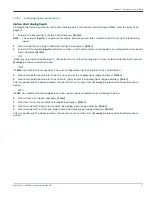
• If you have the RS485 MODBUS option, proceed to step 4 on the next page.
• If you have the standard RS232 serial interface or optional Ethernet interface, the meter exits the
COMM
submenu and returns to the
Global PROGRAM
prompt.
Summary of Contents for DigitalFlow XMT868i
Page 2: ......
Page 4: ...ii no content intended for this page...
Page 50: ...Chapter 1 Programming Site Data 42 DigitalFlow XMT868i Programming Manual...
Page 74: ...Chapter 4 Printing Data 2 DigitalFlow XMT868i Programming Manual...
Page 78: ...Chapter 5 Clearing Data 4 DigitalFlow XMT868i Programming Manual...
Page 79: ...DigitalFlow XMT868i Programming Manual 5 Appendix A Menu Maps Appendix A Menu Maps...
Page 80: ...Appendix A Menu Maps 6 DigitalFlow XMT868i Programming Manual...
Page 86: ...Appendix A Menu Maps DigitalFlow XMT868i Programming Manual...
Page 144: ...Appendix D PanaView Menu Maps for the XMT868i 70 DigitalFlow XMT868i Programming Manual...
Page 150: ...Appendix A PanaView Menu Maps DigitalFlow XMT868i Programming Manual 76...
Page 162: ...Warranty 6 AquaTrans AT868 User s Manual no content intended for this page...
Page 163: ......


