


2-16
u
Installation
S
ETTING
U
P
THE
R
ACK
M
OUNT
M
ODEL
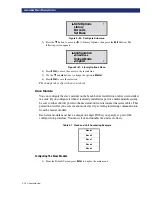
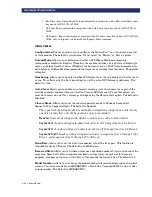
2) At the Default Screen, press the
Enter
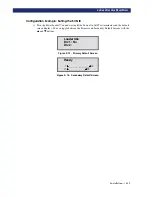
button. The screen displays the Main Menu:
Figure 2–15. Main Menu
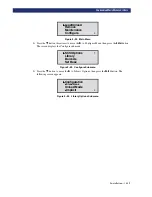
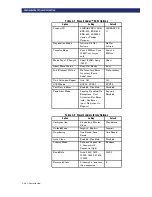
3) Press the
q
button three times to scroll to the Configure Menu, and press
Enter
. The screen
displays the Configure submenu:
Figure 2–16. Configure Submenu
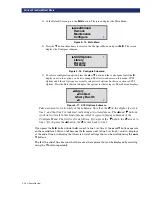
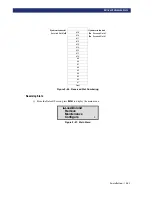
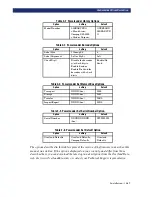
4) To select a configuration option, press the
p
or
q
button on the control panel until the
u
displays next to the option you want to change. The first two choices on this menu, SCSI
Options and Library Options, are actually categories of options. In this case, choose SCSI
Options. Press the Enter button to display the options for that category. The submenu displays:
Figure 2–17. SCSI Options Submenu
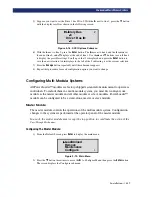
Take a moment to look closely at the submenu. Note that the
u
on the display is next to
line 1, and that line 2 is indented, indicating a two-tiered menu. The
p
and
q
buttons
work on two levels in this kind of menu, which is typical of many submenus of the
Configure Menu. The first level is as follows: If you press the
q
button, the
u
moves to
line 3. If you press the
p
button, the
u
moves back to line 1.
If you press the
Enter
button while the
u
is next to line 1 (or line 3), the
p
and
q
buttons operate
on the second level. You can tell because the
u
moves next to line 2 (or line 4), and a
✴
displays
at the end of line 4, indicating that there is a list of settings that can be scrolled using the
p
and
q
buttons.
The
$$$$
at the end of line 4 means that there are other options that can be displayed by scrolling,
using the
q
button repeatedly.
u
u
u
u
Load/Unload
Remove
Maintenance
Configure
$
u
u
u
u
SCSI Options
Library
Barcode
Set Base
#
u
Library
✴
✴
✴
✴
Enabled
Library Bus ID:
✴
✴
✴
✴
6
$
Summary of Contents for PowerLoaders AIT-2
Page 1: ......
Page 4: ...ii u...
Page 13: ...xi LIST OF FIGURES CONT D...
Page 14: ...xii LIST OF FIGURES CONT D...
Page 16: ...xiv LIST OF TABLES CONT D...
Page 26: ...2 2 u Installation RELEASING THE LOCKDOWN MECHANISM Lockdown Screw...
Page 52: ...2 28 u Installation CONFIGURATION OPTIONS DESCRIPTION...
Page 96: ...5 18 u Troubleshooting ERROR RECOVERY...
Page 102: ...A 6 u Specifications SPECIFICATIONS...
Page 104: ...B 2 u...


