background image

OPERATING INSTRUCTIONS

BEFORE FIRST USE AND AFTER EVERY GAS CYLINDER CHANGE, GAS 
DELIVERY SYSTEM MUST BE PURGED OF AIR BEFORE IGNITING! TO DO 
THIS, TURN THE CONTROL KNOB ANTI-CLOCKWISE TO THE PILOT SETTING. 
PRESS KNOB IN AND HOLD FOR 3 MINUTES BEFORE ATTEMPTING IGNITION.

BATTERY REPLACMENT

R e m o v e  i m p u l s e  i g n i t i o n  c a p  f r o m  B u r n e r  A s s e m b l y  ( J )  b y  t u r n i n g  c a p 
counterclockwise. Install 1 AAA battery. Negative end of battery goes in first, then 
replace impulse ignition cap by turning cap clockwise.

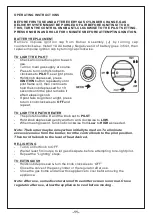
TO LIGHT THE PILOT

Check all connections prior to each 
use.

Turn on main gas supply at source.

Press to turn control knob anti-
clockwise to 

PILOT

, see right photo.

Hold knob depressed, press 

IGNITION 

button repeatedly until 

pilot flame is lit, then continue to 
hold the knob depressed for 10 
seconds until the pilot remains it 
after releasing knob.

If pilot fails to ignite or alight, press 
to turn knob clockwise to 

OFF

 and 

repeat.

TO LIGHT THE PATIO HEATER

The pilot should be lit and the knob set to 

PILOT

.

Hold knob depressed gently and turn anti-clockwise to 

LOW

.

When mesh glows lit, turn knob clockwise from 

Low

 to

 HIGH

 as needed.

Note: The burner may be noisy when initially turned on. To eliminate 
excessive noise from the burner, turn the control knob to the pilot position. 
Then turn the knob to the level of heat desired.

RE-LIGHTING

Turn Control Knob to OFF.

Wait at least 5 minutes, to let gas dissipate, before attempting to re-light pilot.

Repeat the “Lighting” steps.

TO EXTINGUISH

Hold knob depressed & turn the knob clockwise to 'OFF'

Close the valve of the gas cylinder or the regulator after use. 

Close the gas bottle and allow this appliance to cool before moving the 
appliance. 

Note: After use, some discoloration of the emitter screen is normal. Close 
regulator after use, allow the appliance to cool before moving.

Summary of Contents for 842-191

Page 1: ...ASSEMBLY INSTRUCTION MANUAL IMPORTANT RETAIN FOR FUTURE REFERENCE READ CAREFULLY INbza012_UK 842 191 ...

Page 2: ...e this appliance when in operation or after it has been turned off before the temperature has cooled down Do not attempt to alter the appliance in any manner Do not paint the radiant screen control panel or reflector Do not obstruct the ventilation holes of the cylinder housing The appliance must be installed and gas cylinder stored in accordance with local gas fitting regulations Shut off the valve...

Page 3: ... slight popping noise is normal when the appliance is extinguished The regulator hose assembly must be located out of pathways where people may trip over it or in area where the hose will not be subject to accidental damage Any guard or other protective device removed for servicing the heater must be replaced before operating the heater Children and adults should be warned of the hazards of high s...

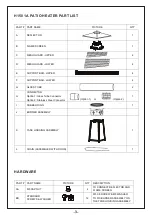
Page 4: ...CONNECTOR Option 1 Glass Tube Connector Option 2 Stainless Steel Connector Option 1 or Option 2 1 I RUBBER RING 1 J BURNER ASSEMBLY K TANK HOUSING ASSEMBLY 1 L CHAIN ASSEMBLED WITH DOOR 1 HARDWARE PART PART NAME PICTURE QTY DESCRIPTION AA M5 CAP NUT 4 TO CONNECT REFLECTOR AND FLAME SCREEN BB STANDARD SCREWS WASHER 12 M5 X 8 SCREW M5 WASHER TO FIX BURNER ASSEMBLY ON THE TANK HOUSING ASSEMBLY ...

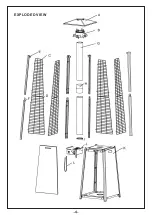
Page 5: ...EXPLODED VIEW ...

Page 6: ...your work and increase the stability of the appliance Before assembly make sure all packing material and any transmit protection must be removed Small deviations in equipment may occur This is no lack of quality but subject to improvements If any part is missing or damaged do not attempt to assembly this product Contact customer service for replacement parts Assembly should be performed on a flat l...

Page 7: ......

Page 8: ......

Page 9: ...firmly in place ...

Page 10: ......

Page 11: ......

Page 12: ...t remains it after releasing knob If pilot fails to ignite or alight press to turn knob clockwise to OFF and repeat TO LIGHT THE PATIO HEATER The pilot should be lit and the knob set to PILOT Hold knob depressed gently and turn anti clockwise to LOW When mesh glows lit turn knob clockwise from Low to HIGH as needed Note The burner may be noisy when initially turned on To eliminate excessive noise ...

Page 13: ...e and regulator Never use a gas cylinder with a damaged body valve collar or foot ring A dented or rusty gas tank may be hazardous and should be checked out by a gas supplier Never connect this appliance to an unregulated gas source When the appliance is not in use turn the gas cylinder OFF Always perform a leak test on gas connections whenever a cylinder is connected If bubbles form in the leak t...

Page 14: ...surfaces clean Use warm soapy water for cleaning Never use flammable or corrosive cleaning agents While washing your unit be sure to keep the area around the burner and pilot assembly dry at all times If the gas control is exposed to water in any way DO NOT try to use it It must be replaced Airflow must be unobstructed Keep controls burner and circulation air passageways clean Signs of possible bloc...

Page 15: ...knob OFF Turn gas cylinder OFF Store heater upright in an area sheltered from direct contact with inclement weather such as rain sleet hail snow dust and debris If desired cover to protect exterior surfaces and to prevent build up in air passages Note Wait until heater is cool before covering During periods of extended inactivity or when transporting Turn control knob OFF Disconnect gas cylinder a...

Page 16: ...age in orifice Clear blockage Control knob is not in ON position Turn control knob to ON position Burner flame is low Note Do not operate heater below 5 40 F Gas pressure is low Replace gas cylinder Outdoor temperature is greater than 5 40 F and tank is less than 25 full Replace gas cylinder Supply hose is bent or kinked Straighten hose and perform leak test on hose Control knob is fully ON Turn c...

Page 17: ...rous and is PROHIBITED For use outdoors or in amply ventilated areas An amply ventilated area must have a minimum of 25 of the surface area open The surface area is the sum of the walls surface 0063 GUARANTEE Any defect affecting the functionality of the appliance which becomes apparent within one year of its purchase will be corrected by free repair or replacement provided that it has been used a...

Page 18: ......

Reviews: