Cap Frame Set User Manual
Manuel de l’utilisateur de l’unité de cadre pour
casquettes
Manual de usuario del juego de bastidor para
gorras
Manual do usuário para o conjunto de bastidor
para boné
帽框说明书
Page 1: ...Cap Frame Set User Manual Manuel de l utilisateur de l unit de cadre pour casquettes Manual de usuario del juego de bastidor para gorras Manual do usu rio para o conjunto de bastidor para bon...
Page 2: ...howing which embroidery frames can be used appear as shown below Advanced cap frame 2 1 Embroidering area 60 mm H 130 mm W 2 3 8 inches H 5 1 8 inches W 2 The mark indicates the center of the embroide...
Page 3: ...umber Example OTTO27 007 Mesh backing on the back of front panels soft or hard Constructed firm front Unconstructed soft crown Ease of framing hooping Easy Recommended Fairly easy Backing 1 to 2 ply 2...
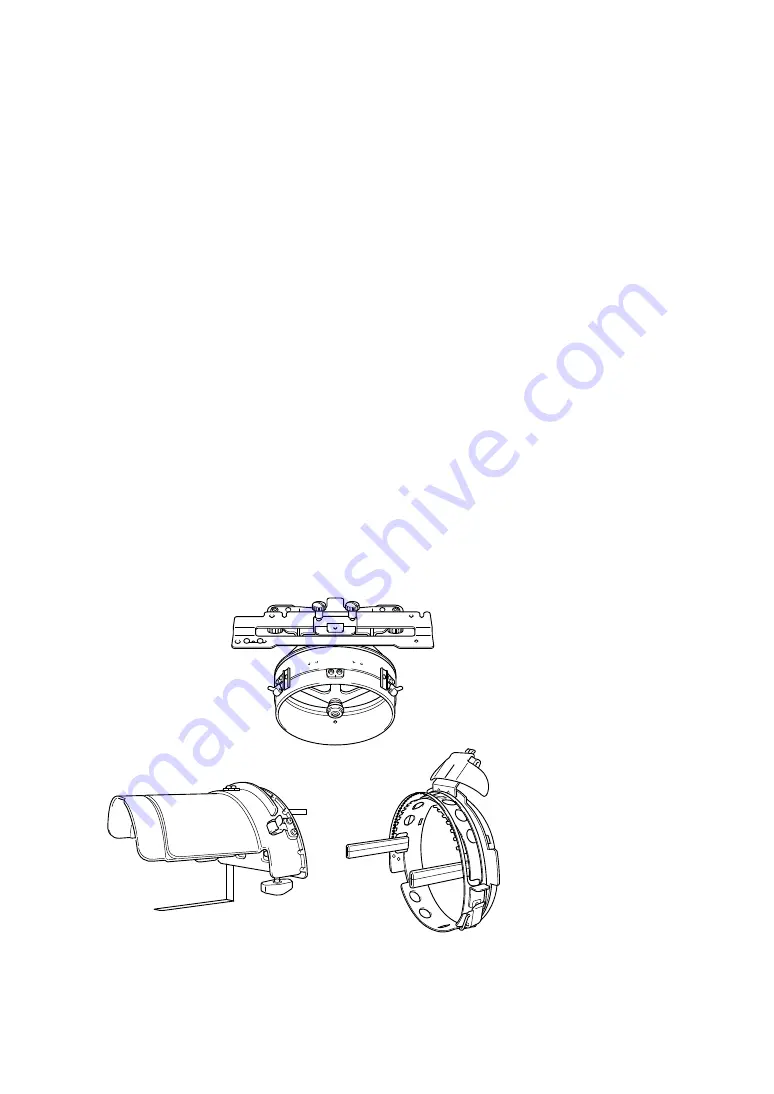
Page 4: ...emove the embroidery frame holder from the carriage on the machine and then install the cap frame driver Before removing the embroidery frame holder remove the embroidery frame 1 Loosen and then remov...
Page 5: ...e 2 Holes in the mounting plate of the cap frame driver 6 Insert and tighten the two upper thumb screws in outer holes of mounting plate of cap frame driver 7 While pushing in the cap frame driver tow...
Page 6: ...onal screws using the Allen screwdriver medium Firmly tighten the screws 1 L shaped bracket 4 Using the Allen screwdriver large loosen the four hexagonal screws on the inside of the ring Loosen the sc...
Page 7: ...o loosen the two screws and then lower the stopper in the direction of the arrow 1 Loosen the screw so that the stopper can be hooked onto the screw and clamped with it 2 Loosen until the stopper move...
Page 8: ...s securely clamped onto the mounting surface and that the thumb screw is firmly tightened Do not attach the mounting jig to an unstable surface flexible bent or warped Be careful that the mounting jig...
Page 9: ...cap into the frame 1 Attach the cap frame to the mounting jig Align the side of the mounting jig with the brace on the cap frame and then push the cap frame into place 1 Side of mounting jig 2 Brace...
Page 10: ...ign the centerline of the cap with the centerline of the sweat guard holder on the cap frame and then slide the sweat guard under the sweat guard holder 1 Sweat guard holder 2 Centerline of sweat guar...
Page 11: ...rfectly align with the base of the brim 1 Teeth of outside clamping frame 2 Base of brim 3 Outside clamping frame 4 Screws for the outside clamping frame 9 Adjust the other side in the same way 0 Clos...
Page 12: ...over the cap brim and then lower the brim holder 1 Brim holder 2 Centerline of brim holder Fully lower the brim holder so that the centerline on the brim holder is visible d Adjust the brim so that i...
Page 13: ...gn the notch in the cap frame with the guiding plate on the cap frame driver and then snap the frame into place 1 Guiding Plate on cap frame driver 2 Notch on cap frame 3 Holder The cap frame is secur...
Page 14: ...thumb screws 1 Thumb screws 3 Remove the two upper thumb screws 1 Thumb screws 4 Remove the cap frame driver Note Be careful that the cap frame driver does not hit any nearby parts such as the presser...
Page 15: ...cap frame pay attention to following points in order to avoid registration problems misalignment of gaps in the pattern 1 Sew underlay stitches 2 Start the embroidery pattern from the center and sew t...
Page 16: ...t least 2 mm and that the stitching over laps the fabric by at least 1 mm Also make sure that there are no jumps of long stitches in the outlining on each region or letter 1 At least 1 mm 2 At least 2...
Page 17: ...hant les cadres de broderie pouvant tre utilis s apparaissent comme illustr ci dessous Cadre pour casquettes avanc 2 1 Zone de broderie 60 mm H 130 mm L 2 3 8 po H 5 1 8 po L 2 Le rep re indique le ce...
Page 18: ...s Otto International Inc exemple OTTO27 007 Doublure en mailles au dos de la penne souple ou rigide Face avant rigide assembl e Couronne souple non assembl e Mise en place ais e du cadre Facile Recomm...
Page 19: ...e pour casquettes Retirez le support du cadre de broderie du chariot de la machine et installez celui du cadre pour casquettes Avant d enlever le support du cadre de broderie retirez tout d abord le c...
Page 20: ...us situ s sur la plaque d assemblage du support du cadre pour casquettes 6 Ins rez et serrez les deux vis sup rieures dans les trous ext rieurs de la plaque d assemblage du support du cadre pour casqu...