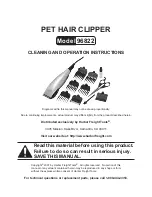
Heavy-Duty Detachable
Blade Clipper
Instruction Manual
•
For Commercial Use Only
•
Model 10 - 76010
AVAILABLE OSTER
®
LUBRICANTS & CLEANERS,
& REPLACEMENT PARTS
Regular use of the following products will help you enjoy optimum performance from your
clipper and prolong its functionality.
Oster 5-in-1
®
(076300-107)
All-purpose clipper
& blade lubricant
and disinfectant.
Kool Lube
®
3
76300-101
Lubricates and
cools down blade.
Spray
Disinfectant
76300-102
Minimizes bacteria
buildup between
upper and lower
blades.
Blade Wash
®
Cleaning
Solution 76300-
103
Flushes away
accumulated hair
and removes dirt
buildup trapped
between upper
and lower cutting
blades.
Blade Lube™
Oil 76300-104
Lubricates between
upper and lower
blades to keep
them sharper lon-
ger and produce a
smoother clipping
action
Gear Lube
®
(076300-105)
Specially designed
to prolong the life of
gears, bearings and
the motor.
Replacement carbon brushes
(076917-710)
Set of replacement carbon brushes and
springs
To order any of these products, please call 1-800-830-3678 or visit www.osterstyle.com
IMPORTANT SAFEGUARDS
Commercial Clipper • When using an electrical appliance, basic precautions
should always be followed, including the following:
Read all instructions before using this appliance.
DANGER
To reduce the risk of electric shock:
1. Do not reach for an appliance that has
fallen into water. Unplug immediately.
2. Do not use while bathing or in a
shower.
3. Do not place or store appliance where
it can fall or be pulled into a tub or
sink.
4. Do not place in or drop into water
or other liquid.
5. Always unplug this appliance from
the electrical outlet immediately after
using.
6. Unplug this appliance before cleaning,
putting on or taking off parts.
WARNING
To reduce the risk of burns, fire,
electric shock, or injury to persons:
1. An appliance should never be left
unattended when it is plugged in.
2. Close supervision is necessary when
this appliance is used by, on, or near
children or invalids.
3. Use this appliance only for its intended
use as described in this manual. Do not
use attachments not recommended by
the manufacturer.
4. Never operate this appliance if it has
a damaged cord or plug, if it is not
working properly, if it has been dropped
or damaged, or dropped into water.
Return the appliance to a service center
for examination and repair.
5. Keep cord away from heated surfaces.
6. Never operate the appliance when air
openings are blocked or while on a soft
surface (such as a bed or couch).
7. Never drop or insert any object into
opening.
8. Do not use outdoors or operate where
aerosol spray products are being used
or where oxygen is being administered.
9. Do not use this appliance with a
damaged or broken comb or blade,
as cut or scratched skin may occur.
10. To disconnect, move all controls to
“OFF”, then remove plug from outlet.
11. Do not wrap cord around unit when
storing. Continuous stress on the
cord can damage cord insulation and
result in a shock hazard.
12. Avoid contact with moving blades.
13. Avoid tangling or kinking the cord
while clipping. Should the cord become
tangled or kinked, stop clipping and
straighten the cord.
SAVE THESE INSTRUCTIONS
THE FOLLOWING PARAGRAPH IS FOR 120-VOLT MARKETS ONLY
To reduce the risk of electrical shock, this appliance has a polarized plug
(one blade is wider than the other). This plug fits a polarized outlet only one
way. This is a safety feature intended to help reduce the risk of electrical
shock. If the plug does not fit fully into the outlet, reverse the plug. If it still
does not fit, contact a qualified electrician. Do not attempt to defeat this
safety feature.
ABOUT YOUR CLIPPER
Although your clipper has been thoroughly tested and inspected at every
stage of its manufacturing and assembly, it is recommended that you lubri-
cate it, as instructed in this manual, after 4-6 weeks of extensive use. This
will ensure you obtain optimum performance and prolong the life of your
clipper.
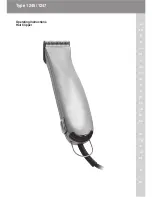
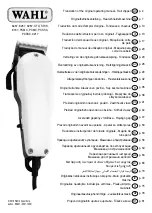
GETTING FAMILIAR WITH
YOUR CLIPPER
Due to continuous product improvement, product may vary slightly from
what is illustrated.
11
12
13
1
2
5
6
8
9
10
6
3/4
7
6
4
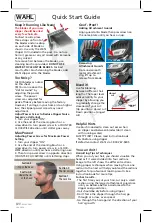
USING YOUR CLIPPER
Important:
• Before using your clipper, apply 1 or 2 drops of Oster
®
Clipper & Blade
Lube™ Oil to the blade (refer to Taking Care of Your Clipper section).
• For best results, hair should be clean and free from styling agents.
• During use, apply Kool Lube
®
coolant occasionally to the blades to keep
them cool.
1. Plug unit into an AC electrical outlet.
2. Move On/Off switch to turn clipper on.
3. Remove blade guard.
4. Insert blade. Holding blade sides, slide blade bracket into hinge.
5. Push blade toward the clipper until it snaps into place
6. When finished clipping, turn clipper off and unplug cord from electrical outlet.
7. Cover blade with blade guard to keep it protected.
Note: Any other maintenance not explained in this manual must be per-
formed by an Oster-Direct
®
Authorized Service Center.
Important: Make sure clipper is turned off and unplugged from electrical
outlet before removing, replacing or cleaning any parts.
Lubricating Motor
If you hear a “squeal” or a dry bearing noise
from the motor, it is a signal that the motor
needs lubricating.
Remove cap from Oster
®
Clipper and Blade
Lube™ tube and insert tip into oiler to apply 1
drop of oil. Be careful not to over lubricate.
Greasing Gear Drive Assembly
We recommend checking the gear drive
assembly every six months for greasing.
Caution: Grease only when necessary as over-greasing may cause
leakage and reduce clipper’s efficiency.
STEP 4
STEP 5
TAKING CARE OF YOUR CLIPPER
APPLY 1
DROP
1. Blade guard
2. Blade
3. Blade bracket
4. Blade hinge
5. Name plate/gear drive assembly access
6. Carbon brush cap/carbon brush
7. Oiler
8. Power cord
9. On/Off switch
10. Hanging ring
11. Cleaning Brush
12. Oster
®
Clipper & Blade Lube™ oil
13. Oster Gear Lube
®
grease
10-76010_12EM1.indd 1
8/7/12 11:03 AM