background image

Keep this user guide for future reference. Always retain your proof of purchase in case of 

warranty service and register your product on line at: 

AUSTRALIA: www.oricom.com.au  NEW ZEALAND: www.oricom.co.nz

Operating Instructions

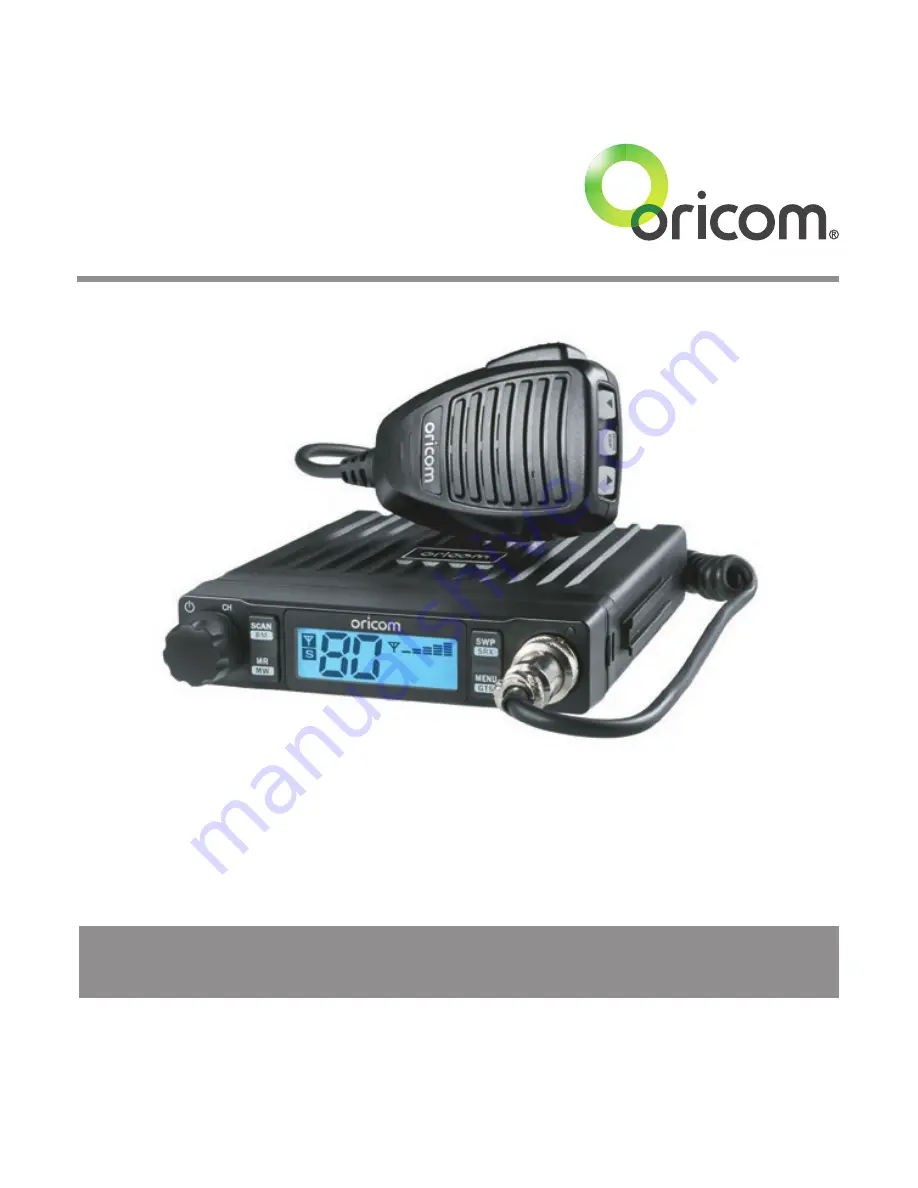
DTX4000 80 Channel UHF Citizen Band Radio

Summary of Contents for DTX4000

Page 1: ...eference Always retain your proof of purchase in case of warranty service and register your product on line at AUSTRALIA www oricom com au NEW ZEALAND www oricom co nz Operating Instructions DTX4000 8...

Page 2: ...useable voice channels What issues may users experience during the transition phase When a new narrowband radio receives a transmission from an older wideband radio the speech may sound loud and disto...

Page 3: ...CB channels and frequencies 27 Customer Support 31 Express Warranty Australia 32 Need Help If you need assistance setting up or using your Oricom product now or in the future call Oricom Support Aust...

Page 4: ...ght brightness 5 pre set levels plus auto Fast scanning 80 channels within 3 seconds Rotary volume channel and squelch control Duplex 38 CTCSS 104 DCS codes Heavy duty diecast metal chassis Slide in m...

Page 5: ...ot always clearly marked They include fueling areas such as below deck on boats fuel or chemical transfer or storage facilities areas where the air contains chemicals or particles such as grain dust o...

Page 6: ...ounting it close to heaters or air conditioners Never press the PTT or CALL button before connecting the antenna to the radio Wiring Methods There are two possible wiring configurations for connecting...

Page 7: ...ou should only purchase an antenna designed for the 477MHz frequency band Antenna installation 1 Connect the antenna to the rear antenna socket using a PL259 coaxial connector not supplied 2 To obtain...

Page 8: ...NU GTS SQ CH 1 2 3 7 4 5 6 1 Power on off and Volume channel squelch selector and SVL sub receiver volume 2 Scan open scan memory group scan scan skip memory 3 Memory recall memory write 4 Main Sub ch...

Page 9: ...k for optional 8 ohm speaker and PA speaker 2 Power supply connection 3 Rear microphone jack for Optional extension Microphone cable 4 Antenna Connection Microphone 1 Push to talk 2 Volume Channel SQ...

Page 10: ...Channel display TO MOUNT SLIDE INTO UNIVERSAL MOUNTING BRACKET TO REMOVE SLIDE OUT HOLDING BRACKETS AWAY FROM TRANSCEIVER Installation of the DTX4000 and fitting optional accessories Mounting the Tran...

Page 11: ...D OPTIONALACCESSORY EXTERNAL SPEAKER O P T IO N A L A C C E S S O R Y _________or________ O ANTENNA CONNECTOR 4 5 MICROPHONE HANGER Fit the supplied micrphone hanger in the desired location 6 6 4 RED...

Page 12: ...hone push the up or down buttons to increase or decrease the volume If held down the volume will increase or decrease quickly SCAN RM MR MW SWP SRX MENU GTS SQ CH Selecting a channel Press channel sel...

Page 13: ...times SVL is displayed 2 Rotate the Channel selector to adjust the SRX volume Note If a button is not pressed within 2 seconds the radio will automatically exit the sub display of VOL CH SQL and SVL...

Page 14: ...The scan resume time can be set as an optional pause of P8 default ch 1 2 3 4 5 6 7 77 78 79 80 Open Scan the scan direction cannot be changed by rotation of the channel control or microphone buttons...

Page 15: ...nned starting in selected group 2 Press Scan button to start group scan The MS SC sub menu display appears on the LCD 3 To stop Group memory Scan press SCAN RM button or PTT press Group tone Scan Grou...

Page 16: ...want to access From A to C Group Continuous Press MR button will be change to A B C A blinking B blinking C brining A If SC RM button press and start of all memory Group scanning at during the blinkin...

Page 17: ...nd holding the SRX button the S indicator on the display will be on if the SRX is on It is not possible to transmit on the SRX you must swap the SRX and Main RX to transmit on that channel To adjust t...

Page 18: ...hin 8 seconds the radio will automatically exit the menu mode You can exit the menu by briefly pressing PTT button Please see below menu modes SCAN RM MR MW SWP SRX MENU GTS SQ CH Function Step Displa...

Page 19: ...19 Operations Bright of Dimmer auto 4 to 5 Reset User User reset Factory Squelch tail Off Off On Busy channel lock Off Off On Key Beep Off Off On Logo Display On On Off TPI On On Off...

Page 20: ...connect the PA speaker to the yellow coloured socket and the external CB speaker to the red coloured socket the output will be directed to the PA speaker when PA function is selected How to operate t...

Page 21: ...8 and 41 48 used by local repeater stations When activated your radio will receive the Repeater on its specific channel all repeater outputs are on channel 1 to 8 and 41 to 48 but transmit to the repe...

Page 22: ...476 4375 477 1875 CH71 42 476 4625 477 2125 CH72 43 476 4875 477 2375 CH73 44 476 5125 477 2625 CH74 45 467 5375 477 2875 CH75 46 476 5625 477 3125 CH76 47 476 5875 477 3375 CH77 48 476 6125 477 3625...

Page 23: ...nnel 05 and 35 are reserved for Emergency calls Group Tone setting The group tone scan default tone selected is CTCSS 01 67Hz You can select from CTCC 01 38 to DCS 01 to 104 code for Group tone scan 9...

Page 24: ...ing party release PTT and is heard by the receiving party If Squelch tail in turned ON on both radios this squelch noise will be muted Busy channel Lock If the channel is already in use you can preven...

Page 25: ...the transceiver Generally a VSWR of less than 2 is an acceptable match Correct Antenna install with 5W VSWR 1 2 with 4 5W VSWR 2 6 with 4W VSWR 3 5 with 3 5W VSWR 4 4 with 3W 3W The VSWR and Power te...

Page 26: ...cted SCAN will start again after 5 10 or 15 second pause even though a signal is still present If P5 is selected SCAN will stop as long as a signal is present and will resume SCAN again 5 seconds late...

Page 27: ...0500 477 0500 46 476 5625 66 477 0625 477 0625 07 476 5750 476 5750 27 477 0750 477 0750 47 476 5875 67 477 0875 477 0875 08 476 6000 476 6000 28 477 1000 477 1000 48 476 6125 68 477 1125 477 1125 9...

Page 28: ...respectively as approved by the ACMA CBRS Class Licence in Australia and the MED GURL in New Zealand This radio is user upgradable at no cost if the Class Licence is amended to allow repeater use on c...

Page 29: ...7 0 21 136 5 2 71 9 22 141 3 3 74 4 23 146 2 4 77 0 24 151 4 5 79 7 25 156 7 6 82 5 26 162 2 7 85 4 27 167 9 8 88 5 28 173 8 9 91 5 29 179 9 10 94 8 30 186 2 11 97 4 31 192 8 12 100 0 32 203 5 13 103...

Page 30: ...30 UHF CB channels and frequencies...

Page 31: ...sing the product after reviewing the resources above or would like to purchase replacement parts or accessories please call our Customer Support Team Our dedicated local support team are more likely t...

Page 32: ...right or remedy pursuant to the Australian Consumer Law and which may not be so excluded restricted or modified For such conditions terms guarantees and warranties that cannot be excluded restricted...

Page 33: ...or injury arising out of or in connection with a 1 Failure by you to adhere to the warnings and follow the instructions set out in this user guide for the proper installation and use of the product 2...

Page 34: ...rranty excludes expenses incurred by you in returning any faulty product to us You must arrange and pay any expens es incurred including postage delivery freight transportation or insurance of the pro...

Page 35: ...Windsor NSW 2756 Australia Email support oricom com au Phone 1300 889 785 or 02 4574 8888 Monday to Friday 8am to 6pm AEST Web www oricom com au Fax 02 4574 8898 Contact details for Oricom support and...

Reviews: