background image

Component

Physical addressing

Power Supply

module

,

top|bottom

Hand (Robot)

No address

SCSI Element Addressing

See the SL150 SCSI Reference Guide for more information.

Example Library Configurations and Slot Maps

Library addressing varies depending on the library configuration.

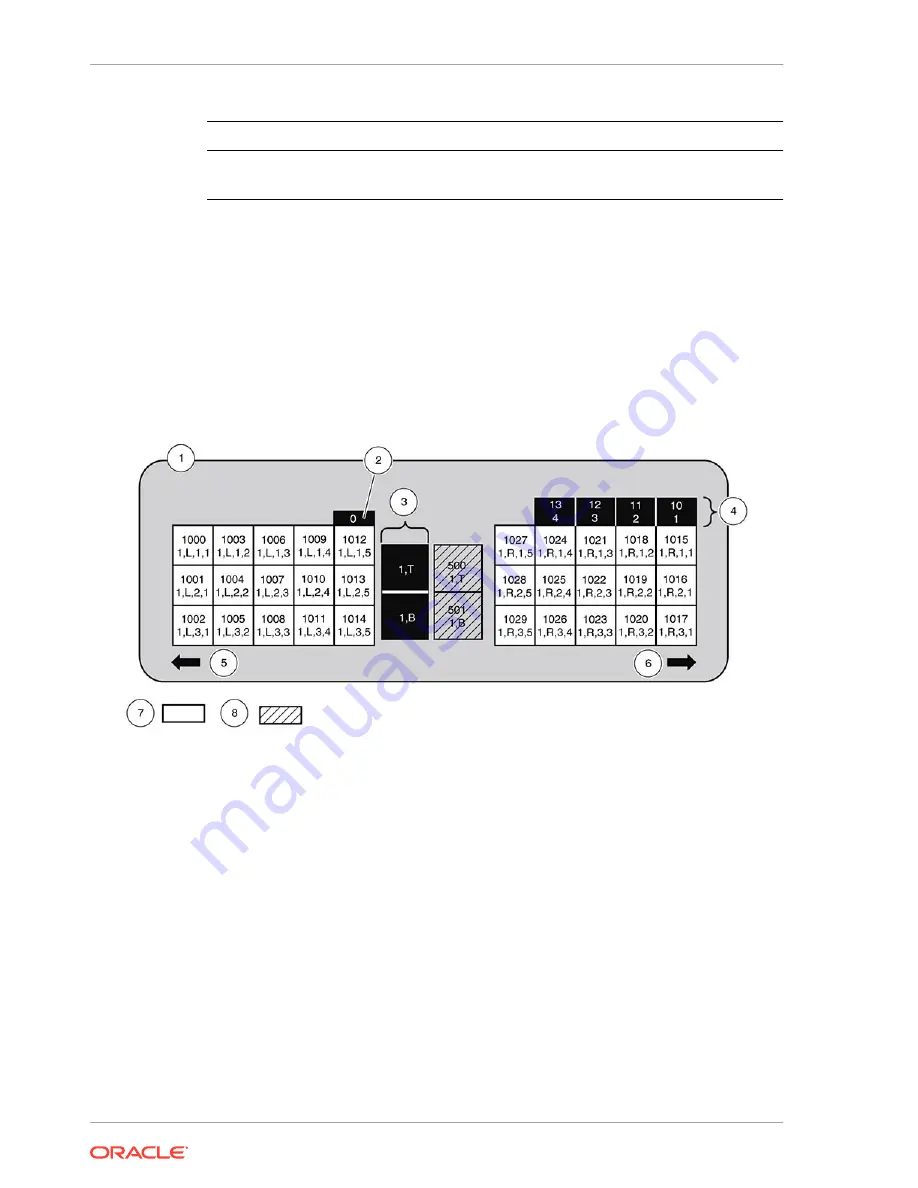
Figure A-1    Non-Partitioned One Module Library, Standard Mailslot, and No Reserved Cells

Illustration Legend:
1 - Module 1 (Base)
2 - Robot
3 - Power supplies
4 - Standard mailslots
5 - Left magazine front
6 - Right magazine front
7 - Storage slots
8 - Tape drives

Appendix A

SCSI Element Addressing

A-2

Summary of Contents for storagetek sl150

Page 1: ...StorageTek SL150 Library Guide E22579 19 June 2020 ...

Page 2: ...d or iii other Oracle data is subject to the rights and limitations specified in the license contained in the applicable contract The terms governing the U S Government s use of Oracle cloud services are defined by the applicable contract for such services No other rights are granted to the U S Government This software or hardware is developed for general use in a variety of information management...

Page 3: ...ing and Host Communication 1 9 IPv6 Network Address Support 1 10 Selecting a Switch that Uses Power Over Ethernet POE 1 10 Configuring a SAN Connection 1 10 Software that Supports the SL150 1 11 About Automated Cartridge System Library Software ACSLS 1 11 StorageTek Tape Analytics STA 1 11 Service Delivery Platform 2 SDP2 1 12 Oracle Key Manager 3 OKM 1 12 SL150 Marketing Part Numbers 1 13 Configu...

Page 4: ...he Base Module to the Rack 2 14 Install the Expansion Module 2 15 Unpack the Expansion Module Accessory Kit 2 16 Remove the Library Floor 2 17 Install Clip Nuts for the Expansion Module for square hole racks only 2 18 Prepare the Expansion Module by Removing the Cartridge Magazines 2 19 Install the Floor in the Bottom Expansion Module 2 19 Mount the Expansion Module 2 21 Install the Rear Rails for...

Page 5: ...ew and Apply Initialization Settings 2 39 Configure the Library Finish the New Configuration 2 40 Run a Self Test 2 40 Stopping a Self test 2 41 3 Basic User Interface Operations Log In to the Remote Interface 3 1 Log Out of the Remote Interface 3 1 Show Hide and Reorder Table Columns 3 1 Export a Table as a Spreadsheet 3 2 Print a Table 3 2 4 Configure the Library Run the Configuration Wizard 4 1...

Page 6: ... 4 13 Obtain Required Certificates 4 13 Import the Certificate File 4 13 Configure Accessibility Settings 4 13 Set Automatic Screen Refresh 4 14 5 Users User Roles and Access 5 1 Change Your Password 5 1 Reset Another User s Password 5 2 Add a User and Assign a Role 5 2 Remove a User 5 3 Change an Assigned Role 5 3 6 Tape Cartridges Media Media Labels 6 2 Tape Media ID 6 2 Tape Cartridge Types 6 3...

Page 7: ...Cartridges 6 16 Manage Expired Cleaning Cartridges 6 16 Monitor Cleaning Cartridges Using the Remote Interface 6 17 Replace Expired Cleaning Tapes Using the Remote Interface 6 17 Replace Expired Cleaning Tape Using the Host Application 6 18 Media Validation 6 18 Add a Drive to the Media Validation Pool 6 19 Remove a Drive from the Media Validation Pool 6 19 Start a Media Validation 6 20 Manually C...

Page 8: ...ary State 8 2 Library LED Status Indicators 8 2 Determine the Possible Cause of a Degraded or Failed Library State 8 3 View User and Host Activity 8 3 Configure Simple Network Management Protocol SNMP 8 4 SNMP Versions 8 4 SNMP Traps 8 5 Enable or Disable SNMP 8 5 Configure an SNMP User 8 5 Configure an SNMP Trap Recipient 8 6 Send a Test Trap 8 6 Download the Management Information Base MIB 8 6 E...

Page 9: ... 9 10 Locate and Clear Obstructions Such as Loose or Protruding Cartridges 9 10 Save the Health Log to a File 9 11 Run a Self Test 9 11 Restore the Factory Default Configuration 9 12 SAS 2 and SAS 3 Configuration Issues 9 13 Get Parts and Technical Support 9 14 Check for Relevant Knowledge Articles 9 14 Get Firmware Updates 9 14 Create a Service Request 9 14 Run a Self Test 9 15 10 Replace Compone...

Page 10: ...ion Module 10 17 Power Down Lock the Robot and Remove Magazines 10 18 Remove the Floor Cables and Cords 10 18 Remove Operational Expansion Modules Below the Defective Module 10 19 Remove Components from the Defective Module 10 19 Replace the Expansion FRU Chassis 10 20 Install the Expansion Module Chassis 10 20 Install CRUs Fillers and Magazines in Replaced Module 10 20 Install the Remaining Expan...

Page 11: ...e Shipping Clip 10 26 A Slot Mapping and Cartridge Locations Cartridge Slot Addressing A 1 Reserved Slot Addressing A 1 Drive Mailslot Power Supply and Robot Addressing A 1 SCSI Element Addressing A 2 Example Library Configurations and Slot Maps A 2 Glossary Index xi ...

Page 12: ...1 Expansion Module 2 15 2 12 Expansion Module Accessory Package Hardware 2 16 2 13 Library Floor Removal from the Base Module 2 17 2 14 Expansion Module Clip Nut Installation 2 18 2 15 Magazine Latches 2 19 2 16 Library Floor 2 20 2 17 Floor Secured 2 20 2 18 Scratch Avoidance 2 21 2 19 Alignment Tab Seated 2 22 2 20 Expansion Module Back Rail and Clip Nut 2 22 2 21 Expansion Module ID Label 2 24 ...

Page 13: ... 10 6 Module Rear Rail Removal 10 19 10 7 Base Module FRU 10 22 10 8 Cable Attachment 10 24 A 1 Non Partitioned One Module Library Standard Mailslot and No Reserved Cells A 2 A 2 Non Partitioned Two Module Library Expanded Mailslot and No Reserved Cells A 3 A 3 Non Partitioned 15 Module Library Standard Mailslot and Three Reserved Cells A 4 xiii ...

Page 14: ... and Dimensions 1 7 1 2 Component Unpackaged Weights and Dimensions 1 7 1 3 Storage Slot Mailslot and Drive Counts for Different Configurations 1 9 2 1 Gas Limit Recommendations 2 2 7 1 Port Configuration Options 7 3 8 1 SNMP Trap Levels 8 5 xiv ...

Page 15: ... id docacc Access to Oracle Support Oracle customers that have purchased support have access to electronic support through My Oracle Support For information visit http www oracle com pls topic lookup ctx acc id info or visit http www oracle com pls topic lookup ctx acc id trs if you are hearing impaired Class 1 Laser Product Notice The StorageTek SL150 Modular Tape Library contains a class 1 laser...

Page 16: ...Software that Supports the SL150 SL150 Marketing Part Numbers The SL150 library has two module types the Base Module and Expansion Modules Each module has two drive slots and stores up to 30 tapes in two 15 slot magazine one on the left side and the other on the right side Additionally a four slot mailslot resides in the Base Module for importing or exporting tapes The library must have one Base M...

Page 17: ...er supply 6 Module controller Base Module The Base Module contains the main hardware components of the library One Base Module is required per library The Base Module is a 3U rack mounted unit Each library must contain a Base Module at the top of the library A single Base Module is the smallest library configuration The Base Module ships with Front control panel Two 15 slot tape magazines left and...

Page 18: ...n up to two drives and two power supplies However they ship without tape drives or power supplies installed The Expansion module only requires a power supply if you install a tape drive in it If you do not install a tape drive the Expansion Module can operate off of the power provided by the USB cable connected to the Base Module If you install a drive in the Expansion Module you must also install...

Page 19: ...s Magazine Each magazine provides 15 storage slots for tape cartridges Each library module has a left and right magazine Magazines slides into the module and store tape cartridges for the robot to access During normal library operations the magazines stay in place In certain cases you can use the magazine to bulk load cartridges The optional expanded mailslot configuration converts the right side ...

Page 20: ... based you do not need to download or locally install anything The main areas of the remote interface are described below 1 Masthead Displays the current user and allows you to set user preferences access the help and logout 2 Status Bar Displays the current library state and allows you to control the online offline and on off state of the library 3 Library Activity Bar Displays current library op...

Page 21: ...ntrol Panel Home Screen Status Bar Located at the top of every screen The status bar displays the current library state and contains the Home button Copyright information button and library activity button Home screen The various home screen buttons provide access to information on library components Use the various screens to operate and monitor the library from the local op panel You can click t...

Page 22: ...m 44 5 in 15 9 kg 35 lbs for complete weight 12 3 kg 27 lbs for chassis only Tape Drive 41 6 cm 16 4 in 21 cm 8 25 in 43 8 cm 17 25 in 3 6 kg 8 lbs Power Supply 20 3 cm 8 in 14 6 cm 5 75 in 30 5 cm 12 in 1 6 kg 3 6 lbs Robot CRU 47 6 cm 18 75 in 20 3 cm 8 in 96 5 cm 38 in 8 3 kg 18 4 lbs Op Panel CRU 24 5 cm 9 6 in 9 5 cm 3 75 in 46 cm 18 1 in 1 kg 2 25 lbs Magazine CRU 31 1 cm 12 25 in 26 4 cm 10...

Page 23: ... amp VA measurements add 2 percent to the Watt value For Btu hr multiply the total wattage number by 3 414 Refer to the power calculator at http www oracle com us products servers storage sun power calculators calc sl150 power calculator 1954625 html A minimum library configuration has a total idle power of 44 W 150 Btu hr and a steady state maximum of 67 5 W 230 Btu hr A ten module library with 2...

Page 24: ...se Module plus six Expansion Modules 210 195 14 Base Module plus seven Expansion Modules 240 225 16 Base Module plus eight Expansion Modules 270 255 18 Base Module plus nine Expansion Modules 300 285 20 Base Module plus 10 Expansion Modules 330 315 22 Base Module plus 11 Expansion Modules 360 345 24 Base Module plus 12 Expansion Modules 390 375 26 Base Module plus 13 Expansion Modules 420 405 28 B...

Page 25: ...and overload the Ethernet connection on the library Results of an overload appear as the Ethernet port being unresponsive and the remote management interface not working Configuring a SAN Connection You can connect the library to the host HBA through a storage area network SAN Configure zoning on the FC switch so only the backup servers access the library Zoning Use zoning to partition a SAN into ...

Page 26: ...ssing mode to Installed Drives Only ACSLS Version Description 8 2 Minimum level to support the SL150 8 3 patch 2 Minimum level to support library firmware version 2 25 which supports new ASC and ASCQ reporting 8 3 patch 3 Minimum level to support LTO 5 and LTO 6 with SL150 firmware version 2 50 8 4 Minimum level to support LTO 5 and LTO 6 with SL150 firmware version of 2 60 8 4 with patch 1 Minimu...

Page 27: ... application that can be installed on a Linux server that connects to the library SDP collects device events and alerts support analysts providing remote diagnosis and automatic service requests ASR For more information contact an Oracle representative or visit https www oracle com support premier auto service request html Related Topics Enable or Disable the Service Delivery Platform SDP2 SDP2 ca...

Page 28: ... LTO8 8Gb FC 7118433 N A Base Module 30 slots one power supply one IBM LTO8 6Gb SAS 7118432 N A Exp Module 30 slots contains no tape drive or power supply 7101763 7101770 Tape Drive IBM LTO7 8 Gb FC 7114335 7114343 Tape Drive IBM LTO7 6Gb SAS 7114338 7114345 Tape Drive IBM LTO8 8Gb FC 7118437 7118351 Tape Drive IBM LTO8 6Gb SAS 7118438 7118350 Tape Drive activation file Encryption Key for LTO4 5 6...

Page 29: ... C13 connector 10 A PWRCORD10083244 A PWRCORD10083244 Z Power Cable Italy 2 5 m CEI23 plug IEC60320 1 C13 connector 10 A PWRCORD10083245 A PWRCORD10083245 Z Power Cable Switzerland 2 5 m SEV1011 plug 10A IEC60320 1 C13 connector 10 A PWRCORD10083246 A PWRCORD10083246 Z Power Cable United Kingdom 2 5 m BS1363A plug 10A IEC60320 1 C13 connector 10 A PWRCORD10083247 A PWRCORD10083247 Z Power Cable De...

Page 30: ...lots with IBM LTO 7 half height FC tape drive 7114335 Drive IBM LTO 7 half height FC 7101769 Power supply Example 2 60 cartridge library with two partitions a total of four IBM LTO 8 drives 2 SAS and 2 FC and four power supplies 7118432 Base Module 30 slots with one IBM LTO 8 half height SAS tape drive 7101763 Expansion Module 30 slots 7118438 Drive IBM LTO 8 half height SAS 7118437 Drive IBM LTO ...

Page 31: ...il tapemediaorders_ww oracle com See the tape media area on the Oracle website for additional information https www oracle com storage tape storage lto data cartridge Related Topics Media Labels The library identifies cartridges by the barcode label attached to the front of the cartridge Each label must follow specific guidelines to be read by the library Chapter 1 SL150 Marketing Part Numbers 1 1...

Page 32: ... Install the Base Module Install the Expansion Module Install Power Supplies and Tape Drives Cable the Library Unlock the Robot Apply Power to the Library Configure the Library After Powering on for the First Time Run a Self Test Verify the Site Meets Environmental Requirements Make sure the site meets environmental requirements to prevent equipment damage Temperature and Humidity Limits Airborne ...

Page 33: ...riately designed carbon filters must be used to ensure safe levels of airborne chlorine when chlorinated water is used for humidification Table 2 1 Gas Limit Recommendations Chemical ASHRAE OSHA PEL ACGIH NIOSH Acetic Acid CH3COOH Not defined 10 ppm Not defined Not defined Ammonia NH 3500 µg m3 350 ppm 25 ppm Not defined Chlorine Cl 2100 µg m3 31 ppm c Not defined 0 5 ppm c Hydrogen Chloride HCl N...

Page 34: ...e expectancy of the product Avoid electrostatic discharge when handing parts Electrostatic discharge can damage components Follow the guidelines below to prevent electrostatic discharge Electrostatic Discharge Prevention Avoid hand contact by transporting and storing products in static safe containers Keep electrostatic sensitive parts in their containers until they arrive at static free work area...

Page 35: ...ld be between 457 mm 18 in and 902 mm 35 5 in Provide sufficient rack space to install the Base Module 3U and any Expansion Modules 2U each Rack Preparation Position the power distribution unit PDU on the right side of the rack as viewed from the rear of the rack see Figure 2 1 The power supply outlets are on the right side of the SL150 library Refer to the rack and power distribution unit documen...

Page 36: ...e at the end of the module and set it aside 7 Remove the plastic covering the module 8 Grasp the module by the sides lift it out of the carton and set it down Do not lift the Base Module by the front control panel the tape drive or the tape drive filler Two people should lift the module 9 Acclimate the module to the environment If the module is colder than the location and sufficient humidity exis...

Page 37: ... square holes Assorted screws 8 32 X 5 8 screws used with the mounting block 10 32 X 5 8 screws used with clip nuts and racks with 10 32 threaded holes M5 0 8 X 16 mm screws used with M5 threaded hole racks M6 16 mm screws used with M6 threaded hole racks Hex key used to manually open a magazine Mounting block Figure 2 2 Base Module Accessory Package Mounting Hardware Illustration Legend 1 Back Ra...

Page 38: ...to the front rails and support the module Install the back rails before the front rails Parts Required Back rails 1 left 1 right Two Mounting blocks Two 8 32 X 5 8 screws Figure 2 3 Back Rail Position Illustration Legend 1 Pins Chapter 2 Install the Base Module 2 7 ...

Page 39: ...e center hole of the rack unit Position the back rail so the rail extends to the interior of the rack align the mounting block pins with the holes in the rail bracket see Figure 2 3 5 Verify the pins and screw hole are within the boundaries of a single rack unit 6 Insert the 8 32 screw into the mounting block hole and turn the screw several full turns by hand Tighten the 8 32 screw with a 2 Philli...

Page 40: ...gn and slide the two pieces of the Base Module s rail together 1 Position the front rail with the rail tabs toward the outside of the rack 2 Slide the front rail toward the back rail to engage the tabs of the front rail 3 Push the front rail into the rack until the front edge of the rail is approximately 60 mm 2 4 inches from the rack stile Figure 2 5 Front Rail Installation Left Rail Shown Illust...

Page 41: ...ew turns into the mounting block 4 Tighten the 8 32 screw with a Phillips screwdriver while making sure that the rail is plumb with the inside edge of the rack stile Note The front rail should not tilt in or out 5 Repeat to install other front rail on the other side of the rack Verify the Installation of the Base Module Front Rail The rails must be parallel and properly installed before mounting t...

Page 42: ...aced on the inside of the rack stile Figure 2 8 Clip Nut Location for the Base Module Illustration Legend 1 First U 2 Second U 3 Third U 4 Clip Nut in the Second Hole of the Third U 1 Locate the hole immediately below the front rail second hole in the third U 2 Seat one edge of the clip nut into the hole from the rear of the rack stile Chapter 2 Install the Base Module 2 11 ...

Page 43: ...ch front rail Mount the Base Module The Base Module mounts to the rails and secures to the rack WARNING The Base Module is heavy Two people should lift and install it Engage the Base Module with the Rail Remove the Cartridge Magazine with the Hex Key Remove the Cable Clip in the Base Module Secure the Base Module to the Rack Engage the Base Module with the Rail The Base Module has tabs on each sid...

Page 44: ...Push the module into the rack to engage the bottom and center side tabs 4 Push the module into the rack until the front side tabs approach the front of the rack rails 5 Lift the module up slightly push it into the rack and set the front tabs down on the rack rail Remove the Cartridge Magazine with the Hex Key A specialized hex key tool allows you to remove the cartridge magazine 1 Insert the hex k...

Page 45: ...d pull down 4 Discard the cable clip unless you intend to reship the library after rack installation Figure 2 10 Cable Clip Removal Secure the Base Module to the Rack Two screws secure the module frame to the rack 1 Obtain the correct screws for your rack either 10 32 M5 or M6 Use the 10 32 screw when the rack has square mounting holes this screw mates with the clip nut 2 Insert a screw through ea...

Page 46: ...xpansion Module by Removing the Cartridge Magazines Mount the Expansion Module Install the Rear Rails for the Expansion Module Secure the Expansion Module to the Rack Front Replace the Cartridge Magazines Tools Required 2 Phillips screwdriver Figure 2 11 Expansion Module Illustration Legend 1 Alignment Tab 2 Flanges Related Topics Expansion Module An Expansion Module provides additional cartridge ...

Page 47: ...s used with M5 threaded hole racks M6 16 mm screws used with M6 threaded hole racks Expansion interconnect cable with USB Type A connectors Label set Module 2 through Module 10 Hook and loop strap Pop in rivet Hex key Figure 2 12 Expansion Module Accessory Package Hardware Illustration Legend 1 Back Rails 2 Clip Nuts 3 Screws Assorted 4 Expansion Cable with USB Type A Connectors 5 Module Labels 6 ...

Page 48: ...See Power Off the Library 2 Remove the cartridge magazines from the bottom module of the library See Remove the Cartridge Magazine with the Hex Key 3 Grasp the holds on the front edge of the floor in the magazine bay see figure 4 Pull the floor out the front of the module and set it aside Tip If the floor does not move reach through the magazine opening and push down on the floor behind the touch ...

Page 49: ...hole down from the junction of the first U boundary on both the left and right rail stiles for installation of the clip nut Use the Rail Installation Template if desired See Figure 2 14 2 Fore each clip nut location a Seat one edge of the clip nut into the hole from the back of the rack stile b Compress the other edge of the clip nut and seat it in the hole 3 Make sure the clip nuts are parallel i...

Page 50: ...e The Expansion Module is open at the top and the latches are located behind the front face of the module Tip You can also release the magazine with the hex tool See Remove the Cartridge Magazine with the Hex Key 3 Remove and set aside the cartridge magazines Install the Floor in the Bottom Expansion Module Install the floor on the module that will reside at the bottom of the library Only perform ...

Page 51: ...th the module slot see Figure 2 16 5 Push the floor in and seat the floor clip in each magazine bay see Figure 2 17 6 Turn the module over and verify the floor clips properly engage the chassis Figure 2 16 Library Floor Illustration Legend 1 Floor Slot 2 Floor Tab Figure 2 17 Floor Secured Chapter 2 Install the Expansion Module 2 20 ...

Page 52: ...ers 3 inches 3 Lower the front edge of the module approximately 10 mm 0 4 inch guide any sharp metal edges away from the upper module front panel and push the module in until the sharp edges are past the front panel see Figure 2 18 Caution Do not scratch the front panel of the module above 4 Raise the front of the 2U module push the module in and engage the module left and right side flanges with ...

Page 53: ...Seated in Slot 2 Slot in Magazine Bay Install the Rear Rails for the Expansion Module The rear rails secure the Expansion Module to the rear of the rack 1 Slide the back rail under the Expansion Module tabs see Figure 2 20 Figure 2 20 Expansion Module Back Rail and Clip Nut Chapter 2 Install the Expansion Module 2 22 ...

Page 54: ...place the Cartridge Magazines Replace the magazines after all modules are installed in the rack 1 Verify the magazines are empty Do not put cartridges in the magazine slots 2 Note that left and right magazines are unique Orient the magazine with the cartridge slots facing toward the center of the module 3 Lift the magazine and engage it the track in the magazine slot 4 Push the magazine fully into...

Page 55: ...he Hook and Loop Strap The hook and loop strap mounts to the rear of the module and assists in cable management 1 Insert the rivet into a hole in the hook and loop strap see Figure 2 22 Figure 2 22 Hook and Loop Strap Illustration Legend 1 Module Controller 2 Hook and Loop Strap 3 Rivet Chapter 2 Install the Expansion Module 2 24 ...

Page 56: ... or power supplies skip to Cable the Library Remove the Power Supply Slot Cover Insert a Power Supply into the Slot Remove the Drive Slot Cover Insert a Tape Drive Tray into the Slot You can add power supplies and tape drives while the library is powered on However you must restart the library for it to recognize the tape drives if the library is not set to address all drive slots Figure 2 23 SL15...

Page 57: ...ly Illustration Legend 1 Power Supply Indicators 2 Power Supply Latch Figure 2 25 Tape Drive Tray Illustration Legend 1 Drive Indicators 2 Port Indicators HP drives only Chapter 2 Install Power Supplies and Tape Drives 2 26 ...

Page 58: ...ot Always have a cover in place 1 Hook your finger in the hole of the power supply cover 2 Pull the cover from the power supply slot and set it aside Insert a Power Supply into the Slot Power supplies provide power to the tape drives and library components 1 Remove the power supply filler from the slot see Remove the Power Supply Slot Cover 2 Remove the power supply from the shipping carton 3 Gras...

Page 59: ...side of the tape drive slot cover 2 Grasp the captive screws and pull the cover toward you 3 Remove the cover from the drive slot and set it aside Insert a Tape Drive Tray into the Slot Each module contains two slots for tape drives The drives slide into the slot from the back of the module Caution Equipment damage Do not touch the drive tray circuit card or static sensitive components The circuit...

Page 60: ...e Cable the Library Connects cables to the Base and Expansion Modules drives power and network ports Cable the Expansion Modules Connect Cables to the Drives and Power Supplies Connect the Network Port Align and Dress the Cables and Cords Figure 2 26 Initial Cabling Example Illustration Legend 1 Tape Drive Fibre Channel Cable 2 Expansion Cable 3 Ethernet Cable Net Mgt Port 1 4 Power Supply Cord 5 ...

Page 61: ...odule Output Port 9 Module 9 Controller Input Port Base Module Output Port 10 Module 10 Controller Input Port Module 1 thru 5 Controller Output Do not connect anything Leave dust cover in place Module 6 Controller Output Port Module 11 Controller Input Port Module 7 Controller Output Port Module 12 Controller Input Port Module 8 Controller Output Port Module 13 Controller Input Port Module 9 Contr...

Page 62: ...s to the Drives and Power Supplies Connect the power cables to the power supplies and FC SAS cables to the drives 1 For each power supply connect the power cord to the power supply and the power distribution unit in the rack Chapter 2 Cable the Library 2 31 ...

Page 63: ...is The ports used depend on your LME configuration 3 Attach a label to the cable indicating the network port to ensure proper connection after servicing the library Related Topics Behavior of Library Port 1 and Port 2 with LME The LME configuration affects the behavior of library port 1 and 2 Align and Dress the Cables and Cords Proper cable management helps with servicing the library 1 Gather cab...

Page 64: ...oint past the black unlocked padlock icon Unlock the Thumbscrew type Robot Lock Unlock the robot by pulling out flipping over and re inserting the thumbscrew type lock The thumbscrew lock is on older hardware versions 1 Loosen the thumbscrew Pull the lock assembly straight out until the long tab comes out of the slot at left 2 Rotate the lock clockwise 180 degrees and slide the long tab into the s...

Page 65: ... remove a cartridge magazine while the library is starting up You could damage the robot or other internal components Only manually remove the magazine when the library is operational and offline Configure the Library After Powering on for the First Time The library will launch the Initialization Wizard after the first power on Use the front touch screen to configure the library with the wizard Co...

Page 66: ...word is temporary and will be changed in the next configuration step 5 Tap Done 6 Tap Log In Configure the Library Step 1 of 6 Change the Default Administrator Password Change the default admin password for security The customer should change the default admin password 1 Tap the keyboard button 2 Have the customer enter a new administrator password Note The password must be at least eight characte...

Page 67: ... _ is supported c Select an IP address type IPv4 only or IPv4 and IPv6 d Tap Next 2 Option 1 Configure Network Port 1 with an IPv4 Address a Use the Configure IPv4 list to select either Static or DHCPv4 If you select DHCPv4 for a successful startup DHCPv4 must be running on your network If you select Static tap the keyboard button and then enter the following Address Clear the default value Enter ...

Page 68: ...Tap Next 2 Configure the date and time by selecting either Manually or Using Network Time Protocol from the list If you select Using Network Time Protocol you must provide the IP address of a Network Time Protocol server on your network The steps are similar to those for setting an IP address for Network Port 1 If you select Manually enter the current date in the format MM DD YYYY Enter the curren...

Page 69: ... Only installed drives are assigned a sequential SCSI element address Empty drive slots are not assigned a SCSI element address and are not reported to attached hosts In this mode the library must be restarted before newly installed drives are usable by attached hosts and drive SCSI element addresses may change Also only installed drives can be assigned to a partition You must select this setting ...

Page 70: ...n tap Next To accommodate various cartridge labeling schemes the SL150 library supports labels eight to 14 characters long and provides a label windowing feature that lets you specify how the labels should be interpreted by the host application See Label Format Types for a description of the format types Configure the Library Step 6 of 6 Review and Apply Initialization Settings Verify all settings...

Page 71: ...e Add a User and Assign a Role Set up system monitoring if required see Configure Simple Network Management Protocol SNMP Configure system notifications if required see Configure Email Notifications Load cartridge magazines see Tape Cartridges Media Run a Self Test A self test can help troubleshoot library issues and confirm proper installation Before placing a newly installed or reconfigured libr...

Page 72: ... See Use the Health Table to Diagnose the Issue more information 7 If you did not check the Set the Library back Online checkbox remember to bring the library back online manually once you are ready See Place the Library Online or Offline Stopping a Self test Stop a self test to resume library operations To stop a test that is in progress from the Library drop down select Stop the current test The...

Page 73: ...nistrator if you do not have login credentials 3 Click Log In Related Topics Remote Interface The remote interface is a browser based application used to monitor and managed the library Log Out of the Remote Interface Log out when you are done using the interface For security never leave a session open and unattended Always log out of the interface when you are finished using it 1 Near the top rig...

Page 74: ...heet application such as Microsoft Excel Note The extension of the file is xls but the format is html When opening the file in a spreadsheet program you may need to confirm the file is not corrupt and from a trusted source You can also view the file in a web browsers by renaming the xml file extension to html Related Topics Print a Table Print any table in the remote interface Show Hide and Reorde...

Page 75: ... Export a Table as a Spreadsheet Export an xls file for any of the tables found in the remote interface Use a spreadsheet application to analyze the exported table data Chapter 3 Print a Table 3 3 ...

Page 76: ...Time The library will launch the Initialization Wizard after the first power on Use the front touch screen to configure the library with the wizard Run the Configuration Wizard The configuration wizard sets the library time network parameters library settings partitioning and encryption 1 From the remote interface select Configuration in the left menu 2 Click Configure 3 Within the Configuration W...

Page 77: ...figure the network settings allow the library to restart and then configure library encryption Verify Job Activity and Launch the Wizard Modifying the network settings will affect host communication Verify there is no library activity before changing the network settings 1 Check the activity log for active jobs such as tape moves or mounts Never change the network configuration during active jobs ...

Page 78: ...teless address will not change unless the robot has to be replaced DHCPv6 If a DHCPv6 server is available on your network you can select DHCPv6 Be aware the network address of the library user interface will change 5 Click Next Related Topics IPv6 Network Address Support The dual stack network configuration supports both IPv4 and IPv6 Configure Network Port 2 Optionally configure Network Port 2 fo...

Page 79: ...d IPv6 Set the Library Date and Time Use the configuration wizard to set the library date and time 1 Run the Configuration Wizard Select Set the Library Date and Time 2 Select the Time Zone and Closest City or Region from the drop down lists Click Next 3 Either set the time Manually or use NTP Manually Enter the date using the format mm dd yyyy month day year Enter the time using the format hh mm ...

Page 80: ...guration drop down select either Standard 4 slots Expanded 19 slots Converts the right magazine of the Base Module into an additional mailslot The magazine must be empty before selecting this configuration Requires 2 25 code and above 5 From the System Reserved Slots drop down select the number of slots If you are unsure see Determine the Required Number of Reserved System Slots 6 From the Library...

Page 81: ...through the configuration wizard Pre requisite Tapes cannot be in the mailslot while configuring partitioning 1 Run the Configuration Wizard 2 Select Configure Library Settings and then click Next 3 From the Library Partitioning drop down select Partitioning On and then click Next 4 If at any point you do not wish to proceed click Previous or Cancel Create a New Partition Create a partition to seg...

Page 82: ...ying the overall partitioning configuration review your changes and then click Next Delete an Existing Partition Delete a partition to remove the partition definition and unassign all resources in the partition Caution Before deleting a partition make sure that it no longer holds tape cartridges that contain valid data When you reassign the slots the host application that controls the new partitio...

Page 83: ...se the OKM GUI to create an SL150 library agent and then record the following information to use in the SL150 configuration OKM Cluster IP address Agent Name Passphrase Configure the SL150 to Manage Encryption With code version 3 50 and above the library can manage encryption Note You cannot configure the network settings and library encryption in the same instance of the Configuration Wizard Conf...

Page 84: ...ithin the Configuration Wizard have the OKM administrator go to the OKM GUI and verify that the SL150 agent now shows Enrolled True See the OKM documentation for more information Review and Apply Configuration Wizard Changes Verify and accept changes you made in the configuration wizard to apply the settings 1 Within the configuration wizard review the Summary of Configuration Changes screen Alter...

Page 85: ...My Oracle Support https support oracle com 2 Click the Patches Updates tab 3 Within the Patch Search area click on the Product or Family Advanced link 4 In the Product is field enter For library firmware Enter SL150 and then select StorageTek SL150 Modular Tape Library from the list of results For drive firmware Enter LTO and then select the drive model for example IBM LTO7 Tape Drive 5 From the R...

Page 86: ...splayed in the dialog the file is corrupt and cannot be installed successfully Stop here and re download the firmware zip Update the Library Firmware Update the library firmware to access the latest features 1 Download the library firmware see Download Firmware from My Oracle Support 2 Extract the firmware ZIP the extracted file should contain a tar file and release notes 3 Log in to the remote in...

Page 87: ...before you can view the login screen To eliminate this browser security exception you can install a certificate signed by a certifying authority CA see Install a Third Party Signed Certificate 1 Click Configuration in the left navigation area of the GUI 2 Click the Certificate tab and then click New Certificate 3 Enter in the certificate information Install a Third Party Signed Certificate Install...

Page 88: ...le into the library to replace the self signed certificate 1 Click Configuration in the left navigation area of the GUI 2 Click the Certificate tab and then click Import Certificate 3 Copy and paste each certificate file into the text box and click Next To skip the intermediate certificate leave the box blank and click Next Configure Accessibility Settings Users with visual impairments can adjust ...

Page 89: ...n of the remote interface refreshes The interface automatically refreshes by default However you may want to pause this functionality and only refresh the screen using your browser controls 1 In the top right of the remote interface click Preferences 2 Select Pause Automatic Refresh or Resume Automatic Refresh from the drop down menu When auto refresh is paused you must use your web browser s relo...

Page 90: ...nd run self tests Administrator has full control over the operation and configuration of the library and can manage other users The administrator can grant or deny users access assign user roles set and change library properties configure the TCP IP connection and SNMP communication Since the administrator role can alter configuration settings you should limit the number of users with this role Se...

Page 91: ...emote interface with the administrator role 2 Select Users in the left menu 3 Select the user account by clicking on the corresponding table row 4 Click Reset Password 5 Enter a new password Note The password must be at least eight characters long and contain one or more numeric or special characters The value passw0rd is invalid Related Topics Change Your Password Change your password at any time...

Page 92: ...ministrator role 2 Select Users in the left menu 3 Select the user account by clicking on the corresponding table row 4 Click Delete User Change an Assigned Role The administrator can change the role of a user 1 Log into the remote interface with the administrator role 2 Select Users in the left menu 3 Select the account by clicking on the corresponding table row 4 Click Change Role 5 Select a rol...

Page 93: ...ts Prepare Diagnostic Cleaning and Data Tape Cartridges Apply a Label to a Tape Cartridge View Import Export and Move Cartridges View a List of Tape Cartridges View Tape Cartridge Health Media Health Guidelines for Handling Tape Cartridges Import or Export Cartridges Using the Mailslot Load the Magazines Bulk Loading Move Tape Cartridges with the Remote Interface Cleaning Cartridges and Reserved S...

Page 94: ...dge The label has both alphanumeric characters and a machine readable barcode The following sections describe labeling standards and tape cartridge types Tape Media ID Tape Cartridge Types Label Format Types Support for Non Standard Label Formats Apply a Label to a Tape Cartridge Order Media and Labels Tape Media ID Standard LTO data cartridge labels have a unique customer assigned six character v...

Page 95: ...tic tape label Related Topics Tape Media ID Standard LTO data cartridge labels have a unique customer assigned six character volume ID followed by a two character media ID field M8 Cartridge Type The M8 cartridge is an LTO7 cartridge with increased storage capacity An M8 cartridge is an LTO7 cartridge initialized to a 9TB capacity by an LTO8 drive instead of the standard 6TB capacity of a standard...

Page 96: ... your cartridges and the logical label format that the application uses internally Translating Between Physical and Logical Labels To accommodate the fullest range of possible labeling schemes the library supports labels 8 to 14 characters long and provides a label windowing feature that lets you specify how labels should be interpreted when communicating with the host application So for example i...

Page 97: ...he media descriptor for universal cleaning media Prepare the Data Tape Cartridges Locate the correct label for the data tape and apply the label Make sure that the label s media ID matches the cartridge type If you need to configure the library for a non standard labeling scheme see Support for Non Standard Label Formats Related Topics Apply a Label to a Tape Cartridge Properly apply a label to en...

Page 98: ... view properties Related Topics View Tape Cartridge Health Media Health The library report any tape alerts which affect the tape s media health after it has been dismounted from a drive Move Tape Cartridges with the Remote Interface The remote interface can move cartridges when you cannot use the host application View Tape Cartridge Health Media Health The library report any tape alerts which affe...

Page 99: ... tape that is outside the cartridge the tape edge might be damaged Do not expose the tape or cartridge to direct sunlight moisture excessive temperatures or magnetic fields Transport cartridges in shock resistant cases Inspect a Tape Cartridge Always inspect a tape before you insert it into a drive or a library to prevent damage Never use a damaged tape A defective or dirty tape can damage the tap...

Page 100: ...ape Cleaner Wipes to clean the cartridge exterior These wipes are saturated with isopropyl alcohol Do not let any solution touch the tape or get inside the cartridge Caution To avoid damage to cartridges do not use acetone trichloroethane toluene xylene benzene ketone methylethyl ketone methylene chloride ethyldichloride esters ethyl acetate or similar chemicals to remove labels or clean cartridge...

Page 101: ...ated Topics Magazine Each magazine provides 15 storage slots for tape cartridges Each library module has a left and right magazine Unlock and Remove the Magazines Unlock the magazines using the remote interface before sliding them out Always use the remote interface to unlock the magazines whenever possible However you can also manually unlock them using the hex key see Remove the Cartridge Magazi...

Page 102: ...en side of the magazine Gently push the cartridge into the slot until the plastic retention spring snaps into place 3 If using host managed drive cleaning place one or two LTO universal cleaning cartridges in unreserved data slots Reserved slots are optional so the following figure could represent a valid configuration for host managed cleaning 4 Load the remaining slots with data tapes 5 Once loa...

Page 103: ... From the Library drop down menu select Lock and Audit Magazines 3 Optionally select Set the Library back Online to automatically bring the library online after the audit 4 Click OK to lock the magazines take the library offline and start the audit See Audit the Library Update Media Health After a Bulk Load After bulk loading tapes Media Health for many cartridges will be listed as Unknown The lib...

Page 104: ...thout interfering with robot operations It is often referred to as a cartridge access port CAP in other StorageTek libraries Assign the Mailslot to a Partition In a partitioned library you must assign the mailslot to a partition before exporting or importing tapes For information on how SCSI hosts handle a shared mailslot see the SL150 SCSI Reference Guide Assign the Mailslot Using the Remote Inte...

Page 105: ...sign the mailslot to a partition see Assign the Mailslot to a Partition 2 Use the host application to move the tapes from the storage slots to the mailslot If you cannot use the host application you can move tapes using the remote interface Then after closing the mailslot update the host application database to account for the removed tapes 3 Open the Mailslot Remove the tapes Close the Mailslot 4...

Page 106: ...ick 1 Push the mailslot into place until it latches with a noticable click If the mailslot does not latch it may trigger needless multiple re audits of the mailslot If using the expanded mailslot grasp the front handle while supporting the magazine weight with the other hand Carefully align the magazine with the right magazine bay of the Base Module and gently push it in 2 If using a partitioned l...

Page 107: ...ick on where you want to move the tape to within the graphical library map 5 To move the tape click OK 6 If you did not check the Set the Library back Online checkbox remember to bring the library back online once you are ready Determine the Required Number of Reserved System Slots Reserved system slots store diagnostic and cleaning cartridges The number of required slots depends on your cleaning ...

Page 108: ... need to reside depends on your drive cleaning strategy and partitioning configuration If using library auto cleaning or manual cleaning Oracle recommends that you provide two new LTO universal CU cleaning cartridges into reserved system slots The partitioning configuration does not affect this number If using host managed cleaning the number of cleaning cartridges required depends on your partiti...

Page 109: ... replace it If the cartridge is in a reserved system slot see Replace Expired Cleaning Tapes Using the Remote Interface If the cartridge in a host application managed storage slot see Replace Expired Cleaning Tape Using the Host Application Replace Expired Cleaning Tapes Using the Remote Interface Use the remote interface to replace cleaning cartridges in the reserved system cells 1 From the remot...

Page 110: ... that the drive can read the data written on the tape The library must be at firmware version 3 70 or above A drive can validate a tape by reading the data previously written on the it The tape is considered valid if the drive does not encounter errors during the read The drive will report SCSI sense data for any errors encountered to help identify the issue There are three levels of media validat...

Page 111: ...brary will go offline disable the drive data ports and add the drive to the media validation pool The drive is no longer available for host operations On the Library page the drive will be marked with MV Remove a Drive from the Media Validation Pool Drives remain dedicated for media validation until you explicitly remove them from the media validation pool 1 From the Library page or Drives table r...

Page 112: ...rogress and results within the Media Validation Status section of the Tapes table 6 If there is an error with the validation the Results column provides SCSI sense data to help identify the issue Any tape alerts that may cause the tape to be labeled Suspect are listed in the Tape Alerts column If there is an error you should first try the tape in another drive Manually Cancel a Validation in Progr...

Page 113: ...gress the validation will stop When the library comes back up the tape will remain loaded in the drive but media validation will not automatically resume You must manually cancel the media validation and then start a new validation Media validations cannot be resumed from where they last left off Media validation that was halted due to a system drive or library restart will show a status of Failed...

Page 114: ... library is online Add a Drive to the Media Validation Pool Add IBM LTO6 or higher drives to the pool to dedicate them for media validation These drives are invisible to host applications and can only be used for media validation Remove a Drive from the Media Validation Pool Drives remain dedicated for media validation until you explicitly remove them from the media validation pool Supported Tape ...

Page 115: ... the robotics Data is sent to the remaining LUN on the bridged drive or to LUNs on the other unbridged drives in the partition all of which are configured as SCSI sequential access tape devices Related Topics Configure the Library Update the library configuration using the wizard update library firmware and manage the library s certificate Library Managed Encryption LME The library can manage encr...

Page 116: ...xed with other traffic Configured normally Used for UI SNMP SMTP OKM traffic 192 168 10 10 default Used for SDP 2 traffic and direct Service laptop connection LME disabled with Port 2 unchanged Configured normally Used for UI SNMP SMTP traffic 192 168 10 10 default Used for SDP 2 traffic and direct Service laptop connection LME disabled with Port 2 altered Leave Port 2 setting unchanged unless usi...

Page 117: ...use the Actions drop down 3 Note the drive state The library polls the drive approximately every 10 seconds Possible states are Empty Cleaning Loading Loaded Reading Writing Rewinding Unloading Related Topics Tape Drives Tape drives read and write data on tape cartridges The SL150 supports LTO half height SAS and FC drives Configure Drive Cleaning Manage drive cleaning in one of three ways library...

Page 118: ...ive Auto Clean to On 6 Set System Reserved Slots to 1 or 2 To use the auto cleaning you must reserve at least one system slot for a cleaning cartridge 7 Click Next If applicable click Next again to bypass the partitioning configuration 8 On the summary screen select Accept all changes and then click Apply Related Topics Determine the Required Number of Reserved System Slots Reserved system slots s...

Page 119: ...terval duration The desired interval between cleaning cycles Clean using emptiest Select Yes to use cleaning cartridges in round robin fashion starting from the least used cartridge Select No to use each cleaning cartridge until it expires starting from the cartridge with the fewest remaining cleaning cycles the default Set Up NetBackup for Reactive Cleaning Set up NetBackup for Reactive Cleaning ...

Page 120: ...active Cleaning for HP StorageWorks Enterprise Backup Solution with HP Data Protector Data Protect automatically configures reactive cleaning 1 Verify all cleaning cartridges are properly labeled 2 Data Protector detects the properly labeled cleaning cartridges and automatically sets up reactive cleaning Set Up As Needed Cleaning in IBM Tivoli Storage Manager TSM Use the DEFINE DRIVE or UPDATE DRI...

Page 121: ... clean a drive by monitoring the remote interface for cleaning messages and responding accordingly Caution Over cleaning can damage drives Only mount a cleaning tape when the drive indicates that it requires cleaning Check for Drives that Require Cleaning 1 Log in to the remote interface 2 Check the Library Health indicator at the top of the screen If it is in the Degraded state click on it and ex...

Page 122: ...he remote interface select Library in the left menu 2 Right click a drive and then select Drive Port Settings 3 In the drop down for each port select either Enable or Disable Update the Drive Firmware Keep drive firmware up to date with the most current and supported drive firmware Make sure that the proper device driver is installed if applicable Use Windows Update to obtain the driver for an IBM...

Page 123: ...correct file and then click Upgrade The update begins immediately If you are updating multiple drives you can click Cancel to skip the upgrade for any drives that have not yet been processed However the upgrade that is currently underway will continue 10 If a firmware upgrade fails make sure that the chosen firmware is correct for the LTO generation and interface specification of the drive If it i...

Page 124: ...plays a graphical representation of library components 1 From the remote interface select Library in the left menu 2 Hover over a component to see detailed information For example hover over a tape to display the corresponding slot address and label You can view the whole library or a single partition at a time When viewing one partition resources assigned to the other partitions are grayed out Re...

Page 125: ...r displays the Library Health pop up which you can use to troubleshoot the library see Determine the Possible Cause of a Degraded or Failed Library State Library LED Status Indicators LEDs on the front control panel and rear of the library indicate status Indicator Indicator State Meaning Green OK is solid The library or component is fully operational Green OK is solid Amber is solid The library o...

Page 126: ...ct the faulty library state Related Topics View the Library State The status bar at the top of the interface displays library health which represents the combined state of every component in the library Diagnose a Library Problem The health table health log and self tests help diagnose library problems Troubleshoot the Library Troubleshoot common user interface and library problems View User and H...

Page 127: ... unless you need compatibility with older SNMP versions and have no security concerns v3 requires the following information User Name Authentication Protocol Select SHA for best security or MD5 for compatibility with systems that use MD5 Authentication Passphrase Enter a strong user authentication password Privacy Protocol Select AES Advanced Encryption Standard for best security or DES Data Encry...

Page 128: ...ware Check 41 Drive Status Good 45 Drive Status Check 61 CAP mailslot Status Good 63 CAP mailslot Status Open 65 CAP mailslot Status Check 100 Proprietary 102 Proprietary Enable or Disable SNMP Enable or disable SNMP using the remote interface 1 From the remote interface select SNMP in the left menu 2 Click the SNMP is Enabled Disabled drop down 3 Select either Enable SNMP or Disable SNMP 4 Click ...

Page 129: ...to this management station For a list of valid entries see SNMP Traps Version The SNMP version See SNMP Versions for details on additional required information Send a Test Trap Send a test trap level 13 to all trap recipients to verify the configuration 1 From the remote interface select SNMP in the left menu 2 Click the SNMP Trap Recipients tab 3 Click Send a Test Trap If the icon is grayed out t...

Page 130: ...opics Service Delivery Platform 2 SDP2 The StorageTek Service Delivery Platform 2 SDP 2 is a support solution that provides faster problem resolution analysis and trending and improved diagnostics Configure Email Notifications Email notifications send automatic alerts whenever the library state or health changes Enable or Disable Email Notifications Configure Email Recipients Send a Test Email Ale...

Page 131: ...Recipients The library sends notifications only to configured recipients 1 From the remote interface select Email Alerts in the left menu 2 Click Add Recipient or select a recipient and click Edit Recipient or Delete Email Recipient Alert on Health and or Change When selected the library will notify the recipient when the library health status changes Send a Test Email Alert Send a test email to v...

Page 132: ...e Library Power Off the Library Restart the Library Audit the Library Move the Library Rack Enable the Locate Light Troubleshoot the Library Get Parts and Technical Support Run a Self Test Place the Library Online or Offline Change the state of the library using the remote interface An offline library will not perform host operations Always take the library offline before performing any maintenanc...

Page 133: ...y follows a specific sequence to verify operations after powering on 1 The robot unparks and the hand fully retracts 2 The robot determines the order of the modules starting at the top and moving down one module at a time 3 The wrist sweeps through its full range of motion and the hand moves through the full track range The reach mechanism extends and retracts 4 The magazines latch 5 The library r...

Page 134: ... a Press the front panel power button and hold it until the library shuts down approximately 10 seconds b Remove power from all power supplies disconnect the power cord from all power supplies or set the PDU or power strip switch to the off position Lock the Robot Lock the robot if removing or replacing the robot moving the library or preparing the library for shipment 1 Perform a controlled power...

Page 135: ...k turn the knob counter clockwise until it clicks into place The pointer on the knob should point past the red locked padlock icon Lock the Thumbscrew type Robot Lock older version The older lock style has a lock assembly secured with a thumbscrew 1 Loosen the captive thumbscrew on the lock assembly Pull the lock straight out until the long tab comes out of the slot at right Chapter 9 Power Off th...

Page 136: ...once power is restored When power is restored the library powers up and runs just long enough to check its previous power state If the library was ON before the outage it will be ON afterward If it was OFF the library powers itself OFF after a few seconds Restarting a library that was off prior to a power interruption is like powering on any other library that is off See Power On the Library Audit...

Page 137: ...tion Move the Library Rack Power off the library and lock the robot before moving the rack to prevent equipment damage 1 Power the library off see Power Off the Library 2 Secure the robot see Lock the Robot 3 If the floor is uneven remove all magazines from library as tape cartridges can shift and obstruct library robotics when the library is restarted a Unlock all magazines using the remote inter...

Page 138: ...oblem The browser level and type may cause issues with the remote interface 1 If you have problems with a browser try a different browser Check the SL150 firmware release notes for known incompatibilities 2 If you start to have problems with a browser that used to work check for recent changes to the browser configuration If scripting Javascript has been disabled enable it If browser plug ins or e...

Page 139: ...a center power outlet Check breakers 4 If the library is connected to power check the LED Indicators on the library and its components Power supplies If an amber power supply LED is lit or if both power supply LEDs are dark replace the power supply See Power Supply Removal and Replacement Robot Module If an amber Robot Module LED is lit or if both robot LEDs are dark replace the robot See Robot Mo...

Page 140: ...t a time and in the order specified in the suspect components list See Replace Components CRUs FRUs If you replace the robot the operator panel or the chassis of library module 1 power cycle the library as soon as you finish These three components maintain records of the product serial number and configuration settings If you replace more than one of them at a time without restarting the library t...

Page 141: ... a replacement Go to Get Parts and Technical Support and create a service request If you find no damage reseat the cartridge in its slot and make sure that it is moving freely Reinstall the magazine in its bay and power up the library and see Check if a Fault is Closed in the Health Log If you cannot free the cartridge go to Get Parts and Technical Support and check for relevant knowledge articles...

Page 142: ... spreadsheet applications such as Microsoft Excel and Apache OpenOffice Calc To view these files in web browsers simply rename the file using the html file extension in place of xsl Run a Self Test A self test can help troubleshoot library issues and confirm proper installation Before placing a newly installed or reconfigured library into production you should run a full self test 1 Before running...

Page 143: ...Place the Library Online or Offline Restore the Factory Default Configuration Restore the library to factory defaults settings to erase the existing configuration Record any important library configuration information because restoring will erase all configuration information Only reset the configuration as a last resort 1 This procedure requires two people One person at the front of the library a...

Page 144: ...0 Update 8 and later and Solaris 11 11 1 and later disrupts communications between Oracle Solaris and common tape backup applications The SAS driver only allows one device driver to attach per device sg sgen st and so forth Users must have every component in the following list to be affected Oracle Solaris 10 Update 8 or later or Solaris 11 11 1 and later Any SAS 2 or SAS 3 HBA Tape drives or libr...

Page 145: ...ge tab 3 In the Knowledge Base area select the Search Browse tab 4 In the Select a product or product line field enter StorageTek SL150 Modular Tape Library 5 In the Go directly to the best match area click the Information Center StorageTek SL150 link 6 In the Information Center document select the Resources tab and browse the links on the page Get Firmware Updates Updating library and drive firmw...

Page 146: ...f Test a quick 6 move test used to verify basic library function to test robot access to the corner locations of the library Full Self Test a thorough test that moves a tape to every slot and to every unoccupied drive compatible with the chosen diagnostic tape A full test can take significant time depending on the number of modules in the library so plan accordingly 5 Optionally select Set the Lib...

Page 147: ...assumes you have isolated the issue and have replacement parts on hand If you have not determined the problem see Troubleshoot the Library CRU Locations Drive Tray Removal and Replacement Power Supply Removal and Replacement Front Control Panel Removal and Replacement Module Controller Removal and Replacement Robot Module Removal and Replacement Expansion Module Chassis Removal and Replacement FRU...

Page 148: ... Expansion Module 4 Power Supply Drive Tray Removal and Replacement The drive tray is a CRU that can be removed and replaced while the library is online WARNING Do not operate the library with an open and empty power supply or tape drive slot Always have a cover in place Remove the Drive Tray Replace the Drive Tray Remove the Drive Slot Cover Install the Drive Slot Cover Chapter 10 CRU Locations 1...

Page 149: ...Two Thumbscrews Remove the Drive Tray Remove a drive tray for replacement or relocation Note Removing a bridged drive disconnects the host from the library 1 In the remote interface select Library in the left menu Right click on the drive and then select Remove Drive 2 At the back of the library locate the drive tray with the blue LED indicator upper left corner Chapter 10 Drive Tray Removal and R...

Page 150: ...ove the replacement drive tray from the shipping carton Save the packaging materials to return the failed CRU Replace the Drive Tray Slide the new tray into the drive slot and reconnect the cables 1 Grasp the rear corners of the drive tray and guide it into the drive slot Push the drive tray completely into the drive slot 2 Verify that the indicators are active on the rear of the drive tray 3 Tigh...

Page 151: ... guide the cover into the tape drive slot 3 Tighten both thumbscrews Power Supply Removal and Replacement The power supply is a CRU that can easily be removed and replaced WARNING Do not operate the library with an open and empty power supply or tape drive slot Always have a cover in place Remove the Power Supply Replace the Power Supply Remove the Power Supply Slot Cover Install a Power Supply Sl...

Page 152: ...t out of the library and set it aside Replace the Power Supply The power supply resides in a slot in the Base Module or Expansion Module 1 Remove the power supply filler if necessary see Remove the Power Supply Slot Cover 2 Remove the power supply from the shipping carton 3 Grasp the supply by the handle and support the bottom with your other hand 4 Orient the power supply as shown in Figure 10 2 ...

Page 153: ... module frame 3 Seat the cover notch against the module frame edge 4 Push the left side of the cover into the power supply slot Front Control Panel Removal and Replacement The front control panel is a CRU located at the front of the Base Module Remove the Front Control Panel Replace the Front Control Panel Caution The front control panel maintains the product serial number and customer settings Af...

Page 154: ... Use care when removing the panel 1 Power down the library see Power Off the Library 2 Remove both cartridge magazines from the Base Module see Unlock and Remove the Magazines 3 Press the latch inside each magazine bay inner wall and pull the bottom edge of the panel away from the module until the panel unlatches see image below Chapter 10 Front Control Panel Removal and Replacement 10 8 ...

Page 155: ...nects to a cable and latches into the front of the Base Module Caution ESD damage Do not touch any exposed electronic components cables or contacts 1 Remove the replacement front control panel from its packaging 2 Grasp the panel by the plastic housing and raise it to the Base Module 3 Attach the cable to the circuit card jack at the back of the panel Make sure the connector is flush with the jack...

Page 156: ... The Module Controller is a CRU located in the upper right rear of the Expansion Module The Module Controller obtains power from the expansion cable connected to a Module Output port on the Base Module Remove the Module Controller Replace the Module Controller Remove the Module Controller The Module Controller latches into the upper right rear of the Expansion Module Note Be aware of ESD see Elect...

Page 157: ...o not touch any electronic components or electrical contacts 1 Remove the replacement module controller from the ESD packaging 2 Grasp the Module Controller without touching components or electrical contacts and open the retaining latch 3 Insert the Module Controller component side up into the module slot 4 Seat the latch in the slot to secure the Module Controller 5 Connect the expansion cable in...

Page 158: ...re attempting to remove the Robot Module Park and Lock the Robot Slide Robot CRU Out of Base Module Park and Lock the Robot Parks the robot at the top of the Base Module where you can lock it into place 1 Power down the library with the to prepare the robot for removal option enabled See Controlled Power Down from the Interface If the robot cannot be parked by using the power down procedure perfor...

Page 159: ...bot 6 Pull the robot completely out of the Base Module and set it on the anti static work surface 7 Proceed to Replace the Robot Module Manually Retract the Robot Manually retract the robot when you cannot park the robot by using the power down procedure 1 Always attempt to have the library park the robot before attempting this procedure see Park and Lock the Robot 2 Remove the top drive tray from...

Page 160: ...tep of robot removal see Slide Robot CRU Out of Base Module Figure 10 4 Bullwheel Gear and Robot Lock Illustration Legend 1 Bullwheel Gear 2 Robot Lock Improved Design Manually Disengage the Robot Manually disengage the robot when you cannot get the robot to retract by other methods Use this as a last resort Caution Perform this procedure only if either the library power down Step 1 of Park and Lo...

Page 161: ...dule 4 Pull the robot completely out of the Base Module and set it aside Manually Remove the Z Platform With the cables cut the Z platform of the robot will be at the bottom of the library You must raise it and slide it out of the Robot CRU opening 1 Remove the cartridge magazines from the Base Module 2 Remove cartridge magazines from Expansion Modules until you locate the Z platform Note You can ...

Page 162: ...the anti static mat Save the packaging materials for the return of the failed CRU 2 Grasp the robot near the center with the thumbscrews facing you 3 Insert the robot into the Base Module 4 Push the robot fully into the module 5 Tighten the thumbscrews on each side of the robot CRU 6 Unlock the Robot Reconnect Cabling to the Base Reconnect the cabling to the Base Module 1 Plug the expansion cable ...

Page 163: ... fillers power supplies power supply fillers and the module controller from the failed module to the FRU as applicable You might need to remove operational modules to access the defective one Remove an Expansion Module Replace the Expansion FRU Chassis Figure 10 5 Expansion Module FRU Illustration Legend 1 Flange 2 Tab Remove an Expansion Module Removal of the Expansion Module is complicated and m...

Page 164: ...t 1 Grasp the library floor at the thumb holds within the magazine openings 2 Pull the floor out from the front of the bottom module Note If the floor does not move reach through the magazine opening and push down on the floor behind the touch screen panel to unseat the floor locks Pull the floor forward with your other hand 3 Disconnect the expansion cable plug s from the port s at each affected ...

Page 165: ...o the front of the rack 3 Grasp the module pull it forward until the break in the flange is visible lower the front of the module pull it free from the module above it and away from the rack 4 Set the module down and away from the front of the rack 5 Remove the Phillips screws and rear rails from the module Leave the clip nut in place See Figure 10 6 6 Repeat until you have removed the all modules...

Page 166: ...ow an existing module 1 Grasp the Expansion Module chassis by the sides and remove it from the shipping carton 2 Remove the magazines from the Expansion Module See Prepare the Expansion Module by Removing the Cartridge Magazines 3 If this will be the bottom module of the library install the library floor now See Install the Floor in the Bottom Expansion Module 4 Mount the module See Mount the Expa...

Page 167: ...tion refer to the module number label on the back of the module 2 Repeat the installation tasks until all Expansion Modules and CRUs are installed See Install the Expansion Module Chassis See Install CRUs Fillers and Magazines in Replaced Module 3 Make sure you have installed the floor in the bottom module See Install the Floor in the Bottom Expansion Module Cable the Library and Power On After In...

Page 168: ... Module Chassis Replace the Base Module Chassis Figure 10 7 Base Module FRU Caution The Robot Module front control panel and Base Module chassis are critical to maintaining the product serial number and customer settings Only replace one unique device during a single power down cycle If the library has Expansion Modules remove all of the Expansion Modules to access the defective Base Module Remove...

Page 169: ...y Remove the Drive Slot Cover Remove the Power Supply Remove the Power Supply Slot Cover Remove the Front Control Panel Remove the Robot Module 2 Remove the screws securing the Base Module to the front of the rack WARNING The Base Module weighs approximately 12 8 kg 28 3 pounds without magazines tape drives power supplies or the robot CRU Two people should lift the unit 3 Extract the module from t...

Page 170: ...ly Install a Power Supply Slot Cover Replace the Front Control Panel 2 Reinstall the Expansion Modules See Replace the Expansion FRU Chassis Make sure to install the floor in the bottom module 3 Re cable the Expansion Modules Connect the specific Base Module port to the controller card port of the associated Expansion Module See Cable the Expansion Modules for details Reinstall Magazines and Dress...

Page 171: ...e Front Panel Test the panel for general operation locate light touch screen open the mailslot and so forth Module Controller Confirm that the library recognizes the module controller Modules area of the touch screen or Library area of the SL150 remote interface 5 Run the offline self tests from the remote interface see Run a Self Test 6 Set the library to the online state see Place the Library On...

Page 172: ...obot 3 Remove the right cartridge magazine from the Base Module see Remove the Cartridge Magazine with the Hex Key if necessary 4 Make sure the robot has positioned the hand against the ceiling and front face of the library see image below Install the Shipping Clip The shipping clip secures the robot hand for shipment 1 Verify the robot is in position see Power Down the Library and Verify Robot Po...

Page 173: ...sembly see image below The hand will be contained between the front wall and the clip 5 Guide the instruction tag out of the cartridge magazine slot Route the string and instruction tag between the mailslot and right side of the front control panel and set it on top of the Base Module see image below Chapter 10 Lock the Robot for Shipment within a Rack 10 27 ...

Page 174: ...6 Replace the right magazine in the Base Module and verify the magazine is securely latched Chapter 10 Lock the Robot for Shipment within a Rack 10 28 ...

Page 175: ...umbered starting from the top of magazine 1 and counting down column is the column of the slot within the magazine numbered starting from the handle side of the magazine at the front of the library and counting to the back Reserved Slot Addressing The library can have a maximum of three reserved slots each with a unique address There are maximum of three reserved slots in the library Only the foll...

Page 176: ...ry Configurations and Slot Maps Library addressing varies depending on the library configuration Figure A 1 Non Partitioned One Module Library Standard Mailslot and No Reserved Cells Illustration Legend 1 Module 1 Base 2 Robot 3 Power supplies 4 Standard mailslots 5 Left magazine front 6 Right magazine front 7 Storage slots 8 Tape drives Appendix A SCSI Element Addressing A 2 ...

Page 177: ...Reserved Cells Illustration Legend 1 Module 1 Base 2 Robot 3 Power supplies 4 Tape drives 5 Standard mailslot 6 Mailslot expansion 7 Right magazine front 8 Left magazine front 9 Storage slots 10 Module 2 Expansion Appendix A Example Library Configurations and Slot Maps A 3 ...

Page 178: ...ved Cells Illustration Legend 1 Module 1 Base 2 Robot 3 Power supplies 4 Standard mailslots 5 Left magazine front 6 Right magazine front 7 Storage slots 8 Reserved slots Configurable 9 Tape drives 10 Module 15 Expansion Appendix A Example Library Configurations and Slot Maps A 4 ...

Page 179: ...ode consisting of a series of bars of varying widths This code appears on the external label attached to the spine of a tape cartridge and is equivalent to the volume serial number VOLSER This code is read by the machine vision system of the library Base chassis The sheet metal and plastic chassis that makes up the framework of the Base Module Module 1 Base Module The smallest fully functional lib...

Page 180: ...figuration The manner in which the hardware and software of an information processing system is organized and interconnected T data cartridge A term used to distinguish a cartridge onto which a tape drive may write data diagnostics Pertaining to the detection and isolation of errors in programs and faults in equipment dismount To remove a tape from a drive drive A drive controls the movement of th...

Page 181: ...the Mailslot from four to 19 cartridges A logical entity containing four slots in the Standard Mailslot plus 15 slots in the Base Module right magazine the Mailslot Expansion expansion cable A cable used to connect Expansion Modules to the Base Module Each end of the cable has a USB A style connector expansion chassis The sheet metal and plastic chassis that makes up the framework for Module 2 15 ...

Page 182: ... affected by external electrical noise and they are better for transmissions which require security Fibre Channel The National Committee for Information Technology Standards standard that defines an ultrahigh speed content independent multilevel data transmission interface that supports multiple protocols simultaneously Fibre Channel supports connectivity to millions of devices over copper or fibe...

Page 183: ...l devices T A HBA See host bus adapter host bus adapter HBA A circuit installed in a multi platform host or device that interfaces between the device and the bus host computer In a computer network a computer that usually performs network control functions and provides end users with services such as computation and database access T host interface An interface between a network and host computer ...

Page 184: ... from its source to its destination in an Internet environment IBM inventory The process of reading and storing in memory the bar code identification and location of all tape cartridges in a library IP See internet protocol IPL See initial program load LC connector A standard fiber optic cable connector for Fibre Channel data transfer LED Light emitting diode An electronic device that lights up wh...

Page 185: ...evice In this device the host computer sends the SCSI commands for the library to LUN 1 of the master tape drive and sends SCSI commands for the tape drive itself to LUN 0 MAC address The media access control address is a unique identifier assigned to devices for communication on a physical network magnetic tape A tape with a magnetizable layer on which data can be stored T magnetic tape drive A m...

Page 186: ...sion chassis that is behind the tape slots and in front of the tape drives Other cards connect to it either by direct connection or by a cable Module 1 See Base Module module controller A card inserted into the back of Modules 2 15 that controls the operation of the module It is connected to the robot by an expansion cable Module X 2 through 15 See Expansion Module mount To place a tape in a drive...

Page 187: ...pendent tape library The partition must have one bridged drive and at least one magazine Partitions share the mailslot and robot but the tape drives and magazines within each partition are for use solely by that partition Other partitions cannot use these tape drives or magazine storage slots port A specific communications end point within a host A port is identified by a port number IBM 2 In Fibr...

Page 188: ...y and serial communication protocol for direct attached storage devices including disk drives and high performance tape drives SCSI Small Computer System Interface A standard interface and command set for transferring data between mass storage and other devices The host computer uses SCSI commands to operate the device Depending on the model physical connection between the host computer and the ta...

Page 189: ...pe and includes mechanisms for writing and reading data to and from the tape The drive is mounted into a proprietary tray sometimes called a sled tape drive filler A metal frame that slides into a tape drive slot when a tape drive will not be used in that slot Terabyte A unit of storage abbreviated T or TB equal to 1 024 Gigabytes U A measure of chassis height 1U in rack measurement is 44 45 milli...

Page 190: ...any times a class of recording systems that allow recording and adding data but not altering recorded data wrist A component of the hand assembly that rotates the hand horizontally Z mechanism The robotic assembly mounted at the back of the robot that raises and lowers the arm The Z mechanism includes a motor gears the bullwheel and the wires and pulleys that hold the arm As the motor turns the bu...

Page 191: ...lling 2 5 mounting 2 12 mounting hardware 2 6 remove replace 10 22 bridged drive 4 4 7 2 browser 9 7 BUI See user interface bulk loading cartridges 6 9 C CA 4 12 cable Ethernet 2 32 expansion module 2 29 FC 2 31 installation 2 29 management 2 24 2 32 network ports 2 32 power supply 2 31 SAS 2 31 tape drive 2 31 CAP See mailslot capacity 1 8 cartridge 6 1 about 6 1 bulk load 6 9 cleaning 6 3 6 16 c...

Page 192: ... 4 2 reserved slot 2 38 4 4 restore defaults 9 12 SNMP 8 4 volume label format 2 38 contaminants 2 2 control panel remove replace 10 7 controller remove replace 10 10 CRU 10 1 10 2 10 25 D data cartridge 6 5 date 2 37 4 4 default admin 2 35 delete partition 4 7 delete user 5 3 diagnose 8 3 9 8 diagnostic cartridge 6 5 6 15 dimensions 1 7 download firmware 4 10 MIB 8 6 drive See tape drive drive tr...

Page 193: ...10 K knob type lock 2 33 knowledge article 9 14 L label applying 6 5 configure format 2 38 4 4 format types 6 3 module 2 23 non standard 6 4 ordering 1 16 labels 6 2 large fonts 4 13 LED 8 2 library audit 9 5 capacity 1 8 certificate 4 12 configure 4 1 diagnose issue 9 8 graphical representation 8 1 health 8 3 installation 2 1 monitoring 8 1 move 9 6 offline online 9 1 power off 9 2 power on 9 2 r...

Page 194: ...STA 1 11 mount base module 2 12 expansion module 2 21 mounting hardware 2 16 move cartridge 6 15 move continued library 9 6 my oracle support 4 10 9 14 N network IPv6 support 1 10 persistent binding 1 10 port 1 2 36 port configuration 2 36 4 2 ports cabling 2 32 SAN 1 10 switch 1 10 zoning 1 10 notification email 8 7 number of slots 1 8 O obstruction 9 10 offline 9 1 OKM about 1 12 online 9 1 open...

Page 195: ...ot about 1 4 addressing A 1 knob type lock 2 33 lock 9 3 10 25 remove replace 10 12 thumbscrew type lock 2 33 unlock 2 32 verify position 10 26 role administrator 5 1 assignment 5 2 change 5 3 operator 5 1 service 5 1 viewer 5 1 row A 1 S SAS 2 31 9 13 scratch avoidance 2 21 screen reader 4 13 screen refresh 4 14 SCSI element ID 2 37 4 4 SDP2 1 12 enable disable 8 7 self signed certificate 4 12 se...

Page 196: ...certificate 4 12 thumbscrew type lock 2 33 time 2 37 4 4 TLS 4 12 touch screen 1 6 trap levels 8 5 troubleshoot 8 3 9 7 self test 2 40 9 11 9 15 U UI See user interface unassign mailslot 6 14 unlock robot 2 32 unpack base module 2 6 expansion module 2 16 library 2 5 update drive firmware 7 9 library firmware 4 9 user activity 8 3 add 5 2 assign role 5 2 change password 5 2 change role 5 3 managing...

Reviews: