background image

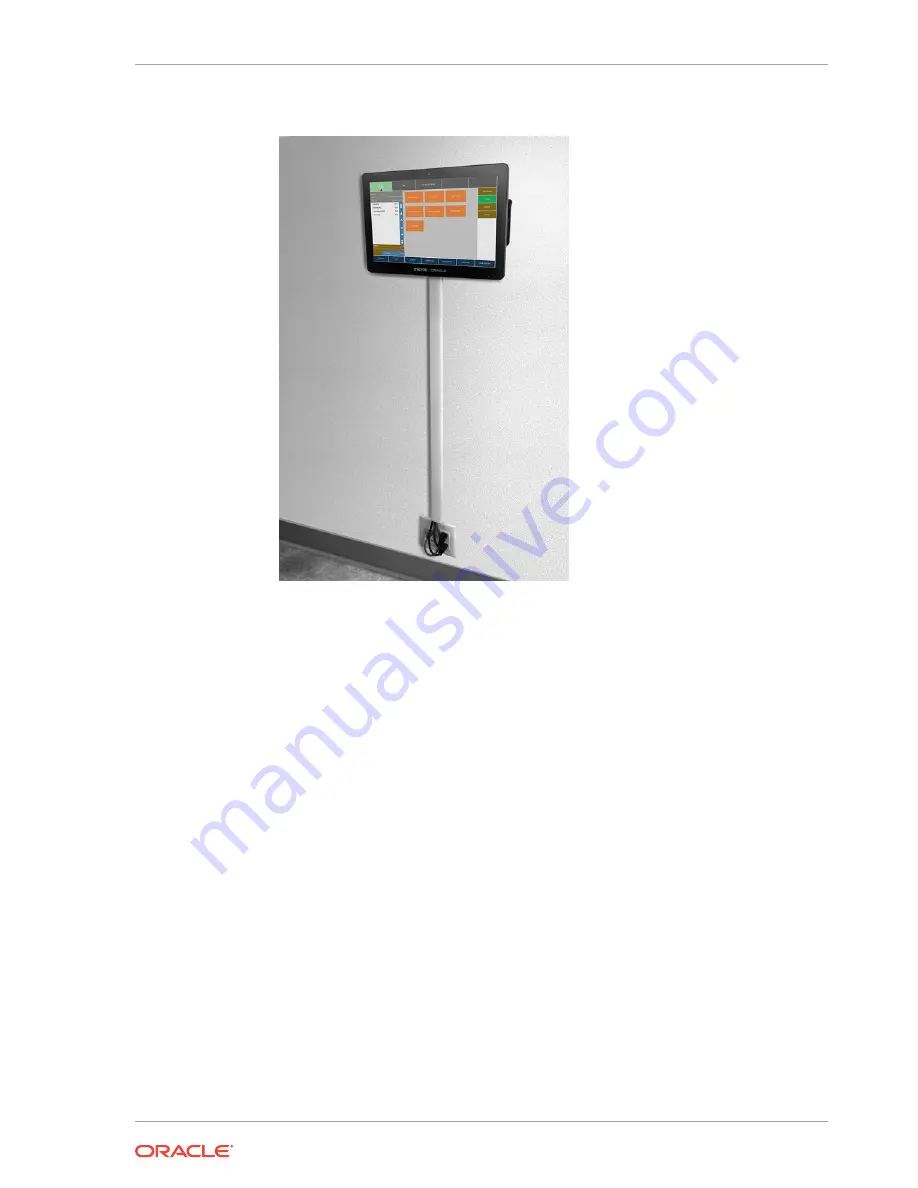
Figure 4-3    Example Wall-Mounted Workstation (Recessed/In-Wall Cage)

Securing the Workstation 625/655 to a VESA Mount

The Workstation 625/655 supports mounting the workstation display to a VESA mount.
The workstation display is engineered in accordance with the Flat Display Mounting
Interface (FDMI) Standard, otherwise known as the Mounting Interface Standard
(MIS), defined by VESA. The VESA standard defines the dimensions of a display’s
four-hole attachment panel and dictates the placement of the hole pattern on the back
of the workstation display.

When choosing a mounting bracket, look for VESA-compliant brackets.

During installation, follow the directions provided with the mounting bracket. When
mounting the workstation display to the bracket, the External Power supply for Oracle
MICROS Workstation 6 Series (Part Number 7601142) is required and includes the
following:

External Power Supply for Workstation 6 Series

4 Stainless Steel Spacers (8.15mm)

4 Stainless Steel Washers

The stainless steel spacers allow for clearance of the external power supply. When
mounting the workstation display to the bracket, insert the washers and spacers
between the bracket and the workstation display, and then secure using the bracket’s
mounting screws.

Chapter 4

Securing the Workstation 625/655 to a VESA Mount

4-17

Summary of Contents for MICROS 625

Page 1: ...Oracle MICROS Workstation 6 Series Setup Guide for the 625 and 655 F18406 07 May 2020...

Page 2: ...ons applicable to the programs No other rights are granted to the U S Government This software or hardware is developed for general use in a variety of information management applications It is not de...

Page 3: ...6 Turning Off the Workstation 3 6 4 Workstation and Accessories Setup and Use Removing the Adjustable Stand Cover 4 1 Locating the Hex Key and Security Hex Bolts 4 3 Securing the Adjustable Stand Cove...

Page 4: ...r MICROS Operating System 6 2 Oracle Linux for MICROS Commands 6 2 7 Workstation Accessibility Features 8 Diagnostics Utility Starting the Diagnostics Utility 8 1 Viewing System Information 8 2 Testin...

Page 5: ...rs 11 1 IDN RS422 232 11 1 Powered RJ45 11 2 Series 2 Cash Drawer 11 2 Customer Display 11 3 12 Troubleshooting Basic Troubleshooting 12 1 Removing the Workstation from the Adjustable Stand 12 2 Disas...

Page 6: ...Cord Connection 13 2 Battery Warning 13 3 System Unit Cover 13 3 International Compliance Information 13 4 Care and Handling 13 4 Equipment Placement 13 4 Electromagnetic Interference 13 5 Cleaning 13...

Page 7: ...document applies to each configuration of the Workstation 6 Series The following symbols may appear in this document Caution There is a risk of personal injury and equipment damage Follow the instruc...

Page 8: ...program module name Functional and technical description of the problem include business impact Detailed step by step instructions to recreate Exact error message received Screenshots of each step you...

Page 9: ...iewable display area within a smaller physical footprint Audio expansion bar optional for enhanced sound capabilities 2 Gigabit Ethernet ports 2nd port can be used as dual NIC for workstation or as a...

Page 10: ...Basic Features Feature 1 Magnetic Stripe Reader 2 Power Button 3 Audio expansion bar optional 4 Fingerprint Reader optional 5 Storage Expansion optional 6 Magnetic Stripe Reader rear view 7 Input Outp...

Page 11: ...4x Ultra high speed USB port DisplayPort capable 12V powered USB port Customer display port The customer display port supports existing pole displays and the Workstation 6 integrated customer display...

Page 12: ...creen for increased contrast in bright lighting conditions Multi touch projected capacitive touchscreen with edge to edge active area Memory 2 SODIMM Sockets 8GB DDR4L 2400MHz Storage 256 GB M 2 NVMe...

Page 13: ...igh Speed USB ports Cash Drawer Ports 2 MICROS Series 2 cash drawer ports 12 24V selectable Customer Display Port 1 MICROS DIN customer display port Power Output 1 12V power out 2 5A Expansion Ports 1...

Page 14: ...luminum rugged PC ABS plastic blend and PC 10 glass fiber Spill resistant enclosure IP43 Passive cooling no fans Casework open detection and workstation detached from stand detection configurable via...

Page 15: ...rkstation 625 655 can be mounted on a variety of Oracle MICROS stands including the Oracle MICROS Workstation 6 Series Adjustable Stand Oracle MICROS Flexible Stand Oracle MICROS Compact Stand and the...

Page 16: ...4 Place the workstation face down on a flat surface and then remove the I O panel cover by sliding it away from the workstation 5 Place the workstation on the Adjustable Stand so that the nubs rest on...

Page 17: ...in is depressed If it is not depressed you must pull the workstation toward you until it clicks in place 8 If you want to secure the workstation to the Adjustable Stand install the security hex bolt 9...

Page 18: ...etc to the appropriate ports on the workstation I O Panel Route cables through the bottom of the stand and then guide them through the opening in the stand neck To access the Adjustable Stand interio...

Page 19: ...I O panel cover For added security install the included hex bolts to anchor the cover to the workstation 13 Turn on the workstation by pressing the power button Chapter 3 Mounting the Workstation on...

Page 20: ...or MICROS operating system setup 1 Follow the prompts to complete the Oracle Linux for MICROS setup a Set language keyboard and time zone b Enter and confirm a Support user password Follow the passwor...

Page 21: ...655 to the Wall Mount Securing the Workstation 625 655 to a VESA Mount Installing the High Mount Customer Display on the Adjustable Stand Installing the 10 Inch Customer Display with High Mount on the...

Page 22: ...3 Use the front tabs and the edges to pop the cover off the Adjustable Stand You can detach the cover by rotating it toward you and sliding it forward Chapter 4 Removing the Adjustable Stand Cover 4 2...

Page 23: ...spare 2 5mm hex key and the three M3x6 security hex bolts Securing the Adjustable Stand Cover Securing the adjustable stand cover is a common procedure used when setting up any configuration of the W...

Page 24: ...n 6 Series When using this option ensure that the adjustable stand is properly secured to a counter 1 Place the Adjustable Stand flat on the counter surface and then turn the unit upside down 2 Unscre...

Page 25: ...3 Use the following dimensions to map out the location on the counter where the stand and fifth foot will sit Chapter 4 Securing the Adjustable Stand to a Counter 4 5...

Page 26: ...nting screw is not provided Ensure that you are using the correct screw that meets the needs of the installation The screw thread is M4 and the length is a minimum of one inch plus the thickness of th...

Page 27: ...Lift the two raised edge corners of the bracket and slide it out of the mounting slots 3 Place the bracket on a flat surface Chapter 4 Attaching the Epson PS 180 Power Supply to the Adjustable Stand 4...

Page 28: ...ply into the bracket until the retaining clips snap into place and it is flush with the bracket face Note the orientation of the power supply on the bracket Chapter 4 Attaching the Epson PS 180 Power...

Page 29: ...5 Locate the C13 power cord in the Adjustable Stand interior 6 Connect the C13 power cord to the power supply Chapter 4 Attaching the Epson PS 180 Power Supply to the Adjustable Stand 4 9...

Page 30: ...table Stand by sliding the bracket feet into the two mounting slots until it snaps into place Route cables as needed 8 When properly installed the power supply is securely attached to the Adjustable S...

Page 31: ...g the hex wrench included with your workstation Figure 4 1 The Enclosure for Battery 2 Insert the battery into the enclosure by carefully aligning the battery power contacts 1 with the battery termina...

Page 32: ...surface 2 Insert the enclosure mounting tabs into the stand mounting slots 3 Tighten the stand thumbscrew 1 to secure the enclosure to the stand 4 Connect the workstation Power Adapter 15V to the DC...

Page 33: ...a flat surface Note the location of the two enclosure mounting slots 1 2 Place the enclosure into the recessed compartment and then slide up to join the enclosure mounting tabs with the stand 3 Tight...

Page 34: ...mount a Ensure that the metal bracket is levelled with the integrated spirit level b Mark the positions of the holes at the four corners c Create the holes by drilling into the wall d Secure the metal...

Page 35: ...ation 3 Align the back of the workstation to the metal bracket and then slide it down until it stops 4 Slide the locking slide bar to the right and tighten the hex screw with a hex wrench Chapter 4 Se...

Page 36: ...er supplies are exposed and can be organized using cable ties and cable casing Recessed In Wall Cage with Cable Management and Concealed Power Supply Storage A portion of the wall is cut away and a re...

Page 37: ...n choosing a mounting bracket look for VESA compliant brackets During installation follow the directions provided with the mounting bracket When mounting the workstation display to the bracket the Ext...

Page 38: ...stable Stand 1 Place the Adjustable Stand upright on a flat surface and then tilt the mounting plate upwards to a vertical position 2 Remove the High Mount slot cover 3 Slide the Customer Display powe...

Page 39: ...or remove press the release button on the bottom of the bracket to unlock 6 Secure the display and bracket assembly to the Adjustable Stand using the provided security screws 2 and a No 2 1 4 Phillips...

Page 40: ...a mouse to the workstation 3 Right click the desktop and then select Display settings from the popup menu 4 Click Extend These Displays and then click Keep These Changes 5 Open the Control Panel and t...

Page 41: ...ease the USB cable from the USB cover 3 Insert the USB cable into the USB connector on the left side of the power USB module 4 Insert the power cable connector into the power supply inlet on the right...

Page 42: ...to the base unit compartment and then slide it forward all the way to the edge 6 Tighten both thumbscrews by turning them clockwise to secure the power USB module to the Workstation 6 Adjustable Stand...

Page 43: ...etailed information on how to configure RFID enabled employee ID cards refer to the Changing Employee Settings section in the MICROS Simphony Manager User Guide Release 19 1 and higher Identifying You...

Page 44: ...2 If your workstation cannot be powered on locate the workstation model on the sticker in the IO panel area Chapter 4 Identifying Your Workstation 4 24...

Page 45: ...rs minimal power to key circuits to detect a power button or wake on LAN event Do not disassemble the workstation in this power management state You must disconnect the AC power cord from the system I...

Page 46: ...power button begins a graceful shutdown This behavior is based on the Windows power button management setting Oracle Linux for MICROS Pressing the power button initiates a graceful shutdown but shutd...

Page 47: ...Table 5 2 Cont Port Power Specifications Port or Connector Available Power Capability Mini USB 5V 0 5A 2 5W Chapter 5 Power Considerations for Peripheral Devices 5 3...

Page 48: ...standard OPOS commands A Diagnostic Utility that provides the resources for testing functionality and validating software versions The utility allows users to test peripheral components The Oracle MI...

Page 49: ...charge for Oracle Linux Support customers Optimized for Oracle including Oracle Database and Oracle Applications Increase security by applying patches sooner and minimizing time spent troubleshooting...

Page 50: ...End a running process kill 4465 Edit a text file nano webconfig txt Restart the device reboot Turn off the device shutdown now Note for workstations with Oracle Linux for MICROS You can press and rele...

Page 51: ...ed Mode only a portion of the screen is magnified leaving the rest of your desktop unchanged You can then control which area of the screen is magnified Select Control Panel Ease of Access Center Start...

Page 52: ...rd OSK Options Key on keyboard Click on Keys The Hover over keys option lets you use a mouse or joystick to point to a key The characters you point to are entered automatically when you point to them...

Page 53: ...with the Microsoft Windows 10 IoT Enterprise Operating System Feature Behavior Setup Speech Recognition Windows Speech Recognition lets you control your PC with your voice alone without needing a keyb...

Page 54: ...ng the Cash Drawers Performing an RS232 Loopback Test Testing an RS232 Printer Performing an IDN Loopback Test Testing an IDN Printer Viewing Diagnostics Reports for Devices on COM Ports Viewing Hardw...

Page 55: ...of inactivity a Enter a time in seconds in the Backlight Reprime Timer field b Press Reprime Backlight to set the timer Set the value to 0 to disable the timer and allow the backlight to stay on indef...

Page 56: ...tate of the cash drawers By default you can determine the password by applying the following formula to the key Digit 1 Digit 2 Digit 4 Digit 6 Password For example if the utility shows the key 532586...

Page 57: ...d print line by line at an IDN Roll Printer with an ID of 1 You must have an RS422 6 pin to 8 pin cable 1 Connect the 8 pin end to the workstation COM port 4 2 Connect the 6 pin end to the printer IDN...

Page 58: ...nt tap a finger on one of the hand icons The Enroll a Fingerprint Scan your finger screen appears 6 Place your finger on the fingerprint reader and wait until success is confirmed Ensure the finger yo...

Page 59: ...C ConfigDump txt Chapter 8 Saving Configuration Data 8 6...

Page 60: ...he following steps 1 Connect a USB keyboard to the Workstation 6 2 Power on or restart the workstation 3 Press F2 immediately after pressing the power button or tap the left or right third of the boot...

Page 61: ...isable the 24V Powered USB port USB Ports 1 6 After Shutdown Enable or Disable the USB ports 1 6 after the workstation has been shut down USB Port 1 Enable or Disable USB port 1 USB Port 2 Enable or D...

Page 62: ...omised Startup Warning Presents a warning during startup if the system detects the workstation casework was compromised Forced Off Turns off the workstation if the system detects the casework was comp...

Page 63: ...ion taken by the system if the workstation casework is compromised Startup Warning Presents a warning during startup if the system detects the workstation casework was compromised Forced Off Turns off...

Page 64: ...the Boot tab use the arrow keys to reorder the priority list for boot devices The BIOS reads the devices from top to bottom in determining the method for booting into the operating system For example...

Page 65: ...ntains the equipment dimensions for the Workstation 625 and Workstation 655 Dimensions for the Workstation 625 655 with Adjustable Stand Workstation 625 655 VESA Dimensions Dimensions for the Workstat...

Page 66: ...Workstation 625 655 VESA Dimensions Chapter 10 Workstation 625 655 VESA Dimensions 10 2...

Page 67: ...I O Panel Connectors This section depicts the input output panel connectors IDN RS422 232 Powered RJ45 Series 2 Cash Drawer Customer Display IDN RS422 232 You can configure the IDN connector to run i...

Page 68: ...nnector into a traditional 4 pin DIN connector by using a P N 300290 020 PT cable Figure 11 4 Series 2 Cash Drawer Pin Reference The following table describes the signal name and function of each pin...

Page 69: ...Name Description 4 CD_ST Input status from cash drawer 5 MCU_TX_5V Tx data to cash drawer 6 MCURX Rx data from cash drawer Customer Display The customer display port contains the following pins Figure...

Page 70: ...et UPS power conditioner or wall outlet If you placed the workstation on the stand make sure you connected the power cable to the stand The workstation does not start and the screen remains blank afte...

Page 71: ...tabs on each side of the DC power cable and then pull the connector out of the workstation power port 4 If you secured the workstation to the Adjustable Stand using a security screw remove the securit...

Page 72: ...s connected Always disconnect the AC power cord before opening the unit for service or configuration To disassemble the unit to access the system board and peripheral components 1 Remove the IO panel...

Page 73: ...the expansion slot 6 Carefully lift the rear housing away from the body of the workstation to avoid damaging the RFID tag cable 7 Disconnect the RFID tag 8 pin modular cable The RFID tag is factory p...

Page 74: ...settings To perform a system recovery you can use the BIOS the workstation s recovery button or the operating system recovery function Note Operating system recovery is available for workstations wit...

Page 75: ...o continue Y N appears type y and then press Enter The recovery process begins Performing a Factory Reset from BIOS Microsoft Windows This method applies to all 625 655 workstations running Microsoft...

Page 76: ...tap Exit Saving Changes and then tap Yes to confirm The workstation restarts automatically 7 The workstation reboots and the Entering Recovery Mode message appears 8 When the The system will reset Ora...

Page 77: ...e security screw 4 Power on the workstation It briefly powers on restarts and then shows the Please Wait message below the splash screen 5 On the Choose an Option screen click Troubleshoot 6 On the Tr...

Page 78: ...t Dangerous voltages may be present Conductive foreign objects could produce a short circuit that could cause fire electric shock or damage to your equipment This product is intended for restricted ac...

Page 79: ...cle products into any other type of power system Contact your facilities manager or a qualified electrician if you are not sure what type of power is supplied to your building Caution Not all power co...

Page 80: ...the system Do not dispose of batteries in fire Dispose of batteries properly in accordance with the manufacturer s instructions and local regulations Note that on the main board there is a lithium coi...

Page 81: ...50C 122F If you are placing your equipment in an area adjacent to carpeting use an anti static grade of carpeting If you do not have anti static carpeting use static discharge mats Do not place equip...

Page 82: ...uipment or cable during operation Cleaning LCD Touchscreen You can use any ammonia free household cleaner or a 50 50 mix of isopropyl alcohol and distilled water applied with a clean cotton cloth Spra...

Reviews: