


Pyroelectric and Photodiode Energy Sensors
StarBright User Manual
45
8.3
Measuring Pulses of High Energy Density
Due to the nature of their construction, Pyroelectric sensors are restricted in the energy density
they can withstand, particularly for short pulses on the order of nanoseconds. If the energy density
of your laser exceeds the rating of the Pyroelectric absorber, there are several options available:
You can enlarge your laser beam using a negative lens until the energy density is below
damage threshold. You should test this using the test slide that is supplied with the sensor.
You can use a beam splitter, splitting off typically 8 -10% of the light. If you use this method,
note that there may be polarization effects.
Ophir has sensors specifically designed for high energy density pulses. Some of these sensors
can measure energy densities up to several Joules/cm². Contact your Ophir dealer for details
.
8.4
Operation of StarBright with Pyroelectric and Photodiode
Energy Sensors
On power up, the StarBright meter checks its own memory as well as the sensor’s to decide on the
measurement configuration. For example, if in the last session, the sensor was used to measure
energy in the Bargraph screen in the 200uJ range with a 1064 laser with no averaging, this will be
the setup used the next time the system is powered up.
These settings can all be easily changed, as described in the following procedures.
To use StarBright with Pyroelectric and Photodiode energy sensors:
1.
Connect the Pyroelectric (or Photodiode) energy sensor to the StarBright meter: Insert the 15
pin D type connector of the measuring sensor cable into the socket marked
Sensor Input
on
the rear panel of the StarBright meter. StarBright will reconfigure itself to work with the
attached sensor.
2.
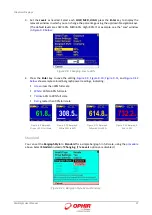
All of the sensor’s measurement parameters are shown on the main screen. (These are also
available when you press the
Menu
button and select
Sensor
). Use the Navigation keys to
navigate to the parameter you want to change.
3.
Use the up (
↑
) /down (
↓
) Navigation keys to select the parameter to change and press the
Enter
key. Change the setting with the Navigation keys.
4.
Press the
Enter
key
to save the settings.
Note:
The StarBright automatically saves the current settings for the next power up.
The following procedures explain how to configure measurements for laser power or energy:
Zeroing the Energy Sensor Against the StarBright Meter
Setting Measurement Parameters When Using Energy Sensors
Energy, Average Power, or Exposure Measurement
Measuring Total Energy Exposure
Warning:
Do not exceed maximum sensor limits for power, energy, power density, and energy
. Otherwise, there is a risk of damaging the absorber.