background image

40

Operating the System

AS7200 User Manual - OPEX Corporation

Adjusting image quality

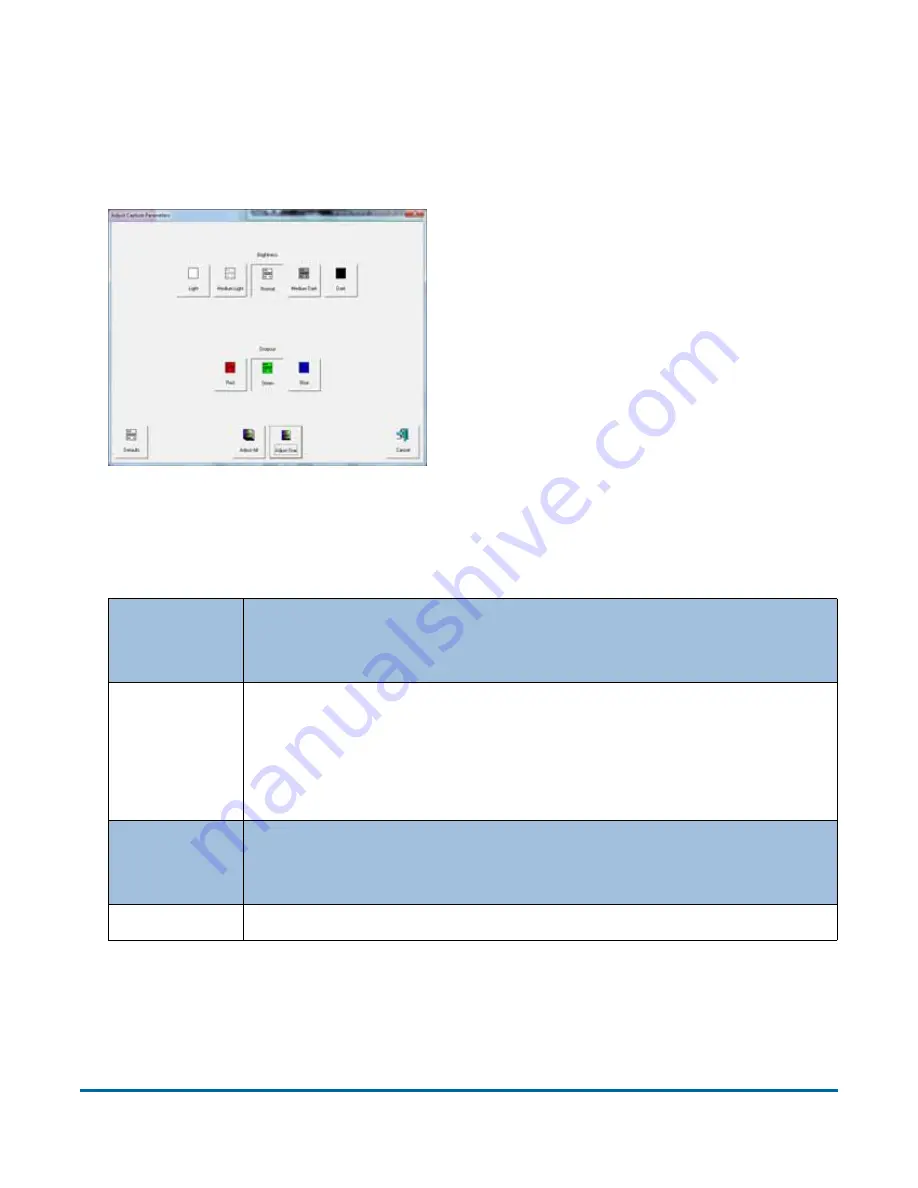
Fine-tune the quality of the document images by pressing 

A

DJUST 

on the Run 

screen. The Adjust Capture Parameters screen will appear, where you can 
modify the brightness and dropout colors for the images.

Table 1 describes the Adjust Capture Parameters screen buttons.

Table 1:  Adjust Capture Parameters screen buttons

Brightness

Adjust the brightness of the document images from 

L

IGHT

 to 

D

ARK

. Press a button to adjust the brightness. The default is 

N

ORMAL

.

Dropout

Remove a dropout color (

R

ED

G

REEN

B

LUE

, or 

W

HITE

) from the 

document image. The color you select will appear as white. 

The default is 

W

HITE

.

Note: 

To use this feature, the documents must be printed with 

a specific dropout color.

Adjust All/
Adjust One

Select 

A

DJUST 

A

LL

 to apply these changes to all the documents 

in the current job, or 

A

DJUST 

O

NE

 to make the adjustments only 

to the next document scanned.

Defaults

Return to the default capture parameters.

Summary of Contents for AS7200

Page 1: ...ion contained herein is proprietary confidential and copyrighted by OPEX Corporation Copying duplicating selling or otherwise distributing any part of this publication or the information contained herein without the express written consent of OPEX Corporation is strictly forbidden February 26 2016 Document Revision 16 01 AS7200 User Manual ...

Page 2: ...cerns with this document please contact the OPEX Technical Writers via email at GroupTechwriters opex com AS7200 User Manual OPEX part no 5068900 Doc Rev Date Changes click blue text to go to that page 16 01 Feb 26 2016 The AS7200 User Manual was completely restructured for better viewing on a tablet style reader ...

Page 3: ...ociated with other scan ning devices The AS7200i is either mounted to an OPEX Model 72 or Model 51 Rapid Extraction Desk for processing mail from envelope to image The AS7200t is mounted to a workstation table and provides a solution for scanning documents whose source may not be an envelope such as from file folders and storage boxes Whatever the application the key to this process is YOU the AS7...

Page 4: ...s 11 Page types 12 Chapter 2 Operating the System Overview 14 Safety precautions 14 Ergonomics 15 Main controls and system components 16 Getting Started 18 Navigating the AS7200 CertainScan software 19 Running Jobs 20 Using the Run screen 22 Scanning documents 31 Assigning a page type 38 Adjusting image quality 40 Rescanning documents 41 Deleting documents from the batch 41 Voiding documents and t...

Page 5: ... Touchscreen Monitor 54 Removing Replacing the Printer Cartridge 56 Adjusting the Printer Carriage Position 56 Cleaning the System 57 Conveyor and transport assemblies 58 Feed assembly 59 Contact image sensor 60 Chapter 4 Statistics AS7200 Statistics 64 Creating statistic reports 64 General Information statistics 68 Overall System Performance Measures statistics 69 Performance Details statistics 7...

Page 6: ...6 AS7200 User Manual OPEX Corporation ...

Page 7: ...1 AS7200 User Manual Introduction Overview 9 AS7200 specifications 10 How the AS7200 Works 10 About this manual 10 Software 10 Jobs 11 Page types 12 ...

Page 8: ...troduction AS7200 User Manual OPEX Corporation Model 72 Rapid Extraction Desk optional Sort bins Touchscreen PC monitor In line recognition MCR OCR BCR PC controller OMR thickness detect Drop feeder Printer ...

Page 9: ...ing and auto feeding It can scan multi stream perform in line recognition of barcodes optical character recognition OCR optical mark sense recognition OMR magnetic ink character recognition MICR and document type classification When OPEX CertainScan software is equipped with VRS technology a variety of additional optimizations can be performed in line including content based rotation background sm...

Page 10: ...r The system scans the items based on the current job parameters The scanner can capture MICR and OCR information print audit trails on the documents and sort them to a specified bin Software The AS7200 uses two software applications which control the system INtime Controller The INtime Controller runs in the background of the CertainScan software and controls all machine related functions such as...

Page 11: ...e with the machine Jobs A job is a collection of parameters the AS7200 use for scanning documents The jobs you set up allow you to process documents in a similar manner from run to run The scanner captures images of documents and stores the information it collects in batches which consist of one or more transactions The definition of a transaction can vary from customer to customer and even from j...

Page 12: ...pe is scanned last in the transaction The transaction boundary tells the system the current transaction is complete and the next transaction will begin Page types The term page type is used to specify a collection of criteria that a piece must meet to be classified as a certain type of document in other words length height barcode mark detect MICR etc The system uses the page type parameters set u...

Page 13: ...2 AS7200 User Manual Operating the System Overview 14 Getting Started 18 Running Jobs 20 Clearing Paper Jams 50 ...

Page 14: ... AC power Electrical wiring can be hot any time the machine is plugged in Failure to use caution may result in electric shock or death Do not set liquids such as drinks on the scanner that could spill into the machine Keep loose objects away from any exposed moving parts of the machine The moving parts of the AS7200 can become jammed and or damaged by foreign objects Also keep hands hair loose clo...

Page 15: ... the seat height on your chair or the height of the scanner so that your elbow is approximately even with the top of the work surface when your arms are near your sides and your feet are flat on the floor If this cannot be achieved with normal chair and scanner adjustments a footrest for shorter operators or scanner leg extensions for taller operators should be used Adjust your chair position to a...

Page 16: ...profile of a regular envelope Audit trail printers The audit trail printers are located behind the sort bins Audit trails can be applied to the front and or back of each scanned document Main power switch The main power switch is located on the electrical box under the stacker bins as shown in Figure 1 This is the main on off switch for the AS7200 system For more info on turning the AS7200 system ...

Page 17: ...hen the operator triggers IdAssist the LED will go out briefly indicating to the operator that IdAssist has been activated Figure 1 Main controls and components Touchscreen monitor Conveyor Sort bins Audit trail printers Stacker bypass bin PC UPS Trash bin Override feed AS7200i with Model 72 Rapid Extraction Desk Main power switch see inset Main power switch control butto ...

Page 18: ...mputer will begin to boot up 3 Log in to Windows with your Windows network user name and password If your AS7200 is not connected to a network you may not have to log in to Windows first Proceed to step 4 Once the computer has finished booting Windows it will launch the AS7200 CertainScan application Note If you mistakenly close CertainScan double click the icon on the desktop to start it again Lo...

Page 19: ... documents on the AS7200 system The CertainScan interface consists of Title bar The title bar displays the name of the current operator and other pertinent information Click the AS7200 icon in the title bar to access the Windows functions Restore Move Size Minimize Maximize Close as well as the following menus The DIAGNOSTICS menu contains the AS7200 system options These options are used by OPEX t...

Page 20: ...ptions bar will change based on the current menu bar selection Main window View and adjust settings and parameters in the main window Figure 3 CertainScan interface Running Jobs Now that you have logged into the system and taken some time to familiarize yourself with the main controls and components you are ready to begin operating the machine This section will give you a general outline of how to...

Page 21: ...n for the job you want to run Figure 4 Main screen Note Depending on how the job is set up the Batch Information screen may appear Use the Batch Information screen to select a received date a processed date and the type of batch you want to run Figure 5 Batch information screen ...

Page 22: ...Run screen The Run screen will appear after you select a job This is the main screen you will use for scanning documents Figure 6 Run screen Page types Thumbnails Preview Information Rotate image buttons Run buttons window window View tabs View snippets Scroll thumbnails ...

Page 23: ...n page 41 for more infor mation DELETE a document from the batch The DELETE buttons if enable in the current job are only available when the machine is stopped See Deleting documents from the batch on page 41 VOID the selected document or transaction The VOID buttons are only available if activated for the current job See Voiding documents and transactions on page 42 for more information End the c...

Page 24: ...o You can select one of the dual transaction or sequence views which display two thumbnails for each piece Note The dual transaction and dual sequence views will only work properly if the page types in your job are set up to include a secondary thumbnail Transaction view The transaction view groups thumbnails by transaction All of the pieces in a transaction are displayed in a single row from left...

Page 25: ...OPEX Corporation Sequence view The sequence view displays all of the pieces in the order they were scanned from left to right A new row will start after the fifth piece Bin view The bin view arranges the thumbnails by the bin they were sorted to ...

Page 26: ...ser Manual OPEX Corporation Dual transaction view The dual transaction view shows 2 thumbnails for each piece grouped by transaction The first row will show one snippet the following row will show the other Transaction 3 Transaction 4 ...

Page 27: ...tab displays job information such as the start time and operator name The General Information will not change depending on the document The PIECE INFORMATION tab provides information about the selected thumbnail Piece information may include the bin the piece was sorted to size dimensions and page type BATCH INFORMATION includes data such as the transaction number pages in the batch and the date a...

Page 28: ...rt Batch Processing Date System assigned or selected by operator at batch start Batch File Format How the system stores batch information Character Read Combined results of magnetic and optical MICR reads Barcode Results Up to 3 per page Page Sub TypePage type sub category if available for current page type Average Thickness Value Thickness of the piece determined by the system Page Name Page Type...

Page 29: ...oard to zoom in and out Use the RULER function to measure distance from one place to another on the image Use the mouse to click the Ruler button then click and hold the left mouse button on one location while you drag the cursor to the other location Notice that as you move the cursor from place to place its exact position is indicated in the field as noted in Figure 7 Display the designated scan...

Page 30: ... For example if you are scanning checks your system may be set up to capture images of specific parts of the check such as the back of the check or the CAR region Figure 8 Viewing snippets Press Snippet 1 to view the entire front image of the check Press Snippet 2 to view the entire back image of the check Press Snippet 3 to view the CAR region ...

Page 31: ...As documents are dropped onto the conveyor it s important to drop them in such a way as to have the documents fully justify to the side rail prior to entering the feeder The conveyor rollers are angled to assist in justifying the documents to the side rail as they are dropped Drop the documents far enough back so that they will have time to straighten If documents are not fully justified as they e...

Page 32: ...d properly Document skew is determined by the angle in which an item enters the scanner The angle is calculated by a set of LED transmit and receiver parts that detect when one sensor is uncovered for a while If the angle is greater than 2 degrees then the system will jam for too skewed If it jams for 5 degrees or more then the MICR section should be checked and documents remove To scan documents ...

Page 33: ...pear in the Preview window In this example the system recognizes 8 5 11 sheets of paper as belonging to the Portrait page type This is the default for any page of this size which contains no other significant identifier such as a barcode or MICR line Note The scanner will display the original raw color capture in the Preview window first then display the snippet as it is intended to be captured Us...

Page 34: ...ets 3 Place the next document you want to scan onto the conveyor In this example the document is a check The system recognizes the check by the presence of a MICR line at the bottom 4 Place an envelope onto the conveyor The system will recognize the document as an envelope In this example an envelope is set up as the transaction boundary and ends the current transaction ...

Page 35: ... correct side up When searching for reading MICR lines OCR lines and mark boxes the AS7200 will assume the documents are being fed face up with the bottom edge towards you As the AS7200 processes documents check to make sure Documents are being scanned properly All critical information MICR line OCR line etc is being collected properly Documents are being sorted to the correct bin Scanning tips Ma...

Page 36: ...op of the stack and fed into the scanner The feeder will continue to pull the top page from the stack until the last page is fed Since the feeder pulls from the top of the stack the lead sheet in the stack must be the first to reach the feeder If the bottom piece reaches the feeder first a paper misfeed is likely to occur There are techniques for learning to drop packets of paper consistently and ...

Page 37: ...same orientation as if you were reading them Other landscape pages can also be automatically detected if their page width or height is unique To scan thicker documents such as envelopes that would not match the profile of a regular envelope first press the override feed control button This will disable the scanner s ultrasonic multifeed detector and allow the thick piece into the system Drag finge...

Page 38: ...In a structured job the page type buttons will also indicate which page types the system expects to see next For example if the job expects to see either a batch ticket or a stub to start a transaction their corresponding page type buttons will appear in color as shown in Figure 11 Figure 11 Sample page type buttons structured job Page type locking Depending on the job setup the operator may also ...

Page 39: ...For example if you are scanning cash into the system press the CASH page type button 2 Select from the available page sub types Figure 13 Assigning a page sub type 3 Scan the document Note If you do not assign a page sub type before you scan an eligible document the system will assign the default page sub type to the document For example if you are scanning cash and you have the 1 dollar bill set ...

Page 40: ...tons Brightness Adjust the brightness of the document images from LIGHT to DARK Press a button to adjust the brightness The default is NORMAL Dropout Remove a dropout color RED GREEN BLUE or WHITE from the document image The color you select will appear as white The default is WHITE Note To use this feature the documents must be printed with a specific dropout color Adjust All Adjust One Select AD...

Page 41: ...image is acceptable Note The RESCAN buttons will only be available if activated for the current job Deleting documents from the batch When the machine is stopped you can delete documents from the batch Press the DELETE button to delete a document image Note The DELETE button will only be present if activated for the current job The action of the DELETE button depends on the setting of the ALLOW DE...

Page 42: ...te all the images to the end of the batch as well Voiding documents and transactions The void functions allow you to mark a scanned document or transaction as invalid by placing a VOID stamp over the document s image s Use the void functions for example as an alternative to the delete functions if you would like to keep a record of the fact that a document was scanned into the system and later dee...

Page 43: ...ed as void in the batch file Press UNVOID ITEM to remove the VOID stamp Figure 15 Voiding documents Starting a new batch There are three ways to start a new batch Press the NEW BATCH button while the job is running to begin a new batch with the next scanned document Press the CLOSE BATCH button then scan the new batch ticket or the first document of the new batch Scan a batch ticket If the New Bat...

Page 44: ...on to close the current batch and exit the job when prompted Viewing editing the batch Use the Batch Editor to Display previous document images by batch Delete images from prior batches Void un void documents from prior batches Assign page sub types To access the Batch Editor 1 Select MAIN in the menu bar and BATCH EDITOR in the options bar Figure 16 Batch Editor 2 Click the OPEN button 3 Navigate...

Page 45: ...king for try to use the date the batch s folder was last modified for reference Figure 17 Opening the batch 4 View delete and void the document thumbnails in the same way as in the Run screen see Using the Run screen on page 22 Figure 18 Viewing the batch When voiding documents and transactions in the Batch Editor check the MARK VOIDS button shown in Figure 18 to mark the images in the resulting b...

Page 46: ...dentifying and or taking action on documents Trigger the IdAssist function associated with the job by dropping documents in the right front corner of the conveyor reducing the wait time associated with using the touchscreen monitor Consult your AS7200 Administrator for more information on how IdAssist works with your jobs The following functions are available as part of IdAssist Color The color se...

Page 47: ...he checks you scan normally as belonging to the check page type Page sub type selection The page sub type selection function is useful in jobs that have a page type with many page sub types Use the trigger to bring up the page sub type selection screen so you can choose from among the available sub types Override feed control The override feed control function allows you to disable multifeed detec...

Page 48: ... System AS7200 User Manual OPEX Corporation sub type If no default page sub type has been assigned the document will be rejected Figure 19 Triggering IdAssist IdAssist LED sensor Drop documents here to trigger IdAssist ...

Page 49: ...tructured jobs as they require page types in a specific order Also you cannot use KeyAssist with Reference ID in the same job Use the keypad to activate many of the more common Run screen functions Key Function 1 8 selects page types 1 8 and page sub types when the sub type select screen is displayed 0 selects a new transaction starts stops the track rotates the piece 90 degrees clockwise rotates ...

Page 50: ...scanner may also reject documents that are misfed skewed or because the document was not properly identified In these cases the scanner will stop after all the paper in the track has been sent to the reject bin If the paper doesn t clear into the reject bin after selecting CONTINUE then you need to open the cover s and remove the paper s Scanner area To open the scanner cover lift the latch up The...

Page 51: ...he transport door away from the scanner Clear any paper or debris that is caught in the transport area Figure 21 Opening the stacker transport cover To close the stacker transport cover hold onto the latch and gently pull the cover closed When the cover reaches the closed position rotate the latch clockwise until you hear the lock snap into place ...

Page 52: ...ual OPEX Corporation Clearing the bins When removing the paper from the output bins pull the piece from the side of the bins The trays have been designed to allow access to the smallest of pages in the bins Figure 22 Clearing the output bins ...

Page 53: ...intenance Calibrating the Touchscreen Monitor 54 Removing Replacing the Printer Cartridge 56 Adjusting the Printer Carriage Position 56 Cleaning the System 57 Conveyor and transport assemblies 58 Feed assembly 59 Contact image sensor 60 ...

Page 54: ...nitor is calibrated for its touch sensitivity before it leaves OPEX However you may need to recalibrate especially if it is in use for an extended period of time To calibrate the monitor 1 From the Windows desktop double click on the touch screen icon to open the monitor control panel 2 Select CALIBRATION ...

Page 55: ...low the calibration procedure as instructed using the stylus provided To ensure proper calibration make sure to hold the stylus on each center point for at least one full second Please do not use fingers pens pencils etc 5 When calibration is complete log in to CertainScan and test the touchscreen controls to ensure they are working properly ...

Page 56: ...replace a printer cartridge 1 Pull the tab on the rear of the printer cartridge and rotate outward as shown in the figure below 2 Remove the cartridge 3 Insert the new cartridge by tipping the front end of the cartridge in first and then pushing in the rear of the cartridge until it clicks into place Adjusting the Printer Carriage Position You can adjust the vertical print position on documents by...

Page 57: ... pad and the CIS contact image sensor require regular cleaning Regular and scheduled maintenance will ensure that the AS7200 continues to function properly with minimum downtime and maximum efficiency This maintenance procedure consists of debris dust removal and general cleaning Loosen thumb screw to move carriage along detent shaft DANGER Be careful when working with cleaners A cleaner soaked cl...

Page 58: ...s and ensure that all motors are stopped 2 Check the transport area once a shift Open the transport door Figure 23 and clear the area of paper debris dust envelope flaps etc Figure 23 Transport area and stacker bins 3 Vacuum dust and debris from the stacker bins 4 Vacuum dust and debris from the conveyor rollers ...

Page 59: ...er Manual OPEX Corporation Feed assembly Black lines on the image can be caused by dirt toner ink white out glue etc transferred from the paper to the rollers and feeder belts and pad Clean the feed mechanisms on a weekly basis Feed tires ...

Page 60: ... should be cleaned at the beginning or end of each shift or as needed If you see lines appearing on the image previewed on the screen then it is likely there is a speck toner white out paper glue etc attached to the glass obstructing the view Wipe the glass clean and the line should not appear on the image when the piece is scanned again Be sure to clean the top camera glass if the line appears on...

Page 61: ...nsors are located underneath the scanner cover Apply Windex the recommended glass cleaner to a lint free rag and wipe the imager glass top front camera and bottom back camera The top camera not viewable in this picture is on the underside of the cover directly above the bottom camera ...

Page 62: ...62 Operational Maintenance AS7200 User Manual OPEX Corporation ...

Page 63: ...4 AS7200 User Manual Statistics AS7200 Statistics 64 Creating statistic reports 64 General Information statistics 68 Overall System Performance Measures statistics 69 Performance Details statistics 70 ...

Page 64: ...orts to evaluate the efficiency of jobs you have run The AS7200 can generate Individual Reports Provide information on each job run When you select the criteria for generating individual reports if more than one job run fits the criteria a separate report is created for each run Summary Reports Provide information on a job range defined in the Statistics Reports Criteria window The Individual Repo...

Page 65: ...t however if you click ALL JOBS it automatically deselects the individual jobs since they would be included in the All Jobs category Operators select the operator s and or the shift for which you want to run a statistics report You can select several individual operators for a single report however if you click ALL OPERATORS it automatically deselects the individual operators since they would be i...

Page 66: ...s still stored in the stats file You can access it by selecting this radio button then clicking the REFILL button 4 In the Summary section select one of the radio buttons ALL to generate a statistics report for every job run that matches the selected criteria JOBS to generate a statistics report sorted by job name s OPERATORS to generate a statistics report sorted by Operator name s Check the box ...

Page 67: ...ows LEFT RIGHT ARROWS use to move through the content of your report s If unneeded the arrows are disabled grey PRINTER BUTTON click to open the printer dialogue window where you can select a printer if one is connected to print your report EXPORT BUTTON the letter E click to automatically back up the report to the location specified by the PARAMS CONFIG STATISTICS SETTINGS STAT SEXPORTFILENAME pa...

Page 68: ... field Run Type Type of run determined by setting the DEFAULT BATCH TYPE Batch parameter Can be SINGLES MULTIS STUB ONLY CHECK ONLY MULTIS WITH PAGES UNSTRUCTURED TRANSACTIONS PAGE ONLY STRUCTURED TRANSACTIONS MIX The DEFAULT BATCH TYPE parameter can also be set in the Modify Batch Information window that appears when first starting a job if the PROMPT OPERATOR FOR PROCESS RECV DATES Batch paramet...

Page 69: ... per hour the AS7200 is currently feeding The formula for the Feed Rate is Output Rate Number of pieces per hour the AS7200 is processing The formula for the Output Rate is Jam Clear Time Average time the AS7200 was halted while the Operator was clearing a jam The formula for the Jam Clear Time is Reference Feed Rate Number of pieces fed into the AS7200 per hour The formula for the Reference Feed ...

Page 70: ... Clear Time Estimated time it takes to clear a jam This number is fixed at 20 seconds Table 3 Overall System Performance Measures terms continued Term Definition Table 4 Performance Details terms Term Definition Active Job Time Time the AS7200 was either actively running or was halted due to a jam Active Job Time is broken down by RUN TIME JAM TIME Run Time Total run processing time Jam Time Total...

Page 71: ...job is set to reject blank pages and the piece was determined to be a blank page Does Not Match Expected Page Types Results when the system could not match a piece to any of the page types in a particular job Bad MICR Read Results when the result from the combined MICR read does not have sufficient valid characters or a valid checksum Batch Ticket Expected Results when a piece is identified as som...

Page 72: ... Transaction Already Complete Results when a transaction has met its defined criteria and a new piece that is not defined to start a new transaction is identified Batch Ticket Not Expected Results when a piece is identified as a batch ticket after valid pieces are already included in the batch unless auto batch mode is in use Ran Out of Time Processing Image Results when the software has run out o...

Page 73: ...ve a response from the magnetic MICR when it is expecting one Cannot Process Printer Data Results when there is an error in sending the audit trail information down to the printer Required Item Expected Results when an item is of the wrong priority to be scanned in the current location within a transaction Structured batches only Only One Item of this Type Expected Results when only one item of th...

Page 74: ...ker Entry Sensor Missing Results when the controller is expecting to see a piece pass by the stacker entry sensor but it has not within the time period that we are expecting it Bin 2 Gate Sensor Missing Results when the controller is expecting to see a piece pass by the bin 2 gate sensor but it has not within the time period that we are expecting it Bin 3 Gate Sensor Missing Results when the contr...

Page 75: ...did not fire properly usually causes this to occur Unexpected Piece at Bin 4 Sensor Results when a piece is detected at the bin 4 sensor that the software was not expecting A gate that did not fire properly usually causes this to occur Unexpected Piece at Bin 5 Sensor Results when a piece is detected at the bin 5 sensor that the software was not expecting A gate that did not fire properly usually ...

Page 76: ... controller is expecting piece information from the host and does not receive it within the expected time window This is frequently caused by pushing the system to its limits or by something causing the system to get out of sync Jam Caused by Reject Results whenever a reject other than Jamsorts occurs Thus every reject other than Jamsorts is counted as a jam under this category The Job Parameter S...

Page 77: ...Skew 9 Sensor is blocked Skew 8 Sensor Blocked The Skew 8 Sensor is blocked Skew 7 Sensor Blocked The Skew 7 Sensor is blocked Skew 6 Sensor Blocked The Skew 6 Sensor is blocked Skew 5 Sensor Blocked The Skew 5 Sensor is blocked Skew 4 Sensor Blocked The Skew 4 Sensor is blocked Post Feed MFD Trail Sensor Blocked The Post Feed MFD Trail Sensor is blocked Stepper Stall Detected A Stepper Motor has ...

Page 78: ...lower skew detect sensor is blocked by something when the system is attempting to start up System Entry Sensor Blocked Results when the system entry sensor is blocked by something when the system is attempting to start up Vertical Turn Sensor Blocked Results when the vertical turn sensor is blocked by something when the system is attempting to start up Stacker Entry Sensor Blocked Results when the...

Page 79: ...er door is detected to be open during a run or when the system is attempting to start up Transport Door Open Results when the transport door is detected to be open during a run or when the system is attempting to start up ScanLink Plug in Requested a Stoppage Results when the ScanLink Plug in has requested a stoppage Too Skewed Results when a piece is detected to be too skewed to pass through the ...

Page 80: ...80 Statistics AS7200 User Manual OPEX Corporation use only not for distribution ...

Page 81: ...User Manual AS7200 G Glossary ...

Page 82: ...thematical check to ensure the data is accurately read DLL Dynamic Link Library Plug ins supplied by third party vendors Document Any single sheet of paper processed by the AS7200 Dropout Removing a selected color from a document image The AS7200 can remove red green blue or white from document images Grayscale Image format where all pixels are processed as a shade of gray i e gray level Gray leve...

Page 83: ... detect MICR etc Each job includes one or more page types Once you have defined a page type you can set up a job to process pieces that match that page type profile in a consistent way For example the page type Check contains parameters that match the profile of a personal check When you run a personal check the AS7200 recognizes it as a Check page type and processes the personal check as it does ...

Page 84: ... and an envelope e g in a payments job it can contain singles multis mixed check only etc Transaction Boundary A term used to indicate the beginning or end of a single or group of page types in a transaction Typically a specific page type is used to identify this boundary either at the beginning or end of a transaction Transaction Sorting A term used to indicate jobs in which prior documents withi...

Reviews: