QUICK START GUIDE
OE-CAE08 / OE-CAE16
Analog to IP Encoder
This quick start guide is a reference for users to install and operate their
OpenEye encoder and provides basic information on the encoder’s
settings and operation. Before attempting to connect, configure and
operate the encoder, please read this document thoroughly.
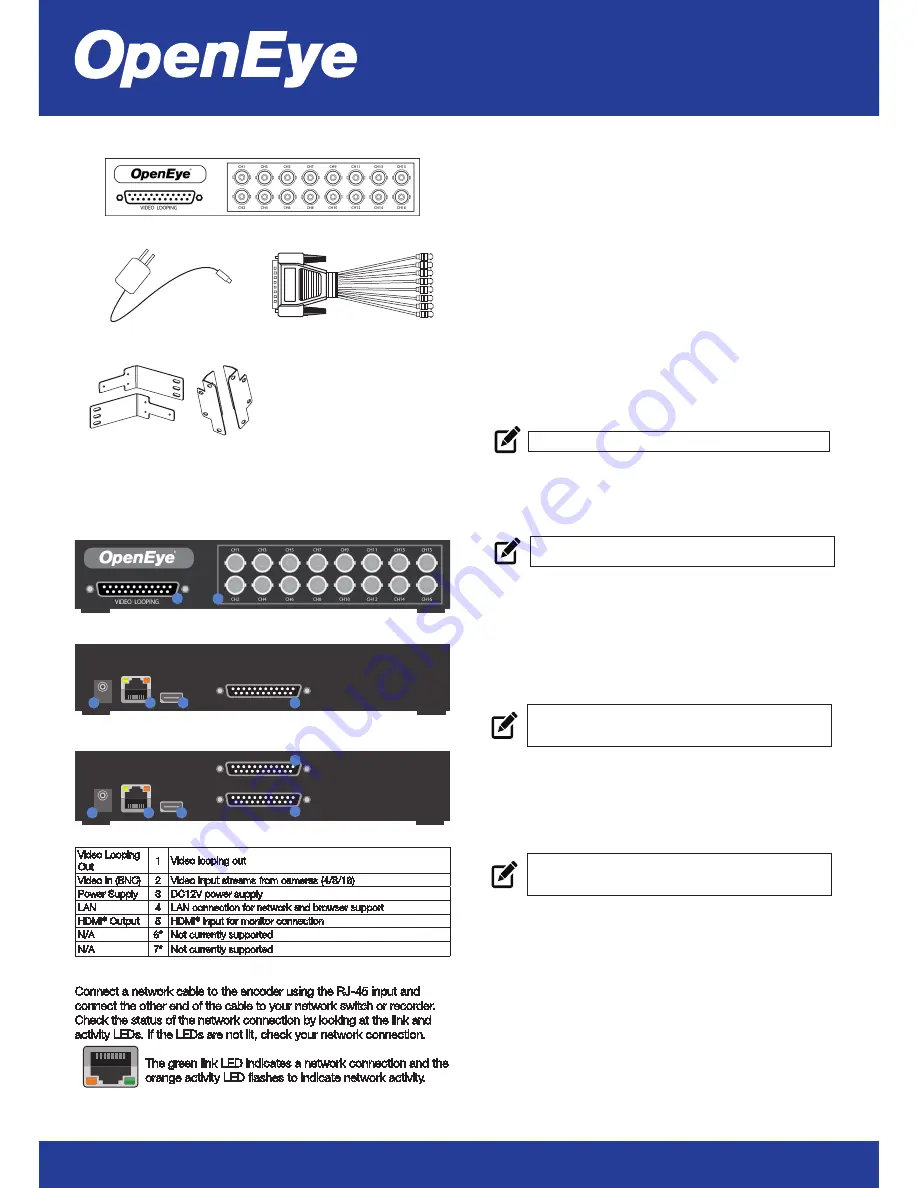
Video Looping
Out
1 Video looping out
Video In (BNC)
2 Video input streams from cameras (4/8/16)
Power Supply
3 DC12V power supply
LAN
4 LAN connection for network and browser support
HDMI
®
Output
5 HDMI
®
input for monitor connection
N/A
6* Not currently supported
N/A
7* Not currently supported
• H.264 video compression
• 30 IPS @ 960H
• Rack and wall mount brackets included
• Looping outputs
• HDMI
®
spot monitor output
CONNECTIONS
8/16CH Front
DC 12V
LAN
HDMI
AUDIO
ALARM I/O
DC 12V
LAN
HDMI
AUDIO
ALARM I/O
3
4
5
6
7
3
4
5
6
8CH Rear
16CH Rear
BOX CONTENTS
Encoder (8 or 16 channel model)
Power Cord
D-Sub Cable (Video Looping)
PRODUCT FEATURES
Ethernet Cable
Connect a network cable to the encoder using the RJ-45 input and
connect the other end of the cable to your network switch or recorder.
Check the status of the network connection by looking at the link and
activity LEDs. If the LEDs are not lit, check your network connection.
The green link LED indicates a network connection and the
orange activity LED flashes to indicate network activity.
1
2
TURNING THE ENCODER ON
1.
Connect the
power cord
to the encoder, and then plug the cord
into a power source.
2.
Connect the
network
cable
,
accessory cables,
and
monitor
(optional)
, to the encoder.
3.
Plug the power cord into the encoder, and then plug the power cord
into a power source.
NOTE
Acceptable power input is between 110vAC~ 240vAC.
Rack (left) and Wall (right)
Mounts with Screws
*Audio and Alarm I/O are not currently supported
*Audio and Alarm I/O are not currently supported
CONNECTING TO THE ENCODER
To access the encoder setup menu, you must install the OpenEye
Network Camera Manager (NCM) on a PC that resides on the same
network as the encoder.
Using the OpenEye Network Camera Manager to Connect to
the Encoder
To install the OpenEye Network Camera Manager application on your
PC, download the program from OpenEye.net, and follow the prompts.
1.
Open
NCM
, and then click
Find Devices
.
2.
Double-click the
encoder
in the Device List, and then click
Browse
to open the encoder software in Internet Explorer.
NOTE
The first time you connect to the encoder, you are
automatically prompted to install a plugin to view live
video.
Default Username and Password
The Username and Password are case sensitive. It is strongly
recommended that the password be changed after the initial setup to
prevent unauthorized access. Any password change will need to be
applied to your recorder also.
Default Username: admin
Default Password: 1234
Using the RTSP Stream to Stream Video from the Encoder
The URL for the encoder RTSP stream will allow you to stream video
directly from the encoder using an OpenEye recording device or VLC.
Encoder RTSP Stream URL syntax:
rtsp://admin:[email protected]/
h264/ch[1-16].[1-2]
NOTE
The username and password are only needed in the
RTSP stream if you are using VLC and are prompted for
them.
NOTE
The encoder and the PC you use to access the encoder
must be on the same network.


