background image

Technical Reference 

OPEN824RL / RLW ADSL / VoIP Routers 


78

PSTN Dial Plan  

This section enables you to configure 

VoIP with PSTN switching

 on your system.  You can define a range of 

dial plans to make regular calls from VoIP switching to the PSTN line.  Prefix numbers are essential to 
distinguish between VoIP and Regular phone calls.  If the actual numbers dialled match with the prefix number 
defined in this dial plan, the dialled number will be routed to the PSTN to make a regular call.  Otherwise, the 
number will be routed to the VoIP networks.  

Reminder!


In order to utilize this feature, you must have registered and connected to your SIP Server 

first.  

To Access The PSTN Dial Plan area of the VoIP Wizard: 

From the 

Configuration 

menu list, 


Click 

VoIP, 

then 

PSTN Dial Plan.  

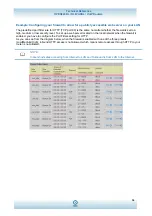
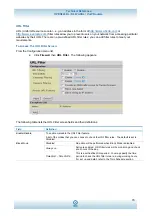
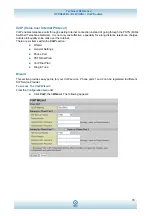
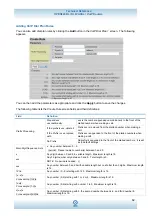
The following appears: 


Click 

Add Entry.  

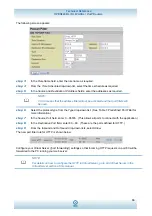
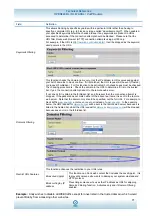
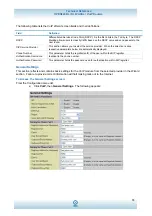
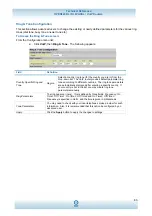
The following appears: 


Edit the settings as required, then click 

Apply. 


NOTE: 

To add a PSTN Entry, click 

Add Entry 

from the PSTN Dial Plan screen. 

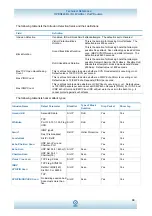
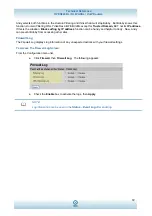
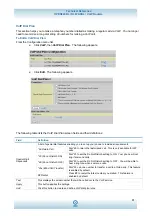
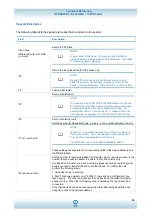
The following table lists the 

Dial Plan 

fields and their definitions: 

Field Definition 

Prefix 

Specify number(s) for switching to a PSTN. 

Number of Digits 

Specify the total number of digits you wish to dial out.  Maximum digit number is 15. 

Dial With Prefix 

The dialled number will send the call through the PSTN 
with the prefix.  The length of the dialled number must 
match the 

Number Of Digits 

field. 

Dial Without Prefix 

The dialled number will send the call through the PSTN 
without the prefix.  The length of the dialled number must 
match the 

Number Of Digits 

field. 

Action 

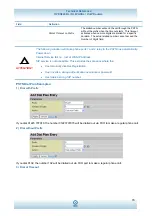
Dial at Timeout 

The dialled number will send the call through the PSTN 
with the prefix when the timeout starts.  This timeout 
activates when no more digits are dialled for a specific 
duration.  The actual dialled number cannot exceed the 

Number of Digits 

field. 

Summary of Contents for 824RL

Page 1: ...O OP PE EN N8 82 24 4R RL L R RL LW W V Vo oI IP P 8 80 02 2 1 11 1g g A AD DS SL L2 2 R Ro ou ut te er r T Te ec ch hn ni ic ca al l R Re ef fe er re en nc ce e...

Page 2: ...orks Pty Ltd No part of this manual may be translated transcribed reproduced in any form or by any means without prior written permission by OPEN Networks Pty Ltd D Di is sc cl la ai im me er r For co...

Page 3: ...Factory Default Settings 20 Web Interface Username and Password 20 LAN Device IP Settings 20 ISP setting in WAN site 20 DHCP server 20 LAN and WAN Port Addresses 20 Information from your ISP 21 Confi...

Page 4: ...ters 65 Intrusion Detection 67 URL Filter 70 Firewall Log 72 VoIP Voice over Internet Protocol 73 Wizard 73 General Settings 74 How To Register To The SIP Server 75 Phone Ports 76 PSTN Dial Plan 78 Vo...

Page 5: ...hnical Reference iv Advanced VLAN Setup Example Triple Play 106 Save Configuration to Flash 111 Logout 111 Troubleshooting 112 Problems starting up the router 112 Problems with the WAN Interface 112 P...

Page 6: ...streaming and real time audio more easily and faster than ever It is compliant with Multi Mode standard ANSI T1 413 Issue 2 G dmt ITU G 992 1 G lite ITU G 992 2 G hs ITU G994 1 G dmt bis ITU G 992 3...

Page 7: ...s don t saturate upload bandwidth or office browsing doesn t bring client web serving to a halt In addition or alternatively you can simply change the priority of different types of upload data and le...

Page 8: ...mediately and have it repaired at a qualified service centre Avoid using this product and all accessories outdoors ATTENTION Place this router on a stable surface Only use the power adaptor that comes...

Page 9: ...Mbps Blinking when data is Transmitted Received 7 WLAN Wireless Router only Lit green when the wireless connection is established Flashes when sending receiving data 8 9 Phone 1X 2X RJ 11 connector Li...

Page 10: ...it to reset the device or restore to factory default settings 0 3 seconds reset the device 6 seconds above restore to factory default settings this is used when you can not login to the router e g for...

Page 11: ...product is a bank of LEDs Verify that the LAN Link and ADSL line LEDs are lit If they are not verify that you are using the proper cables Ensure that all other devices connected to the same telephone...

Page 12: ...ounter any problems accessing the router s web interface it may also be advisable to uninstall any kind of software firewall on your computers as they can cause problems accessing the 192 168 1 254 IP...

Page 13: ...Technical Reference OPEN824RL RLW ADSL VoIP Routers 12 VoIP 802 11g ADSL Router with LINE port ADSL Phone ADSL Splitter Line Connect more computers Switching HUB Analog Phone...

Page 14: ...Classic View From the Control Panel window double click Network Connections The following appears step 2 Double click the Local Area Network connection name required step 3 Click Properties The follow...

Page 15: ...l Reference OPEN824RL RLW ADSL VoIP Routers 14 step 5 Highlight the Obtain an IP address automatically and the Obtain DNS server address automatically radio buttons then click OK to complete the confi...

Page 16: ...ntrol Panel window double click Network and Dial up Connections The following appears step 2 Double click the Local Area Connection name as required The following appears step 3 From the Local Area Co...

Page 17: ...l Reference OPEN824RL RLW ADSL VoIP Routers 16 step 5 Highlight the Obtain an IP address automatically and the Obtain DNS server address automatically radio buttons then click OK to complete the confi...

Page 18: ...e Configuration tab to make it active The following appears step 2 Highlight TCP IP NE2000 Compatible or the name of any Network Interface Card NIC in your PC then click Properties The following appea...

Page 19: ...Technical Reference OPEN824RL RLW ADSL VoIP Routers 18 step 5 Highlight the Disable DNS radio button then click OK to complete the configuration...

Page 20: ...ol Panel From the Control Panel window double click Network and highlight the Protocols tab to make it active The following appears step 2 Highlight TCP IP Protocol then click Properties The following...

Page 21: ...168 1 254 Subnet Mask 255 255 255 0 ISP setting in WAN site PPPoE DHCP server DHCP server is enabled Start IP Address 192 168 1 100 End IP Address 192 168 1 199 IP pool counts 100 LAN and WAN Port Ad...

Page 22: ...it can be automatically assigned by your ISP when you connect or be set manually PPPoA VPI VCI VC based LLC based multiplexing Username Password and Domain Name System DNS IP address it can be automa...

Page 23: ...a web browser and enter the following address in the Address bar http 192 168 1 254 then click Go The following appears step 2 Enter the username and password of admin and admin in the User name and P...

Page 24: ...tus ARP Table This section displays the router s ARP Address Resolution Protocol Table which shows the mapping of Internet IP addresses to Ethernet MAC addresses This is useful as a quick way of deter...

Page 25: ...From the menu list Click Status then Routing Table The following appears Routing Table The following table lists the Routing Table fields and their definitions Field Definition Valid This indicates a...

Page 26: ...xpired The expired IP Addresses information Permanent The fixed host mapping information Leased Table To Access The Leased Table Screen Once you have accessed the DHCP Table screen click the Leased li...

Page 27: ...on IP Address The fixed IP address for the specified client MAC Address The MAC to be assigned to the fixed IP Address Maximum Lease Time The Maximum Lease Time interval you allow clients Email Status...

Page 28: ...Click Status then VoIP Status The following appears Event Log This page displays the router s Event Log entries Major events are logged to this window such as when the router s ADSL connection is dis...

Page 29: ...o entries are logged to this window To Access The Error Log From the menu list Click Status then Error Log The following appears NAT Sessions This section lists all current NAT sessions between interf...

Page 30: ...tests To Access the Diagnostics Screen From the menu list Click Status then Diagnostics The following appears Click Refresh to update the details on the screen UPnP Portmap The section lists all port...

Page 31: ...ble box to get the DNS automatically from your ISP For detailed instructions on configuring your WAN settings please see the WAN section of this manual If you have deleted the current WAN Connection i...

Page 32: ...ers 31 step 4 Select the desired option from the list and click Apply to return to the Quick Start interface to continue configuring your ISP connection Please note that the contents of this list will...

Page 33: ...ireless Security Wireless Client Filter Port Setting DHCP Server LAN Local Area Network Bridge Interface You can set up member ports for each VLAN group under the Bridge Interface section From the exa...

Page 34: ...rea of the screen specifies which VLAN group will manage the device like doing web management NOTE NAT NAPT can be applied to management interface only Ethernet From the Configuration menu list Click...

Page 35: ...ition IP Address Specify an IP Address on this virtual interface SubNetmask Specify a subnet mask on this virtual interface Specify the firewall setting on this virtual interface Internal The network...

Page 36: ...hernet Client Filter screen fields and their definitions Field Definition Disable Default setting Allowed Check this radio button to authorize a specific device access to your LAN by entering the MAC...

Page 37: ...ses which connect to the router To allow these check the checkbox beside the IP address to be blocked or allowed Then Add to enter details to the Ethernet Client Filter table The maximum number of all...

Page 38: ...nnot discover the Access Point AP of your router ESSID Broadcast Enable Any client using the any setting can discover the Access point AP in the Regulation Domain There are seven regulation domains fr...

Page 39: ...Key Integrity Protocol utilises a stronger encryption method and incorporates Message Integrity Code MIC to provide protection against hackers WPA Shared Key The key for network authentication The inp...

Page 40: ...s used to generate WEP keys automatically based on the input string and a pre defined algorithm in WEP64 or WEP128 You can input the same string in both the AP and client card settings to generate the...

Page 41: ...ing table lists the Wireless Client MAC Address Filter screens and their definitions Field Definition Disabled Default setting for this filter Allowed Check this radio button to authorize a specific d...

Page 42: ...allow these by checking the box next to the MAC address to be blocked or allowed Then click Add to include the details in the Wireless Client MAC Address Filter table The maximum number of Ethernet c...

Page 43: ...IP packet of data Bits 6 7 of this octet are reserved and bits 0 5 are used to specify the priority of the packet If the packet is high priority it will flow first and will not be constrained by the...

Page 44: ...work lease time for each assigned IP address the period of time the IP address assigned will be valid DNS IP address and the gateway IP address These details are sent to the DHCP client i e your compu...

Page 45: ...he WAN section ISP DNS ADSL ISP The factory default is PPPoE If your ISP uses this access protocol click Edit to input other parameters as below If your ISP does not use PPPoE you can change the defau...

Page 46: ...s If users on your LAN have public IP addresses and can access the Internet directly the NAT function can be disabled Encapsulation Method Selects the encapsulation format The default is LLC Bridged S...

Page 47: ...the ATM layer Encapsulation Method Selects the encapsulation format The default is LLC Bridged Select as provided by your ISP Acceptable Frame Type Specify what kind of traffic can be sent through th...

Page 48: ...e IP address If users on your LAN have public IP address and can access the Internet directly the NAT function can be disabled Username Enter the username provided by your ISP You can input up to 128...

Page 49: ...calculated from the class of the IP address obtained during IPCP negotiation Route Mask Sets the subnet mask used by the route that is created when a PPP link comes up If it is set to 0 0 0 0 the sub...

Page 50: ...llows multiple users to access the Internet through a single IP account sharing a single IP address If users on your LAN have a public IP address and can access the Internet directly the NAT function...

Page 51: ...single IP address If users on your LAN have a public IP address and can access the Internet directly the NAT function can be disabled Username Enter the username provided by your ISP You can input up...

Page 52: ...al IP interface connected to the PPP transport If the value 0 0 0 0 is supplied the netmask will be calculated from the class of the IP address obtained during IPCP negotiation Route Mask Sets the sub...

Page 53: ...e DNS converts the friendly name into its equivalent IP Address To Set Up DNS From the Configuration menu list step 1 Click WAN then DNS The following appears step 2 Check the Enable checkbox step 3 C...

Page 54: ...line code to G DMT Activate Line Aborting false your ADSL line and making it active true again for taking effect with setting of Connect Mode Coding Gain Configure the ADSL coding gain from 0dB to 7dB...

Page 55: ...ur local time zone click Enable and click the Apply button After a successful connection to the Internet the router will retrieve the correct local time from the SNTP server you have specified If you...

Page 56: ...ntly enable remote access choose a time period of 0 minutes This setting cannot be saved into flash when the timer is set to zero Firmware Upgrade Your router s firmware is the software that allows it...

Page 57: ...multiple backups step 3 Click Browse to select a file from your computer to restore You should only restore settings files that have been generated by the Backup function and that were created when u...

Page 58: ...the device s configuration interface Once you have clicked Create or Edit the following options are displayed You can change the user s password choose whether the account is active and Valid as well...

Page 59: ...e on your network This natural firewall is on when NAT function is enabled NOTE When using virtual servers your computers will be exposed to the degree specified in your Virtual Server settings provid...

Page 60: ...ther access to the Internet High Medium Low security level the predefined port filter rules for High Medium and Low security are displayed in Port Filters of Packet Filter Select either High Medium or...

Page 61: ...m and Low The predefined port filter rules in the Packet Filter must modify accordingly to the level of Firewall which is selected See Table1 Predefined Port Filter for more detailed information To Ac...

Page 62: ...23 NO NO NO YES NO YES SMTP 25 TCP 6 25 25 NO YES NO YES NO YES POP3 110 TCP 6 110 110 NO YES NO YES NO YES NEWS 119 Network News Transfer Protocol TCP 6 119 119 NO NO NO YES NO YES RealAudio RealVide...

Page 63: ...Address Filter used to allow or block traffic to from particular IP address es To select the Subnet Mask of the IP address range you wish to allow block the traffic to or from set the IP address and S...

Page 64: ...acket Filter screen fields and their definitions Field Definition Rule Name User defined description to identify this entry or click to select existing predefined rules Time Schedule It is self define...

Page 65: ...low security level To set up a web server located on the local network when the firewall is enabled you have to configure the Port Filters setting for HTTP As you can see from the diagram below when...

Page 66: ...les screen in this case for the low security level appears NOTE You may click Edit to edit the predefined rule instead of deleting it To Add a Packet Filter Click Delete step 1 Select the existing HTT...

Page 67: ...pe drop down list See Table 1 Predefined Port Filter for more information step 7 In the Source Port field enter 0 65535 This allows all ports to connect with the application step 8 In the Destination...

Page 68: ...o be suspicious The router uses a Blacklist to detect possible attacks If such attacks are detected the source IP or destination IP address of the offending source will be added to the Blacklist Any f...

Page 69: ...Count This is a threshold value to decide whether an CIMP Echo Storm is occurring or not Default value is 15 ICMP Echo Requests PING per second Max ICMP Count This is a threshold to decide whether an...

Page 70: ...session DstPort Net Bus 12345 12346 3456 SrcIP Scan Yes Yes Back Orifice Scan UDP DstPort Orifice Port 31337 SrcIP Scan Yes Yes SYN Flood Max TCP Open Handshaking Count Default 100 c sec Yes ICMP Floo...

Page 71: ...ilter The following appears The following table lists the URL Filter screen fields and their definitions Field Definition Enable Disable To enable or disable the URL Filter feature A list of the modes...

Page 72: ...yes the connection attempt is sent to the remote web server If not check if it is listed in the forbidden list and if present then the connection attempt is dropped If the packet does not match either...

Page 73: ...uation Block surfing by IP address function can be handy and helpful to Andy Now Andy can prevent Bobby from accessing other sites Firewall Log The Firewall Log displays log information of any unexpec...

Page 74: ...ecially for a long distance telephone charges but also toll quality voice calls over the Internet There are six items within the VoIP section Wizard General Settings Phone Port PSTN Dial Plan VoIP Dia...

Page 75: ...respective parameters below are automatically displayed Phone Number This parameter holds the registration ID of the user within the SIP registrar Authentication Username Identical to the phone number...

Page 76: ...ntiated Services Code Point DSCP it is the first 6 bits in the ToS byte The DSCP Marking allows users to classify traffic based on the DSCP value and send packets to the next router Registrar Address...

Page 77: ...d allows you to edit the account information of your Phones To Access The Phone Ports screen From the Configuration menu list step 1 Click VoIP then Phone Port The following appears step 2 Click Edit...

Page 78: ...r to convert 14 bit linear samples 64Kbps bandwidth is required Priority 1 3 G 711A LAW This is a basic non compressed encoder and decoder technique LAW uses pulse code modulation PCM encoded and deco...

Page 79: ...Click Add Entry The following appears Edit the settings as required then click Apply NOTE To add a PSTN Entry click Add Entry from the PSTN Dial Plan screen The following table lists the Dial Plan fi...

Page 80: ...one ports 1 and 2 relay to the PSTN line automatically Power down Internet Service fail i e lost of WAN IP Address SIP service is not accessible This excludes the scenarios where the User manually dis...

Page 81: ...number of digits 6 defined in the field 7070 is still a valid phone number since it has not exceeded 6 digits 4 Dial at Timeout no Prefix If you only dial 9 7070 and no more numbers after the timeout...

Page 82: ...vidual requirements 69 Return Call Dial 69 to return the last missed call This is only available for SIP calls 20 Do not Disturb ON Dial 20 to set the Do Not Disturb setting to ON Your phone will not...

Page 83: ...f the dialled numbers when making a call Prefix Processing No Prefix No prefix is appended to the front of the dialled numbers It is set as in default settings Main Digit Sequence Lists x Any number b...

Page 84: ...provides default parameter ring tones according to different countries The ring tone parameters are automatically displayed after entering a specific country If your country is not in the list you ma...

Page 85: ...ing 80 Set do not disturb to off 74 x number Set the number for Speed dial code x where x is a number between 2 and 9 NOTE Where x is a number between 2 and 9 and number is the number to dial The code...

Page 86: ...stream loading You will find two items under the QoS section Prioritization Outbound Inbound IP Throttling bandwidth management Prioritization To Access the Prioritization screen From the Configuratio...

Page 87: ...f packets to be monitored Destination IP Address Range The destination IP Address of range of packets to be monitored DSCP Marking Differentiated Services Code Point DSCP This is the first 6 bits in t...

Page 88: ...The following table lists the Outbound IP Throttling screen fields and their definitions Field Description Application A user defined description to identify this new policy application Time Schedule...

Page 89: ...tion The following table lists the Inbound IP Throttling screen fields and their definitions Field Description Application A user defined description to identify this new policy application Time Sched...

Page 90: ...Restricted PC Normal PCs V Information and Settings Upstream 928 kbps Downstream 8 Mbps VoIP User 192 168 1 1 Normal Users 192 168 1 2 192 168 1 5 Restricted User 192 168 1 100 0 100 200 300 400 500...

Page 91: ...ation Some companies will set up the FTP server for customer downloading or home user file sharing by using FTP The above settings help to limit utilization of upstream of FTP Time schedule can also h...

Page 92: ...en you will usually need to configure your router to forward these incoming connection attempts using specific ports to the computer on the network running the application You will also need to use po...

Page 93: ...tual Server From the Virtual Server screen Click the Add Virtual Server link The following appears The following table lists the Virtual Server Entry screen fields and their definitions Field Descript...

Page 94: ...dit the virtual server application Delete Click this link to delete the virtual server application NOTE Using port forwarding does have security implications as outside users will be able to connect t...

Page 95: ...isks To Edit A DMZ Host From the Virtual Server screen Click the Edit DMZ Host link The following appears The following table lists the Edit DMZ Host screen fields and their definitions Field Descript...

Page 96: ...he following appears The following table lists the fields in the Global IP Pool in ipwan IP interface area of the Virtual Server screen Field Description NAT Type Select the desired NAT type Disabled...

Page 97: ...pplication to use This global IP Address must be defined in the Global IP Address field External Port The Port number on the Remote WAN side used when accessing the virtual server Redirect Port The Po...

Page 98: ...gin Protocol 23 TCP Telnet 25 TCP SMTP Simple Mail Transfer Protocol 53 TCP UDP DNS Domain Name Server 69 UDP TFTP Trivial File Transfer Protocol 80 TCP World Wide Web HTTP 110 TCP POP3 Post Office Pr...

Page 99: ...ations This Time Schedule correlates closely with the router s time since the router does not have a real time clock on board it uses the Simple Network Time Protocol SNTP to get the current time from...

Page 100: ...and their definitions Field Description ID This is the index of the time slot Name A user defined description to identify this time portfolio Day The default is set from Monday through Friday You may...

Page 101: ...ion menu list under the Advanced menu step 1 Click Static Route then Crate The following appears step 2 Enter the Destination Netmask or Interface details followed by the Cost step 3 Click Apply The f...

Page 102: ...example http www dyndns org From the Configuration menu list under the Advanced menu step 1 Click Dynamic DNS The following appears There are more than 5 DDNS services supported These are as follows...

Page 103: ...table lists the Check Email screen fields and their definitions Field Description Disable Highlight this radio button to disable the router s email checking function Enable Highlight this radio butto...

Page 104: ...he user may specify an alternative if for example they are running a web server on a computer on their LAN Management IP Address You may specify an IP Address allowed to logon and access the router s...

Page 105: ...function SNMP v1 and v2 Read Community Specify a name to be identified as the Read Community and an IP address This community string will be checked against the string entered in the configuration fi...

Page 106: ...ght the Enable radio button to accept multicast packets This is the default setting IGMP Snooping This allows switched Ethernet to check and make correct forwarding decisions The default setting is En...

Page 107: ...e Play VLAN_data Ethernet Port 1 Wireless and Wireless WDS are reserving for Internet On Ethernet port 1 I also need VC 0 40 bridged VLAN_Video Ethernet ports 2 3 and 4 0 33 Bi directional IP 0 34 Vid...

Page 108: ...hernet3 P4 Step 2 Create WAN Interface Click Configuration WAN ISP Wanlink is the factory default WAN interface which is in service for data internet access If your ISP uses this access protocol click...

Page 109: ...ction all traffic or only VLAN tagged Specify the type of Ethernet filtering performed by the named bridged interface All Allows all types of ethernet packets through the port IP Allows only IP ARP ty...

Page 110: ...VLAN From the example two VLAN groups are requested Data and Video To create another VLAN group for Video click Create VLAN Give a name and ID PVID to identify the Video group The valid value range fo...

Page 111: ...he VLAN Bridge with Bridge Interface created in Step1 you will see the conformable relationship in these two screenshots Step 4 IGMP Snooping Enable Click Configuration Advanced IGMP IGMP Snooping mus...

Page 112: ...saved the configuration settings before you logout Be aware that the router is restricted to only one computer accessing the configuration web pages at a time Once a computer has logged into the web i...

Page 113: ...capsulation type and type of multiplexing settings are the same as those provided by your ISP Reboot the router GE If you still have problems you may need to verify these settings with your ISP Freque...

Reviews: