background image

C h a p t e r   9   P R O C E S S   R E C I P E

7/26/00

INTEGRA Operations Revision A

9-31

20-0200-231 (CR), 20-0200-232 (Std), 20-0200-251 (CD)

A

NOTE:

 If the Brush Station


is set up to process chemical,


then chemical will be 

dispensed to the brush, even if the DRIP CHEM button (operational during the 

coinciding


EVENT

) is toggled to the 

OFF


position.

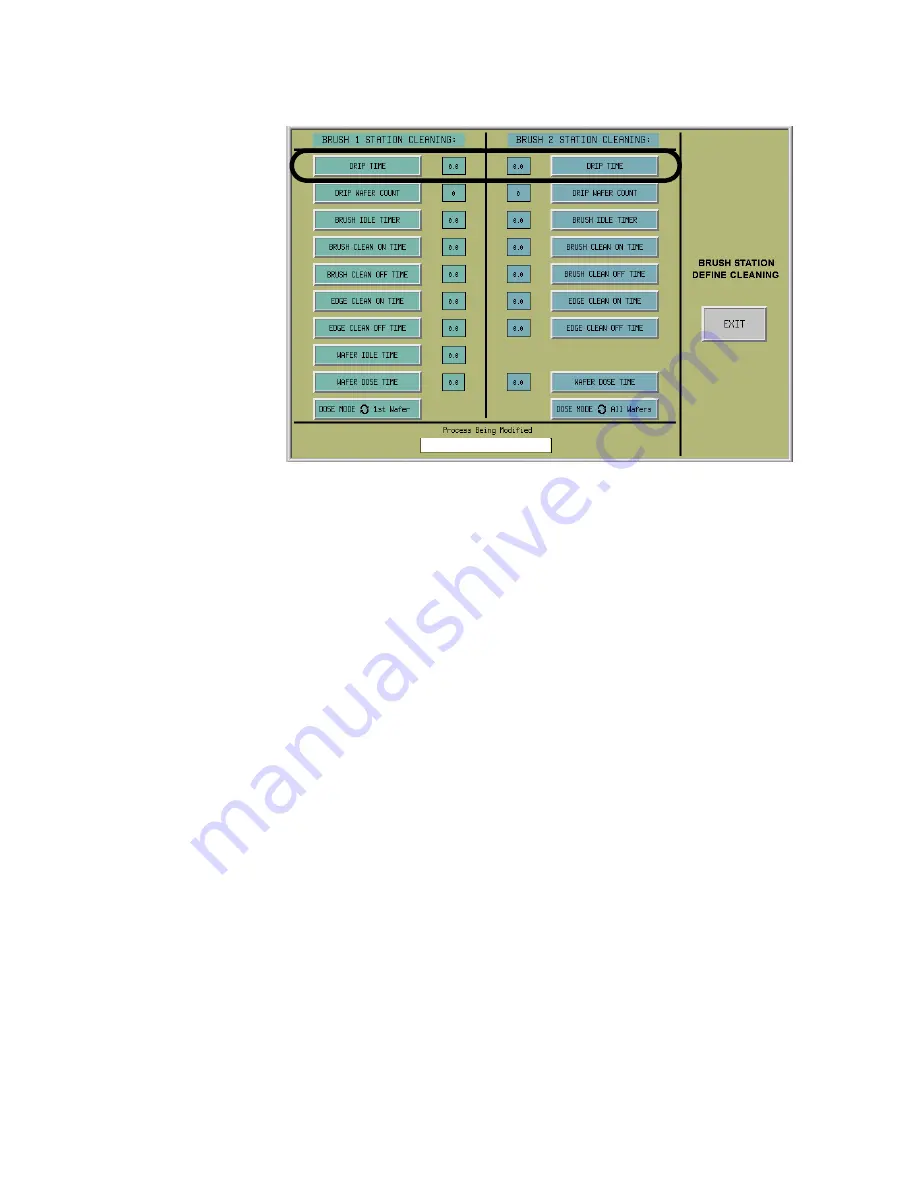
Change DRIP WAFER COUNT

6 Touch


DRIP WAFER COUNT for Brush Station #1 Cleaning to 

display the

 NUMBER PAD 

and set the number of wafers between 

brush cleaning cycles. This option is only used when DI water, 
(not chemical) is used to process each wafer. Periodically (based 
on wafer count) NH

4

OH is introduced to clean the brushes.

7 Enter the desired count on the 

NUMBER PAD

 (not shown), and 

touch ENTER.

Use the DRIP WAFER COUNT button to set the number of wafers 
that can pass through the Brush Station without interruption. When 
the number is reached, processing is halted, no incoming wafers are 
allowed into the Brush Station(s), and the brushes are cleaned.

If Brush Station #2 is processing with NH

4

OH, then the process is 

identical to Brush Station #1 processing with NH

4

OH.

8 Touch


DRIP WAFER COUNT for Brush Station #2 Cleaning to 

display the

 NUMBER PAD 

to set the number of wafers between 

brush cleaning cycles.

9 Enter the desired count on the 

NUMBER PAD

 (not shown), and 

touch ENTER.

STANDARD

Summary of Contents for Synergy Integra

Page 1: ...Synergy IntegraTM Volume 1 of 5 Operations Manual Set 20 0200 251 CD Software Version 2 2 3 Revision A May 2000 Click to Go Back to Main Menu...

Page 2: ...WARE LICENSE The system software the Software whether on disk or embedded in ROM and related documentation are licensed to the corporation that originally purchased this equipment the Corporation Lam...

Page 3: ...up checklist and clearing and shutdown procedures Chapter 6 Start up After EMO is intended to assist the operators and technicians in starting the system after shutdown by EMO or other premature proce...

Page 4: ...tains assembly drawings and part lists for the system and its major modules Input Station Brush Station 1 Brush Station 2 and Spin Station The Troubleshooting manual includes system schematics electri...

Page 5: ...0 0200 237 Spare Parts clean room manual 20 0200 238 Spare Parts standard manual 20 0200 239 Installation clean room manual 20 0200 240 Installation standard manual NOTE The highest current revision l...

Page 6: ...er EMO Revised version of Chapter 6 Start up After EMO Wafer Recovery in Volume 2 Operations Chapter 7 Optional Process Settings Revised version of Chapter 7 Optional Process Settings in Volume 2 Oper...

Page 7: ...to be changed in the manual Please provide support documentation Part 5 Comments What else do you want to say Name _____________________________________________ Title __________________________ Date _...

Page 8: ......

Page 9: ...Y PRECAUTIONS 2 6 ELECTRICAL SAFETY 2 6 Safety Shields 2 6 Component Maintenance 2 6 High Voltage 2 6 Electrical Lockout Tagout 2 6 Electrical Hazard Rating 2 7 Integra Type 3 and Type 4 Task Hazards...

Page 10: ...STATION SHELL 3 6 CHEMICAL DISPENSE DRAWERS 3 6 NH4OH Dispense Drawer 3 6 HF Dispense Drawer 3 7 BRUSH STATION 1 3 8 ENTRANCE SPRAY 3 8 BRUSHES 3 8 ROLLERS AND EDGE CLEAN OPTION 3 8 PROCESS SOLUTION...

Page 11: ...ELECTRICAL ENCLOSURE 3 40 ELECTRICAL ENCLOSURE INTERLOCK OVERRIDE 3 40 HIGH VOLTAGE 3 40 PROCESS DESCRIPTION 4 1 INTRODUCTION 4 1 WAFER INPUT ROBOT ARM 4 1 GEM INTERFACE 4 1 INPUT ROBOT 4 1 INPUT STA...

Page 12: ...PUT ROBOT ARM 4 15 OUTPUT ROBOT SPIN STATION EXIT TUNNEL 4 15 ELECTRICAL ENCLOSURE 4 16 HIGH VOLTAGE 4 16 SIGNAL LIGHT TOWER 4 17 NORMAL OPERATION 5 1 INTRODUCTION 5 1 PRE START UP CHECKLIST 5 1 START...

Page 13: ...MAINTENANCE ALARMS 7 11 BRUSH MOTOR ALARMS 7 14 FIRST WAFER DOSE 7 15 SMOOTH WAFER TRAVEL CHECKLIST 8 1 INTRODUCTION 8 1 PROCESS RECIPE 9 1 CHANGE PROCESS RECIPE 9 1 MODIFY BRUSH 1 RECIPE 9 5 Set or...

Page 14: ...EFFECT Brush Conditioning 9 44 DOSE MODE 1ST WAFER or ALL WAFERS 9 46 Change WAFER IDLE TIME 9 46 Change WAFER DOSE TIME 9 47 Change DOSE CHEM 9 49 Change DOSE LOW FLOW DI 9 49 Change DOSE HI FLOW DI...

Page 15: ...10 14 ALARM ID 4 10 14 ALARM ID 5 10 14 ALARM ID 6 10 15 ALARM ID 7 10 15 ALARM ID 8 10 15 ALARM ID 9 10 16 ALARM ID 10 10 16 ALARM ID 11 10 16 ALARM ID 12 10 17 ALARM ID 13 10 17 ALARM ID 14 10 17 AL...

Page 16: ...ID 53 10 32 ALARM ID 54 10 32 ALARM ID 55 10 33 ALARM ID 56 10 33 ALARM ID 57 10 33 ALARM ID 58 10 34 ALARM ID 59 10 34 ALARM ID 60 10 34 ALARM ID 61 10 35 ALARM ID 62 10 35 ALARM ID 63 10 36 ALARM I...

Page 17: ...ARM ID 100 10 50 ALARM ID 101 10 50 ALARM ID 102 10 51 ALARM ID 103 10 51 ALARM ID 104 10 52 ALARM ID 105 10 52 ALARM ID 106 10 52 ALARM ID 107 10 53 ALARM ID 108 10 53 ALARM ID 109 10 53 ALARM ID 110...

Page 18: ...ALARM ID 150 10 70 ALARM ID 151 10 70 ALARM ID 152 10 70 ALARM ID 153 10 71 ALARM ID 154 10 71 ALARM ID 155 10 72 ALARM ID 156 10 72 ALARM ID 157 10 72 ALARM ID 158 10 73 ALARM ID 159 10 73 ALARM ID...

Page 19: ...11 7 OFFLINE SUBSTATE 11 8 ONLINE SUBSTATE 11 8 PROTOCOL PARAMETERS 11 8 DEVICE ID 11 8 T1 T4 TIMEOUTS 11 9 RETRY LIMIT 11 9 COLLECTION EVENTS CEIDS 11 10 TROUBLESHOOTING SECS GEM RS232 COMMUNICATION...

Page 20: ...TA BL E O F CO NT E NT S 7 26 00 INTEGRA Operations Revision A xx 20 0200 231 CR 20 0200 232 Std 20 0200 251 CD This page intentionally left blank...

Page 21: ...Version The Integra cleaner s base system software level is 2 2 3 and screens presented in this manual reflect the 2 2 3 software Integras shipped after the manual s release date may have higher soft...

Page 22: ...em and how to program the system for various processes Volume 2 Maintenance includes preventive maintenance adjustment and alignment and remove and replace procedures Volume 3 Troubleshooting provides...

Page 23: ...ess Settings presents the 2 2 3 level screens and procedural steps that are used to complete the optional process settings Chapter 8 Smooth Wafer Travel Checklist is a guide to help the operator check...

Page 24: ...1 4 INTEGRA Operations Revision A 7 26 00 20 0200 231 CR 20 0200 232 Std 20 0200 251 CD...

Page 25: ...c devices it is the responsibility of the CMP System Integrator to ensure that the operator is protected from any cleaner input and or output opening pinch points Normal and or ancillary protection mu...

Page 26: ...of severe physical damage to equipment and or personnel HWARNING ELECTRICAL HAZARD Symbol forewarns of an electrical hazard which could result in personal injury or loss of life FCAUTION HOT SURFACE...

Page 27: ...g maintenance procedures that expose you to HF The PPE kit should contain at least the following supplies Items marked with an asterisk are one time or single use items and MUST be replenished after E...

Page 28: ...cular count is based on a timed procedure producing consistent repeatable experimental data The data is available from Lam by request Brush Station secondary containment prevents hazardous material fr...

Page 29: ...Installation manual High Voltage Warnings High voltage warning tags have been placed on all electrical components and circuitry where high voltage shock is possible if safety precautions are circumven...

Page 30: ...ms before working with electrical components 5 The metal frame and protective panels can operate as a ground Do not lean on them when working with live components or circuits Electrical Lockout Tagout...

Page 31: ...key 11 Attach a TAG to the padlock with your name and phone number You are the only person authorized to remove the padlock 12 Upon completion of maintenance servicing remove the lockout and notify al...

Page 32: ...e system or halt the operation of the individual station if opened Below is a list of the cover lid switches and how each switch affects the system when its corresponding lid is opened or removed duri...

Page 33: ...Station motors can be manually operated with the lid open but no chemicals can be dispensed Spin Station Door The Spin Station activity STOPS when the door is opened When the door is closed the system...

Page 34: ...nd the general fault interrupt GFI is located to the right of the circuit breaker EMERGENCY MACHINE OFF The Emergency Machine Off EMO switches are large red mushroom shaped buttons which operate as em...

Page 35: ...HF down to 3 ppm max The brush box lid can not be opened until a 5 minute flush procedure is performed If any chemical lines are to be disconnected during maintenance the system must be purged of che...

Page 36: ...e weight and bulkiness of the Spin Station cover and the ULPA filter top heavy removal of either one requires two people To avoid injury to personnel and equipment always use two people Purge Procedur...

Page 37: ...c ultrasonic generator is 1 5 MHz 0 3 MHz Input power is 100 VAC 1 phase 60Hz 1 AMP 48 Watts Maximum Ergonomic Issues The only known ergonomic hazard in wafer cleaners is the hand loading and unloadin...

Page 38: ...2 14 INTEGRA Operations Revision A 7 26 00 20 0200 231 CR 20 0200 232 Std 20 0200 251 CD...

Page 39: ...e options are generic to all equipment Flat Rotate Enable This option is only used when the machine is equipped with a Spin Station stepper motor The purpose of this motor is to rotate the flat 90 deg...

Page 40: ...he INPUT STATION I O screen This is accessible from the MAINTENANCE screen by pressing the VIEW I O button of the INPUT STATION I O screen Light Tower Options Ten system light tower options are curren...

Page 41: ...en the Input Station door closes DI water is sprayed from four manifolds six nozzles to rinse off large wafer polishing contaminants and to keep the wafer wet INPUT STATION LID The mechanically locked...

Page 42: ...additional wafers are sent but wafers in process are completed LEFT WAFER SENSOR Track runs left to right Capacitive Resistance Sensor On the right side of the conveyor facing upward Icon is green wh...

Page 43: ...d Door Robot Wafer Door Icon is green when the Bulkhead Door Robot Wafer Door is closed SENSOR NAME TYPE AND LOCATION FUNCTION OUTPUT NAME DESCRIPTION BULKHEAD DOOR SOLENOID Solenoid The solenoid valv...

Page 44: ...reen Brush Station 1 and Brush Station 2 contain individual exhaust manifold and baffle Each exhaust manifold contains its own exhaust pressure sensor for detecting insufficient exhaust pressure or ex...

Page 45: ...rawers the Process Key must be changed to the STANDARD setting HF Dispense Drawer The Hydrofluoric Acid dispense drawer is for dispensing HF into the core of the top brush of the Brush Station being s...

Page 46: ...DI water is required to ensure wafer surfaces are properly cleaned and rinsed BCAUTION Brushes should never be allowed to dry out Keep DI water running through the brushes at all times or remove them...

Page 47: ...ar the area of use PROCESS SOLUTION INJECTION HF OPTIONAL CONFIGURATION Brush Station 1 brushes are plumbed to allow the conversion of the system for the injection of dilute hydrofluoric acid through...

Page 48: ...igh flow exhaust is provided for operator safety EXHAUST BAFFLE CLOSED SENSOR Hall Effect Sensor Located on the baffle s rotary actuator sensor assembly Icon is green when the baffle is CLOSED and red...

Page 49: ...he sensors are mounted to the front of the Brush Box frame The roller positions as demonstrated by their sensor status show which size wafer is processing If the Front Roller Sensor 1 is red and the F...

Page 50: ...es when the stepper motor plunger is in the HOME down position causing the brush to lift off the wafer Brush is attached to a rocker arm opposite the plunger Icon is green when the front lifter is in...

Page 51: ...he Chemical Drawer 1 after the chemical and chemical redundant valves but before the flow meter Icon is green when there is sufficient pressure The icon is red and an alarm is posted if the system req...

Page 52: ...f the HF processing is not being used the button will not be displayed Icon Status The right side of the HF PURGE button displays ACTIVE when the system is purging DI water through the Brush Station c...

Page 53: ...green when the DI Low Flow valve is OPEN and red when the valve is CLOSED DI HI FLOW Solenoid OPENS or CLOSES the valve which provides a higher flow rate of DI water through the Brush Station 1 upper...

Page 54: ...are normally plumbed for the injection of Hydrofluoric Acid through the brushes When the Process Key is set to HF2 the system Process Recipe screen is set to include the HF dispense option In this sy...

Page 55: ...vate it and prevent an alarm See Alarm ID 25 on page 10 22 Set the speed to the desired number to activate the flat finder SENSORS Seventeen sensors and sixteen solenoids switches monitor and or contr...

Page 56: ...wafer is present Icon is green when a a wafer is present wafer transferring between Brush Station 1 and Brush Station 2 and red when a wafer is not present Note The lid must be closed and locked befo...

Page 57: ...ched to the micro stepper motor and the driver below the Brush Station 2 brush motor on the system back side Indicates when the stepper motor plunger is in the EXTEND up position causing the brush to...

Page 58: ...the conveyor for transport into the Spin Station Icon is green when a wafer flat is detected and red when a wafer is not detected Important The software must see the wafer s trailing edge to signal th...

Page 59: ...troller Circuitry Brush Motors are programmable speed motors When the BRUSH MOTOR button is touched a NUMBER PAD displays so that the desired speed for the Brush 2 brush motor can be entered Enter the...

Page 60: ...vate the solenoid Icon Status Icon is green when the NH4OH valve is OPEN and red when the valve is CLOSED HF SOLENOID Normal process chemical in Brush Station 2 If HF is selected NH4OH cannot be dispe...

Page 61: ...shes and red when it is CLOSED DI FLUSH SOLENOID Solenoid Actuates the valve that provides DI water for the chamber rinse chemical brush purge 5 minutes when the Brush Lid Operation has been initiated...

Page 62: ...ler level in the track After it is detected by the WAFER SENSOR array the incoming wafer travels for a set period of time depending on the wafer size The time set in the SPIN XPORT DELAY counter stops...

Page 63: ...grasping the wafer lifting it slightly off of the conveyor SPINDLE MID SENSOR and the BOTTOM position is for the spin dry operation SPINDLE BOTTOM SENSOR A pneumatic cylinder moves the spindle up and...

Page 64: ...ning two bearings A finger close safety spring mounted between the air cylinder and the coupling is compressed when the fingers are open In the event of power loss all pneumatic control solenoids retu...

Page 65: ...otor Megasonic Arm The megasonic arm holds the megasonic head which sweeps across the wafer during the initial phase of the spin procedure and the DI water line which delivers DI water to the megasoni...

Page 66: ...e exit tunnel as the Output Robot arm enters exits the Spin Station DRYING LAMP A 1000 watt halogen lamp is built into the Spin Station cover This lamp can be configured to be ON during a portion of t...

Page 67: ...Std 20 0200 251 CD SENSORS Twenty one sensors and twenty four solenoids switches monitor and or control Spin Station activity Sensors are described in the following table and are listed in the order...

Page 68: ...inch wafer Only the common sensor middle sensor is used in 150 mm 6 inch wafer detection SIX INCH When the Wafer Diameter option is set to six inch the wafer centering process is as follows The enteri...

Page 69: ...OOR LOCK SOLENOID is toggled open MEGASONIC ARM SENSOR first or left icon position Infrared OpticalInterrupt FlagSensor At the back of the megasonic arm motor assembly under the plate facing up agains...

Page 70: ...tally mounted on the megasonic air cylinder Screen icon is green when the Z axis is extended When the Megasonic arm moves from the drip tray out to the edge of the wafer the arm is in the extend posit...

Page 71: ...Optical Interrupt Flag Sensor On the back of the cylinder plate beneath the BOTTOM Spindle Position Detects when the spindle is at BOTTOM Screen icon is green when the flag reaches the BOTTOM posi ti...

Page 72: ...SOLENOID Solenoid The MEGASONIC WATER SOLENOID is the main valve When it is OFF the MEGASONIC DRIP has no effect When the solenoid is open DI water flows unrestricted to the megasonic head to be used...

Page 73: ...ent CARRIAGE REVERSING RELAY Works with MOVE CARRIAGE output signal Relay Allows for the change in the relay response to the carriage If there is a response problem with the carriage movement out of s...

Page 74: ...reen Sensor Located next to the door sensor and interrupts the Spin Inhibit Relay signal when the door is not closed UPPER RINSE SOLENOID Solenoid Operates a valve which sends DI water to a spray mani...

Page 75: ...mall amount of DI water through the lower rinse manifold keeps the water fresh or free of bacterial contamination Both valves turn OFF during the Spin dry cycle Icon Status Icon is green when the valv...

Page 76: ...S1 S2 ON 4 Check Spin TOP sensor 5 Lock Z Lock 6 Check Z Lock Locked sensor Button Status Button depresses until the spindle sequence completes i e TOP then pops back out ANOTE Do not use these button...

Page 77: ...Spin BOTTOM sensor Button Status Button depresses until the spindle sequence completes i e BOTTOM then pops back out ANOTE Do not use these buttons to clear a Z_Lock failure or to make Z_Lock adjustm...

Page 78: ...aution ELECTRICAL ENCLOSURE INTERLOCK OVERRIDE The Integra system has an EMO interlock switch mounted to the center of the divider plate of the Electronics Enclosure Opening the Electronic Enclosure d...

Page 79: ...m the Input Robot INPUT STATION DOOR CASSETTE SENSOR Using GEM messages from the CMP host the ROBOT PRESENT CASSETTE SENSOR determines that the Input Station is empty no wafer or Input Robot arm paddl...

Page 80: ...ry from the wafer WAFER TRANSFER Each time a wafer is detected in the Input Station the computer checks for the presence of a wafer in Brush Station 1 If no wafer is present in Brush Station 1 the con...

Page 81: ...ation with the continual forward pressure exerted by the rotating brushes causes the wafer to be centered between the brushes Roller heights are set so that the wafer is in correct contact with them i...

Page 82: ...IGH FLOW valve opens to allow DI water to flush the chemical and contamination out of the brush 29 NH4OH TTB Processing Option When Brush Station 1 is configured with a 29 NH4OH chemical drawer and th...

Page 83: ...12 EDGE CLEAN OPTION Integra s roller function is to rotate the wafer so that its axis of rotation is centered between the two brushes In addition Integra s rollers can be configured for edge cleanin...

Page 84: ...CREEN The first variables that can be set are the IDLE TIME PURGES An idle time purge dispenses TTB chemistries to the top brush followed by a dispense of DI water via the DI HIGH FLOW After a set per...

Page 85: ...he flow of chemical to the brushes in Brush Station 1 and then Brush Station 2 using the times set in the 1ST WAFER DOSE TIME variables Dose times must be individually set for each Brush Station When...

Page 86: ...ination with the continual forward pressure exerted by the brushes centers the wafer between the brushes Roller heights are set so that the wafer is in correct contact with them its horizontal positio...

Page 87: ...et in each EVENT during which it is activated See Change HF Flow Option on page 9 23 When DI HIGH FLOW activates in an EVENT a high volume of DI water injects into the brush core and out through the p...

Page 88: ...2 continues to undergo a DI water cleaning process until the Spin Station is clear If a wafer is not detected the wafer in Brush Station 2 transfers to the Spin Station The time setting procedure is...

Page 89: ...NO FLAT FINDER When the Spin Station is ready for a wafer the top brush slows to idle speed and lifts off of the wafer in Brush Station 2 the rollers retract and the conveyor activates to transport t...

Page 90: ...Inch When the Wafer Diameter option is set to six inch the wafer centering process is as follows 1 The entering wafer is detected by the Six Inch Sensor 2 The wafer is detected by the Common Sensor a...

Page 91: ...from the spindle shaft the spin cycle starts and the wafer begins to spin As the wafer spins a final DI water rinse sprays on the top and bottom of the wafer The final rinse stops and the wafer contin...

Page 92: ...gasonic rinse optional low speed and high speed drying cycles to provide maximum process efficiency The heat lamp can also be programmed to activate ON OFF for a specific duration time to coincide wit...

Page 93: ...Station exit tunnel The Output Robot s paddle enters the exit tunnel moves under the cleaned wafer between the spin fingers and stops The paddle then moves up and contacts the wafer The wafer is held...

Page 94: ...system CPU Operator access to the inside of the electrical enclosure is not necessary The following warnings are given as a precaution DWARNING ELECTRICAL HAZARD Procedures associated with the Electr...

Page 95: ...POSE STATUS DESCRIPTION Red Stop ON System is in STOP PAUSED mode OFF System is NOT in STOP PAUSED mode FLASH N A Yellow Alarm ON System ALARM present Check SYSTEM STATUS screen for the current Alarm...

Page 96: ...mplete OFF MIR or MOR NOT present FLASH Move In Request waiting for input or output cassette or MIR and MOR Green Processing State ON Lot processing wafers in Brush 1 Brush 2 Spin OFF During Initializ...

Page 97: ...defined via GEM OFF User defined via GEM FLASH User defined via GEM Green User defined via GEM ON User defined via GEM OFF User defined via GEM FLASH User defined via GEM COLOR PURPOSE STATUS DESCRIP...

Page 98: ...g to process wafers OFF Lot in progress FLASH Process lot completes remove output cassette Green Running ON Processing wafers OFF NOT processing wafers FLASH N A COLOR PURPOSE STATUS DESCRIPTION Red A...

Page 99: ...ove in Request Input Station Green Running ON Processing wafers wafers in Brush 1 Brush 2 or Spin OFF Move out complete NOT processing wafers FLASH Move out Request Output Station COLOR PURPOSE STATUS...

Page 100: ...arm not present FLASH N A Green Running ON Processing wafers wafers in Brush 1 Brush 2 or Spin OFF Not processing wafers FLASH N A Blue Process Status ON Standby Machine in PAUSED CLEARING mode IDLE S...

Page 101: ...hen the operator or Gem acknowledges Start Required 3 Processing is complete when the output cassette or pod if Asyst SMIF is ready to be removed COLOR PURPOSE STATUS DESCRIPTION Red Alarm Status ON A...

Page 102: ...4 24 INTEGRA Operations Revision A 7 26 00 20 0200 231 CR 20 0200 232 Std 20 0200 251 CD This page intentionally left blank...

Page 103: ...the Start Up procedure it is important to go through the Pre Start Up Checklist of activities Many process difficulties can be avoided if this procedure is followed when starting the system PRE START...

Page 104: ...Panels Doors and Station Covers Check that all the doors lids and panels to the system are securely in place Check that all the station covers are securely in place and closed The Brush Station lid m...

Page 105: ...Off EMO situation or other mid processing shut downs The key operated Security Switch located on either the attached or remote Operator Control Panel allows access to the functions which control the S...

Page 106: ...emical dispense drawers are for ammonium hydroxide NH4OH or that no chemical is to be dispensed at all 3 Press the ON button on the Operator Control Panel left button This powers up the system and sta...

Page 107: ...of the desired Process Recipe Set Process Touch Run Selected Recipe Select Process Touch EXIT Main Menu Touch SYSTEM STATUS Select Process Recipe on page 7 8 8 Check that the feed status for wafer de...

Page 108: ...operator should observe the physical component station not screen as they initialize to verify proper machine activity The operator should also verify the Input Station Wafer Door initializes to the H...

Page 109: ...on and Robot Initialization Positions Checklist STATION COMPONENT FLAG LOCATION HOME POSITION INPUT ROBOT ARM Paddle External to Integra n a n a INPUT Input Station Door At top of door Input Door is a...

Page 110: ...eps DI water free of bacterial growth contaminants Use the I O screens If installed verify the UV lamp for the control of bacterial growth is lit 2 Pneumatic Air Supply CDA or N2 With the system ON Ch...

Page 111: ...reens MANUAL MODE Set the HF flow rate at 500cc minute or 0 if NOT USED 10 Megasonic Unit With the system ON and processing wafers verify that the megasonic unit moves properly in both the X Y and Z a...

Page 112: ...gh the machine in a straight line centered on the track and between the two Brush Station brushes Spin Station gripper fingers close uniformly on the wafer causing no more than 3 mm movement in any di...

Page 113: ...12 2 The procedure can be manually initiated using the CONTINUOUS CLEARING toggle button on the SYSTEM STATUS screen Once the CONTINUOUS button has been pressed toggled to CLEARING the CLEARING proce...

Page 114: ...ion on the light configuration for this system see the Signal Light Tower section in Chapter 3 System Configuration In general the system will halt when 1 Processing chemicals do not flow at the requi...

Page 115: ...ed in their individual stations The PAUSE button toggles between RUNNING and PAUSED This button reads RUNNING when processing is under way and PAUSED when processing is halted The following illustrati...

Page 116: ...hutdown Before Maintenance Checklist STEP PROCEDURE COMMENTS 1 Verify that no wafers are in the system If there are wafers continue the processing until they have cleared the system before shutting do...

Page 117: ...els with the brushes on them and place them in containers which will ensure that each brush remains entirely saturated with DI Water A solution of 0 5 NH4OH is suggested to prevent bacterial growth DO...

Page 118: ...5 16 INTEGRA Operations Revision A 7 26 00 20 0200 231 CR 20 0200 232 Std 20 0200 251 CD This page intentionally left blank...

Page 119: ...e danger is NOT immediate check the position of the wafers in the system and determine if any wafers are in the Input Station or Spin Station If there are wafers in either position let the wafer trans...

Page 120: ...when removing shards Use tweezers and or a vacuum system to clean wafer fragments out of the track NO PROCEDURE COMMENTS 1 Perform the standard pre processing checklist See Pre Start up Checklist on p...

Page 121: ...are responding properly The monitor displays the current station component being initialized See Initialization Sequence on page 5 6 5 Acknowledge all alarms which may have occurred prior to or after...

Page 122: ...Start command If the cleaner is set to CONTINUOUS it will start processing each new wafer as soon as a wafer is loaded into the Input Station by the Input Robot STEP PROCEDURE COMMENT STEP PROCEDURE C...

Page 123: ...ECOVERY If a lost wafer is to be recovered from a Brush Station currently using HF during processing HF will not be dispensed during the recovery process in that station All other station processes wi...

Page 124: ...erator is required to press the STOP button An alarm will inform the operator that a wafer detection error has occurred or that there is a Lost Wafer situation It is then up to the operator to place t...

Page 125: ...m suffers a power failure or an EMO button is pressed use the following procedure see following table to initiate the Wafer Recovery procedure ANOTE All wafers recovered during wafer recovery should b...

Page 126: ...3 From the MAIN MENU touch the WAFER RECOVER button This displays the wafer recovery message window 4 In the WAFER RECOVERY message window touch the YES button next to the question Start wafer recover...

Page 127: ...l the system will proceed to Brush Station 2 Answer any inquiries that appear in the message box at the bottom of the Wafer Recovery window A NOTE Throughout the procedure whenever the system is worki...

Page 128: ...way to the Spin Station or Output Robot Once the wafer has been recovered Brush Station 1 is RESET A NOTE If Brush Station 1 normally uses HF in the processing cycle it WILL NOT be dispensed during t...

Page 129: ...a p t e r 6 S TA R T U P A F T E R E M O WA F E R R E C O V E R Y 7 26 00 INTEGRA Operations Revision A 6 11 20 0200 231 CR 20 0200 232 Std 20 0200 251 CD Wafer Recovery Complete Message Recovery Comp...

Page 130: ...tem in STOP 2 locate the bottom brush motor 3 turn motor clockwise until the wafer moves backwards and levels does not dip down then 4 press START and recover wafer s Wafer Recovery from Brush Station...

Page 131: ...aken out of wafer recovery Waiting Stations to Finish None None automatic Put Machine into START Press START button Operator Console Cleaner automatically recovers wafer until it reaches Brush Station...

Page 132: ...g Stations to Finish None None automatic Put Machine into START Press START button on Operator Console Cleaner automatically recovers wafer until it reaches Brush Station 2 and then prompts operator N...

Page 133: ...wafer recovery Waiting for Stations to Finish None None automatic Put Machine into START Press START button on Operator Console Cleaner automatically begins to recover wafer in Spin Station Recoverin...

Page 134: ...Recovery from Brush Station 1 Wafer Recovery from Brush Station 2 Wafer Recovery from Brush Station 1 Brush Station 2 and Spin Station Each displayed message is presented and the operator response and...

Page 135: ...afer recovery Are you sure Touch YES Continue Touch NO NO taken out of wafer recovery Put Machine into START Press START button on Operator Console Cleaner automatically recovers wafer until it reache...

Page 136: ...ES Continue Touch NO NO taken out of wafer recovery Put Machine into START Press START button Operator Console Cleaner automatically recovers wafer until it reaches Brush Station 2 prompts operator Is...

Page 137: ...sure Touch YES Continue Touch NO NO taken out of wafer recovery Put Machine into START Press START button on Operator Console Cleaner automatically recovers wafer displays automatic messages when comp...

Page 138: ...communicates or talks to the Input Robot using GEM messages Input Robot wafer recovery can only be performed from the CMP host s user interface console If when the operator detects a lost wafer at th...

Page 139: ...lean room Only the CMP host system communicates or talks to the Output Robots using GEM messages Output Robot wafer recovery can only be performed from the CMP host s user interface console If when th...

Page 140: ...6 22 INTEGRA Operations Revision A 7 26 00 20 0200 231 CR 20 0200 232 Std 20 0200 251 CD This page intentionally left blank...

Page 141: ...d on Lam s proprietary operating system software ver 2 2 3 or higher This chapter presents the 2 2 3 level screens and procedural steps that are used to complete the following Optional Process Setting...

Page 142: ...gs 150 mm and 200 mm The Integra predominantly uses the 200 mm wafer diameter standard with 150 mm the next most frequently used diameter Use the following procedure to select the wafer diameter 1 Fro...

Page 143: ...he size selection 6 When the wafer size is changed a message displays reminding the operator to power off the system and install the new size kit components e g spin fingers etc 7 Touch EXIT to return...

Page 144: ...0 If the flat finder speed is not set to 0 system processing stalls while the flat finder looks for the non existent wafer flat If the system is processing wafers with flats i e 6 inch 150 mm the FLA...

Page 145: ...the flat finder that is to be set changed The example in the illustration above uses the STANDARD Process Recipe The Process Recipe name STANDARD should briefly be highlighted and cause the EDIT SELE...

Page 146: ...20 0200 232 Std 20 0200 251 CD 6 Touch MODIFY BRUSH 2 RECIPE 7 Touch FLAT FINDER SPEED to display the NUMBER PAD screen STANDARD TEST TEST2 SHORT Choose the Flat Finder Speed button Ensure that the c...

Page 147: ...QUIT to close the NUMBER PAD 9 Touch 0 on the NUMBER PAD and touch ENTER This will deactivate the flat finder by setting its speed to 0 and close the NUMBER PAD screen 10 ACTIVATE the flat finder If t...

Page 148: ...ecipe specifically designed to meet its processing requirements Use the SELECT PROCESS SCREEN to select a specific Process Recipe name ANOTE Only change the Process Recipes when the Integra is idle If...

Page 149: ...anges the process to the new Process Recipe When RUN SELECTED RECIPE is touched the MAIN MENU screen should display However if the SELECT PROCESS SCREEN remains displayed verify that the new Process R...

Page 150: ...cal delivery system is established To change the status of the Envoy Status communication link use the following procedure 1 From the MAIN MENU screen touch SELECT OPTIONS to display the SYSTEM OPTION...

Page 151: ...maintenance alarms Maintenance Alarm 1 and Maintenance Alarm 2 Each alarm can serve as a reminder for prescribed maintenance tasks The operator technician should also keep a written record log of the...

Page 152: ...EMS OPTION SCREEN displays touch the MAINTENANCE ALARMS button to display the MAINTENANCE ALARMS screen 3 Touch the box in the SETPOINT column next to Maintenance Alarm 1 to enter the alarm s setpoint...

Page 153: ...Touch YES to accept the change or touch NO to abort the change If NO is touched the SYSTEM OPTION screen displays 7 After setting Maintenance Alarm 1 and or 2 touch EXIT to return to the SYSTEM OPTIO...

Page 154: ...the SYSTEM STATUS screen and an audible alarm sounds Also a written description of the alarm displays in the CURRENT WARNING box of the SYSTEM STATUS screen See Alarm Types page 10 2 The system will...

Page 155: ...er effect processing used to clean the brushes before the first wafer in a cassette or batch The First Wafer Dose Effect can also be set in the Process Recipe 1 From the MAIN MENU screen touch SELECT...

Page 156: ...7 16 INTEGRA Operations Revision A 7 26 00 20 0200 231 CR 20 0200 232 Std 20 0200 251 CD This page is intentionally left blank...

Page 157: ...ntacting the wafer or Input Station door When the arm paddle is fully retracted the Input Station s conveyor smoothly moves the wafer away from the door into the process position center of station the...

Page 158: ...13 Verify that the spindle fingers do not open so wide that they contact the carriage when the carriage moves in Adjust fingers using the Spin Figure Adjustment procedure in the Maintenance manual 14...

Page 159: ...21 Verify that the wafer is centered in each spindle finger Also verify that the spindle is smoothly retracted into the catch cup The spindle motor operation should be smooth and free from any jerkin...

Page 160: ...ck the following variables Spin process completes before Output Robot arm moves into Spin Station exit tunnel Output Robot arm moves in under wafer Arm is centered between spin fingers and centered un...

Page 161: ...accessing the PROCESS PROGRAM MANAGEMENT SCREEN ANOTE Changing Process Chemistries In order to change system chemistries e g HF to Hi Toxic MCC 3000 hardware and or system software must be changed How...

Page 162: ...PROGRAM MANAGEMENT SCREEN to select and edit a Process Recipe 3 Touch EDIT RECIPE to deactivate all buttons except EDIT RECIPE When EDIT RECIPE is active the button changes to CANCEL EDIT ANOTE The c...

Page 163: ...creen in the CURRENT PROCESS box e g Standard 5 Touch the blinking EDIT SELECTED RECIPE button at the bottom left of the screen to display the MODIFY STATION RECIPE window See illustration above 6 The...

Page 164: ...tations Entrance Spray Brush 1 only On Off Binary 1 or 0 Process Chemistry On Off Binary 1 or 0 Brush Height 0 50 5 mm max 10th of mm Event Time 0 1800 3 min 0 180 seconds 10th of seconds Roller Speed...

Page 165: ...tings The BRUSH STATION DEFINE PROCESS screen is divided into four functional sections columns The first left second and third columns are used to set individual Brush Station 1 EVENT variables EVENTS...

Page 166: ...OFF the ammonium hydroxide drip for the EVENT in that column Current status of the switch appears on the right side of the button ON or OFF DI HIGH FLOW Toggle Switch Toggles ON and OFF the DI water h...

Page 167: ...t change the roller speed Sets the speed RPM at which the roller turns Operating parameter range 30 140 for standard motors Motors will stall below 30 rpm Edge rollers hold the wafer in place centered...

Page 168: ...et to 0 the following EVENT entries will not be operational Thus if EVENT 2 TIME is set to 0 and EVENT 3 TIME is set to 30 seconds 300 10th of seconds EVENT 3 will never be triggered 4 Enter the desir...

Page 169: ...o display the NUMBER PAD 6 Enter the required ROLLER SPEED RPM in the NUMBER PAD screen not shown and touch ENTER The ROLLER SPEED controls the speed at which the wafer turns between the brushes The s...

Page 170: ...The BRUSH SPEED sets the speed RPM of both brushes in the Brush Station The BRUSH SPEED is identical for both brushes during the EVENT even though the top and bottom brushes turn in opposite directio...

Page 171: ...to activate ON or deactivate OFF the higher flow of DI water to the upper brushes or upper and lower brushes depending on hardware configuration for a specific EVENT The DI HIGH FLOW button is an ON O...

Page 172: ...for process Carefully evaluate the process before disabling closing the DI LOW FLOW The DI LOW FLOW button is an ON OFF toggle switch that controls DI Low Flow dispense during each process EVENT Chan...

Page 173: ...ustration below are not EVENT dependent They are set to operate according to their own individual parameters These parameters occur during CONTINUIOUS wafer processing mode Do not confuse these parame...

Page 174: ...nd the recipe has DI LOW FLOW MODE toggled OFF then the system will not flow DI water to the brushes while not processing wafers or in STOP mode Do not leave the system in this condition for more than...

Page 175: ...l move off the wafer and the brushes and rollers stop turning Current status is displayed on the right side of the button BRUSH IDLE SPEED Defining button which brings up NUMBER PAD Speed at which the...

Page 176: ...ng EVENT in Brush Station 1 DI will remain off until the next wafer is processed using DI water The current status displays on the right side of the button ANOTE If DI Low Flow 2 way air controlled fl...

Page 177: ...t disables the alarm Note Brush Station 2 PROCESS ALARM TIMEOUT is set for programmable Alarm 159 The PROCESS ALARM TIMEOUT timer starts at the completion of the last programmed EVENT in the First Bru...

Page 178: ...hes move off UP the wafer and the brushes and rollers stop turning Once the wafer can transfer out of Brush Station 1 Alarm 158 is cleared the brushes return to their process position and normal proce...

Page 179: ...to lift the brushes off the wafer When UP is selected the brushes and rollers stop turning ANOTE Time out Alarms 158 and 159 are used to prevent wafers from being over exposed to the process chemical...

Page 180: ...mode the brushes do not rotate If the system is to be down for more than an hour see Several Hours on page 5 14 Change BRUSH HEIGHT 20 Touch BRUSH HEIGHT to display the NUMBER PAD to set the distance...

Page 181: ...USH STATION PROCESS screen of the Process Recipe is identical to Brush Station 1 with the following three exceptions There is no ENTRANCE SPRAY option because the EXIT SPRAY option in Brush Station 1...

Page 182: ...ns see the preceding Brush Station 1 section Change FLAT FINDER 2 Touch FLAT FINDER SPEED previous illustration to display the NUMBER PAD not shown and set the speed 3 Enter the desired speed RPM on t...

Page 183: ...ivates ON or deactivates OFF the flow of HF solution through the Brush Station 2 brushes HF may be activated or deactivated for each specific EVENT The Process Key on the control panel must be turned...

Page 184: ...under two different conditions Drip Wafer Count Brush Cleaning and Idle Time Brush Cleaning The third grouping of buttons chemically prepares doses the brushes First Wafer Effect that have been idle...

Page 185: ...the DRIP TIME If the DRIP CHEM and or the DRIP LOW FLOW DI and or the DRIP HI FLOW DI are all set to ON then they will all start at the same time DRIP LOW FLOW DI ToggleON OFF default ON Sets the DRI...

Page 186: ...Clean OFF Time Displays the NUMBER PAD screen to set change the brush clean off time Defines the time intervals that the NH4OH flow stops dripping onto the brush during extended system idle time Durin...

Page 187: ...dle time elapses BRUSH IDLE TIMER the IDLE HI FLOW DI will turn ON to clean the brushes Brush cleaning continues for the interval time set in the BRUSH IDLE ON TIME Brush cleaning stops for the interv...

Page 188: ...ner will be put into CLEARING mode After the alarm timeout period the First Wafer Dose for the next wafer may occur BEFORE the cleaner comes out of the CLEARING mode DOSE MODE Brush Station 1 Selects...

Page 189: ...H is dispensed in the STD and HF1 key positions The HF2 position is not functional When hi toxic or lo toxic chemicals are configured in the Brush Stations the drip manifolds is are not used In hi tox...

Page 190: ...g time 3 Enter the desired DRIP TIME s in 10th of seconds that ammonium hydroxide will flow through or drip onto the brushes on the NUMBER PAD not shown and touch ENTER 4 Touch DRIP TIME for Brush Sta...

Page 191: ...d to process each wafer Periodically based on wafer count NH4OH is introduced to clean the brushes 7 Enter the desired count on the NUMBER PAD not shown and touch ENTER Use the DRIP WAFER COUNT button...

Page 192: ...ion 1 or Brush Station 2 Once the number of wafers in the DRIP WAFER COUNT occurs processing halts and the DRIP CHEM flow turns ON so that the brushes can be cleaned Brush cleaning continues for the t...

Page 193: ...F default ON for Brush Station 1 or Brush Station 2 Once the number of wafers in the DRIP WAFER COUNT occurs processing halts and the DRIP LOW FLOW DI turns ON so that the brushes can be cleaned Brush...

Page 194: ...Station 1 or Brush Station 2 Once the number of wafers in the DRIP WAFER COUNT occurs processing halts and the DRIP LOW FLOW DI turns ON so that the brushes can be cleaned Brush cleaning continues fo...

Page 195: ...afers to process a timer 10th of seconds begins to count until it matches the time set in the BRUSH IDLE TIMER variable When the timer matches the time process chemical and or DI Low Flow and or DI Hi...

Page 196: ...n to set the time delay between the machine becoming idle and the start of the first brush cleaning cycle 15 Touch BRUSH IDLE TIMER for Brush Station 2 Cleaning to display the NUMBER PAD and set the t...

Page 197: ...RUSH IDLE ON TIME button to set the length duration of brush cleaning time During the clean on cycle process chemical flows through or drips on the turning brushes and the DI HIGH FLOW and or DI LOW F...

Page 198: ...red time in 10th of seconds on the NUMBER PAD not shown and touch ENTER Use the BRUSH IDLE OFF TIME button to set the length of the time delay between brush cleaning cycles 23 Touch BRUSH IDLE OFF TIM...

Page 199: ...th of seconds on the NUMBER PAD not shown and touch ENTER Use the EDGE CLN ON TIME button to set the length duration of edge cleaning time During the clean on cycle DI water sprays on the edge cleanin...

Page 200: ...sired time in 10th of seconds on the NUMBER PAD not shown and touch ENTER Use the EDGE CLN OFF TIME button to set the length of the time delay between edge cleaning cycles 31 Touch EDGE CLN OFF TIME f...

Page 201: ...e used The Idle Chem icon does not display when Hi Toxic chemicals such as HF MCC etc are used Once the system is in IDLE and the idle time elapses BRUSH IDLE TIMER the IDLE CHEM will turn ON to clean...

Page 202: ...DLE CHEM since process chemicals can be wasted during Idle Time Change IDLE LOW FLOW DI 34 Toggle the IDLE LOW FLOW DI ON or OFF default ON for Brush Station 1 or Brush Station 2 Once the system is in...

Page 203: ...sh Station 2 Once the system is in IDLE and the idle time elapses BRUSH IDLE TIMER the IDLE HI FLOW DI will turn ON to clean the brushes Brush cleaning continues for the interval time set in the BRUSH...

Page 204: ...correct the process pH when continuous wafer cycling is interrupted When wafer cycling is interrupted and DI LOW FLOW is ON then the brush pH levels are neutralized When normal processing resumes the...

Page 205: ...been idle for the time set in the WAFER IDLE TIME variable Once the wafer process activates the system waits for a signal that a wafer is ready to begin processing When the selected flow conditions a...

Page 206: ...in the WAFER DOSE TIME parameter next page then stops The current mode displays on the DOSE MODE button 1st WAFER mode will only dose the brushes with chemical before processing the first wafer after...

Page 207: ...1st WAFER IDLE TIME variable Change WAFER DOSE TIME 42 The WAFER DOSE TIME see illustration on following page only applies to the first wafer if the DOSE MODE is 1st WAFER If the DOSE MODE is ALL WAFE...

Page 208: ...g speed of the brushes will vary dramatically Only a process engineer should determine the dose time setting for each Brush Station 45 Touch WAFER DOSE TIME following illustration for Brush Station 2...

Page 209: ...dosing chemical starts Change DOSE LOW FLOW DI 48 Toggle the DOSE LOW FLOW DI ON or OFF default ON for Brush Station 1 or Brush Station 2 When DOSE LOW FLOW DI is set to ON high flow DI water is used...

Page 210: ...ose the brushes Brush dosing continues for the time set in the WAFER DOSE TIME DOSE HI FLOW DI is not typically enabled ON because the 1st WAFER dosing option is used to precondition the brushes and e...

Page 211: ...Y SPIN EVENT 1 3 MODIFY SPIN EVENT 4 6 and MODIFY SPIN EVENT 7 9 buttons to display the corresponding SPIN STATION PROCESS EDIT SCREEN to set EVENT variables following illustration Together these EVEN...

Page 212: ...hree Spin Station EVENTS This displays the SPIN STATION PROCESS PROGRAM DEFINE EVENTS 1 3 for EVENTS 1 3 Time 0 1800 3 min max 10th of seconds Spindle Speed Never run above 2000 rpm with wafer present...

Page 213: ...creen provides access for setting the parameters of each variable in each EVENT Each setting is valid only for the amount of time a particular EVENT is in process When the time in each EVENT expires t...

Page 214: ...om spray rinse The current status displays on the right side of the button The LOWER RINSE button is an ON OFF toggle switch for the DI water spray applied to the bottom of the wafer throughout the sp...

Page 215: ...lamp is not usually used in the early EVENTS when larger drops of water are being removed It is normally used in later EVENTS to help dry the wafer MEGASONIC GENERATOR BUTTONS Change MEGASONICS GEN Op...

Page 216: ...plays on the screen in seconds ANOTE For the Megasonic Event only set the time to 0 seconds The event time is the actual time it takes to complete the programmed number of sweeps at the sweep per seco...

Page 217: ...s per minute RPM at which the spindle turns the wafer in the Spin Station during this EVENT The first EVENTS may have a slower speed as the larger droplets of water are spun off Later EVENTS may have...

Page 218: ...seconds required for the megasonic arm to move from the edge of the wafer to the center Enter the number of seconds for the sweep and touch ENTER 10 SET THE MEGASONIC SWEEPS AFTER SETTING SECONDS SWEE...

Page 219: ...AM MANAGEMENT screen 4 From the PROCESS PROGRAM MANAGEMENT screen not shown touch EDIT RECIPE 5 From the PROCESS PROGRAM RECIPE SCREEN choose touch one of the Process Recipes and then touch EDIT SELEC...

Page 220: ...PROGRAM SCREEN to a manual log Remember the COPY TO FLOPPY button in the PROCESS PROGRAM MANAGEMENT SCREEN next section does not produce a readable file The function of this button is only to copy a...

Page 221: ..._____ _____ _____ DI Flush Duration sec ___________ Roller Speed rpm _____ _____ _____ Brush Idle Speed rpm ___________ Brush Speed rpm _____ _____ _____ Brush Height mm ___________ Edge Clean On Off...

Page 222: ...9 62 INTEGRA Operations Revision A 7 26 00 20 0200 231 CR 20 0200 232 Std 20 0200 251 CD...

Page 223: ...Idle Clean OFF Time 0 864000 24 hrs 10th of seconds Edge Clean Clean ON time 0 36000 1 hour 10th of seconds Edge Clean Clean OFF time 0 864000 24 hrs 10th of seconds Brush Idle Speed 0 140 190 450 rpm...

Page 224: ...l other flow meter Actual Flow Rates are for DI water or a very dilute chemical solution i e 2 0 LAM P N 35 0005 031 LAM P N 35 0005 036 20 CC MIN FLOWMETER Ultra Low Flow Series Flow Meter Settings A...

Page 225: ...LOWMETER Low Flow Series FLOW RATE 5 250 CC MIN in H20 w Solid Teflon Float 1 2 3 4 5 6 7 8 9 10 MARK 1 10 0 25 50 75 100 125 150 175 200 225 250 CC MIN 0 0 01 0 02 0 03 0 04 0 05 0 06 GPM ACCURACY 5...

Page 226: ...1000 CC MIN FLOWMETER FLOW RATE 90 1000 CC MIN in H20 1 2 3 4 5 6 7 8 9 10 MARK 1 10 0 100 200 300 400 500 600 700 800 900 1000 CC MIN 0 0 05 0 1 0 15 0 2 0 25 GPM ACCURACY 5 FS U U S 1500 CC MIN FLO...

Page 227: ...e system to another 1 Display the PROCESS PROGRAM MANAGEMENT SCREEN 2 Place the disk in the drive slot in the Electrical Enclosure and touch the FORMAT FLOPPY button for all software ver 2 2 2 and low...

Page 228: ...he screen asking if a floppy disk is in the drive Ensure that a disk is in the drive 4 When the disk is reformatted ver 2 2 2 and lower to OS9 to accept the Process Recipe data touch the COPY TO xxx F...

Page 229: ...e is not displayed touch the scroll bar right side of the screen hold and drag until the name displays in the Recipe Column It is possible to select all of the Process Recipes by clicking on the ALL R...

Page 230: ...mpted with a confirming message when the currently selected recipe is not the default recipe The default recipe can only be modified if the user first suspends the Default Process feature Any attempt...

Page 231: ...C h a p t e r 9 P R O C E S S R E C I P E 7 26 00 INTEGRA Operations Revision A 9 71 20 0200 231 CR 20 0200 232 Std 20 0200 251 CD STANDARD Current Process Status Box...

Page 232: ...DEFAULT PROCESS to access the DEFAULT PROCESS PROGRAM screen 3 When the DEFAULT PROCESS PROGRAM screen displays the message DEFAULT RECIPE is DISABLED please select an operation flashes on the screen...

Page 233: ...E DEFAULT to complete the selection The message see following figure at the top of the screen changes to RECIPE STANDARD is DEFAULT Please select an option The system copies the default recipe Each ti...

Page 234: ...sabled before the parameters in the recipe can be changed 6 Touch DISABLE DEFAULT RECIPE to disable the default recipe TEST TEST2 SHORT TEST STANDARD RECIPE STANDARD is DEFAULT please select an operat...

Page 235: ...to cancel the request When YES is selected the is removed from the default recipe Also the message at the top of the screen displays DEFAULT RECIPE is DISABLED please select an operation 8 When YES i...

Page 236: ...eration The remains next to the default recipe A default recipe is Suspended so that the parameters in the recipe can be changed without disabling losing the default recipe Operator Message If the def...

Page 237: ...the text changes to CANCEL DEFAULT RECIPE The Suspended default recipe is restored to an enabled status The message at the top of the screen displays RECIPE STANDARD is DEFAULT please select an operat...

Page 238: ...9 78 INTEGRA Operations Revision A 7 26 00 20 0200 231 CR 20 0200 232 Std 20 0200 251 CD This page intentionally left blank...

Page 239: ...s put into STOP mode Input Station processing will not dispense wafers until the problem is corrected or some processing condition is met processing in a particular station will be halted until the pr...

Page 240: ...he message in the ALARM field described below it The light bulb icon is a button which may be touched to acknowledge the current alarm If there is more than one warning the light bulb will return with...

Page 241: ...d resolve each alarm that displays on the screen before touching the light bulb to erase it In this way alarms are dealt with and not forgotten The following illustration shows the location of the lig...

Page 242: ...MESSAGES screen displays The ALARM MESSAGES screen see illustration above has two columns The first column lists the alarm number and alarm description The second column lists the date time and wafer...

Page 243: ...alarms can also be reviewed in the Alarm logs of both the CMP host system and Integra cleaner Note Although the Integra cleaner has a GEM CONFIGURATION screen see Chapter 11 GEM Configuration Message...

Page 244: ...h Motor Failure Alarm ID 99 Brush Station 2 Lower Brush Motor Failure Programmable Alarms Set Operating Parameters Seven alarms are programmable in that various operating parameters can be set in the...

Page 245: ...om the MAIN MENU screen touch SELECT OPTIONS 2 Touch the BRUSH MOTOR ALARMS button to enable or disable the following four alarms Alarm 19 Alarm 20 Alarm 98 Alarm 99 See Illustration above Brush motor...

Page 246: ...MMABLE ALARMS Accessing Alarm Configuration Menu 1 From the ENGINEERING MENU screen touch ALARM CONFIGURATION Alarm Configuration Menu Screen Description ALARM CONFIGURATION MENU Screen STANDARD 100 B...

Page 247: ...e configured under the current software version ver 2 2 3 Most alarms do not have parameters that can be configured The number of alarms that can be configured configurable parameters will increase wi...

Page 248: ...ed alarm highlights blue Alarm Number and Description display in the boxes at the top of the screen alarm displays if it is selectable or configurable and if configurable displays the alarm s current...

Page 249: ...lled Alarm Causes the Alarm Status to be ENABLED or DISABLED so that system can respond to or ignore the alarm when signalled Sonalert Causes an audible alarm to sound when alarm is signalled 2 ALARM...

Page 250: ...uration procedure CLEAR Clears all configured alarm parameters and resets them to DISABLED UNDO Erases any changes made to the alarm parameters before they are saved All configuration alarm parameters...

Page 251: ...may be halted If processing is terminated due to the alarm the system will remain shut down until the problem is resolved even though the operator touches the Light Bulb icon and clears the alarm The...

Page 252: ...is posted when the programmed set point has been reached Disposition The alarm is posted but processing continues GEM ALID 3 GEM Alarm ALARM ID 4 Description UV Lamp Failure Posting Program Monitor A...

Page 253: ...ation is for HF processing The alarm is posted any time HF is enabled and the delivery system is not ready Disposition System is put into CLEAR mode GEM ALID 6 GEM Alarm ALARM ID 7 Description Chemica...

Page 254: ...tion Water Heater Minor Alarm Posting Program Monitor Alarm Type Alarm Sonalert Reason This alarm is only valid on systems with the optional Rippey Water Heater Interface The alarm is posted if a mino...

Page 255: ...nowledged as received by Brush Station 1 Disposition Input STATION process will not continue until Brush Station 1 acknowledges receipt of wafer GEM ALID 12 GEM Alarm ALARM ID 13 Description Input Sta...

Page 256: ...1 Station Alarm Type Alarm Sonalert Reason This alarm indicates that the leading edge of the wafer was detected but after 10 seconds the trailing edge was not detected The system thinks the wafer is n...

Page 257: ...cription Brush Station 1 Error Trying To Close Rollers To 8 Inch Posting Program Brush 1 Station Alarm Type Alarm Sonalert Reason This alarm is valid only on systems that have the Roller Position Sens...

Page 258: ...s a 10 difference between the actual speed and the programmed speed Disposition System is put into CLEAR mode GEM ALID 20 GEM Alarm ALARM ID 21 Description Brush Station 1 Roller Motor Speed Out Of Sp...

Page 259: ...nks that the wafer is not completely in Brush Station 2 Disposition The Brush 2 Station program will not continue until the trailing edge of the wafer is detected GEM ALID 23 GEM Alarm ALARM ID 24 Des...

Page 260: ...isposition The Brush 2 Station program will not continue until the Spin Station acknowledges receipt of the wafer GEM ALID 26 GEM Alarm ALARM ID 27 Description Spin Station Wafer Sensor Doesn t See Wa...

Page 261: ...id only on systems that have the Roller Position Sensor option installed The alarm is posted when the roller solenoids are set to the 6 inch closed position but the sensors do no report 6 Inch closed...

Page 262: ...ion program will not continue until the spin spindle lock sensor reports that the spindle is locked GEM ALID 31 GEM Alarm ALARM ID 32 Description Brush 2 Error Looking For Megasonic Arm Home Sensor Po...

Page 263: ...g Program Brush 2 Station Alarm Type Alarm Sonalert Reason If the spindle is not in the MID position when it is time to release the wafer into the Spin Station an attempt is made by the Brush 2 Statio...

Page 264: ...ALID 36 GEM Alarm ALARM ID 37 Description Spin Station Waiting on Wafer From Brush Station 2 Posting Program Spin Station Alarm Type Alarm Sonalert Reason The wafer has failed to arrive from Brush St...

Page 265: ...GEM Alarm ALARM ID 40 Description Megasonic Low Flow Detected Before Meg Processing Posting Program Spin Station Alarm Type Alarm Sonalert Reason Before the Megasonic Generator is turned on the flow s...

Page 266: ...g a Megasonic processing event Disposition The system is put into STOP mode and the Spin Station readies itself for the next wafer GEM ALID 42 GEM Alarm ALARM ID 43 Description Spin Fingers Closed Los...

Page 267: ...icates that the spindle top sensor did not detect the spindle after the spindle was sent to the TOP position Disposition The Spin Station program will not continue until the spindle top sensor detects...

Page 268: ...to remove the wafer a check is made on the rotation arm home sensor and the rotation arm at output sensor One of these sensors must detect the rotation arm in order for the Spin Station program to kno...

Page 269: ...e rotation arm is clear of the Spin Station If it is not this alarm is posted Disposition The Spin Station program will not continue until it is reported that the rotation arm has been removed from th...

Page 270: ...not continue until the Z_Lock unlocked sensor detects that the Z_Lock is unlocked GEM ALID 52 GEM Alarm ALARM ID 53 Description Time out Looking For Spin Door Latch Sensor Posting Program Spin Station...

Page 271: ...ill not continue until the Megasonic sweep motor finds the megasonic motor home sensor GEM ALID 55 GEM Alarm ALARM ID 56 Description Time out Looking For Megasonic Arm Home Extend Sensor Posting Progr...

Page 272: ...chanism is retracted GEM ALID 58 GEM Alarm ALARM ID 59 Description Time out Looking For N2 Arm Retract Sensor Posting Program Spin Station Alarm Type Alarm Sonalert Reason When the N2 arm is told to r...

Page 273: ...ion program will not continue until the spindle lock sensor reports the spindle lock in the locked position GEM ALID 61 GEM Alarm ALARM ID 62 Description Time out Looking For Carriage Extend Sensor Po...

Page 274: ...Alarm Sonalert Reason When the spin fingers are told to open the spin finger open sensor is monitored If after 10 seconds the sensor does not report the open position this alarm is posted Disposition...

Page 275: ...MID position GEM ALID 66 GEM Alarm ALARM ID 67 Description Time out Looking For Spindle Bottom Position Sensor Posting Program Spin Station Alarm Type Alarm Sonalert Reason The alarm is posted if 10 s...

Page 276: ...p EMO Posting Program Spin Station Alarm Type Alarm Sonalert Reason If an E stop EMO condition occurs while the Spin Station is processing all motions and flows are halted When the E stop EMO conditio...

Page 277: ...ted Disposition This is a severe error that puts the system into STOP mode The system can continue if the problem can be resolved without powering down If the fingers can be closed through the mainten...

Page 278: ...n does not have a cassette 12 seconds after the rotation arm is ready to move the alarm is posted Disposition The Unload Handler program will not continue until the Output Station has a cassette avail...

Page 279: ...t Wafer In Lifter Posting Program Unload Handler Alarm Type Alarm Sonalert Reason After the rotation arm has moved from the Spin Station to the Output Station the lifter is told to make it s final mov...

Page 280: ...sette Five seconds after the move has started a check is made to verify the wafer is still in the lifter If the wafer is not in the lifter the alarm is posted Disposition The system is put into STOP m...

Page 281: ...t continue until the spin carriage extend sensor is seen GEM ALID 80 GEM Alarm ALARM ID 81 Description Remove Output Cassette Press Start Posting Program Output station Alarm Type Alarm Sonalert Reaso...

Page 282: ...ous Posting Program Output station Alarm Type Alarm Sonalert Reason When a new cassette is put in the output cassette mode is checked to verify that it is in a valid configuration This alarm is posted...

Page 283: ...EM ALID 85 GEM Alarm ALARM ID 86 Description Brush Station 2 Exhaust Failure Posting Program Monitor Alarm Type Alarm Sonalert Reason This alarm is valid only on systems equipped with exhaust sensors...

Page 284: ...ID 89 Description Megasonic High Flow Detected During Meg Processing Posting Program Spin Station Alarm Type Alarm Sonalert Reason During Megasonic processing the megasonic high flow sensor is consta...

Page 285: ...pin Complete System Waiting On Cassette Removal Posting Program Spin Station Alarm Type Alarm Sonalert Reason When the spin process is complete the spindle is sent to the TOP position and the Unload H...

Page 286: ...alarm is posted whenever a leak is detected on a system without the Envoy Interface option Disposition The alarm is posted but no other action is taken GEM ALID 93 GEM Alarm ALARM ID 94 Description L...

Page 287: ...n Spin Motor Reports Zero Speed Posting Program Spin Station Alarm Type Alarm Sonalert Reason This alarm is posted whenever the Spin Station spindle motor is seen at zero speed A check is made for thi...

Page 288: ...rocess event The process event must be at least 4 seconds for the test to take place Disposition System is put into CLEARING mode GEM ALID 99 GEM Alarm ALARM ID 100 Description Brush Station 2 Roller...

Page 289: ...esn t see the wafer travel past it Disposition The Spin Station process will not continue until the wafer is seen at the 6 inch wafer sensor GEM ALID 102 GEM Alarm ALARM ID 103 Description Spin Statio...

Page 290: ...received and the PRI mode is enabled Disposition The system will not return to a RUN status until the external signal is either cleared or the PRI mode is disabled In either case the Operator Control...

Page 291: ...ed condition GEM ALID 107 GEM Alarm ALARM ID 108 Description Close Lid Timeout Waiting For Lid Closed Sensor Posting Program Input Station Alarm Type Alarm Sonalert Reason This alarm is posted when th...

Page 292: ...and continue to operate the transport for 10 seconds to ensure that the wafer gets to a safe position Note that the Spin Station will not be signaled to receive a wafer if any of the 8 inch wafer sens...

Page 293: ...on Close Door Timeout Waiting For Door Closed Sensor Posting Program Input Station Alarm Type Alarm Sonalert Reason This alarm is only valid on systems that support the Bulkhead or Input Station Door...

Page 294: ...Lock option when the Input Station is attempting to unlock the lid lock and the lid lock sensors are not indicating the correct states Disposition The Input Station will not continue until the lid loc...

Page 295: ...amp failure When the heat lamp fails the spin time for the heat lamp event is increased by 60 seconds to allow ample time to dry the wafer GEM ALID 117 GEM Alarm ALARM ID 118 Selectable Description Pr...

Page 296: ...ystems with multiple spin wafer sensor software configured GEM ALID 119 GEM Alarm ALARM ID 120 Description Exhaust Baffle Open State Expected Baffle Closed Posting Program Monitor Alarm Type Alarm Son...

Page 297: ...host system to issue the GEM Take Wafer remote command The GEM Take Wafer remote command instructs the DSS 200 or Integra to enable the Input Station s transfer belt and move the wafer into the Input...

Page 298: ...n The CMP host system can then send a new GEM Closed Door remote command to continue with the handshake sequence GEM ALID 123 GEM Alarm ALARM ID 124 Description Timeout Waiting For GEM Wafer Accepted...

Page 299: ...Spin Station tunnel If the spin fingers open without the Output Robot arm in the tunnel under the wafer the cleaned wafer will drop from the spindle and be damaged or broken Disposition The Open Fing...

Page 300: ...nted GEM ALID 128 GEM Alarm ALARM ID 129 Description Timeout Waiting For GEM Output Handshake Message Posting Program Spin Alarm Type Alarm Sonalert Reason This alarm is only posted on Series II Serie...

Page 301: ...ms that use an HF Brush Station The leak detector outer containment sensor in the secondary containment drain has detected a liquid Disposition The system will go into CLEARING mode and the secondary...

Page 302: ...rm Posting Program Brush1 Alarm Type Alarm Sonalert Reason The Brush1 program has detected the absence of chemical flow after requesting a chemical The delay time for the alarm is 10 seconds Dispositi...

Page 303: ...e Clearing mode occurs the current wafer continues to be processed in this Brush Station but may not have proper edge cleaning This alarm can only occur on systems that have the appropriate hardware s...

Page 304: ...id is open to allow full exhaust of air from the Brush Station Disposition The system is put into Clearing mode This alarm can only occur on systems equipped with series 2C Brush Stations GEM ALID 139...

Page 305: ...Input Alarm Type Alarm Sonalert Reason This alarm is only valid on systems configured to support both polisher and cassette interfaces If in Cassette mode a wafer is found at start up and there is no...

Page 306: ...Wafer Posting Program Input Alarm Type Alarm Sonalert Reason This alarm is only valid on systems configured with a polisher that uses a parallel interface If a wafer is not received after receiving a...

Page 307: ...The Input Station Exhaust Sensor detects when no exhaust is present Disposition The system is put into CLEARING mode GEM ALID 147 GEM Alarm ALARM ID 148 Description Spin Station Exhaust Failure Postin...

Page 308: ...h is external to the Lam system Disposition The system is put into CLEARING mode GEM ALID 150 GEM Alarm ALARM ID 151 Description Input Spin Or Output Lid Door Not Closed And Locked Posting Program Mon...

Page 309: ...to run the Six Chemical option This alarm indicates that the pressure is below the setpoint for Chemical Line 1 This alarm can only occur on systems that have the appropriate hardware sensors and sof...

Page 310: ...ic Current Sensor Failure Posting Program Spin Alarm Type Alarm Sonalert Reason This alarm indicates that the Megasonic generator is not drawing sufficient line current This implies that there is litt...

Page 311: ...meter The timeout entered is in tenths of seconds A value of 0 disables the alarm GEM ALID 158 GEM Alarm ALARM ID 159 Enable alarm in process recipe screen Description Brush 2 Process Alarm Timeout Po...

Page 312: ...cted GEM ALID 160 GEM Alarm ALARM ID 161 Programmable Description No Spin Time In Recipe Posting Program Monitor Alarm Type Alarm Sonalert Reason This alarm indicates that in the current process recip...

Page 313: ...th the Input Robot from the CMP or the Output Robot to clean room All GEM messages are routed through the CMP Host GEM control messages are sent between computers and can not be directly observed on t...

Page 314: ...10 76 INTEGRA Operations Revision A 7 26 00 20 0200 231 CR 20 0200 232 Std 20 0200 251 CD...

Page 315: ...erations Revision A 10 77 20 0200 231 CR 20 0200 232 Std 20 0200 251 CD INTEGRA OUTPUT STATION GEM INTERFACE SEQUENCE Use the following chart to identify the CEID and RCMD commands sent between the In...

Page 316: ...s of both the CMP host system and Integra cleaner Although the Integra cleaner has a GEM CONFIGURATION screen see Chapter 10 GEM CONFIGURATION of the Maintenance manual or Chapter 11 of the Operations...

Page 317: ...he Input Station conveyor by the Input Robot and the Input Station door not lid closed The Integra recognizes a wafer is present for processing processes the wafer then positions the wafer in the Spin...

Page 318: ...tion Events Appendix C Alarms The CMP Cleaner reports alarms to the host when they occur The Integra has a fixed set of alarms conditions which can occur Each alarm is identified by a unique Alarm ALI...

Page 319: ...s the Input Bulkhead door See the following table ALID ALCD ALTX Alarm Description ON CEID OFF CEID 122 6 Take Input Wafer Command Timeout 443 444 123 6 Close Input Door Command Timeout 445 446 124 6...

Page 320: ...can be guided by either a local operator or by a host computer e g Integra Input Robot Output Robot etc through Remote GEM Commands messages available to the host computer The general format for Remo...

Page 321: ...he Input Station wafer Door is not the Input Station lid S2F41 W L 2 A Open Door Remote Command String L MOVE WAFER INTO INPUT STATION The Move Wafer Into Input Station message command is issued by th...

Page 322: ...exits the Input Station Once the door is closed wafer processing starts The Input Station door is not the Input Station lid S2F41 W L 2 A Close Door Remote Command String L OPEN SPIN STATION FINGERS T...

Page 323: ...the CMP Host after the following Output Robot has removed the wafer from the Spin Station After the Wafer Accepted From Spin Station message is received by the CMP cleaner the Spin Station is reiniti...

Page 324: ...10 86 INTEGRA Operations Revision A 7 26 00 20 0200 231 CR 20 0200 232 Std 20 0200 251 CD This page intentionally left blank...

Page 325: ...o the factory host and receive data messages and instruction from the host The GEM link can be set up strictly as an informational communication system or it can provide access to the Integra so that...

Page 326: ...onal link with the factory host These buttons are primarily used during maintenance procedures and not used to set the initial parameters Each button displays the state that will exist next time the b...

Page 327: ...tton is a switch that toggles between ENABLE and DISABLED When this button is touched an RS 232 link is attempted between the Integra and the factory host system The connection attempt is made for the...

Page 328: ...ablished between the two systems The host system must acknowledge with a signal indicating that it is ready for the CONTROL STATUS link If the attempt fails to setup the ONLINE status the CONTROL STAT...

Page 329: ...s Revision A 11 5 20 0200 231 CR 20 0200 232 Std 20 0200 251 CD The current status is displayed in the CONTROL STATUS box at the bottom right of the GEM CONFIGURATION screen circled in the illustratio...

Page 330: ...on above ESTABLISH COMM TIMEOUT The ESTABLISH COMM TIMEOUT parameter sets the number of seconds during which the Integra will attempt to establish a link between the factory host and itself If the lin...

Page 331: ...he INITIAL COMM STATE button is a switch that toggles between Disabled and Enabled When the button displays Enable the Integra attempts to establish an RS 232 communication link with the factory host...

Page 332: ...the setting is Remote when the Integra boots up the Integra attempts to establish a link where control of the system is determined by the factory host If the setting is Local when the Integra boots u...

Page 333: ...s 0 5 seconds T2 is the Protocol Timeout Its allowable range is 0 2 to 25 0 seconds at increments of 0 1 seconds Default is 10 0 seconds T3 is the Transaction Timeout Its allowable range is 1 to 120 s...

Page 334: ...12 InLidClosed Input lid closed 13 GemPPChangeEvent 14 OutputStart Output cassette start 20 ProcStart Process start 21 ProcCompl Process complete 22 GemEquipmentOFFLINE 25 GemControStateLOCAL 26 GemCo...

Page 335: ...quence has completed at the Output Station 71 InputTransfer Input Station has transfered a wafer to Brush Station 1 72 SpinTransfer Spin Station has transfered a wafer to the Unload Handler 73 OutputT...

Page 336: ...owing parameters should display for a system configured at the factory to run GEM The following troubleshooting procedures only apply to the OnTrak cleaner not the GEM host GEM Control Signals 1 GEM C...

Page 337: ...t Hardware Checks 5 Modem Cable The RS232 modem cable must be a STANDARD MODE cable that uses a straight pin exchange and not a 2 pin or 3 pin exchange Also DO NOT use a NULL MODEM cable 6 RS232 Teste...

Page 338: ...231 CR 20 0200 232 Std 20 0200 251 CD Verify Test Equipment 9 Verify Test Equipment If step 5 6 and or 7 does not establish the GEM communication then individually test the laptop PC connecting RS232...

Page 339: ...engineering access does with the added provision of access to the SECURITY screen The SECURITY screen affords the opportunity to assign and delete password access for additional operators technicians...

Page 340: ...PLAY screen requesting a Logon ID name for the operator wishing to logon when the system initializes or when requesting access to a secure function e g Engineering 2 Touch YES to display the Keyboard...

Page 341: ...e requesting that the 1 6 character logon ID be entered Touch CONTINUE top right of the screen to bring up the keyboard screen 3 Enter the logon ID not the password unless the SYSTEM MESSAGE DISPLAY r...

Page 342: ...ENTER 7 If the password is accepted the screen returns to the function it was performing prior to the request for password verification If the password is not accepted the SYSTEM MESSAGE DISPLAY prese...

Page 343: ...the system for operators and technicians by giving them logon IDs and passwords CONTROL PANEL ON THE ELECTRICAL ENCLOSURE There are two key positions on the SECURITY KEY lock The vertical position act...

Page 344: ...n A 7 26 00 20 0200 231 CR 20 0200 232 Std 20 0200 251 CD 4 From the ENGINEERING MENU screen touch SECURITY CONFIGURATION 5 From the SECURITY screen touch the button next to an empty USER ID space in...

Page 345: ...0200 231 CR 20 0200 232 Std 20 0200 251 CD 6 The SYSTEM MESSAGE DISPLAY asks if you want to create a new user Touch YES upper right corner 7 The SYSTEM MESSAGE DISPLAY not shown requests a 1 6 charact...

Page 346: ...ch NO if you do not require a password for a new user 10 The keyboard not shown comes up again The SYSTEM MESSAGE DISPLAY requests a 1 6 character password Enter the 1 6 character password and touch E...

Page 347: ...delete a user from the system turn ON the Security key then use the following procedure 1 To delete a user ID from the system touch the button in the DELETE USER column next to the user ID to be dele...

Page 348: ...12 10 INTEGRA Operations Revision A 7 26 00 20 0200 231 CR 20 0200 232 Std 20 0200 251 CD This page intentionally left blank...

Page 349: ...roval Process Bulletins PBs Technical Support issues confidential Process Bulletins that may provide urgent maintenance procedures and preliminary procedural documents Customers will receive PBs on an...

Page 350: ...INTEGRA Operations Revision A 7 26 00 20 0200 231 CR 20 0200 232 Std 20 0200 251 CD Technical Service Bulletin TSR Receipt Log Recd Date Received By Technical Bulletin Number Description and or Comme...

Reviews: