

291 Griffith Road Unit 1, Stratford, ON, N5A 6S4, Canada
Phone: 519-271-7611
Fax: 519-271-8892
Email: [email protected]
Superior Design, Legendary Quality
1-800-565-7288
www.oneway.ca
Termite
Accessories
A No. 3 Termite Bit (5/8”) Part No. 2163
is also available.
Included with this Product
No. 1 Termite Bit (3/8”)
No. 2 Termite Bit (1/2”)
Grinding Block
Mounted Grinding Point
Handle and Shank
(Part No. 2161)
(Part No. 2162)
(Part No. 2164)
(Part No. 2166)
(Part No. 3000)
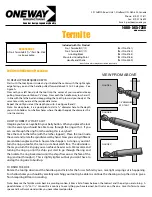
FIGURE A
FIGURE B
FIGURE C
VIEW FROM ABOVE
1-1/4"MINIMUM
AT START
TOOLREST
TO DEVELOP THE REQUIRED DEPTH
Start with the tool tip on its side and just behind the center with the right angle
edge facing you and the handle pulled forward about 15 to 20 degrees. See
Figure A.
Now with your left hand pull the tool into the center of your wood and keep
pulling toward you until about 1/8” deep. Now push the handle away to where it’s
in line with the lathe bed and keep pulling the tool tip toward your body at the
same time until you are at the required diameter.
Repeat this until you are at the depth you wish. See Figure B and C.
Note: For deep holes, it is a good plan to drill a 1/4” diameter hole to the depth
you wish to hollow. For shallow holes where the depth equals the diameter, this
is not neccessary.
HOW TO CORRECTLY START A CUT
Imagine you have an eyeball in your belly button. When you place the tool
into the vessel you should be able to see through the ring with it. If you
can see through the ring from the ceiling this is very bad!
Take the tool to the lathe (with the lathe stopped). Place the tool inside
the vessel and rotate the spindle/vessel by hand. Now you can try different
presentation angles and learn how catches happen. As long as you don’t
turn the ring up too far, the tool is just about catch free. The downside is
that as you turn the ring up you can achieve heavier cuts. We recommend
turning the ring up until the chips just start to go through the ring and
then rotate the ring back down until the chips flow across the face of the
ring (and not through it). This is slightly lighter cut but you won’t have to
unclog the ring due to build up.
TO FINISH THE SIDE
Rotate the tool tip down and the handle up and listen for the hiss which tells you a nice light scraping cut is happening.
For shallow holes you should by carefully watching your tool tip, be able to continue the shearing cut up the side to give a
finish requiring little or no sanding.
Note: Because the Termite works best in a pivoting motion, it likes a bit of room between the tool rest and the part you are turning. A
good distance is 11/4” to 11/2”. I know this is contrary to everything you have learned, but trust me on this one. Give this Termite some
space and it will work wonders like you never dreamed possible.
End Grain Hollowing Procedure
Any of these pieces may be purchased separately.