Onespace 50-812ES Assembly Instructions Manual Download Page 1

MODEL 50-812ES

SUPPLIER CODE: PMEX

ASSEMBLY INSTRUCTIONS

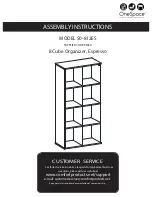
8 Cube Organizer, Espresso

For fastest service on claims, requests for replacement parts, or

                        questions, please visit our website at

www.comfortproducts.net/support

e-mail: [email protected]


Keep your sales receipt as documentation of your ownership.

CUSTOMER  SERVICE


OneSpace is a Trademark of Comfort Products, Inc.

Summary of Contents for 50-812ES

Page 1: ...st service on claims requests for replacement parts or questions please visit our website at www comfortproducts net support e mail customerservice comfortproducts net Keep your sales receipt as docum...

Page 2: ...2 OF 12 1 2 3 4 5 5 6 7 7 9 8 8 Shelf maximum weight capacity 10lbs Top maximum weight capacity 40lbs...

Page 3: ...CLEAR LACQUER THE FOLLOWING TOOLS ARE NOT INCLUDED IF YOU ARE MISSING ANY OF THE PARTS ABOVE OR IF YOU HAVE A DAMAGED PART PLEASE VISIT WWW COMFORTPRODUCTS NET SUPPORT REFERENCE THE MODEL ON THE FRON...

Page 4: ...f Panel B 6 two Center Panels A 7 and two Center Panels B 8 Top Panel 3 two Shelf Panels A 5 and Shelf Panel B 6 1 2 5 5 6 7 7 8 8 Part C x 18 Part A x 24 1 2 3 6 4 OF 12 5 5 A boards as well as to th...

Page 5: ...that the bolts are facing out the grooves referred to are on the sides not shown in the drawing below All grooves should be at the bottom 7 5 Part D x 2pcs Part B x 2pcs 7 5 8 Part E x 2pcs 5 OF 12 W...

Page 6: ...t E x 2pcs Use two CSK Screws D to attach the Shelf Panel B 6 and Center Panel B 8 Make sure that the grooves for the Back Panel are aligned 7 5 8 6 7 7 5 8 6 Part D x 2pcs Cams B clockwise and then c...

Page 7: ...Shelf Panel A 5 to Center Panel A 7 Make sure that the grooves for the Back Panel are aligned 7 5 5 8 6 7 7 5 5 8 6 7 8 Step 7 Step 8 Part D x 2pcs 7 OF 12 Part B x 2pcs Part E x 2pcs clockwise and t...

Page 8: ...8 2 6 7 8 9 Part B x 6pcs Part E x 6pcs both Shelf Panels A 5 and Shelf Panel B 6 While doing this make sure that the groove in Side Panel clockwise and then cover them with Cam Caps E both back Note...

Page 9: ...7 7 7 5 5 5 6 2 2 9 8 6 7 8 8 8 1 Part B x 6pcs Part E x 6pcs 5 both Shelf Panels A 5 and Shelf Panel B 6 While doing this make sure that the groove in Side Panel Left 1 then cover them with Cam Caps...

Page 10: ...7 5 5 6 1 4 2 9 8 8 Use six CSK Screws D to attach the Bottom Panel 4 to Side Panel Left 1 Side Panel Right 2 and Center Panel B 8 Make sure that the groove in the Bottom Panel 4 is aligned with the p...

Page 11: ...1 1 6 5 7 8 8 7 5 4 3 2 5 7 7 8 8 6 5 2 4 Part B x 6pcs Part E x 6pcs Step 16 the Top Panel 3 to the Side Panel Left 1 Side Panel Right 2 and Center Panel A 7 Make sure that clockwise and then cover t...

Page 12: ...conditions of normal use and is not subject to defects caused by improper assembly or disassembly defects occurring after purchase due to product mo sure to the elements labor or assembly cost This w...

Reviews: