background image

21

EN

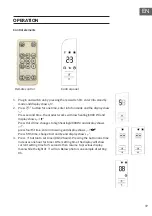
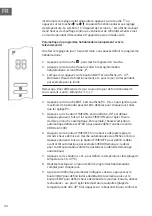
For example: Setting to Wednesday, 9:30 AM under 25 °C under II heating, 

please refer to the following photos.

Note: 

• 

Press SET to check the current time & day in turn;

• 

The LCD was display off if no any operation during 5 seconds;

• 

The timer is in 24 hours.

• 

00~59 minutes.

Set temperature

• 

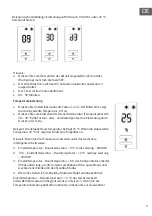
During working status, Press */- , the display shows ”  23 “ as default.

• 

Press +/- to set desired temperature (temperature range 10-49 °C), press 
OK to confirm the setting.

When setting temperature, it will use SMART working way

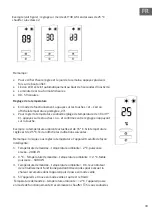
For example: The current ambient temperature is 15 °C, when set 
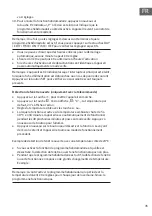
temperature to 25 °C, the display shows as below:

1.  Setting temperature – ambient temperature>2 °C, working with high 

power-2000 W.

2.  0 °C<Setting temperature – ambient temperature=<2 °C, working with 

low power-1000 W.

3. 

Setting temperature – ambient temperature=0 °C. The cool fan will 
work for 30 seconds to below out the heating left inside, then enter into 

standby mode.

4.  After enter into standby mode, if the machine cool down. 
5. 

Setting temperature – ambient temperature>=2 °C, the machine will 

wake up and resume to heating.

If you want to cancel the setting temperature, press   key to choose the 
heating   or 

. The product will work without setting temperature. While 

the display “°C“ will go off, and will show “--”. “--”. After continuous heating for 
12 hours, the cool fan will work for 30 seconds and enter into standby mode. 

Summary of Contents for 10033139

Page 1: ...Walkyrie Wandheizgerät Wall heater Radiateur mural Radiador mural Radiatore da parete 10033139 ...

Page 2: ......

Page 3: ...gfältig durch und befolgen Sie diese um möglichen Schäden vorzubeugen Für Schäden die durch Missachtung der Hinweise und unsachgemäßen Gebrauch entstehen übernehmen wir keine Haftung Scannen Sie den QR Code um Zugriff auf die aktuellste Bedienungsanleitung und weitere Informationen rund um das Produkt zu erhalten TECHNISCHE DATEN Artikelnummer 10033139 Stromversorgung 220 240 V 50 Hz Leistungsaufn...

Page 4: ...ig beaufsichtigt Kinder zwischen 3 und 8 Jahren dürfen das Gerät nur dann ein ausschalten wenn dieses in seiner vorgesehenen Betriebsposition montiert oder aufgestellt wurde und die Kinder von einer für sie verantwortlichen Person angeleitet werden oder bereits in das Gerät eingewiesen wurden und die damit verbundenen Gefahren und Risiken verstanden haben Kinder zwischen 3 und 8 Jahren sollten das...

Page 5: ... mindestens 1 8 Meter über dem Boden installiert werden Trennvorrichtungen mit allpoliger Kontakttrennung müssen gemäß den Verkabelungsvorschriften in die feste Verkabelung integriert werden Fest installierte Heizgeräte müssen so angebracht werden dass Sie nicht von der Dusche oder Badewanne aus erreicht werden können WARNUNG Dieses Produkt kann in Badezimmern installiert werden jedoch nur außerha...

Page 6: ...ie jeweils einen Dübel hinein Hängen Sie das Gerät auf indem Sie zunächst die Aussparungen des Geräts auf Höhe der Löcher bringen und anschließend die Schrauben hindurchstecken und diese in den Dübeln fixieren Hinweis Vergewissern Sie sich nach der Installation immer dass das Gerät stabil hängt und korrekt fixiert wurde Achten Sie darauf dass sich zwischen allen Seiten des Heizgeräts und Hindernis...

Page 7: ...rät auf hoher Stufe 2000 W und der Bildschirm zeigt an Wenn Sie die Taste ein viertes Mal drücken wird der Schwungmodus aktiviert Der Bildschirm zeigt an Wenn Sie die Taste ein fünftes Mal drücken wechselt das Gerät wieder in den Standby Modus Der Bildschirm zeigt an 3 Drücken Sie zum Einstellen des Timers 00 12 Stunden die Taste Jedes Mal wenn die Taste gedrückt wird erhöht sich die Zeit um eine ...

Page 8: ...Wenn Sie einmal die Taste drücken heizt das Gerät auf niedriger Stufe 1000 W und der Bildschirm zeigt an Wenn Sie die Taste ein zweites Mal drücken heizt das Gerät auf hoher Stufe 2000 W und der Bildschirm zeigt an 3 Drücken Sie zum Aktivieren der Schwingfunktion die Taste Drücken Sie die Taste erneut wenn Sie die Schwingfunktion deaktivieren möchten 4 Drücken Sie zum Einstellen des Timers 00 12 S...

Page 9: ...en der Taste Beispiel Die aktuelle Raumtemperatur beträgt 15 C Wenn die eingestellte Temperatur 25 C ist zeigt der Bildschirm folgendes an Hinweis Wenn Sie die Temperatur einstellen nutzt das Gerät eine intelligente Arbeitsweise 1 Einstelltemperatur Raumtemperatur 2 C hohe Leistung 2000 W 2 0 C Einstelltemperatur Raumtemperatur 2 C niedrige Leistung 1000 W 3 Einstelltemperatur Raumtemperatur 0 C d...

Page 10: ... maximal 6 Zeitperioden eingestellt werden können wie beispielsweise die Einstellung P1 5 Drücken Sie die Taste TIME ON Der Bildschirm zeigt voreingestellt 00 an Drücken Sie zum Einstellen der Uhrzeit zum automatischen Einschalten mehrfach die Taste TIME ON Beispielsweise ist die eingestellte automatische Einschaltuhrzeit 07 00 Es kann eine Uhrzeit von 00 00 24 00 eingestellt werden 6 Drücken Sie ...

Page 11: ...ET um zu überprüfen ob ihre Einstellungen noch vorhanden sind Erkennung von offenen Fenstern nur via Fernbedienung Drücken Sie die Taste um das Gerät in den Betriebsmodus zu versetzen Drücken Sie die Taste Der Bildschirm zeigt C an Die voreingestellte Temperatur 23 wird auf dem Bildschirm angezeigt Stellen Sie mit den Tasten oder die Zieltemperatur ein Wenn die Raumtemperatur während die Funktion ...

Page 12: ...nlösung Achten Sie darauf dass kein Wasser oder andere Flüssigkeiten ins Geräteinnere gelangen da dadurch Brandgefahr und ein Stromschlagrisiko bestehen würden Reinigen Sie die Gitter des Geräts regelmäßig vorsichtig mit einem Staubsauger um Staub oder Dreck welcher sich im oder auf dem Gerät angesammelt hat zu entfernen Verwenden Sie zur Reinigung keine aggressiven Reinigungsmittel oder chemische...

Page 13: ...ie Gesundheit ihrer Mitmenschen vor möglichen negativen Konsequenzen geschützt Materialrecycling hilft den Verbrauch von Rohstoffen zu verringern Das Produkt enthält Batterien die der Europäischen Richtlinie 2006 66 EG unterliegen und nicht mit dem normalen Hausmüll entsorgt werden dürfen Bitte informieren Sie sich über die örtlichen Bestimmungen zur gesonderten Entsorgung von Batterien Durch rege...

Page 14: ...max n a kW Art der Wärmeleistung Raumtemperaturkontrolle Bei Mindestwärmeleistung Ventilator Motor elmin n a kW Einstufige Wärmeleistung keine Raumtemperaturkontrolle nein Im Bereitschaftszustand elSB 0 001 kW Zwei oder mehr manuell einstellbare Stufen keine Raumtemperaturkontrolle nein Raumtemperaturkontrolle mit mechanischem Thermostat nein Mit elektronischer Raumtemperaturkontrolle nein Mit ele...

Page 15: ...on Heating level 1 1000 W Heating level 2 2000 W CONTENTS Dear Customer Congratulations on purchasing this equipment Please read this manual carefully and take care of the following hints to avoid damages Any failure caused by ignoring the items and cautions mentioned in the instruction manual are not covered by our warranty and any liability Scan the QR code to get access to the latest user manua...

Page 16: ...y unless continuously supervised Children aged from 3 years and less than 8 years shall only switch on off the appliance provided that it has been placed or installed in its intended normal operating position and they have been given supervision or instruction concerning use of the appliance in a safe way and understand the hazards involved Children aged from 3 years and less than 8 years shall no...

Page 17: ... socket outlet The heater must be installed at least 1 8 m above the floor Means for disconnection having a contact separation in all poles must be incorporated in the fixed wiring in accordance with the wiring rules Fixed heaters are to be installed so that switches and other controls cannot be touched by a person in the bath or shower This product can be installed in bathrooms but only out of th...

Page 18: ... the back of the heater then put two pegs in the holes Hang the heater to the wall by inserting the two screws into the slots of the back panel of the heater the fix the screws on the pegs Note Always be sure that the heater is correctly fixed and stable after performing the installation Let a minimum safety distance of 1 m between each side of the heater and any obstacle walls for example ...

Page 19: ...ting 1000 W and display shows Press third time changes to high heating 2000 W and display shows press fourth time enter into swing and display shows Press fifth time change to stand by and display shows 3 Press button to set timer 00 12 hours Pressing the button one time increases one hour for timer After setting time the display will show current setting time for 5 seconds then resume to previous...

Page 20: ...ntinuous work and enter into standby Function operation ONLY by remote control 1 Press the product enter into working status 2 Press the product enter into working status The product works with low heating 1000W and display shows Press again changes to high heating 2000W and display shows 3 Press button to set swing function press again will stopped 4 Press button to set timer 00 12hours and light...

Page 21: ... C the display shows as below 1 Setting temperature ambient temperature 2 C working with high power 2000 W 2 0 C Setting temperature ambient temperature 2 C working with low power 1000 W 3 Setting temperature ambient temperature 0 C The cool fan will work for 30 seconds to below out the heating left inside then enter into standby mode 4 After enter into standby mode if the machine cool down 5 Sett...

Page 22: ... figure Note turn off time later than turn on time when turn on time same as turn off time the unit in stand by mode 7 Press to set the target temperature temperature range 10 49 C 8 Repeat steps 2 7 above You can set the whole weekly program and each day The work of each segment opens the time of shutdown 9 After above setting press DAY choose the unit turn on day of the week then press EDIT to c...

Page 23: ...t doesn t work During the working status of weekly program the temperature is subject to the setting temperature of open window detection Note Before turn on weekly program it must set day and time period otherwise the weekly default state is 00 which does not work CLEANING AND MAINTENANCE Switch off from the power supply before cleaning Using a soft moist cloth with or without a mild soap solutio...

Page 24: ...ppropriate waste handling of this product For more detailed information about recycling of this product please contact your local council or your household waste disposal service Your product contains batteries covered by the European Directive 2006 66 EC which cannot be disposed of with normal household waste Please check local rules on separate collection of batteries The correct disposal of bat...

Page 25: ... kW Type of heat output room temperature control At minimum heat output fan motor elmin 0 kW single stage heat output and no room temperature control no In standby mode elSB 0 001 kW Two or more manual stages no room temperature control no with mechanic thermostat room temperature control no with electronic room temperature control no electronic room temperature control plus day timer no electroni...

Page 26: ......

Page 27: ...uillez lire attentivement et respecter les instructions de ce mode d emploi afin d éviter d éventuels dommages Nous ne saurions être tenus pour responsables des dommages dus au non respect des consignes et à la mauvaise utilisation de l appareil Scannez le QR Code pour obtenir la dernière version du mode d emploi et à d autres informations concernant le produit FICHE TECHNIQUE Numéro d article 100...

Page 28: ...l écart du radiateur à moins d être surveillés en permanence Les enfants âgés de 3 à 8 ans ne peuvent allumer éteindre l appareil que s il a été monté ou installé dans la position d utilisation prévue et que les enfants ont été informés ou instruits par une personne responsable et ont compris les risques et dangers associés Les enfants âgés de 3 à 8 ans ne doivent pas brancher débrancher ou répare...

Page 29: ...ol Les dispositifs de coupure d alimentation avec séparation des contacts sur tous les pôles doivent être intégrés au câblage fixe conformément aux réglementations de câblage Les radiateurs fixes doivent être installés de manière à ne pas pouvoir être atteints par la douche ou le bain MISE EN GARDE Ce produit peut être installé dans les salles de bain mais uniquement en dehors des volumes autorisé...

Page 30: ...ppareil de chauffage et insérez dans chacun un goujon Suspendez l appareil en amenant d abord les renfoncements de l appareil au niveau des trous puis en insérant les vis et en les fixant dans les goujons Remarque Après l installation assurez vous toujours que le périphérique est stable et qu il a été correctement fixé Assurez vous qu il y a au moins 1 mètre d écart entre tous les côtés du radiate...

Page 31: ...an affiche Si vous appuyez une troisième fois sur le bouton l appareil chauffe à un niveau élevé 2000 W et l écran affiche Appuyez une quatrième fois sur le bouton pour activer le mode oscillant L écran affiche Si vous appuyez sur le bouton une cinquième fois l appareil repasse en mode veille L écran affiche 3 Pour régler la minuterie 00 12 heures appuyez sur la touche Chaque fois que vous appuyez...

Page 32: ... appuyez une fois sur la touche drücken heizt das Gerät auf niedriger Stufe 1000 W und der Bildschirm zeigt an Wenn Sie die Taste ein zweites Mal drücken heizt das Gerät auf hoher Stufe 2000 W und der Bildschirm zeigt an 3 Appuyez sur le bouton pour activer la fonction d oscillation Appuyez à nouveau sur le bouton si vous souhaitez désactiver la fonction d oscillation 4 Pour régler la minuterie 00...

Page 33: ... appuyant sur la touche Exemple la température ambiante actuelle est de 15 C Si la température réglée est de 25 C l écran affiche les indications suivantes Remarque lorsque vous réglez la température l appareil travaille de façon intelligente 1 Température demandée température ambiante 2 C puissance élevée 2000 W 2 0 C Température demandée température ambiante 2 C faible puissance 1000 W 3 Tempéra...

Page 34: ...odes peuvent être définies pour chaque jour telles que le réglage P1 5 Appuyez sur le bouton TIME ON L écran affiche 00 par défaut Appuyez plusieurs fois sur la touche TIME ON pour régler l heure de mise en marche automatique Par exemple l heure d activation automatique définie est 07 00 vous pouvez définir une heure entre 00 00 et 24 00 6 Appuyez sur le bouton TIME OFF Si une heure a déjà été rég...

Page 35: ...étection de fenêtre ouverte uniquement avec la télécommande Appuyez sur la touche pour mettre l appareil en marche Appuyez sur la touche L écran affiche C La température par défaut 23 s affiche à l écran Réglez la température cible avec les touches ou Lorsque la fonction est active si la température ambiante chute de 5 à 10 C en 10 minutes l appareil cesse automatiquement de fonctionner pendant le...

Page 36: ...autres liquides ne pénètrent pas dans l appareil car cela pourrait provoquer un incendie ou un risque de choc électrique Nettoyez soigneusement et régulièrement les grilles de l appareil avec un aspirateur pour éliminer toute poussière ou saleté qui pourrait s être accumulée dans ou sur l appareil N utilisez pas de détergents agressifs ni de nettoyants chimiques ni de solvants pour le nettoyage ca...

Page 37: ...de préserver l environnement et la santé Le recyclage des matériaux contribue à la préservation des ressources naturelles Ce produit contient des piles qui sont soumises à la directive européenne 2006 66 CE selon laquelle elles ne doivent pas être éliminées avec les ordures ménagères Renseignez vous sur les dispositions en vigueur concernant la mise en rebut séparée des piles La mise en rebut corr...

Page 38: ...ns objet kW Type de chauffage contrôle de la température de la pièce A puissance calorifique minimale moteur de ventilateur elmin Sans objet kW Chauffage à une seule vitesse pas de contrôle de la température ambiante non En mode veille elSB 0 001 kW Deux vitesses ou plus réglables manuellement pas de contrôle de la température ambiante non Contrôle de la température ambiante par thermostat mécaniq...

Page 39: ...nte las siguientes instrucciones y sígalas para evitar posibles daños No asumimos ninguna responsabilidad por los daños que resulten del incumplimiento de las instrucciones y del uso inadecuado Escanee el siguiente código QR para acceder al manual de usuario más reciente y a otra información sobre el producto DATOS TÉCNICOS Número de artículo 10033139 Alimentación 220 240 V 50 Hz Consumo de energí...

Page 40: ...jo supervisión constante Los niños de 3 a 8 años sólo podrán encender y apagar el aparato si éste ha sido instalado o colocado en su posición de funcionamiento prevista y si los niños han sido instruidos por una persona responsable de ellos o ya han sido instruidos en el aparato y han comprendido los peligros y riesgos asociados Los niños de entre 3 y 8 años no deben enchufar desenchufar regular o...

Page 41: ...ura mínima de 1 8 metros sobre el suelo Los dispositivos de aislamiento con separación de contactos de todos los polos deben integrarse en el cableado fijo de acuerdo con las normas de cableado Los calefactores fijos deben instalarse de manera que no se pueda acceder a ellos desde la ducha o la bañera ADVERTENCIA Este producto puede ser instalado en cuartos de baño pero sólo fuera de los volúmenes...

Page 42: ... inserte un pasador en cada uno de ellos Cuelgue el dispositivo primero llevando las cavidades del dispositivo al nivel de los agujeros y luego insertando los tornillos a través de ellos y fijándolos en las clavijas Nota Después de la instalación asegúrese siempre de que el dispositivo cuelgue de forma segura y se haya fijado correctamente Asegúrese de que haya al menos 1 metro entre todos los lad...

Page 43: ...nivel bajo 1000 W y la pantalla mostrará Si pulsa el botón por tercera vez el aparato se calentará a un nivel alto 2000 W y en la pantalla aparecerá Si pulsa la tecla por cuarta vez se activa el modo de oscilación En la pantalla aparece Si pulsa el botón por quinta vez la unidad vuelve al modo de espera La pantalla muestra 2 Para ajustar el temporizador 00 12 horas pulse el botón Cada vez que puls...

Page 44: ...sa una vez la tecla el aparato se calentará a un nivel bajo 1000 W y en la pantalla aparecerá Si pulsa el botón por segunda vez el aparato se calentará a un nivel alto 2000 W y en la pantalla aparecerá 3 Presione el botón para activar la función de oscilación Si desea desactivar la función de oscilación vuelva a pulsar la tecla 4 Pulse el botón para ajustar el temporizador 00 12 horas El símbolo s...

Page 45: ...lsando la tecla Ejemplo La temperatura ambiente actual es de 15 C Cuando la temperatura ajustada es de 25 C la pantalla muestra lo siguiente Nota Cuando se ajusta la temperatura el dispositivo utiliza un modo de funcionamiento inteligente 1 Temperatura de ajuste temperatura ambiente 2 C alta potencia 2000 W 2 0 C temperatura de ajuste temperatura ambiente 2 C potencia baja 1000 W 3 Ajuste de tempe...

Page 46: ...ue significa que se pueden establecer un máximo de 6 períodos de tiempo para cada día como P1 5 Pulse el botón TIME ON La pantalla muestra 00 por defecto Pulse el botón TIME ON repetidamente para ajustar la hora de encendido automático Por ejemplo la hora de encendido automático ajustada es 07 00 se puede ajustar una hora de 00 00 a 24 00 6 Pulse el botón TIME OFF Si ya se ha ajustado una hora en ...

Page 47: ...ulse el botón para ajustar la unidad al modo de funcionamiento Presione el botón En la pantalla aparece C En la pantalla aparece la temperatura preajustada 23 Utilice los botones o para ajustar la temperatura objetivo Si la temperatura ambiente desciende entre 5 y 10 C en un plazo de 10 minutos mientras la función está activada el aparato interrumpe automáticamente su funcionamiento durante los 30...

Page 48: ... que el agua u otros líquidos entren en el interior de la unidad ya que podría provocar un incendio o una descarga eléctrica Limpie las rejillas del aparato regularmente y con cuidado con una aspiradora para eliminar el polvo o la suciedad que pueda haberse acumulado en o sobre el aparato No utilice detergentes agresivos o limpiadores químicos o soluciones para la limpieza ya que esto puede dañar ...

Page 49: ...nte y a las personas a su alrededor frente a posibles consecuencias perjudiciales para la salud El reciclaje ayuda a reducir el consumo de materias primas Este producto contiene pilas que según la Normativa europea 2006 66 EG no deben ser arrojadas al cubo de la basura común Infórmese sobre la legislación de su país que regula la retirada y eliminación de las pilas y baterías La retirada y elimina...

Page 50: ...ilador elmax n a kW Tipo de potencia térmica control de temperatura ambiente Con potencia térmica mínima Motor del ventilador elmin n a kW Potencia térmica de un solo nivel sín control de temperatura ambiente no En modo de espera elSB 0 001 kW Dos o más niveles regulables manualmente sín control de temperatura ambiente no Control de temperatura ambiente con termostato mecánico no Con control elect...

Page 51: ...enti istruzioni per l uso e di seguirle per evitare possibili danni tecnici Non ci assumiamo alcuna responsabilità per danni scaturiti da una mancata osservazione delle avvertenze di sicurezza e da un uso improprio del dispositivo Scansionare il codice QR seguente per accedere al manuale d uso più attuale e per ricevere informazioni sul prodotto DATI TECNICI Numero articolo 10033139 Alimentazione ...

Page 52: ...o sotto costante controllo I bambini tra i 3 e gli 8 anni possono accendere e spegnere l apparecchio solo se l apparecchio è stato installato o collocato nella posizione di lavoro prevista e se i bambini sono stati istruiti da una persona responsabile o sono già stati istruiti sull apparecchio e hanno compreso i pericoli e i rischi connessi I bambini tra i 3 e gli 8 anni non possono collegare scol...

Page 53: ...cchio deve essere installato ad almeno 1 8 metri dal suolo I dispositivi di sezionamento con separazione dei contatti su tutti i poli devono essere integrati nel cablaggio fisso in conformità alle norme di cablaggio Le stufe fisse devono essere installate lontano da docce o vasche da bagno AVVERTENZA Questo prodotto può essere installato nei bagni ma solo al di fuori dei volumi consentiti secondo ...

Page 54: ...o della stufa e inserire un tassello ciascuno Agganciare l apparecchio portando prima gli incavi dell apparecchio all altezza dei fori e poi spingendo le viti e fissandole nei tappi Nota dopo l installazione accertarsi sempre che il dispositivo sia appeso saldamente e che sia stato fissato correttamente Assicurarsi che ci sia almeno 1 metro tra tutti i lati della stufa e gli ostacoli come le paret...

Page 55: ...a terza volta l unità si riscalda ad un livello elevato 2000 W e sullo schermo viene visualizzato Premendo il tasto una quarta volta si attiva la modalità volano Sullo schermo viene visualizzato Se si preme il pulsante una quinta volta l unità ritorna alla modalità standby Sullo schermo viene visualizzato 3 Per impostare il timer 00 12 ore premere il pulsante Ogni volta che si preme il pulsante il...

Page 56: ...i funzionamento dall altra parte 2 Premere una volta premuto il pulsante l unità si riscalda ad un livello basso 1000 W e lo schermo visualizza Se si preme il pulsante una seconda volta l unità si riscalda ad alta temperatura 2000 W e lo schermo visualizza 3 Premere il tasto per attivare la funzione di oscillazione Premere nuovamente il pulsante se si desidera disattivare l oscillazione 4 Premere ...

Page 57: ...a ambiente attuale è di 15 C Se la temperatura impostata è 25 C sullo schermo viene visualizzato quanto segue Nota quando si imposta la temperatura il dispositivo utilizza una modalità di funzionamento intelligente 1 Temperatura di impostazione temperatura ambiente 2 C potenza elevata 2000 W 2 Temperatura di regolazione temperatura ambiente 2 C bassa potenza 1000 W 3 Temperatura di impostazione te...

Page 58: ...i di tempo come l impostazione P1 5 Premere il pulsante TIME ON Lo schermo visualizza 00 per impostazione predefinita Premere ripetutamente il pulsante TIME ON per impostare l ora di accensione automatica Ad esempio l orario di accensione automatica impostato è 07 00 è possibile impostare un orario supuò essere impostato da 00 00 00 24 00 6 Premere il tasto TIME OFF Se è già stata impostata un ora...

Page 59: ...no ancora corrette sono disponibili Rilevamento di finestre aperte solo tramite telecomando Premere il pulsante per impostare il dispositivo in modalità operativa Premere il pulsante Lo schermo visualizza C Sullo schermo viene visualizzata la temperatura preimpostata 23 Usare i pulsanti o per impostare la temperatura da raggiungere Se la temperatura ambiente scende di 5 10 C entro 10 minuti mentre...

Page 60: ...unità in quanto ciò può comportare un rischio d incendio e un esposizione al rischio d incendio ci sarebbe il rischio di scossa elettrica Pulire regolarmente e con cura le griglie dell apparecchio con un panno morbido Aspirapolvere per rimuovere la polvere o lo sporco che può accumularsi all interno o sull unità dal corpo che l ha accumulato Non utilizzare detersivi aggressivi o detergenti aggress...

Page 61: ...e delle persone da possibili conseguenze negative Il riciclo di materiali aiuta a diminuire il consumo di materie prime Il prodotto contiene batterie che sono soggette alla direttiva europea 2006 66 CE e non possono essere smaltite con i normali rifiuti domestici Preghiamo di informarvi sulle regolamentazioni vigenti sullo smaltimento delle batterie Grazie al corretto smaltimento dei vecchi dispos...

Page 62: ...max n a kW Tipo di potenza termica controllo della temperatura ambiente Per la potenza termica minima Motore del ventilatore elmin n a kW Potenza termica di un solo livello senza controllo della temperatura ambiente no In modalità di attesa elSB 0 001 kW Due o più livelli impostabili manualmente senza controllo della temperatura ambiente no Con controllo della temperatura ambiente tramite termosta...

Page 63: ......

Page 64: ......

Reviews: