Automatic Blood Pressure Monitor
!"
Model
SEM-2
INSTRUCTION MANUAL
===
SE
M
-2
En_TC-Cover[SEM-2]-2
8/4/05, 4:13 PM
Page 1
Adobe PageMaker 6.5C/PPC
Page 1: ...Automatic Blood Pressure Monitor Model SEM 2 INSTRUCTION MANUAL SEM 2 ...
Page 2: ...How to Install Replace the Batteries 9 Setting the Date and Time 11 How to Sit Correctly When Taking a Measurement 13 How to Apply the Arm Cuff 15 How to Take a Measurement 17 How to Use the Memory Function 21 Care and Maintenance Maintenance and Storage 24 Using the Optional AC Adapter 26 Error Indicator 27 Troubleshooting Tips 29 Specifications 31 CONTENTS 2 ...
Page 3: ...blood pressure measurement This means the monitor detects your blood s movement through your brachial artery and converts the movements into a digital reading An oscillometric monitor does not need a stethoscope so the monitor is simple to use The SEM 2 Automatic Blood Pressure Monitor is intended for home use SAVE THESE INSTRUCTIONS Before Using the Monitor ...
Page 4: ... over 299 mmHg Do not use the unit for any purpose other than measuring blood pres sure Do not use a cellular phone near the unit This may result in incorrect operation of the unit Keep batteries out of the reach of young children and infants If a bat tery swallowed consult a doctor immediately If the battery fluid should get in your eyes immediately rinse with plenty of clean water Consult a doct...
Page 5: ...t for a long period of time approximately three months or more take out the batteries Do not use new and used batteries together Do not use batteries of a different type together Do not forcibly bend the arm cuff or bend the air tube excessively When removing the air tube pull on the air plug at the connection with the main unit not the tube itself Do not expose the unit to strong shocks or vibrat...
Page 6: ...ube Air Plug The arm cuff should last for 18 months when used four times a day To ensure accurate measurement results you should change to a new arm cuff after this period If air starts to leak from the arm cuff please purchase a new one NOTE An air plug is not included with the replacement arm cuff Do not dispose of the current air plug when you purchase a new arm cuff ...
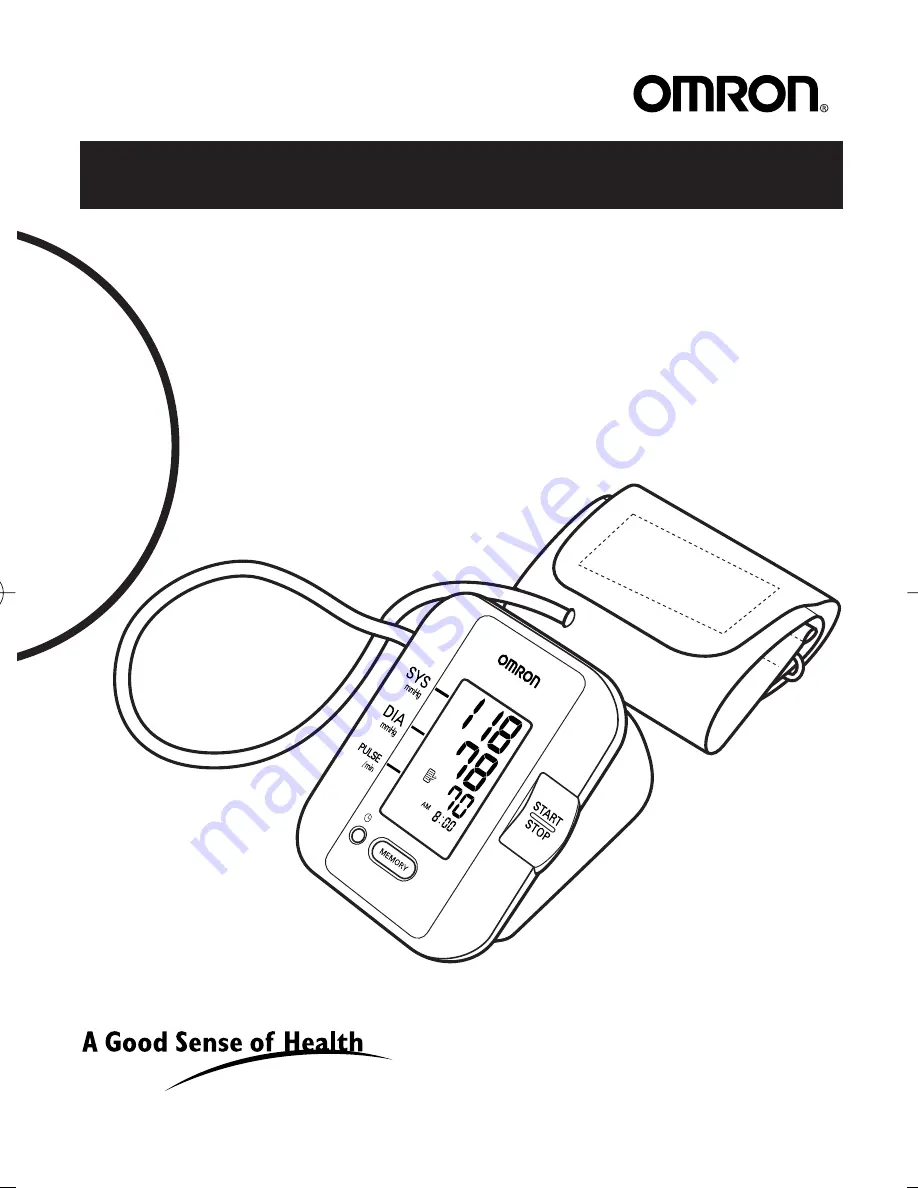
Page 7: ... Blood Pressure Systolic Blood Pressure Memory Symbol Pulse Display Date Time Display Battery Low Symbol Average Value Symbol Heartbeat Symbol Deflation Symbol UNIT DISPLAY Storage Case Components Four AA Alkaline LR6 Batteries ...
Page 8: ...ement Sit correctly Apply the arm cuff Start measurement View Results Check the measurement result View previous measurement results page 9 page 11 page 13 page 15 page 17 page 19 page 21 Measurement results automatically stored in memory Up to 60 measurements Insert the batteries ...
Page 9: ...e four AA size batteries so that the positive and negative polarities match the polarities indicated on the battery compartment 4 Replace the battery cover Slide the battery cover as indicated until it clicks into place NOTE The monitor memorizes previous measurement results even when the batteries are replaced HOW TO INSTALL REPLACE THE BATTERIES ...
Page 10: ... Remove the batteries if the monitor will not be used for more than 3 months If the batteries are removed for more than 30 seconds or so the Date Time setting will need to be reset See Setting the Date and Time for details Dispose of batteries according to applicable local regulations Four new AA manganese batteries will last for approximately 300 measurements when used to take two measurements a ...
Page 11: ...rage reading functions Set the monitor to the correct date and time before taking a measurement for the first time or if the date and time setting has been reset 1 When the monitor is switched on for the first time after inserting batteries the year digits 2005 will flash on the display 2 Press the MEMORY button to advance the digits one at a time NOTE The range for the year setting is 2005 to 203...
Page 12: ...hour The hour is set and the minutes digits flash on the display 7 Repeat steps 2 and 3 to set the minutes The minutes settings is set The monitor automatically shuts itself off after the minute setting has been set To adjust the date and time again press the settings button while the monitor is off When you have finished adjusting the date and time press the START STOP button to turn the monitor ...
Page 13: ... or exercise HOWTO SIT CORRECTLYWHENTAKING A MEASUREMENT 13 Correct Posture Remove tight fitting clothing from your upper arm and any thick clothing such as a sweater Do not place the cuff over thick clothes and do not roll up your sleeve if it is too tight Place your arm on a table so that the cuff will be at the same level as your heart Sit upright with your back straight The gap between the cha...
Page 14: ...SIT CORRECTLYWHENTAKING A MEASUREMENT 14 Incorrect Posture Arched back leaning forwards Sitting cross legged Sitting on a sofa or at a low table so that you tend to lean forwards These situations could lead to higher blood pressure reading due to strain or the arm cuff being lower than the heart If the arm cuff is at a lower position than your heart use cushions etc to adjust the height of your ar...
Page 15: ...air plug into the air jack on the left side of the main unit 2 Put your left arm through the cuff loop The air tube should run down the inside of your forearm and be in line with your middle finger NOTE If the cuff is not assembled pass the end of the cuff furthest from the tubing through the metal D ring to form a loop The smooth cloth should be on the inside of the cuff loop HOW TO APPLY THE ARM...
Page 16: ...olored marker is centered on the middle of your inner arm and points down the inside of the arm TAKING MEASUREMENTS ON THE RIGHT ARM Apply the cuff so that the air tube is at the side of your elbow Be careful not to rest your arm on the air tube or otherwise restrict the flow of air to the cuff The cuff should be 1 to 2 cm above the elbow 4 When the cuff is positioned correctly close the fabric fa...
Page 17: ...e cuff will be at the same level as your heart Keep still and do not talk during measurement NOTE To cancel a measurement press the START STOP button to turn off the unit and to release the air in the arm cuff HOW TO TAKE A MEASUREMENT Correct Posture Do not talk during the measurement Arm cuff at heart level Sit upright with your back straight ...
Page 18: ...e monitor automatically stores blood pressure and pulse rate into its memory HOW TO TAKE A MEASUREMENT 18 Common Causes of Inaccurate Results Arm cuff is too loose Movement or talking during measurement Leaning forwards NOTE If the arm cuff is at a lower position than your heart use cushions etc to adjust the height of your arm ...
Page 19: ...tween readings allows the arteries to return to the condition prior to taking the blood pressure measurement 4 Remove the arm cuff 5 Press the START STOP button to turn the monitor off NOTE If you forget to turn the monitor off it will automatically shut itself off after five minutes HOW TO TAKE A MEASUREMENT Systolic Blood Pressure Pulse Display Diastolic Blood Pressure Guide to Blood Pressure Le...
Page 20: ...s the START STOP button and keep it pressed until the pressure is 30 to 40 mmHg higher than your suspected systolic pressure NOTE You cannot inflate the cuff above 299 mmHg An error will be displayed if you try to inflate the cuff above 300mmHg 3 Release the START STOP button when the cuff has been inflated to the desired pressure The cuff starts to deflate and measurement starts 4 The rest of the...
Page 21: ...est set will be deleted to store a new set 1 Press the MEMORY button If there are three readings stored in memory that were taken within 10 minutes of the last reading an average value for those reading is displayed If there are only two readings in memory for that period the average will be based on two readings If there is only one reading in memory for that period that reading will be displayed...
Page 22: ...y with the measurement reading 3 Press the MEMORY button repeatedly to cycle through the previous measurement results Keep the button pressed down to cycle rapidly through the previous results 4 Press the START STOP button to turn off the power NOTE If you forget to turn the monitor off it will automatically shut itself off after five minutes HOW TO USE THE MEMORY FUNCTION 22 Alternating display ...
Page 23: ...Be careful not to press the START STOP button first If the START STOP button is pressed first the monitor will be turned off 2 Press the START STOP button to turn the monitor off If you forget to turn the monitor off it will automatically shut itself off after five minutes NOTE If the date and time are reset to a time before the most recent measurement the average value will be based on any measur...
Page 24: ... humidity moisture or direct sunlight Do not fold the cuff or tubing tightly Do not inflate the monitor over 299 mmHg Do not disassemble the monitor Do not subject the monitor to strong shocks or vibrations for example dropping the monitor on the floor Do not use volatile liquids to clean the monitor The monitor should be cleaned with a soft dry cloth Do not wash the arm cuff or immerse it in wate...
Page 25: ...sively 3 Place the arm cuff and the main unit in the storage case Do not store the monitor in the following situations If the unit is wet Locations exposed to extreme temperatures humidity direct sunlight dust or corrosive vapours Locations exposed to vibrations shocks or where it will be at an angle Locations exposed to chemicals or corrosive vapours MAINTENANCE AND STORAGE 25 ...
Page 26: ...storing the optional AC adapter in the storage case with the main unit be careful not to damage the main unit or cuff 1 Insert the AC adapter plug into the AC adapter jack on the rear side of the main unit 2 Plug the AC adapter into an electrical outlet To disconnect the AC adapter unplug the AC adapter from the electrical outlet first and then immediately remove the AC adapter plug from the main ...
Page 27: ... the Arm Cuff on page 15 Cuff is under inflated Replace the arm cuff with a new one Air is leaking from the arm cuff Remove any clothing interfering with the arm cuff Clothing is interfering with the arm cuff SYMBOL CAUSE CORRECTION Movement during measurement Repeat measurement Remain still and do not talk during measurement Refer to page 17 Air plug disconnected Insert the air plug securely Refe...
Page 28: ...OR INDICATOR 28 Device error Contact your OMRON service representative Batteries are worn Replace all four AA batteries with new ones Refer to page 9 SYMBOL CAUSE CORRECTION Blinks or appears continuously ...
Page 29: ... Refer to page 15 Movement or talking during measurement Remain still and do not talk during measurement Refer to page 17 Clothing is interfering with the arm cuff Remove any clothing interfering with the arm cuff Refer to page 13 Arm cuff pressure does not rise Is the air plug securely inserted into the main unit Make sure that the air plug is connected securely Refer to page 15 The arm cuff is l...
Page 30: ... for a long time Replace all four AA batteries with new ones Refer to page 9 The batteries have been inserted with their polarities incorrectly aligned Check the battery installation for proper placement of the battery polarities Press the START STOP button and repeat measurement If the problem continues try replacing the batteries with new ones If this still does not solve the problem contact you...
Page 31: ...on Capacitance type pressure sensor Power Source 4 AA batteries or AC Adapter Battery Life Approx 300 uses when used twice a day with new AA manganese batteries Operating Temperature 10ºC to 40ºC 30 to 85 RH Humidity Storage Temperature 20ºC to 60ºC 10 to 95 RH Humidity Main Unit Weight Approximately 340 g not including batteries Main Unit Dimensions Approx 121 mm w 86 mm h 141 mm l Cuff Size Appr...