IntelliSense™
Automatic Blood Pressure Monitor
with Easy Wrap Cuff
Model
HEM-773AC
INSTRUCTION MANUAL
R
Page 1: ...IntelliSense Automatic Blood Pressure Monitor with Easy Wrap Cuff Model HEM 773AC INSTRUCTION MANUAL R ...
Page 2: ...Initial Set Up Battery Installation Replacement 7 How to Set Time and Date 8 How to Use the AC Adapter 9 Correct Usage How to Apply the Arm Cuff 10 11 How to Take a Reading 12 13 How to Use the Memory Function 14 Troubleshooting 15 Caution 16 Care and Maintenance 17 Warranty 18 Specifications 19 ...
Page 3: ...d Your new OMRON monitor uses the oscillometric method of blood pressure measurement This means the monitor detects your blood s movement through your brachial artery and converts the movements into a digital reading At the press of a button the monitor automatically fills the cuff with air starts deflation then displays your systolic diastolic and pulse readings on an extra large display panel Pl...
Page 4: ...nd new batteries together Do not insert the batteries with their polarities in wrong direction Do not force to bend the arm cuff or the air tube excessively When removing the air tube pull at the plug Do not apply strong shock or drop the main unit Do not inflate the arm cuff without it being wrapped on the arm Material damage refers to a wide range of damage involving your house household goods d...
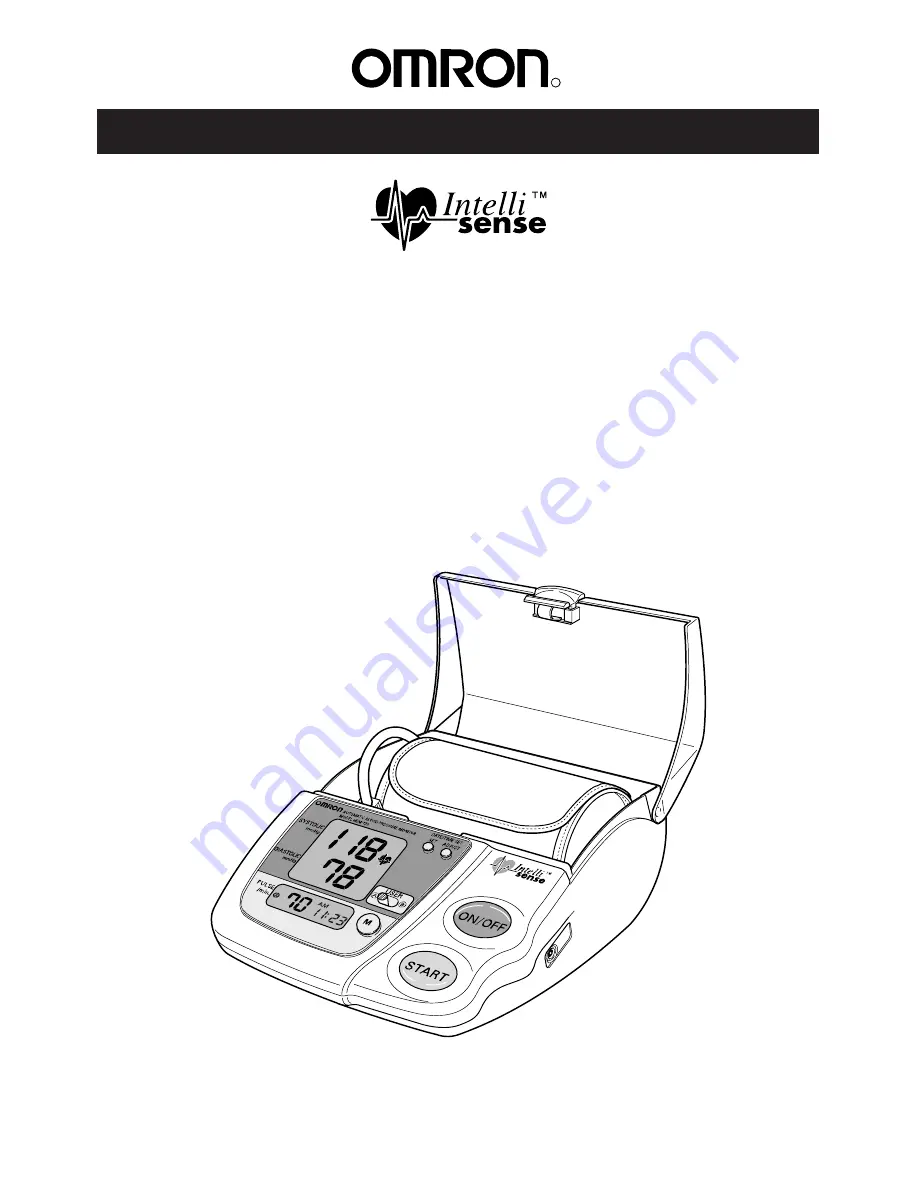
Page 5: ...cuff for Adults 9 to 17 in Cover AC Adapter Jack Release Button of Cover START Button Pulse Rate User Indicator A or B Date Time Display Heart Symbol Memory Call Button Systolic Blood Pressure ON OFF Button Set Button Adjust Button User Selector Diastolic Blood Pressure Air Jack Cuff Storage Container AC Adapter ...
Page 6: ... to 1 above the elbow 5 Pull the end of the cuff so that the entire cuff is evenly tightened around your arm and the Green Marker on the cuff is above the brachial artery 6 Press the ON OFF button 7 After the Heart Symbol appears on the digital panel press the START button and remain still until the measurement is complete 8 When measurement is complete the monitor displays your blood pressure and...
Page 7: ... polarities of the battery compartment as indicated 3 Replace the battery cover NOTES If the Low Battery Indicator appears on the display replace all four batteries Long life alkaline batteries are recommended Remove the batteries if the monitor will not be used for an extended period of time If the batteries remain removed longer than 30 seconds the set date and time will be deleted ...
Page 8: ...year digits 2002 will flash 3 Press the ADJUST button to advance the digit s one at a time If you hold down the ADJUST button the digits will advance rapidly 4 Press SET button when desired number is on the display to lock setting 5 Repeat Step 3 4 for month and date 6 Repeat Step 3 4 for hour and minutes ADJUST SET DATE TIME SET ...
Page 9: ...C adapter plug into the AC Adapter jack on the right side of the main unit 2 Plug in the AC adapter into a 120V AC outlet 50 60 cycles To remove the AC adapter disconnect the adapter plug from the AC outlet first and then disconnect the cord from the monitor s jack NOTE The monitor is designed not to draw power from the batteries when the AC adapter is in use ...
Page 10: ...from your upper arm 3 Sit in a chair with your feet flat on the floor and place your arm on a table so that the cuff will be at same level as your heart 4 Hold the cloth velcro on the cuff with your other hand 5 Turn the palm of your hand upward Apply the cuff on your upper arm Cloth fastener when wrapping on your left arm ...
Page 11: ...ow 7 Secure the cuff around your arm using the cloth velcro 8 Make sure the cuff is wrapped firmly in place 9 Relax your arm and put the elbow on the table NOTE Arm cuff can also be wrapped on your right arm Follow the instructions above numbers 1 9 Bottom Edge 1 2 inch Green Mark Cuff Tube HOW TO APPLY THE ARM CUFF Continued when wrapping on your left arm ...
Page 12: ...flation or measurement press the ON OFF button The monitor will stop inflating and start deflating rapidly and the monitor will turn off 3 Inflation stops automatically and measurement is started As the cuff slowly deflates decreasing numbers appear on the display and the Heart Symbol flashes at every heartbeat In rare circumstances a higher inflation may be necessary In those cases the monitor re...
Page 13: ...tions for special conditions HOW TO TAKE A READING Continued 4 When the measurement is complete the arm cuff completely deflates and your blood pressure and pulse rate are displayed NOTE The monitor automatically stores blood pressure and pulse rate into the memory When 21 sets of readings are stored in memory the oldest set will be deleted to store a new set 5 Press the ON OFF button to turn the ...
Page 14: ...te Select the user to recall memory by the User Selector Turn on the monitor by pressing ON OFF button Press the button to recall stored readings while the Heart Symbol is displayed START Press these two buttons at the same time To delete all the stored readings press the button and the START button simultaneously NOTE You can not delete the stored readings partially Date and Time of stored readin...
Page 15: ...er measurement some users may require a longer waiting period Repeat steps listed under How to Take a Reading If EE is displayed again take another measurement by pressing and holding the START button as shown on instruction page 13 under Instructions for special conditions Your cuff may be wrapped too tightly around your arm Turn the monitor off carefully read and repeat steps listed under How to...
Page 16: ...ference will not occur in a particular installation If the product does cause harmful interference to radio or television reception which can be determined by turning the product on and off the user is encouraged to try to correct the interference by one or more of the following measures Reorient or relocate the receiving antenna Increase the separation between the product and receiver Connect the...
Page 17: ...r any components in water Store the monitor in a safe and dry location Do not subject the monitor to extreme hot or cold temperatures humidity and direct sunlight Avoid subjecting the monitor to strong shocks such as dropping on the floor Remove the batteries if the unit will not be used for an extended period of time Use the unit consistent with the instruction provided in this manual Never infla...
Page 18: ... defects in the materials or workmanship The above warranty is complete and exclusive The warrantor expressly disclaims liability for incidental special or consequential damages of any nature Some states do not allow the exclusion or limitation of incidental or consequential damages so the above warranty may not apply to you Any implied warranties arising by the operation of law shall be limited i...
Page 19: ...ure sensor Power Source 4 AA batteries or AC adapter Battery Life Approximately 250 uses Operating 50 F to 104 F 10 C to 40 C Temperatures Humidity 30 to 85 RH maximum Storage 4 F to 140 F 20 C to 60 C Temperatures Humidity 10 to 95 RH maximum Main Unit Weight Approximately 31 8 oz 900g not including batteries Main Unit Dimensions Approximately 9 l x 7 w x 4 h 228 mm x 178 mm x 102 mm Cuff Size Ap...
Page 20: ...Manufactured by OMRON Distributed by OMRON HEALTHCARE INC 300 Lakeview Parkway Vernon Hills Illinois 60061 www omronhealthcare com Copyright 2003 OMRON HEALTHCARE INC 773ACINST Rev A ...