Instruction Manual
E
S
P
A
Ñ
O
L
N
G
IS
H
Automatic Blood Pressure Monitor
with A.P.S.®
Model
HEM-650
HEM-650-IM-US-8012 12/7/05 10:22 AM Page 1
Page 1: ...Instruction Manual ESPAÑOL ENGLISH Automatic Blood Pressure Monitor with A P S Model HEM 650 ...
Page 2: ... Installation 8 Advanced Positioning Sensor 9 Position Sensor Alarm 9 Wrist Measurement Selection 10 Setting the Date and Time 11 Applying the Wrist Cuff 13 Taking a Measurement 14 Using the Memory Function 16 Care and Maintenance Care and Maintenance 18 Error Indicators and Troubleshooting Tips 19 FCC Statement 21 Warranty Information 22 Specifications 23 Introduction TABLE OF CONTENTS ...
Page 3: ...his means the monitor detects your blood s movement through your artery and converts the movements into a digital reading An oscillometric monitor does not need a stethoscope so the monitor is simple to use Clinical research has proven a direct relationship between blood pressure in the wrist and blood pressure in the arm Changes in wrist blood pressure reflect changes in arm blood pressure becaus...
Page 4: ...struction book and any other literature included in the box before using the unit þ Contact your physician for specific information about your blood pressure Follow the instructions of your healthcare provider þ Operate the unit only as intended Do not use for any other purpose þ The unit is intended for use in measuring blood pressure and pulse rate in adult patient population Do not use on infan...
Page 5: ...at heart level throughout the measurement 6 Remain still and do not talk during the measurement 7 Keep a record of your blood pressure and pulse readings for your physician A single measurement does not provide an accurate indication of your true blood pressure You need to take and record several readings over a period of time Try to measure your blood pressure at the same time each day for consis...
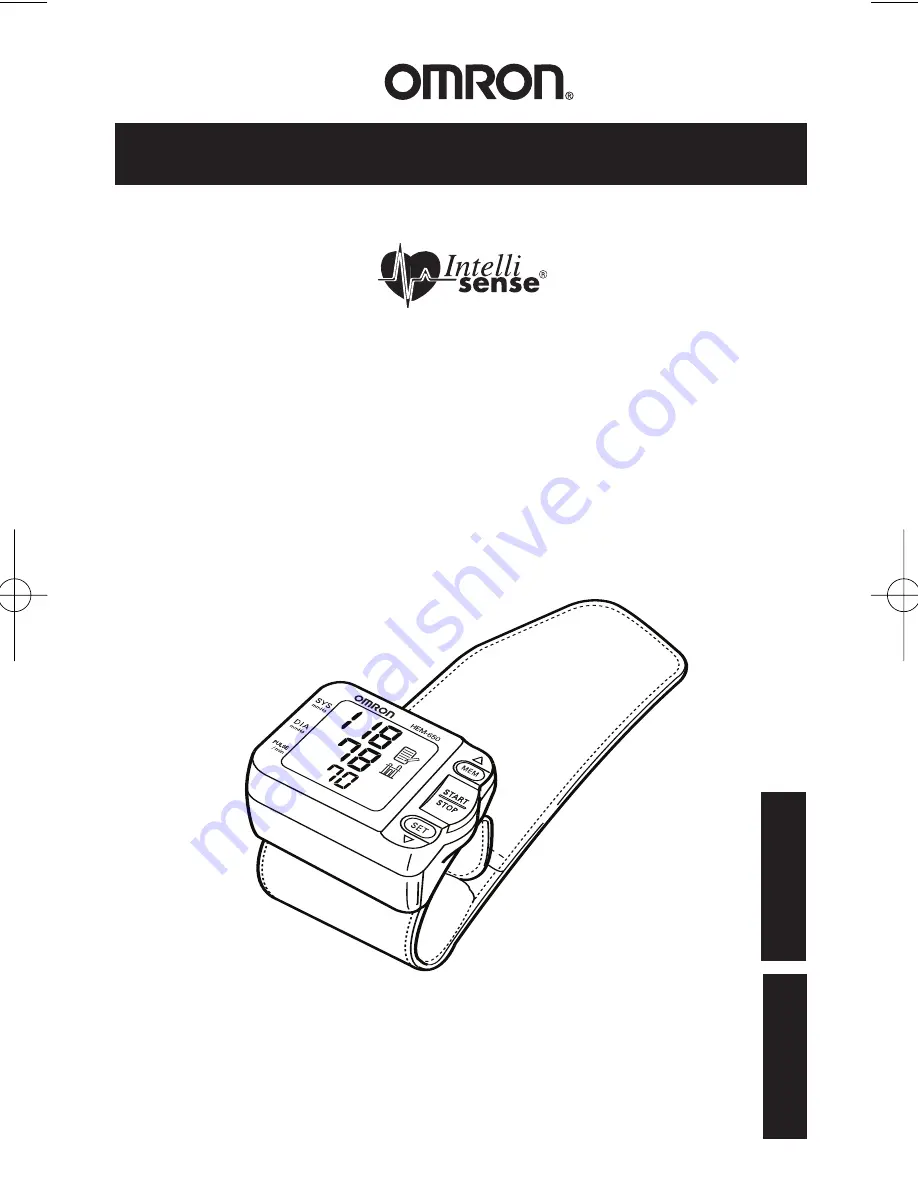
Page 6: ...6 KNOW YOUR UNIT Main Unit Display MEM Button START STOP Button SET Button Wrist Cuff Battery Compartment Accessories Two AAA Alkaline Batteries Storage Case ...
Page 7: ...during the measurement the Irregular Heartbeat Symbol will appear on the display with the measurement values An irregular heartbeat rhythm is defined as a rhythm that varies by less than 25 from the average rhythm or 25 more than the average rhythm detected while the monitor is measuring the systolic and diastolic blood pressure If the Irregular Heartbeat Symbol displays with your measurement resu...
Page 8: ...he Low Battery Symbol appears on the display screen remove all the batteries Replace with two new batteries at the same time When the Low Battery Symbol blinks a brief period of usage remains Long life alkaline batteries are recommended NOTES Measurement values stored in the memory will not be deleted during battery replacement After replacing the batteries reset the date and time Refer to page 11...
Page 9: ...bol will begin to flash when your wrist is in the correct position POSITION SENSOR ALARM The Sensor Alarm emits sound to help you place your wrist in the correct position 1 Press the SET button twice while the power is turned off The Position Sensor Alarm symbol will appears on the display The alarm set on 1 emits a series of blips if your wrist is too far away from the correct measuring position ...
Page 10: ... 3 times while the power is turned off The Right Wrist Measurement symbol will appear on the display Select on to measure your blood pressure using your right wrist Select oFF to measure your blood pressure using your left wrist 2 Press the MEM button to select on or oFF Press the START STOP button to save this selection 10 ...
Page 11: ...date and time will display The measurement values will be stored in the memory with the wrong date and time 1 TO START THE SETTING Press the SET button four 4 times while the power is turned off The will year flash on the display 2 SETTING THE YEAR The year can be set between 2004 and 2030 When the display reaches 2030 it will return to 2004 Press the MEM button to advance by increments of one yea...
Page 12: ...rent day The hour flashes on the display 5 SETTING THE HOUR The time is set using AM or PM Press the MEM button to advance by increments of one hour Press the SET button to set the current hour The minutes flash on the display 6 SETTING THE MINUTE Press the MEM button to advance by increments of one minute Press the SET button to set the current minute The year flashes on the display 7 Press the S...
Page 13: ...2 to 1 inch between the cuff and the bottom of your palm 4 Hold the bottom part of the cuff and wrap it around the wrist so it fits comfortably and securely around your wrist NOTE Make sure the wrist cuff does not cover the protruding part of the wrist bone on the outside of the wrist 5 Fold the remaining part of the wrist cuff back out of the way APPLYING THE CUFF ON THE RIGHT WRIST When taking a...
Page 14: ...he monitor senses that your arm is in the correct position the wrist cuff will automatically start to inflate and measurement starts NOTE If your wrist is too low or too high the position sensor alarm will emit a series of two short bleeps similar to a heartbeat The current time is displayed and the Heart Symbol starts to flash while the cuff is inflating Hold the monitor at heart level until the ...
Page 15: ...utes IRREGULAR HEARTBEAT FEATURE The irregular heartbeat feature automatically determines if the measurement is usable If the measurement results are affected by irregular heartbeats but the result is valid the result is shown together with the Irregular Heartbeat Symbol If the irregular heartbeats cause the measurement to be invalid no result is shown If the Irregular Heartbeat Symbol is shown af...
Page 16: ...st record is deleted to save the most recent measurement values The monitor also calculates an average reading based on the values of the three most recent measurements taken If the date and time is not set the measurement values will not be stored in the memory correctly TO DISPLAY THE AVERAGE VALUE 1 Press the MEM button The average value symbol will display on the screen with the average readin...
Page 17: ... stored in the memory beginning with the oldest values to the most recent values NOTES Press the button repeatedly to display the next values Press and hold the button to display the values faster 2 Press the START STOP button to turn the power off TO DELETE ALL VALUES STORED IN THE MEMORY You cannot partially delete records stored in the memory All records will be deleted 1 Press and hold the MEM...
Page 18: ...n a safe and dry location Do not fold the cuff tightly Do not subject the monitor to extreme hot or cold temperatures humidity and direct sunlight Store the monitor in the storage case when not in use Avoid subjecting the monitor to strong shocks or vibrations such as dropping the unit on the floor Remove the batteries if the unit will not be used for three months or longer Always replace all the ...
Page 19: ...tened securely Remove the monitor from your wrist Refer to Applying the Wrist Cuff on page 13 Wait 2 3 minutes Take another measurement Wrist is not in the correct position Refer to Taking a Measurement on page 14 Make sure the wrist measurement selection is correct Refer to page 10 Batteries are worn Replace the two AAA batteries Refer to Battery Installation on page 8 After several seconds Cuff ...
Page 20: ... STOP button is pressed Replace worn batteries Check the battery installation for proper placement of the battery polarities Measurements values appear too high or too low Blood pressure reading varies constantly Many factors including stress time of day how you apply the cuff may affect your blood pressure reading Review the sections Before Taking a Measurement Applying the Wrist Cuff and Taking ...
Page 21: ...y one or more of the following measures Reorient or relocate the receiving antenna Increase the separation between the product and the receiver Connect the product into an outlet on a circuit different from that to which the receiver is connected Consult the dealer or an experienced radio TV technician for help POTENTIAL FOR RADIO TELEVISION INTERFERENCE for Canada only This digital apparatus does...
Page 22: ... and handling fee Information for warranty service is available on our website at www omronhealthcare com Enclose the Proof of Purchase Include a letter with your name address phone number and description of the specific problem Pack the product carefully to prevent damage in transit Because of possible loss in transit we recommend insuring the product with return receipt requested ALL IMPLIED WAR...
Page 23: ...line batteries at the room temperature of 73 F 23 C and by using three times a day and inflating to 170 mmHg Operating Temperature 50 F to 104 F 10 C to 40 C and Humidity 30 to 85 RH Storage Temperature 4 F to 140 F 20 C to 60 C and Humidity 10 to 95 RH Weight of Main Unit Approximately 110 g not including batteries External Dimensions 2 3 4 w x 2 1 8 h x 1 7 16 d 70 mm x 54 mm x 37 mm not includi...
Page 24: ...Distributed by OMRON HEALTHCARE INC 1200 Lakeside Drive Bannockburn Illinois 60015 www omronhealthcare com Manufactured by Omron Made in China Copyright 2005 OMRON HEALTHCARE INC 650INST Rev ...
Page 25: ...Manual de instrucciones ESPAÑOL Monitor automático para medir la presión arterial con A P S sensor avanzado de posición Modelo HEM 650 ...
Page 26: ...las pilas 8 Sensor avanzado de posición 9 Alarma del sensor de posición 9 Selección de medición en la muñeca 10 Ajuste de la fecha y la hora 11 Colocación de la muñequera 13 Cómo medir la presión arterial 14 Uso de la función de memoria 16 Cuidado y mantenimiento Cuidado y mantenimiento 18 Indicadores de error y consejos para la solución de problemas 19 Declaración de la FCC 21 Información sobre l...
Page 27: ...detecta el movimiento de la sangre a través de la arteria y lo convierte en una lectura digital El monitor oscilométrico no necesita estetoscopio así que es fácil de usar La investigación clínica ha demostrado que existe una relación directa entre la presión arterial de la muñeca y la presión arterial del brazo Los cambios en la presión arterial de la muñeca reflejan los cambios en la presión arte...
Page 28: ...nformación del manual de instrucciones y cualquier otra documentación incluída en la caja þ Comuníquese con su médico para obtener información específica acerca de su presión arterial Siga las instrucciones de su proveedor de atención médica þ Use la unidad sólo según lo indicado No la use para ningún otro propósito þ La unidad está diseñada para medir la presión arterial y el pulso en pacientes a...
Page 29: ...ón durante toda la medición 6 Permanezca quieto y no hable durante la medición 7 Mantenga un registro de sus lecturas de presión arterial y pulso para su médico Una sola medición no proporciona una indicación precisa de su verdadera presión arterial Es necesario tomar y anotar varias lecturas durante un período de tiempo Trate de medirse la presión arterial a la misma hora cada día 8 Espere de 2 a...
Page 30: ...ONOZCA SU UNIDAD Unidad principal Pantalla Botón MEM memoria Botón START STOP inicio paro Botón SET ajustar Muñequera Compartimiento de las pilas Accesorios Dos pilas alcalinas AAA Estuche de almacenamiento ...
Page 31: ... símbolo de latido cardiaco irregular aparece con los resultados de su medición recomendamos que consulte a su médico Siga las instrucciones de su médico PANTALLA DE LA UNIDAD E7 Símbolo de pilas bajas Símbolo del corazón Símbolo del valor en memoria Símbolo de valor promedio Símbolo de alarma del sensor de posición Indicador del pulso Presión arterial diastólica Presión arterial sistólica Indicad...
Page 32: ...figuración inicial Cuando el indicador de batería baja aparece en la pantalla retire todas las baterías Cuando el símbolo de la bateria parpadea queda un periodo breve de uso Se recomienda usar baterías alcalinas de larga duración Notas Los valores de medición que se guardan en la memoria no se borran durante el cambio de las baterías Después de cambiar las baterías vuelva a ajustar la fecha y hor...
Page 33: ... correcta ALARMA DEL SENSOR DE POSICIÓN La alarma del sensor emite un sonido para ayudarle a colocar la muñeca en la posición correcta 1 Oprima el botón SET dos veces ajustar mientras la unidad está apagada hasta que el símbolo de la alarma del sensor de posición aparezca en la pantalla La alarma on 1 encendido1 emite una serie de blips pitidos cortos si tiene la muñeca demasiado alejada de la pos...
Page 34: ...ue el símbolo de medición en la muñeca derecha aparezca en la pantalla Seleccione on encendido para medirse la presión arterial usando la muñeca derecha Seleccione oFF apagado para medirse la presión arterial usando la muñeca izquierdo 2 Oprima el botón MEM memoria para seleccionar on encendido u oFF apagado Presione el botón START STOP inicio paro para ahorrar esta selección E10 ...
Page 35: ...lla Los valores de las mediciones se almacenarán en la memoria con la fecha y hora incorrectas 1 PARA COMENZAR EL AJUSTE Oprima el botón SET ajustar cuatro veces mientras que la energía está apagada Que el año parpadee en la pantalla 2 AJUSTE DEL AÑO El año puede fijarse entre 2004 y 2030 Cuando el año llegue a 2030 volverá a 2004 Oprima el botón de MEM memoria para avanzar en incrementos de un añ...
Page 36: ...parpadea en la pantalla 5 AJUSTE DE LA HORA La hora se ajusta usando AM o PM Oprima el botón MEM memoria para avanzar en incrementos de una hora Oprima el botón SET ajustar para ajustar la hora actual Los minutos parpadean en la pantalla 6 AJUSTE DE LOS MINUTOS Oprima el botón MEM memoria para avanzar en incrementos de un minuto Oprima el botón SET ajustar para ajustar el minuto actual El año parp...
Page 37: ...e ésta y la parte inferior de la palma de la mano 4 Sostenga la parte inferior de la muñequera y envuélvala alrededor de la muñeca para que le quede cómoda y segura NOTA Asegúrese de que la muñequera no le cubra la parte sobresaliente del hueso de la muñeca en la parte exterior de la misma 5 Doble la parte restante de la muñequera hacia atrás para que no le estorbe COLOCACIÓN DE LA MUÑEQUERA EN LA...
Page 38: ...lento Cuando el monitor detecte que el brazo se encuentra en la posición correcta la muñequera comenzará a inflarse automáticamente y comenzará la medición NOTA Si tiene la muñeca demasiado baja o alta la alarma del sensor de posición emitirá una serie de dos blips cortos similares al latido cardiaco Aparece la hora actual y el símbolo del corazón comienza a parpadear mientras la muñequera se infl...
Page 39: ... FUNCIÓN DE LATIDO CARDIACO IRREGULAR La función de latido cardiaco irregular determina automáticamente si la medición se puede utilizar Si la medición resultó afectada por el latido cardiaco irregular pero el resultado es válido éste se muestra con el símbolo de latido cardiaco irregular Si el latido cardiaco irregular hace que la medición sea inválida no aparecerá ningún resultado Si se muestra ...
Page 40: ...más antiguo se elimina para guardar el registro más reciente El monitor también calcula una lectura promedio basada en los valores de las tres mediciones más recientes Si no se han ajustado la fecha y la hora los valores de medición no se almacenarán correctamente en la memoria PARA MOSTRAR EL VALOR PROMEDIO 1 Oprima el botón MEM memoria El símbolo de valor prome dio aparecerá en la pantalla con l...
Page 41: ...a más reciente NOTAS Oprima repetidamente el botón para mostrar los siguientes valores Oprima y mantenga oprimido el botón para mostrar los valores con mayor rapidez 2 Oprima el botón START STOP inicio paro para apagar el dispositivo PARA BORRAR TODOS LOS VALORES ALMACENADOS EN LA MEMORIA No es posible borrar parcialmente las lecturas almacenadas en la memoria Se borrarán todos los registros 1 Opr...
Page 42: ...ponentes en agua Guarde el monitor en un lugar seguro y seco No doble ajustadamente la muñequera No exponga el monitor a temperaturas extremas humedad y luz solar directa Almacene el monitor en la cajo protectora cuando no se use Evite exponer el monitor a impactos o vibraciones fuertes como dejar caer la unidad al suelo Quite las pilas si la unidad no se va a usar por tres meses o más Siempre ree...
Page 43: ...uñeca Consulte la sección Colocación de la muñequera en la página 13 Espere de 2 a 3 minutos Realice otra medición La muñeca no está en la posición correcta Consulte la sección Cómo medir la presión arterial en la página 14 Asegúrese de que la selección de medición en la muñeca sea correcta Consulte la página 10 Las pilas están gastadas Reemplace las dos pilas AAA Consulte la sección Instalación d...
Page 44: ...aro Reemplace las pilas desgastadas Verifique la instalación de las pilas para asegurar la correcta ubicación de sus polaridades Los valores de medición aparecen demasiado altos o demasiado bajos La lectura de la presión arterial varía constantemente Muchos factores incluyendo el estrés la hora del día o cómo se coloca el brazalete pueden afectar la lectura de la presión arterial Revise las seccio...
Page 45: ...rate de corregirla realizando alguna de las siguientes operaciones Cambie la orientación o ubicación de la antena de recepción Aumente la distancia que separa el producto del receptor Conecte el producto a un tomacorriente que esté en un circuito diferente al del receptor Consulte al vendedor o a un técnico experimentado de radio y TV POSIBILIDAD DE INTERFERENCIA EN RADIO Y TELEVISIÓN sólo para Ca...
Page 46: ...re servicio cubierto por la garantía está disponible en nuestro sitio web www omronhealthcare com Incluya el comprobante de compra Incluya una carta con su nombre dirección número telefónico y la descripción del problema específico Empaque cuidadosamente el producto para evitar que se dañe durante el transporte Debido a la posibilidad de pérdida durante el transporte recomendamos asegurar el produ...
Page 47: ...a ambiental de 73 F 23 C tres veces al día con un inflado a 170 mmHg Temperatura y humedad 50 F a 104 F 10 C a 40 C de operación 30 a 85 de humedad relativa Temperatura y humedad 4 F a 140 F 20 C a 60 C y de almacenamiento 10 a 95 de humedad relativa Peso de la unidad principal Aproximadamente 110 g sin pilas Dimensiones externas 2 3 4 de ancho x 2 1 8 de alto x 1 7 16 de profundidad 70 mm x 54 mm...
Page 48: ...Distribuido por Omron Healthcare Inc 1200 Lakeside Drive Bannockburn Illinois 60015 www omronhealthcare com Fabricado por Omron Hecho en China Copyright 2005 OMRON HEALTHCARE INC 650INST Rev ...