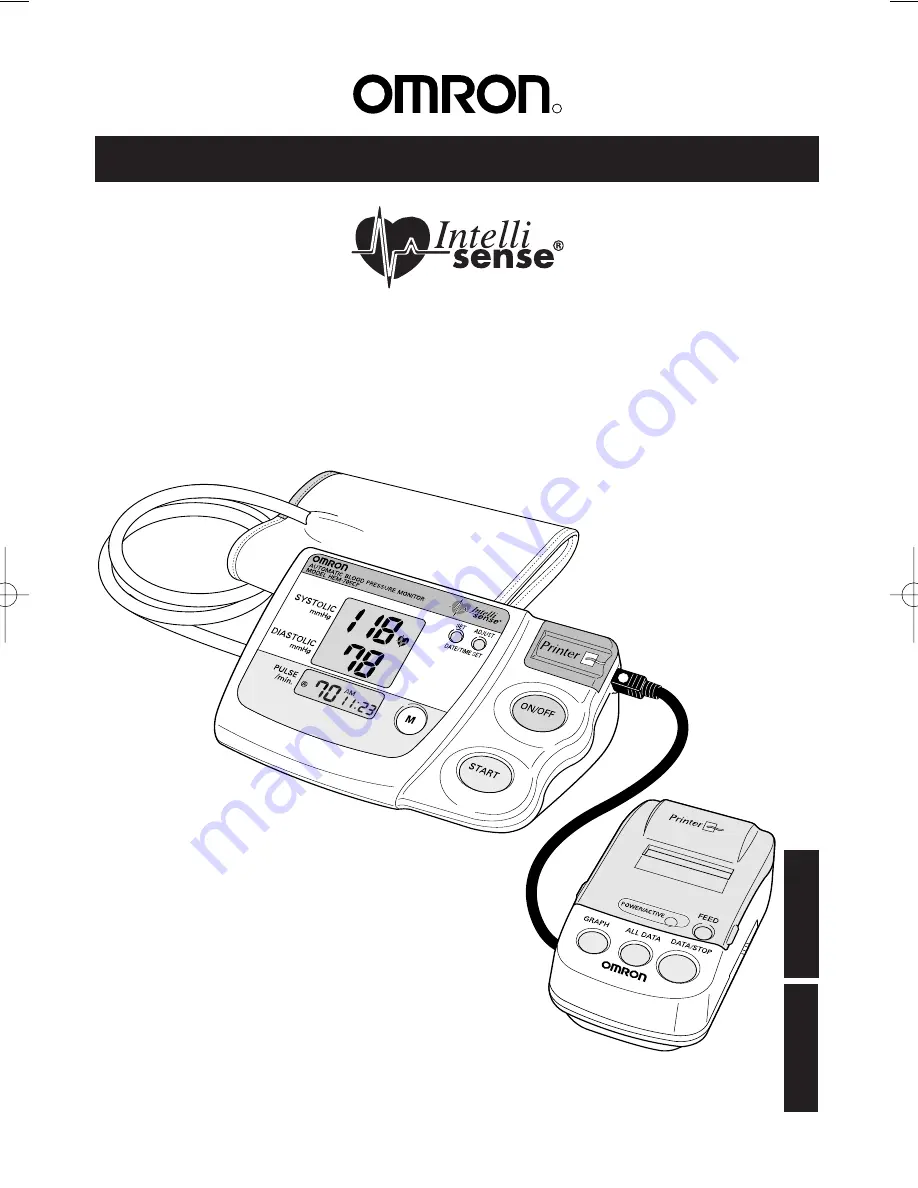
Automatic Blood Pressure Monitor
with
Printer
Model
HEM-705CP
INSTRUCTION MANUAL
R
E
N
G
L
IS
H
S
P
A
Ñ
O
HEM-705CP-IM-US 7/19/05 9:26 AM Page 1
Page 1: ...Automatic Blood Pressure Monitor with Printer Model HEM 705CP INSTRUCTION MANUAL R ENGLISH ESPAÑOL ...
Page 2: ...Battery Installation 7 Connecting the Printer 8 Loading the Paper 9 Setting the Date and Time 10 Applying the Arm Cuff 12 Taking a Measurement 14 Using the Memory Function 16 Using the Printer 17 Care and Maintenance Care and Maintenance 20 Error Indicators and Troubleshooting Tips 21 Quick Reference Guide 23 FCC Statement 25 Warranty Information 26 Specifications 27 ...
Page 3: ...measurement This means the monitor detects your blood s movement through your brachial artery and converts the movements into a digital reading An oscillometric monitor does not need a stethoscope so the monitor is simple to use The HEM 705CP comes with the following components Monitor Standard Cuff 9 13 arm circumference Printer Printer Tape Instruction Manual printed in English and Spanish The H...
Page 4: ...re Follow the instructions of your healthcare provider þ Operate the unit only as intended Do not use for any other purpose þ The unit is intended for use in measuring blood pressure and pulse rate in adult patient population Do not use on infants þ Do not use a cellular phone near the unit It may result in operational failure þ Do not plug or unplug the adapter power cord with wet hands þ Changes...
Page 5: ...rm on a table so that the cuff is at the same level as your heart 6 Remain still and do not talk during the measurement 7 Keep a record of your blood pressure and pulse readings for your physician A single measurement does not provide an accurate indication of your true blood pressure You need to take and record several readings over a period of time Try to measure your blood pressure at the same ...
Page 6: ...mory Button Systolic Blood Pressure ON OFF Button Set Date Time Adjust Date Time Diastolic Blood Pressure Print All Data Print Current Data Stop Printing Printer Cover Air Plug Connects to Air Jack Main Unit Components AC Adapter Jack Printer Jack Cuff Jack Printer Cable Plug Power Operation Light 6 Arm Cuff Printer ...
Page 7: ...ndicated 3 Replace the battery cover Main Unit Printer Unit 7 BATTERY REPLACEMENT Low Battery Indicator When the Low Battery Indicator appears on the display screen remove all the batteries Replace with four new batteries at the same time Long life alkaline batteries are recommended NOTE Measurement values stored in the memory will not be deleted during battery replacement After replacing the batt...
Page 8: ... Remove the printer cord from around the printer unit 2 Connect the printer to the blood pressure monitor Insert the cable plug with the indicator facing upward CAUTION Inserting the cable plug in any other position will damage the monitor ...
Page 9: ...all customer service at 1 800 634 4350 1 Open the printer cover in the direction as indicated by the arrow symbols in the illustration 2 Peel back the glued edge of the printer paper Cut off the first 4 inches of the paper with a pair of scissors 3 Insert the edge of the printer paper in paper feeding slot Press the FEED button until the paper extends approximately 3 inches 4 Insert the paper thro...
Page 10: ...ay 1 SETTING THE YEAR When the batteries are installed the 12 00 AM will display Press and hold the SET button for 2 seconds to adjust the year The year flashes on the display 2 SETTING THE YEAR The year can be set between 2001 and 2030 When the display reaches 2030 it will return to 2001 Press the ADJUST button to advance by increments of one year Press the SET button to set the current year The ...
Page 11: ... one day Press the SET button to set the current day The hour flashes on the display 5 SETTING THE HOUR Press the ADJUST button to advance by increments of one hour Press the SET button to set the current hour The minutes flash on the display 6 SETTING THE MINUTE Press the ADJUST button to advance by increments of one minute Press the SET button to set the current minute The unit will be ready to ...
Page 12: ...ur heart APPLYING THE CUFF ON THE LEFT UPPER ARM 4 Put your arm through the cuff loop The Green Marker on the cuff should lie over the brachial artery on the inside of the arm The air tube runs down the inside of your arm The bottom of the cuff should be approximately 1 2 above your elbow SYSTOLIC DIASTOLIC PULSE min AUTOMATIC BLOOD PRESSURE MONITOR MODEL HEM 711 READY TO MEASURE REPLACE BATTERIES...
Page 13: ...e side of the cuff 7 Make certain the cuff fits snugly around your arm The cuff should make good contact with your skin NOTE You should be able to fit your index finger between the cuff and your arm easily so you can pull the cuff off and on 8 Relax your arm and turn your palm upward 9 Be sure there are no kinks in the air tubing 13 TITLE TITLE TITLE APPLYING THE ARM CUFF ...
Page 14: ...ls appear on the screen The cuff starts to inflate automatically NOTE To stop the inflation or measurement push the START STOP button The monitor will stop inflating start deflating and will turn off 2 Press the START button As the cuff begins to inflate the monitor automatically determines your ideal inflation level Because this monitor detects the pulse even during inflation do not move your arm...
Page 15: ... to turn the monitor off NOTE The monitor will automatically turn off after five minutes INSTRUCTIONS FOR SPECIAL CONDITIONS If your systolic pressure is known to be more than 220mmHg press and hold the START button until the monitor inflates 30 to 40 mmHg higher than your suspected systolic pressure NOTE Do not apply more pressure than necessary The monitor will not inflate above 299 mmHg ...
Page 16: ...played with the measurement values 1 Press the button down while the Heart Symbol is displayed The most recent measurement values will be displayed NOTES Press the button repeatedly to display the next values Press and hold the button to display the values faster 2 Press the START STOP button to turn the power off 16 TITLE TITLE TITLE USINGTHE MEMORY FUNCTION START TO DELETE ALL VALUES STORED IN T...
Page 17: ...ot appear on the print out The printer unit must be connected to the monitor The monitor does not have to be ON to operate the printer unit The printer unit will automatically shut off when the printing is completed To stop printing press the DATA STOP button at any time 1 TO PRINT THE MOST RECENT MEASUREMENT VALUES Press the DATA STOP button The numeric results of the most recent reading will pri...
Page 18: ...2 14 111 56 62 14 7 107 64 64 21 15 111 64 64 22 12 121 62 66 4 6 112 64 63 AV 112 65 65 Date Time Hour Systolic Reading Column Diastolic Reading Column Pulse Reading Column Oldest reading stored Average of all stored readings Month s The month or months will print For example If the blood pressure readings were stored during the months of March through June then the printout will indicate 3 6 Dat...
Page 19: ...he memory The stored data will print as illustrated in the following example 50 100 150 200 mmHg 3 6 Diastolic Reading Systolic Reading Average systolic reading of stored measurements Average diastolic reading of stored measurements Oldest reading stored If reading is lower than 50 mmHg or higher than 200 mmHg 3 will appear Most recent reading Month s ...
Page 20: ...aners Do not attempt to clean the cuff Never immerse the monitor or any components in water Store the monitor in a safe and dry location Do not subject the monitor to extreme hot or cold temperatures humidity and direct sunlight Avoid subjecting the monitor to strong shocks such as dropping the unit on the floor Remove the batteries if the unit will not be used for three months or longer Always re...
Page 21: ...lated Batteries are worn Replace the four batteries Refer to page 7 for battery installation TROUBLESHOOTING TIPS PROBLEM CAUSES AND SOLUTIONS No power No display appears on the unit Replace all worn batteries Check the battery installation for proper placement of the battery polarities Measurement values appear too high or too low Blood pressure varies constantly Many factors including stress tim...
Page 22: ... are stored in the memory Connect printer to BP Monitor Insert cable plug in correct position Reference page 8 Contact Customer Service for repair information Make sure the date and time is set up in the monitor Take a reading then print Reference page 17 Not all data stored in the memory will print POWER ACTIVE Light is blinking Worn batteries Replace all 4 AA batteries Reference page 7 Printer p...
Page 23: ...rm 2 Sit in a chair with your feet flat on the floor and place your arm on a table so the cuff is at the same level as your heart 3 Put your arm through the cuff loop The bottom of the cuff should be approximately 1 2 above the elbow The Green Marker on the cuff should lie over the brachial artery on the inside of the arm Tube should run down center of arm even with your middle finger 4 Wrap the c...
Page 24: ... STOP button The monitor will stop inflating start deflating and will turn off 7 When the measurement is complete the arm cuff completely deflates Your blood pressure and pulse rate are displayed NOTE Wait 2 3 minutes between measurements The wait time allows the arteries to return to the condition prior to taking the blood pressure measurement You may need to increase the wait time depending on y...
Page 25: ...ference by one or more of the following measures Reorient or relocate the receiving antenna Increase the separation between the product and the receiver Connect the product into an outlet on a circuit different from that to which the receiver is connected Consult the dealer or an experienced radio TV technician for help POTENTIAL FOR RADIO TELEVISION INTERFERENCE for Canada only This digital appar...
Page 26: ... handling fee Information for warranty service is available on our website at www omronhealthcare com Enclose the Proof of Purchase Include a letter with your name address phone number and description of the specific problem Pack the product carefully to prevent damage in transit Because of possible loss in transit we recommend insuring the product with return receipt requested ALL IMPLIED WARRANT...
Page 27: ...emperatures Humidity 10 to 95 RH maximum Main Unit Weight Approximately 13 4 oz 380g not including batteries Main Unit Dimensions Approximately 4 1 2 l x 7 w x 2 4 5 h 115 mm x 177 mm x 71 mm Cuff Dimensions Approximately 5 1 2 x 19 140 mm x 480 mm Cuff Circumference Fits arm circumference 9 to 13 Contents Arm cuff printer paper roll instruction manual Optional Accessories AC Adapter model number ...
Page 28: ...Made in China Manufactured by OMRON Distributed by OMRON HEALTHCARE INC 1200 Lakeside Drive Bannockburn Illinois 60015 1243 www omronhealthcare com 2005 OMRON HEALTHCARE INC 705CPINST Rev B ...