Digital Automatic Blood Pressure Monitor
Model i-C10
• Instruction Manual• Mode d’emploi• Gebrauchsanweisung• Manuale di istruzioni• Manual de instrucciones• Gebruiksaanwijzing•
IM-HEM-7070-E-04-05/2012
5320473-7C
EN
FR
DE
IT
ES
NL
RU
AR
Page 1: ...tic Blood Pressure Monitor Model i C10 Instruction Manual Mode d emploi Gebrauchsanweisung Manuale di istruzioni Manual de instrucciones Gebruiksaanwijzing IM HEM 7070 E 04 05 2012 5320473 7C EN FR DE IT ES NL RU AR ...
Page 2: ...3 1 How to Sit Correctly When Taking a Measurement 16 3 2 Applying the Arm Cuff 18 3 3 Taking a Reading 21 3 4 Instructions for Special Conditions 31 3 5 Using the Memory Function 32 4 Quick Reference Guide 39 Care and maintenance 5 Handling Errors and Problems 40 5 1 Error Messages 40 5 2 Troubleshooting 41 6 Maintenance and Storage 42 7 Optional Parts 43 8 Technical Data 44 9 Some Useful Informa...
Page 3: ...mply and quickly For comfortable controlled inflation without the need for pressure pre setting or re inflation the device uses its advanced Intellisense technology The monitor stores measurement results for two people and features morning and evening averages The auto mode allows for three consecutive measurements with timed intervals for an average reading Please read this instruction manual tho...
Page 4: ...s immediately rinse with plenty of clean water Consult a doctor immediately Optional AC Adapter Usage Never plug in or unplug the power cord from the electric outlet with wet hands Caution Indicates a potentially hazardous situation which if not avoided may result in minor or moderate injury to the user or patient or damage to the equipment or other property General Usage Do not leave the unit una...
Page 5: ... months or more When the batteries are replaced you may need to reset the date and time If the year is flashing on the display screen refer to 2 2 Setting the Date and Time Do not use new and used batteries together General Safety Precautions Do not forcibly bend the arm cuff or bend the air tube excessively When removing the air tube pull on the air plug at the connection with the main unit not t...
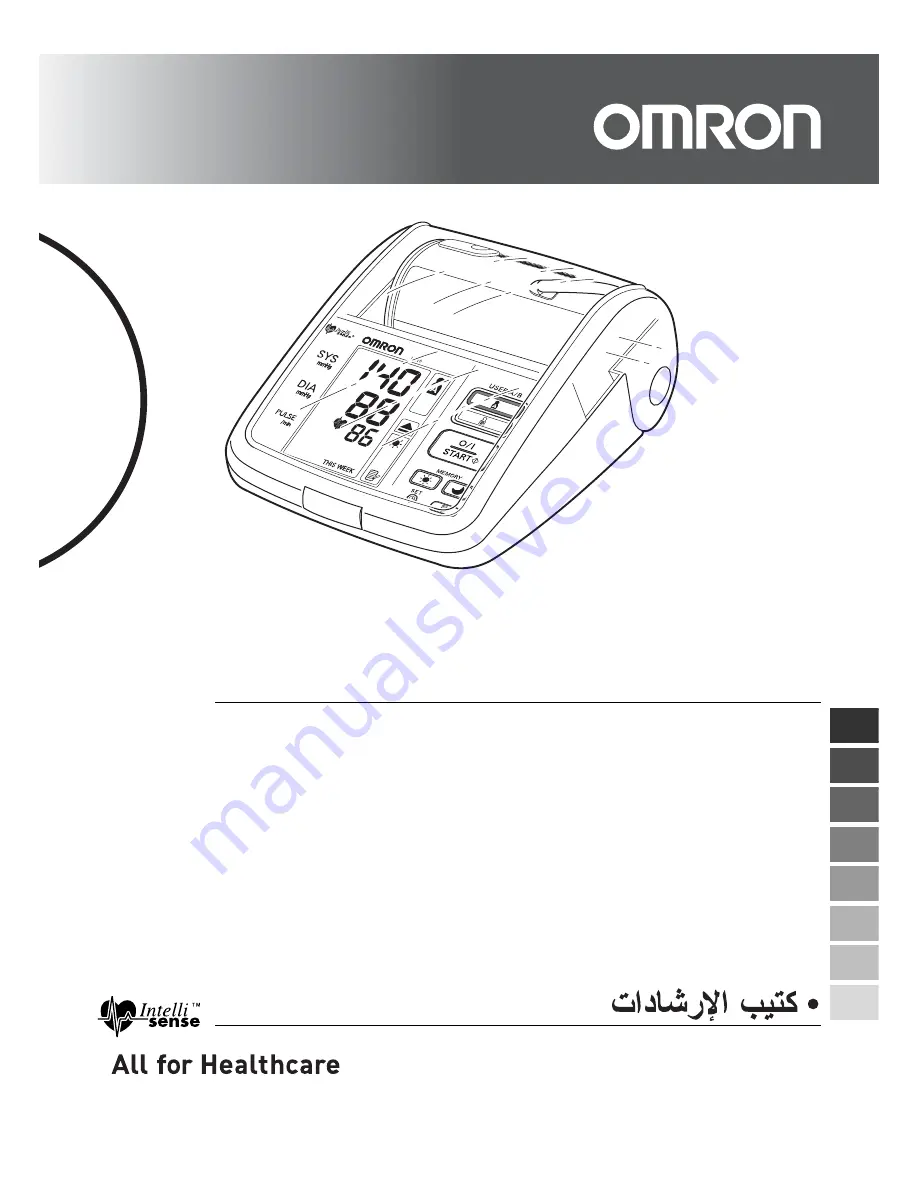
Page 6: ... MEMORY button D Morning Evening Average buttons E O I START button F User ID selection switch A or B G User ID symbol A or B H Cuff compartment I Monitor cover J Air jack K Battery compartment L AC adapter jack for optional AC adapter A B C D E F G H I J K L ...
Page 7: ...7 1 Overview EN Arm Cuff M Arm cuff Medium cuff arm circumference 22 42 cm N Air Plug O Air Tube M O N ...
Page 8: ...e user to take a measurement or when using the memory function Y Pulse display Z Early morning hypertension symbol Displayed if the morning average reading for a week is above 135 for the systolic blood pressure value and or 85 for the diastolic blood pressure value AA Morning average symbol Displayed when viewing morning averages using the memory function AB Evening average symbol Displayed when ...
Page 9: ...9 1 Overview EN Package Contents AG Four AA alkaline LR6 batteries Instruction manual Guarantee card Blood pressure pass Blood Pressure Monitor unit AG ...
Page 10: ...bed part of the cover 3 Install or replace four AA size batteries so that the positive and negative polarities match the polarities indicated on the battery compartment 4 Put the battery cover back in place Slide the battery cover as indicated until it clicks into place Note The measurement values continue to be stored in memory even after the batteries are replaced Battery Cover ...
Page 11: ...eries with new ones at once Turn the unit off before replacing the batteries Remove the batteries if the unit will not be used for three months or more If the batteries have been removed for more than 30 seconds the Date Time setting will need to be reset See Chapter 2 2 for details Dispose of batteries according to applicable local regulations Four new AA alkaline batteries will last for approxim...
Page 12: ...te Time setting will need to be reset 1 When the O I START button is pressed to turn the unit on for the first time after inserting batteries the year digits 2007 will flash on the display 2 Press the MEMORY button to advance the digits one at a time Notes The range for the year setting is 2007 to 2030 If the year reaches 2030 it will return to 2007 If you hold down the MEMORY button the digits wi...
Page 13: ...nd the hour digits flash on the display 6 Repeat steps 2 and 3 to set the hour The hour is set and the minutes digits flash on the display 7 Repeat steps 2 and 3 to set the minutes The minutes settings is set The unit automatically turns itself off after the minute setting has been set To adjust the date and time press and hold the SET button while the unit is turned off ...
Page 14: ...e at a later stage start the unit in the off position Follow the steps below 1 Press and hold the SET button The auto mode symbol and the current setting on or oFF will appear on the display for the user ID selected If the year is not flashing press the SET button once or twice until the year is flashing The year flashes on the display 2 Refer to Chapter 2 2 2 to start setting the date and time Wi...
Page 15: ...correctly press the SET button to circle through the settings in order to adjust to their correct values In the case where the time displays incorrectly after a long period of non use of the unit reset the Date and Time refer to Chapter 2 2 for instructions on setting the clock values Erase the recorded values when reusing the unit refer to Chapter 3 5 for directions on erasing the recorded values...
Page 16: ...id eating smoking or exercising for at least 30 minutes before taking a measurement Do not move or talk during measurement Correct Posture Remove tight fitting clothing from your upper arm and any thick clothing such as a sweater Do not place the cuff over thick clothes and do not roll up your sleeve if it is too tight Sit upright with your back straight Place your arm on a table so that the cuff ...
Page 17: ...r after waking up is recommended Incorrect Posture These situations could lead to higher blood pressure values due to strain or the arm cuff being lower than the heart If the arm cuff is at a lower position than your heart use cushions etc to adjust the height of your arm Arched back leaning forwards Sitting cross legged Sitting on a sofa or at a low table so that you tend to lean forward ...
Page 18: ... and do not roll up your sleeve if it is too tight Taking Measurements on the Left Arm 1 Insert the air plug into the air jack inside the Cuff Compartment of the device The cuff must be fully deflated when it is inserted into the air jack 2 Sit on a chair with your feet flat on the floor and place your arm on a table so that the cuff will be at the same level as your heart Air plug Air jack ...
Page 19: ...er arm so that the blue strip is centred on the middle of your inner arm and points down the inside of the arm The air tube should run down the inside of your forearm and be in line with your middle finger The bottom of the cuff should be approximately 1 to 2 cm above the elbow Grip Fabric fastener Blue strip Bottom edge 1 to 2 cm Air tube ...
Page 20: ... Apply the cuff so that the air tube is at the side of your elbow Notes Be careful not to rest your arm on the air tube or otherwise restrict the flow of air to the cuff Apply the arm cuff so that no part of the cuff is positioned over the elbow joint The cuff should be 1 to 2 cm above the elbow If used 2 times per day the cuff will last for 3 years The blood pressure can differ between the right ...
Page 21: ...sing the guest mode are not stored in the memory Using the Guest Mode 1 Press and hold the O I START button until the A and B user symbols disappear from the display 2 Release the O I START button The cuff starts to inflate automatically Note To stop the inflation press and release the O I START button The unit will stop inflating start deflation and turn off 3 Inflation stops and the measurement ...
Page 22: ...ID selection switch up or down to select user A or B Using the User ID When you select a user ID the unit can be set to take one measurement using the single mode or three consecutive measurements using the auto mode when you press the O I START button Note The default value is set to the single mode to take one measurement The auto mode takes three consecutive measurements The unit will inflate t...
Page 23: ... cuff starts to inflate automatically As the cuff inflates the unit automatically determines your ideal inflation level This unit detects the pulse during inflation Do not move your arm and remain still until the entire measurement process is completed Note To stop the inflation or measurement press and release the O I START button The unit will stop inflating start deflating and will turn off ...
Page 24: ...ssure and pulse rate are displayed 5 Press the O I START button to turn the unit off Note If you forget to turn the monitor off it will automatically turn off after five minutes Notes Self diagnosis of measured results and treatment are dangerous Please follow the instructions of your doctor Wait 2 3 minutes before taking another blood pressure measurement Waiting between readings allows the arter...
Page 25: ...either A or B user 1 Make sure the unit is powered off 2 Select your user ID A or B 3 Press and hold the SET button The auto mode symbol and the oFF setting appears on the display 4 Press the MEMORY button to select on Note Press the MEMORY button to alternate between on and oFF ...
Page 26: ... seconds 6 Press the MEMORY button to change the interval of time between each measurement The interval can be set to 15 seconds 30 seconds 60 seconds or 120 seconds Continue to press the MEMORY button until the desired interval appears on the display 7 Press the SET button to confirm the setting The year flashes on the display 8 Press the O I START button to turn the unit off ...
Page 27: ...d will turn off 3 Inflation stops automatically and the measurement is started As the cuff deflates decreasing numbers appear on the display The heartbeat symbol flashes at every heartbeat When the measurement is complete the arm cuff completely deflates Note Do not move your arm and remain still until the entire measurement process is completed 4 Check the progress of the consecutive measurements...
Page 28: ...for each individual measurement can be displayed after all the measurements have been completed Note During the Auto Mode the unit will repeat the measurement in case of an error After 3 errors the unit will stop taking further measurements If only two measurements are successful the average of these two measurements will be displayed If only one measurement is successful this result will be displ...
Page 29: ...eartbeat feature Irregular heartbeats can influence the results of the measurement The irregular heartbeat algorithm automatically determines if the measurement is usable or needs to be repeated If the measurement results are affected by irregular heartbeats but the result is valid the result is shown together with the irregular heartbeat icon If the irregular heartbeats cause the measurement to b...
Page 30: ...ystem that drives the heartbeat Typical symptoms are skipped heartbeats premature contraction an abnormally rapid tachycardia or slow bradycardia pulse This can be caused by heart disease aging physical predisposition stress lack of sleep fatigue etc Arrhythmia can only be diagnosed by a doctor through a special examination Whether the appearance of the irregular heartbeat symbol in the results in...
Page 31: ...rts to inflate press the O I START button and keep it pressed until the pressure is 30 to 40 mmHg higher than your suspected systolic pressure Note You cannot inflate the cuff above 299 mmHg An error will be displayed if you try to inflate the cuff above 300 mmHg 3 Release the O I START button when the cuff has been inflated to the desired pressure The cuff starts to deflate and measurement starts...
Page 32: ...eks of morning averages and 8 weeks of evening averages for each user A and B Average Function The unit calculates the average reading based on the three most recent sets of measurement values taken within 10 minutes of the most recent reading Note If two sets of measurement values are stored in the memory for the 10 minutes period the average is based on the two sets of measurement values If one ...
Page 33: ...ayed with the measurement values Press the MEMORY button to display the next set of values Press and hold the MEMORY button to display the values faster Auto mode The average for the consecutive measurements appears on the display with the auto mode symbol To display the values for the individual measurements press the SET button while the average is displayed 4 Press the O I START button to turn ...
Page 34: ... for each user A and B Note The week begins Sunday at 4 00 Morning Averages Morning averages are based on the first average reading using the auto mode or the first reading using the single mode Measurement times must be between 4 00 and 9 59 Evening Averages Evening averages are based on the last average reading using the auto mode or the last reading using the single mode Measurement times must ...
Page 35: ...or each day is calculated for up to three measurements taken within 10 minutes of the last measurement of the evening First measurement of the morning Within 10 minutes 9 59 4 00 Measurements of the morning Up to 3 measurements Morning Blood Pressure Measurement Measurement Measurement Measurement Measurement Measurement Sunday Monday Tuesday Wednesday Thursday Friday Saturday Measurements of the ...
Page 36: ...ing the morning average button or the evening average button It is important to check both morning and evening average of the same week 3 Continue to press the morning average button or the evening average button to display the previous weeks The unit displays 1 WEEK for the previous week to 7 WEEK for the oldest set of averages Note If there are not enough measurements taken in a week to calculat...
Page 37: ...ts these may be displayed in the following combinations Display Morning Average Morning average from This Week with Morning Average Symbol Morning average from 7 weeks ago with Morning Average Symbol blinking heartbeat Symbol Morning Hypertension Symbol Evening average Evening average from This Week with Evening Average Symbol Evening average from 7 weeks ago with Evening Average Symbol blinking H...
Page 38: ...played regardless of the values for the evening average To Delete All Values Stored in the Memory The values stored in the memory are deleted by user ID You cannot partially delete values stored in the memory All values for the user you select will be deleted 1 Select your ID A or B 2 While holding the MEMORY button press the O I START button simultaneously for more than 2 seconds and all values w...
Page 39: ...d place your arm on a table so that the arm cuff will be at the same level as your heart 2 Secure the cuff around your arm using the fabric fastener strip 3 Select your user ID A or B 4 Press the O I START button When measurement is complete the unit displays your blood pressure and pulse rate and automatically deflates the cuff Notes Always wait at least 2 3 minutes before taking another blood pr...
Page 40: ...efully read and repeat the steps listed under Chapter 3 3 Movement during measurement Cuff over inflated Batteries have run down Replace all four AA batteries with new ones Refer to Chapter 2 1 Movement sound Carefully read and repeat the steps listed under Chapter 3 3 Cuff leaks air Replace with a new cuff Blinks or appears continuously ...
Page 41: ...rrectly around the arm Attach the arm cuff correctly The cuff pressure does not rise although the pump motor can be heard Check that the air plug is properly connected to the unit Push the air plug firmly into the air jack The blood pressure is different each time The reading is extremely low or high Blood pressure readings constantly vary with time of measurement and nervous condition Take deep b...
Page 42: ...macist The OMRON i C10 is a precision measuring device It is important that the accuracy remains within the specifications It is recommended that you have the unit inspected every two years to ensure it is accurate and functioning correctly Consult the OMRON distributor or Customer Services as mentioned on the packaging for further details Do not subject the unit to strong shocks or vibrations for...
Page 43: ...ed adapters may damage the unit When storing the AC adapter with the main unit be careful not to damage the main unit or cuff 1 Insert the AC adapter plug into the AC adapter jack on the left side of the main unit 2 Plug the AC adapter into an electrical outlet To disconnect the AC adapter unplug the AC adapter from the electrical outlet first and then immediately remove the AC adapter plug from t...
Page 44: ...Measurement Range Pressure 0 mmHg to 299 mmHg Pulse 40 to 180 min Accuracy Pressure r3 mmHg Pulse r 5 of display reading Inflation Fuzzy logic controlled by electric pump Deflation Automatic pressure release valve Pressure Detection Capacitive pressure sensor Memory 84 Measurements with date and time for each user A and B Power Source 4 AA batteries 1 5V or AC DC adapter 6V 4W Battery Life Capacit...
Page 45: ...nterference may result in incorrect operation of the medical device and create a potentially unsafe situation Medical devices should also not interfere with other devices In order to regulate the requirements for EMC Electro Magnetic Compatibility with the aim to prevent unsafe product situations the EN60601 1 2 standard has been implemented This standard defines the levels of immunity to electrom...
Page 46: ...your blood pressure measured by a doctor can cause anxiety which is itself a cause of high blood pressure As a variety of conditions affect blood pressure a single measurement may not be sufficient for an accurate diagnosis Many factors such as physical activity anxiety or the time of day can influence your blood pressure Thus it is best to try and measure your blood pressure at the same time each...
Page 47: ...nt departments of hospitals Note There is no universally accepted definition of hypotension However those having the systolic pressure below 100 mmHg are assumed as hypotensive mmHg 200 150 100 50 6 12 18 24 Example fluctuation within a day male 35 years old Time of day Upper curve systolic blood pressure Lower curve diastolic blood pressure 80 180 160 140 130 120 85 90 100 110 Diastolic blood pre...
Page 48: ...32 LR Hoofddorp THE NETHERLANDS www omron healthcare com Production facility OMRON DALIAN CO LTD Dalian CHINA Subsidiary OMRON HEALTHCARE UK LTD Opal Drive Fox Milne Milton Keynes MK15 0DG U K OMRON MEDIZINTECHNIK HANDELSGESELLSCHAFT mbH John Deere Str 81a 68163 Mannheim GERMANY www omron medizintechnik de OMRON SANTÉ FRANCE SAS 14 rue de Lisbonne 93561 Rosny sous Bois Cedex FRANCE Made in China ...