background image

3 Check and start operation 

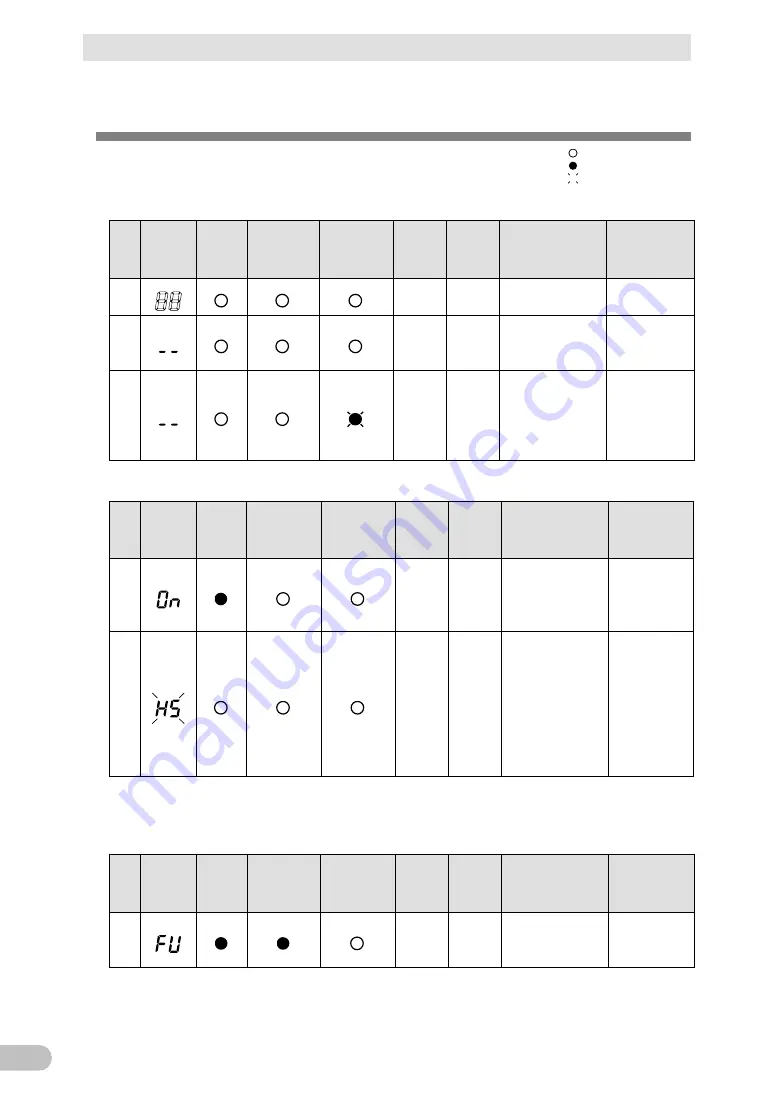
3-4 Interpreting beeps and displays 


BU150R 

46 

3-4  Interpreting beeps and displays 

3-4-1 Displays and beeps in normal operations 

(1)  When "Power" switch is "OFF" 

No

Status 

indicator 

Power 

supply 

output 

lamp 

Battery 

mode 

lamp 

Battery 

replacement 

lamp 

Beep 

Chargin

Description 

Solution 


None 

OFF 

No AC input. 
Operation stopped. 

――


None 

ON 

There is AC input. 
"Power" switch is 
OFF. 

――


None 

――


There is AC input. 
"Power" switch is 
OFF, or OFF

O


Battery 
Disconnect. 

Connect 
Battery. 

 
(1)  When "Power" switch is "OFF" 

No

Status 

indicator 

Power 
supply 

output 

lamp 

Battery 

mode 

lamp 

Battery 

replacement 

lamp 

Beep 

Chargin

Description 

Solution 


None 

ON 

"Power" switch is 
ON. 
Operating 
normally. 

――


None 

ON 

Battery charge is 
low, so the unit is 
waiting to start up. 

Continue 
charging the 
battery. You can 
change the 
settings with 
Simple 
Shutdown 
Software. 


3-4-2 Displays and beeps while testing 

No

Status 

indicator 

Power 

supply 

output 

lamp 

Battery 

mode 

lamp 

Battery 

replacement 

lamp 

Beep 

Chargi

ng 

Description 

Solution 


None 

OFF 
Dischar
ging 

Self-diagnostic test 
in progress. 

――


NOT operation in bypass mode. 

indicates blinking

indicates the display is ON

indicates the display is OFF

Summary of Contents for BU150R

Page 1: ...elated information Thoroughly read and understand this manual before installing and using the product Keep this manual in a convenient location so that you can refer to it whenever necessary The conte...

Page 2: ...red for use with FA or OA equipment Do not use it when very high reliability and safety are required as listed below Medical equipment that may cause death directly Applications that may cause injury...

Page 3: ...rrors in the manual please contact the shop of purchase Windows is the registered trademark of Microsoft Corporation in the United States and or other countries The names of other companies and produc...

Page 4: ...perform shutdown processing of the devices when a power failure occurs 6 Using the contact signal functions Check the operation 3 Check and start operation Charge the battery Operate 3 Check and star...

Page 5: ...1 1 Name of each part 33 3 1 2 The meaning of each LED 33 3 1 3 Switch 34 3 1 4 Setting Switch 35 3 1 5 Beep sound 39 3 2 Checking the operation 40 3 3 Start and stop procedures and basic operation 4...

Page 6: ...onnect 82 6 The contact signal functions 84 6 1 Contact signal functions 84 6 1 1 Type of Output signals 84 6 1 2 Type of Input signals 85 6 1 3 Contact signal port female D SUB 9 pin 85 6 1 4 Remote...

Page 7: ...when very high reliability and safety are required as listed below This unit is designed and manufactured for use with FA or OA equipment such as personal computers Medical equipment or system that ma...

Page 8: ...ible Be sure to pull out the AC input plug from the power outlet When performing maintenance on the connected devices follow the above instructions to ensure safety Do not connect devices such as drye...

Page 9: ...lammable or corrosive gas places with large amounts of dust places exposed to direct sunlight places exposed to shock or vibration salty or wet places or outdoors Installation or storing the unit in s...

Page 10: ...d leaks Ambient temperature Expected life The values in the table are the expected life under standard use conditions and are not guaranteed 40 1 7 years 30 3 5 years 25 5 years Using a dry cloth peri...

Page 11: ...use it as a step ladder or lean against it Doing so may cause the unit to fail or to fall over and result in injury Caution for maintenance When maintaining the connected equipment turn OFF the unit...

Page 12: ...l objects Doing so could cause an electric shock fire or burn Some electrical energy still remains inside the spent battery Do not dispose of batteries in a fire The batteries may explode Dispose of u...

Page 13: ...peak current so an excess of the connection capacity or a power failure due to instantaneous voltage drop may be detected If this unit is used for an inductive device such as a coil or motor check the...

Page 14: ...curely fastened Performing the withstand voltage test with the ground wire connected may damage the surge absorption element built into the power supply input circuit Storing Storing the battery in UP...

Page 15: ...ou should notice defects or anything wrong contact us OMRON Electronic Systems Equipments Customer Support Center Connection cable RS232C 1 Remote ON OFF connector 1 Replacing input plug for 20A NEMA...

Page 16: ...ber feet for landscape layout Label How to determine operating status Battery replacement date label Product warranty Japanese Registration post card User registration guide Japanese Guidance for repl...

Page 17: ...O card SC08 Cable UPS service BUC26 Replacement fan BUF150RA Retaining metal clip BUX150R 1 Replacement battery pack BUB150RA information a 4 pcsof long life type b Nominal voltage of total battery st...

Page 18: ...of each part refer to 2 Installation and connection P 21 and 3 Check and start operation P 33 that provides the details Front view Air vent Operation panel A B E G D C F A Status indicator B Power sup...

Page 19: ...RS232C port D Remote ON OFF port E Air vent F Ground terminal G Battery expansion connector H AC Input protection I AC input plug J Power supply output receptacle A K Power supply output receptacle B...

Page 20: ...t protection AC100V input Power supply relay Charging circuit Rectifier high power factor converter Step up converter Inverter sine wave Filter Commercial power bypass output Output switching 4 ms max...

Page 21: ...f this device The product serial number is required when contacting us about the device The serial number S N is inscribed on the rear panel The product serial number label is also included Allow suff...

Page 22: ...2 Installation and connection 2 1 Installation BU150R 22 Incorrect Positions...

Page 23: ...e the UPS is to be mounted on a rack place it on the lower part of the rack Dropping it may result in injury Be sure to use the supplied mounting screws Use of long screws other than those supplied fo...

Page 24: ...tighten them to hold the front and rear rack rails in place There are 2 types of the front rack rail left L and right R The rear rack rails are same 2 Adjust the length of support angles to suit the...

Page 25: ...cated at the top and bottom for both front and rear For JIS standards use a total of 6 included screws to fix the rack 1 JIS rack fixing flat head screw M5 at a front position of the each of right and...

Page 26: ...asten the ear brackets to the left and right sides of the UPS 5 Place the UPS on the support angles and push it completely into the rack and use the 2 included EIA JIS rack fixing screws M5 to securel...

Page 27: ...nstallation Attach the included rubber feet for horizontal installation and position the unit horizontally Make sure that this product does not slide or fall Upright installation Attach the rack stand...

Page 28: ...rrent may damage the connected devices Make sure that the total power consumption of the devices connected to the power supply output receptacles does not exceed the output capacity rating Reduce conn...

Page 29: ...ds or CE marking compliant product this connection is not possible 3 When using the UPS monitoring software use the included RS232C cable When using the Windows standard UPS service or the contact sig...

Page 30: ...NMP Web card While the UPS is running ON OFF control can be performed on power supply output from the automatic shutdown software The above delay setting and ON OFF control can be performed on each of...

Page 31: ...urce of a different rated voltage may result in fire The unit may fail For other cautions when connecting the UPS refer to Caution for installation and connection shown in the Safety precautions of th...

Page 32: ...NEMA L5 20P Use the Setting switch 8 see 3 1 4 Setting Switch P 35 to switch between 15A and 20A Remove the 15A plug and connects the attached 20A plug NEMA L5 20P as shown in the figure below Confir...

Page 33: ...power supply output is ON The power supply output is OFF C Orange Battery mode LED Backup is operating This status is called Battery Mode Backup is not operating D Red Battery replaceme nt LED Battery...

Page 34: ...witch of the UPS The power output from the UPS begins OFF Press the Power switch of the UPS in ON state then the power output from the UPS stops Additional Information If the AC input is connected to...

Page 35: ...eper sounds Beeper does not sound 2 Auto startup after recovery from power failure Auto startup is performed Auto startup is not performed 3 ON OFF the test once every 4 weeks Test is performed Test i...

Page 36: ...not start up when commercial power is restored Startup is performed by turning the Power switch OFF once and then back ON again Setting for whether or not to perform test once every 4 weeks Setting sw...

Page 37: ...PS monitoring software is used the unit operates in Mode A regardless of this setting 1 When BS signal is used to stop the UPS after a power failure occurs 2 When BS signal is used to shut down the UP...

Page 38: ...cial operation The power supply output of the UPS can be stopped by turning the backup power supply stop signal BS ON for 0 01 seconds 10 milliseconds or longer When you do not want to stop the UPS ev...

Page 39: ...sound Intermittent 0 5 second intervals ON OFF 0 5second 2 second intervals 2 second ON OFF 1 second intervals 1 second ON OFF 4 second intervals 4second ON OFF Continuous Continuous ON OFF Stopping t...

Page 40: ...turn ON the power When the power turns on the beeper sounds and self diagnosis starts automatically If the battery voltage is low the self diagnostic test is not performed 2 When the self diagnosis te...

Page 41: ...connect it to a commercial power source battery charging automatically starts regardless of the ON OFF state of the Power Switch and charging completes within 8 hours 4 Under this condition check the...

Page 42: ...amps and beep and then press the Power switch to turn OFF the power If the display is one of those shown in 3 4 Interpreting beeps and displays P 46 take the necessary measures and then go back to pro...

Page 43: ...ged approximately 8 hours When the self diagnostic test finishes successfully switching to AC output from commercial power is performed and normal operation starts When the self diagnosis test finishe...

Page 44: ...turn the beeper ON OFF indicates blinking Icon Beep Output Description Intermittent 4 second intervals ON Backup is operating due to power failure or AC input error Output will stop if Battery Mode co...

Page 45: ...h P 35 Operation when stopping Note Before stopping the commercial power to the unit turn OFF the Power switch of the unit When the AC Input Plugs are disconnected from a wall outlet commercial power...

Page 46: ...ry 1 When Power switch is OFF No Status indicator Power supply output lamp Battery mode lamp Battery replacement lamp Beep Chargin g Description Solution 4 None ON Power switch is ON Operating normall...

Page 47: ...ervals OFF Discharging In Battery Mode due to power failure or AC input error Output will stop if Battery Mode continues Check that the AC input cable is disconnect If not resume perform shutdown oper...

Page 48: ...y are too high Use within the AC input voltage frequen cy range described in the specifications 11 None ON AC input frequency is too high 12 None ON AC input voltage is too low and AC input frequency...

Page 49: ...us No 4 19 blinking bypass Intermittent 0 5 second intervals ON 20 OFF OFF Battery charge stopped because the battery ambient temperature of 40 C or higher was detected Lower the ambient temperature t...

Page 50: ...FF Stopped charging due to abnormal drop in battery charge voltage When the battery discharges bypass output is performed The display disappears completely Same as above 27 blinking bypass Continuous...

Page 51: ...In bypass operation commercial power is output directly Output stops when a power failure AC input OFF occurs in bypass operation Note 2 The displays and operations vary according to the status Note...

Page 52: ...External Fan Error Same as above 3 4 5 Display and beep for battery replacement No Status indicator Power supply output lamp Battery mode lamp Battery replacement lamp Beep Charging Description Solut...

Page 53: ...ation to the input voltage 2 Maximum backup time setting Maximum backup time can be set Setting range 0 to 90 minutes Default setting 0 minute 3 Reboot battery voltage setting The limit battery capaci...

Page 54: ...setting is not made correctly it may cause a drop in backup time Setting range 0 6 Default setting 0 ON OFF ON OFF ON OFF ON OFF ON OFF ON OFF ON OFF Battery Low signal BL Trouble signal TR Backup sig...

Page 55: ...Settings By using the following procedure set the operation mode 1 The Power switch is turned ON while the Buzzer Pause Test switch is pressed The UPS operation mode can be set Note While in setting m...

Page 56: ...itch for one second or longer to enable the selected item 4 Shortly press the Buzzer Pause Test switch for one second or shorter to select a parameter 5 When the Power switch is turned OFF the setting...

Page 57: ...Operation D pressing the Buzzer Pause switch 5 second or more and then release it Operation E turning off the Power switch B B B B B B B B B B C C A E C C B B B Output 110V Output 115V Output 120V Ba...

Page 58: ...B B Charge 10 Charge 20 Charge 90 Delay 0 2 min Delay 0 5 min Delay 1 min 10 step Delay 0 min Default Delay 2 min Delay 10 min Disable 1 min step BS signal delay DBS setting Display current setting C...

Page 59: ...10 sec step BU signal delay DBU setting Display current setting Current state of BL signal Current state of TR signal Current state of WB signal Current state of BU signal Dry contact logic LDC setti...

Page 60: ...ansion battery unit 1 unit Expansion battery unit 2 units Expansion battery unit 3 units Expansion battery unit 4 units Expansion battery unit 5 units Expansion battery unit 6 units Expansion unit cou...

Page 61: ...the unit and performs a test to check for battery deterioration Use the procedure below to check whether a circuit failure has occurred inside the unit and whether battery replacement is required The...

Page 62: ...software For more details refer to the online help of UPS monitoring software 4 1 3 How to measure backup time 1 Connect the AC input plug to an outlet commercial power source and charge the battery...

Page 63: ...s VA amperes A and watts W Example AC100V 50 60Hz 145W AC100V 50 60Hz 1 8A AC100V 50 60Hz 150VA Indication Value A A power factor 100 W VA VA power factor 100 W For devices that use the VA or A indica...

Page 64: ...3 67 55 47 40 35 29 2 connected 1100 700 380 260 187 150 125 105 90 75 68 58 Backup time min Connected capacity W 100 200 300 400 500 600 700 800 900 1000 1200 Backup time min 3 connected 1050 575 370...

Page 65: ...you do not reset the battery life counter a battery deterioration alarm may occur faster than the expected battery life When the unit is used in compliance with UL standards or CE marking battery rep...

Page 66: ...pan The life varies depending on your storage use environment and backup frequency The nearer the end of the life is the more rapidly deterioration proceeds Refer to the below shown reference data 10...

Page 67: ...wards you to detach the front panel Do not pull the front panel strongly towards you The clamp may be damaged Pull the front panel towards you a little first and detach the front panel while sliding i...

Page 68: ...spection 4 2 Replacing the battery BU150R 68 3 Remove the screw on the sheet metal cover 4 Lightly push in the sheet metal cover to the right first and pull the left side towards you to detach it Shee...

Page 69: ...ck out When the red tape attached to the top of the battery pack appears you can completely remove the battery by pulling it towards you 10cm more Hold the battery tight with both hands and be careful...

Page 70: ...BU150R 70 6 Insert a new battery into the UPS as far as it will go Replacement battery pack model BUB150RA 7 Insert the right end of the sheet metal cover into the UPS unit push the left side in and...

Page 71: ...nnector and insert the connector s groove into the holder Attach the battery cable to the cable holder Note You may hear a pop sound when you connect the battery if it is replaced after the unit s ope...

Page 72: ...groove on the UPS unit and push the right side of the front panel in Securely tighten the two screws on the right side of the front panel with a screwdriver Battery replacement is now complete Tighten...

Page 73: ...is used in compliance with UL standards or CE marking do not replace the fan Fan replacement does not comply with UL standards or CE marking Do not insert your hand or metal objects into the fan rece...

Page 74: ...panel towards you to detach the front panel Do not pull the front panel strongly towards you The clamp may be damaged Pull the front panel towards you a little first and detach the front panel while...

Page 75: ...ntil it clicks into place Replacement fan Model BUF150R 5 Insert the fan into the UPS unit Place the fan guard and fix the fan guard and the fan together with four screws Make sure the cable does not...

Page 76: ...the right side of the front panel with a screwdriver Fan replacement is now complete 4 4 Cleaning Moisten a soft cloth with water or detergent squeeze it tightly and wipe the product lightly Do not u...

Page 77: ...the internal timer active connect the UPS to a commercial power source in approximately three months Battery deterioration over time reduces the period for keeping the internal timer active When manua...

Page 78: ...tions Advanced functions network support Simple Shutdown Software PowerAct Pro Refer to the section number Section 5 2 Section 5 2 Software functions Refer to the reference following 1 Auto shutdown 2...

Page 79: ...tion programs can be launched 9 Event log save Information of events that occur on the UPS power supply problems setting changes occurrences of failure etc are saved as a log 10 Data log save Data of...

Page 80: ...torage Sever 2008 R2 Windows Server 2008 Windows Storage Sever 2008 Windows 7 Windows Vista Windows Server 2003 R2 x64 Editions Windows Server 2003 x64 Edition SP1 Windows XP Professional x64 Edition...

Page 81: ...tic start stop of the UPS based on the schedule setting Ensure that your PC completes shutdown within the backup time after a power failure occurs For the backup time refer to 4 1 4 Estimated backup t...

Page 82: ...onnection To use this product as a CE marking compliant device use a 2 meter or shorter connection cable 1 Connect the UPS to a computer Cable Included connection cable RS232C When connecting 2 or mor...

Page 83: ...2 How to use the UPS monitoring software BU150R 83 5 2 Install the PowerAct Pro or Simple Shutdown Software to the PC you want to shut down Installation method Refer to the PowerAct Pro installation g...

Page 84: ...O can be used a contact signal I O port provided as standard and an optional contact I O card For details on an optional contact I O card see 7 2 Contact I O card P 90 6 1 1 Type of Output signals Th...

Page 85: ...itch of UPS to use this function Note 2 Note1 BS Delay Time You can set the amount of time between when the BS signal is received and when the output of the UPS is stopped See also 3 5 2 Settings P 55...

Page 86: ...Signal output BL TR BU WB UPS Stop Signal input BS Photo coupler ratings Input voltage High ON DC5 15V Applicable voltage DC50V or less Low OFF DC0 5V or less Maximum current 50mA Input voltage 2 18mA...

Page 87: ...nds of the relay Explanation When power is restored after the unit stopped automatically during a power failure the unit automatically restarts and supplies power If you do not want to start the conne...

Page 88: ...t I O card and SNMP Web card as options 7 1 How to mount an option card Mount an option card into the back of the UPS unit This section describes how to mount a SNMP Web card as an example The procedu...

Page 89: ...s 7 1 How to mount an option card BU150R 89 7 2 Insert the option card and fix it using the screws removed previously Insert the option card forward sufficiently so that it fits into the connector in...

Page 90: ...by developing a system on their own using contact signal I O Power failure handling processing can be performed by detecting a backup signal or system shutdown processing can be performed by detecting...

Page 91: ...voltage DC30V or less Maximum current 2A for resistive load 1A for inductive load UPS Stop Signal input BS BS Input voltage High ON DC8V 24V for the 24V setting DC5V 12V for the 12V setting LOW OFF DC...

Page 92: ...7 How to use option cards 7 3 SNMP Web card BU150R 92 7 3 SNMP Web card LAN 10 100...

Page 93: ...through Telnet or serial connection Reinforcing security functionality Access control can be imposed on a per IP basis for HTTP and SNMP connections Linked shutdown Multiple UPS units can be shutdown...

Page 94: ...MRON MIB Other Provided with a real time clock OS platforms supported by the shutdown software WindowsNT4 0 Windows2000 WindowsXP Windows Server2003 RedhatLinux7 2 7 3 8 0 Red Hat Enterprise Linux AS...

Page 95: ...become longer 24 hours per an expantion battery unit For details on the backup time after expansion see 4 1 4 Estimated backup time P 63 8 1 Connecting the battery unit Caution for connection To conne...

Page 96: ...e overcurrent protection switch on the back of the UPS to the ON side When the battery unit is connected correctly the LED for checking expansion on the front of the expansion battery unit turns on If...

Page 97: ...occur You hear the sound of switching Variations decrease in the input power occur frequently Or noise may be included that significantly distorts the voltage waveform of the input power Try and check...

Page 98: ...ntinuously Output stopped due to exceeded connection capacity Turn OFF all power to the unit and connected devices and reduce the number of connected devices Then turn the power to the unit and connec...

Page 99: ...capacity 1500VA 1200W 4 Voltage Commercial Operation and Backup operation 100V mode 100VAC 2 110V mode 110VAC 2 115V mode 115VAC 2 120V mode 120VAC 2 Frequency Commercial operation Synchronized with...

Page 100: ...th VCCI Class A Internal power consumption normal maximum 150W 2 300W 3 Noise 50dB Dimensions W x D x H 438mm 480mm 87mm Weight of unit Approx 21kg 1 Minimum input voltage 70V for 100V mode with 90 lo...

Page 101: ...10 References 10 2 Dimensions BU150R 101 10 10 2 Dimensions Unit mm Tolerance 2mm BU150R 438 480 87...

Page 102: ...10 References 10 2 Dimensions BU150R 102 Stand for vertical layput 200 200 70 50 70 50...

Page 103: ...10 References 10 2 Dimensions BU150R 103 10 Rubber feet 23 25 405 50 40 358 40 3...

Page 104: ...10 References 10 2 Dimensions BU150R 104 Using Ear brackets 44 5 22 0 13 5 455 25 465...

Page 105: ...fe battery 1 7 years 3 5 years 5 years Basically the ambient temperature have a high influence on the battery life The periodic recharges are required even if the battery is stored The battery self di...

Page 106: ...KIL D 15104A No part or whole of this manual may be reproduced without permission The contents of this manual are subject to change without notice...
Reviews: