©
Copyright
Nachdruck verboten!
Reproduction prohibited!
Für weiteren Gebrauch aufbewahren!Keep this manual for future needs!
BEDIENUNGSANLEITUNG
USER MANUAL
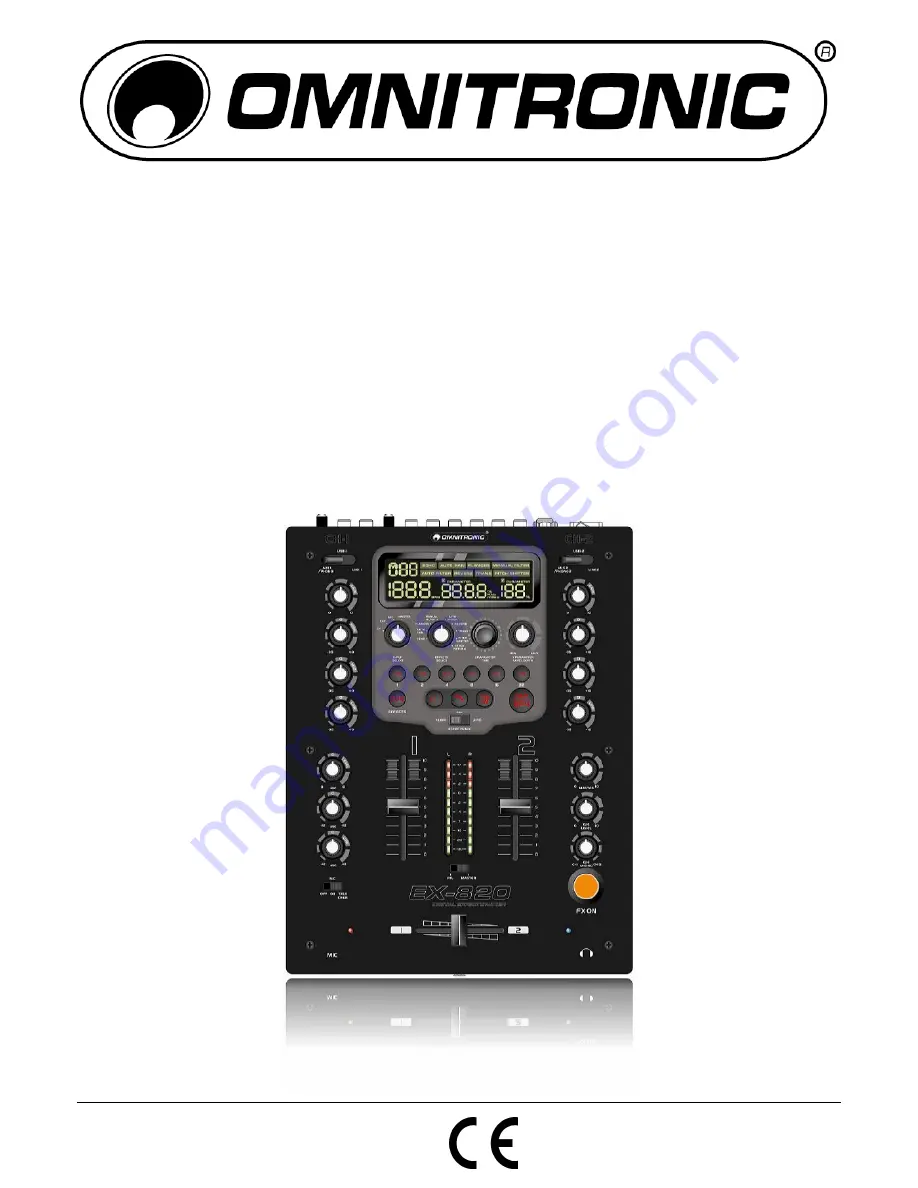
EX-820
Digital Effects Mixer
Page 1: ...Copyright Nachdruck verboten Reproduction prohibited F r weiteren Gebrauch aufbewahren Keep this manual for future needs BEDIENUNGSANLEITUNG USER MANUAL EX 820 Digital Effects Mixer...
Page 2: ...ON 21 2 SAFETY INSTRUCTIONS 21 3 OPERATING DETERMINATIONS 23 4 DESCRIPTION 24 4 1 Features 24 4 2 Operating elements and connections 24 5 INSTALLATION 29 6 BASIC OPERATION 30 6 1 Basic adjustment of t...
Page 3: ...00040996 DOC Version 1 0 3 36...
Page 4: ...EX 820 entschieden haben Sie haben hiermit ein zuverl ssiges und leistungsstarkes Ger t erworben Wenn Sie nachfolgende Hinweise beachten sind wir sicher dass Sie lange Zeit Freude an Ihrem Kauf haben...
Page 5: ...ngerungsleitungen Ger t bei Nichtbenutzung und vor jeder Reinigung vom Netz trennen Fassen Sie dazu den Netzstecker an der Griffl che an und ziehen Sie niemals an der Netzleitung Ansonsten kann das K...
Page 6: ...wendung bei der Installierung oder Inbetriebnahme des Ger tes Achten Sie bei der Wahl des Installationsortes darauf dass das Ger t nicht zu gro er Hitze Feuchtigkeit und Staub ausgesetzt wird Vergewis...
Page 7: ...er Zuordnungsm glichkeit Echo Auto Pan Flanger Manual Filter Auto Filter Reverb Transition Pitch Shifter Effektparameter Time Zeit und Ratio Intensit t stufenlos regelbar 6 Parameter Presets mit autom...
Page 8: ...den beide Kan le mit gleicher Lautst rke geh rt 10 Taste FX ON Ein Ausschalter mit LED f r den Effektprozessor 11 Fader Anzeige B Leuchtet im Faderstart Modus und Effektmix Mischmodus rot und zeigt da...
Page 9: ...n BPM angezeigt Halten Sie die Taste f r 2 Sekunden gedr ckt um wieder zur ck zum automatischen Beatcounter zu schalten LED erlischt 25 Effektmix Wahl Start Tasten ECHO ZIP ROLL Effekttypen ECHO ZIP R...
Page 10: ...m Umschalten zu vermeiden 34 Regler CH FADER CURVE Bestimmt stufenlos die Anstiegskruve der Kanalfader von weich linke Position bis hart rechte Position 35 Umschalter CH FADER CURVE 3 stufiger Umschal...
Page 11: ...ler 42 Eingangsumschalter Schaltet die Phono Eing nge auf Line Eingang 43 Eingangsbuchsen PHONO Stereo Eing nge Cinch f r Kanal 1 und Kanal 2 zum Anschluss von Plattenspielern mit Magnettonabnehmer sy...
Page 12: ...stem an die Buchsen PHONO an Wenn Ihr Plattenspieler mit einem separatem Erdungskabel ausgestattet ist verbinden Sie es mit der Erdungsklemme GND 2 Ein DJ Mikrofon kann ber einen 6 3 mm Klinkenstecker...
Page 13: ...gang an an dem die Tonquelle angeschlossen ist 3 Der Masterregler bestimmt den Gesamtpegel aller angeschlossenen Tonquellen Stellen Sie den Regler auf ca 2 3 des Maximums 4 Geben Sie ein Tonsignal Tes...
Page 14: ...auf OFF 6 4 Vorh ren der Kan le Mit der Vorh rfunktion CUE k nnen Sie jeden der Eingangskan le ber einen Kopfh rer abh ren auch wenn der jeweilige Kanal ausgeblendet ist Dadurch kann z B der richtige...
Page 15: ...e Takte zu schwach vom Rest des Titels abheben um als Rhythmuselement erkannt zu werden In einem solchen Fall tippen Sie die Taste TAP BPM mehrere Male im Takt der Musik an die rote LED der Taste blin...
Page 16: ...wird Ihnen bereits ein oder mehrere sinnvolle r Zeitparameter vorgegeben Der X Parameterwert wird auf dem Display angezeigt Der Zeitparameter der Effekte ECHO AUTO PAN FLANGER AUTO FILTER und AUTO TRA...
Page 17: ...ahl Start Taste ECHO ZIP oder ROLL blinkt Standardeinstellung ECHO w hrend die LEDs der beiden anderen Effektmix Wahl Start Tasten konstant leuchten Die Fader Anzeigen A und B leuchten wie folgt Betri...
Page 18: ...ben wird wird der gew hlte Effekt dem Ton von B hinzugef gt und je nach gew hltem Effekt wird der Klang allm hlich schw cher Wenn der Crossfader aus seiner urspr nglichen Mittelstellung in Richtung vo...
Page 19: ...ort die erforderlichen Einstellungen f r die Tonwiedergabe ber das Mischpult bzw die Tonaufnahme vom Mischpult vor 9 REINIGUNG UND WARTUNG Vor Wartungsarbeiten unbedingt allpolig vom Netz trennen LEBE...
Page 20: ...w rtskompatibel Wiedergabe Max Ausgangspegel 0 dBV 2 dB 1 V Verzerrung 0 04 Frequenzbereich 31 20 000 Hz 2 dB Ger uschspannungsabstand 80 dB Wiedergabe und Aufnahme Max Ausgangspegel 4 dBV 2 dB 1 6 V...
Page 21: ...the Internet 1 INTRODUCTION Thank you for having chosen the OMNITRONIC EX 820 You have acquired a reliable and powerful device If you follow the instructions given in this manual we can assure you th...
Page 22: ...e diameter is sufficient for the required power consumption of the device All warnings concerning the power cords are also valid for possible extension cords Always disconnect from the mains when the...
Page 23: ...g current of 100 240 V AC 50 60 Hz and was designed for indoor use only Do not shake the device Avoid brute force when installing or operating the device When choosing the installation spot please mak...
Page 24: ...esired Echo Auto Pan Flanger Manual Filter Auto Filter Reverb Transition Pitch Shifter Effect parameters time and ratio variably adjustable 6 parameter presets with automatic BPM synchronization Effec...
Page 25: ...es output In mid position both channels can be heard at the same volume 10 Button FX ON Activates deactivates the effect processor with control LED 11 Fader indicator B Lights red during the fader sta...
Page 26: ...button pressed for 2 seconds to return to the automatic counting mode LED goes off 25 Effect mix select start buttons ECHO ZIP ROLL Effect types ECHO ZIP ROLL for the effect mix function The LED of th...
Page 27: ...sent as this may cause a sudden change in volume 34 Control CH FADER CURVE Allows continuous adjustment of the rising curve pattern of the channel faders from smooth left position to sharp right posit...
Page 28: ...1 and channel 2 42 Input selector switch Switches the phono inputs to line inputs 43 Inputs PHONO Stereo inputs PHONO RCA for channel 1 and channel 2 for connecting turntables with magnetic system 44...
Page 29: ...panel 3 Connect the amplifier s to the balanced XLR master output and or to the unbalanced RCA master output 4 For analog sound recordings connect the recording unit to the output REC ORD The recordi...
Page 30: ...d of the channel After level adjustment the cannel fader should be at approx 2 3 of its maximum With the fader advanced only slightly or very var the level must be matched by adjusting the input ampli...
Page 31: ...er if the selector switch for the meter is set to position PFL The channel 1 signal is displayed on the left side and channel 2 on the right side 6 5 Using the fader start function When two CD players...
Page 32: ...fect processor creates a continuous sound displacement resembling the take off of a jet plane 4 MANUAL FILTER The effect processor alternately filters the treble and bass from the signal 5 AUTO FILTER...
Page 33: ...l EFFECTS SELECT to position SEND RETURN 2 Use the control INPUT SELECT to select the signal source to be looped through the external unit The source is indicated on the display and automatically coun...
Page 34: ...de B sound will be output from B 3 Set the selector switch EFFECTS MIX to FADER 4 Actuate one of the effect mix select start buttons ECHO ZIP or ROLL to choose the desired effect The LED of the select...
Page 35: ...USB ports allows transmission of digital audio signals in both directions between the mixer and the computer even at the same time port USB 1 audio signals fed in can be reproduced via channel 1 digi...
Page 36: ...SB ports type B 2 0 downward compatible Playback Max output level 0 dBV 2 dB 1 V Distortion 0 04 Frequency range 31 20 000 Hz 2 dB S N ratio 80 dB Playback and recording Max output level 4 dBV 2 dB 1...