


CPC 100 V1.41
8 - 8
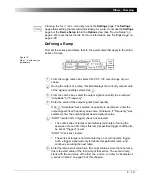
Specify the values that the measurement table will eventually show.
Figure 5:
Step 3 - Specify the
values that the
measurement table will
eventually show
Turn the handwheel to set the focus onto the measurement table’s first
combo box. Press the handwheel to display the available quantities to
measure, and select the one of your choice.
Repeat this step at the combo box for the second quantity to measure.
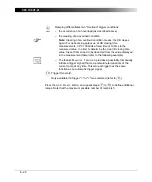
Possible choices of each combo box:
• V1 AC
• V1 AC sel
1
• V2 AC
• V2 AC sel
• VT
• VT sel
• I AC
• I AC sel
1. sel = frequency-selective. To learn more about frequency-selective measurements, refer to ”The
Frequency-Selective Measurement” on page 3-6.
• I Clamp
• I Clamp sel
• CT
• CT sel
• V DC
• I DC
• f V1 AC
• f Out
Each combo box has two corresponding cells in the
measurement table below that display the measured
quantities, where possible; otherwise "n/a" is displayed.
10
11
12
10
11
Summary of Contents for CPC 100
Page 12: ...CPC 100 V1 41 x...
Page 28: ...CPC 100 V1 41 1 16...
Page 90: ...CPC 100 V1 41 3 14...
Page 194: ...CPC 100 V1 41 6 30...
Page 250: ...CPC 100 V1 41 8 32 Figure 24 Settings of Amplifier test card for this example use case...
Page 258: ...CPC 100 V1 41 9 4...
Page 264: ...CPC 100 V1 41 10 6...
Page 282: ...CPC 100 V1 41 12 10 Figure 9 Saving tests with the CPC Editor...
Page 284: ...CPC 100 V1 41 12 12...
Page 312: ...CPC 100 V1 41 14 12...
Page 316: ...CPC 100 V1 41 15 4...
Page 350: ...CPC 100 V1 41 16 34...
Page 372: ...OMICRON Contact Addresses 22...


