

VH081101
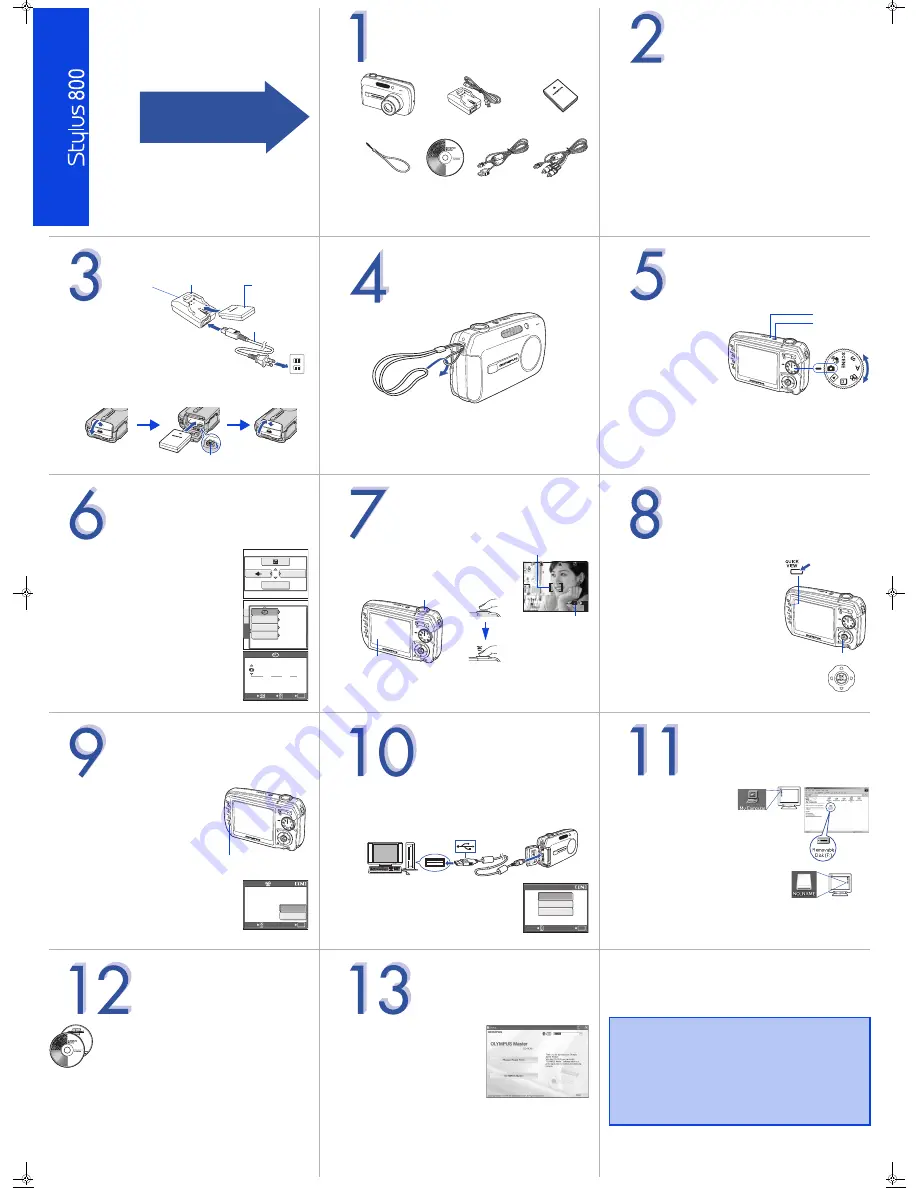
UNPACK THE BOX CONTENTS
Gather the items illustrated below to complete the procedures that
follow.
Digital camera
LI-10C Battery charger
LI-12B Lithium Ion
Battery
Strap
CD-ROM
(OLYMPUS Master
software)
USB cable
AV cable
The following items are also included in the Digital Camera package: Basic
Manual, warranty card, Advanced Manual on CD-ROM and registration card.
S
T
E
P
REVIEW THE DOCUMENTATION
Quick Start Guide
(this document)
Getting started with your digital camera.
Quick Reference Guide
(reverse side of this document)
Quick guide to using common features and functions.
Basic Manual
(printed booklet)
Guide to mastering camera basics.
Advanced Manual
(CD-ROM)
Detailed instructions on all camera features and functions.
Software Installation Guide
(separate document on OLYMPUS Master CD-
ROM)
Detailed instructions on installing the OLYMPUS Master software.
S
T
E
P
INSERTING THE BATTERY
a.
Insert the battery into the
charger and charge
completely. The charging
indicator is red while the
battery is charging and green
when charging is complete.
b.
Make sure the camera is off.
c.
Open the battery compartment/connector cover on the side of the camera
and insert the battery until the battery lock knob clicks into place.
d.
Close the cover.
S
T
E
P
LI-10C battery
charger
LI-12B lithium
ion battery
AC wall
outlet
Power cable
Charging
indicator
Battery lock knob
ATTACH THE STRAP
S
T
E
P
TURN ON THE CAMERA
Set the mode dial to
K
,
and press the
POWER
button. The power lamp
lights green, the monitor
turns on, and the lens
extends.
Note: After use, press the
POWER
button to turn off the camera. The power
lamp and monitor turn off, and the lens retracts.
S
T
E
P
Mode dial
POWER
button
Power lamp
SET THE DATE AND TIME
a.
With the camera on, press
Z
.
b.
Press
Y
to select [MODE MENU].
c.
Press
ON
to select the [SETUP] tab and press
Y
.
d.
Press
ON
to select [
X
] and press
Y
.
e.
Press
ON
to set each item and press
Y
to move
to the next item.
f.
Press
Z
when you have finished entering the date
and time.
S
T
E
P
WB
MODE MENU
CAM
DUALTIME SETUP
’05.01.01
00:00
MEM
SETUP
VIDEO OUT
ALARM CLOCK
OFF
OFF
NTSC
2005 . 01 . 01
00 : 00
Y
M
D
SELECT
OK
GO
SET
TAKING A PICTURE
a.
Place the AF target mark on your subject using
the monitor.
b.
Press the shutter button halfway to lock the
focus and exposure, then press the shutter button
completely to take the picture.
• Pictures are automatically stored in the internal memory ([IN] is
displayed on the monitor). Alternately, you can store your pictures on
an xD-Picture Card (sold separately). While the card is inserted, [xD] is
displayed on the monitor and all pictures are stored on the card.
S
T
E
P
44
3264
3264
×2448
2448
HQ
HQ
1/2000
1/2000
F2.8
F2.8
0.0
0.0
AF target mark
Memory indicator
Shutter button
Monitor
REVIEWING A PICTURE
a.
Press the
QUICK VIEW
button. The last
picture taken is displayed.
b.
Press
XY
on the arrow pad to display the
picture you want.
S
T
E
P
Arrow pad
QUICK VIEW
button
ERASING A PICTURE
a.
Display the picture you want to erase,
and press the
S
button.
b.
Press
ON
to select [YES], and press
Z
.
S
T
E
P
S
button
OK
ERASE
YES
NO
SELECT
GO
CONNECTING THE CAMERA
TO A COMPUTER
a.
Make sure the camera is off.
b.
Connect the camera to the computer using the USB cable (included). The
camera turns on automatically.
c.
Press
ON
to select [PC] on the camera monitor,
and press
Z
.
S
T
E
P
P C
EXIT
USB
OK
SELECT
GO
VERIFY CAMERA CONNECTION
WINDOWS:
a.
From the desktop (“Start”
menu for XP), open “My
Computer”.
b.
Verify that the “Removable
Disk” icon representing the
camera is displayed.
MACINTOSH:
Verify that the “NO_NAME”
icon representing the camera is
displayed.
• The above steps confirm that the camera has been connected
properly. You can transfer your images using the standard drag and
drop procedure and use the OLYMPUS Master software (included) to
enhance your digital imaging experience.
S
T
E
P
ABOUT THE CD-ROM DISCS
Now that you’ve mastered the basic functionality of your Olympus
Digital Camera, you are ready to begin exploring the possibilities that
digital photography brings to your computer. Activities such as photo
editing, printing and much more are only steps away!
CD-ROM1
OLYMPUS Master software:
Download pictures from the camera,
view, organize, retouch, e-mail and print your digital photos and
movies and more! This CD also contains the complete software users
manual in Adobe Acrobat (PDF) format.
CD-ROM2
Advanced Manual:
A complete camera guide in Adobe Acrobat
(PDF) format. This manual contains detailed instructions on the
camera’s features and functions which are not covered in the printed
Basic Manual or Quick Start/Quick Reference Guides.
S
T
E
P
INSTALLING THE CAMERA
SOFTWARE
a.
Insert the OLYMPUS Master CD-ROM
into your computer’s CD-ROM drive.
b.
For Windows:
Click the “OLYMPUS Master” button in
the “Setup” window.
For Macintosh:
Double-click the “Installer” icon.
c.
Follow the on-screen instructions. For more details, click “Please Read First”.
S
T
E
P
Please refer to the Quick Reference
Guide on the reverse side of this sheet to
familiarize yourself with the commonly
used features and functions of your
Olympus Digital Camera.
Printed in China
Quick Start Guide
It is strongly recommended that you follow
these step-by-step instructions to set up and
quickly begin using your new Digital
Camera.
Start Her
e
d4244qsg_e_7.fm Page 1 Monday, May 9, 2005 5:34 PM